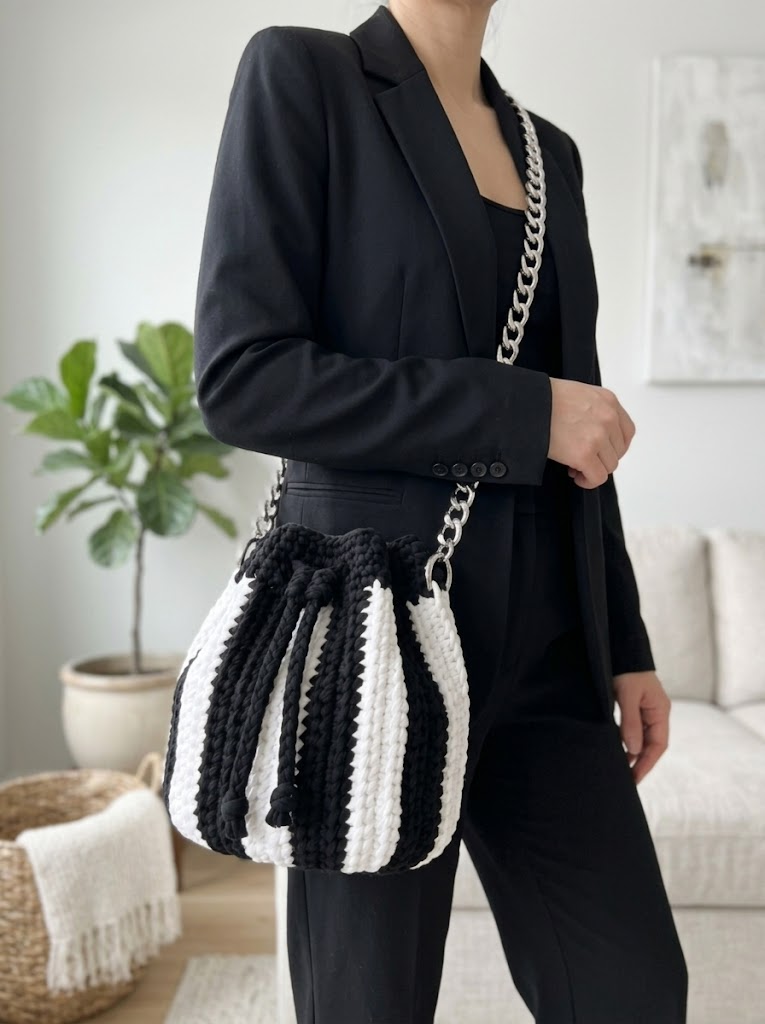
This stunning black and white striped bucket bag might look like something you snagged from a designer boutique. But I made it myself. And you can too.
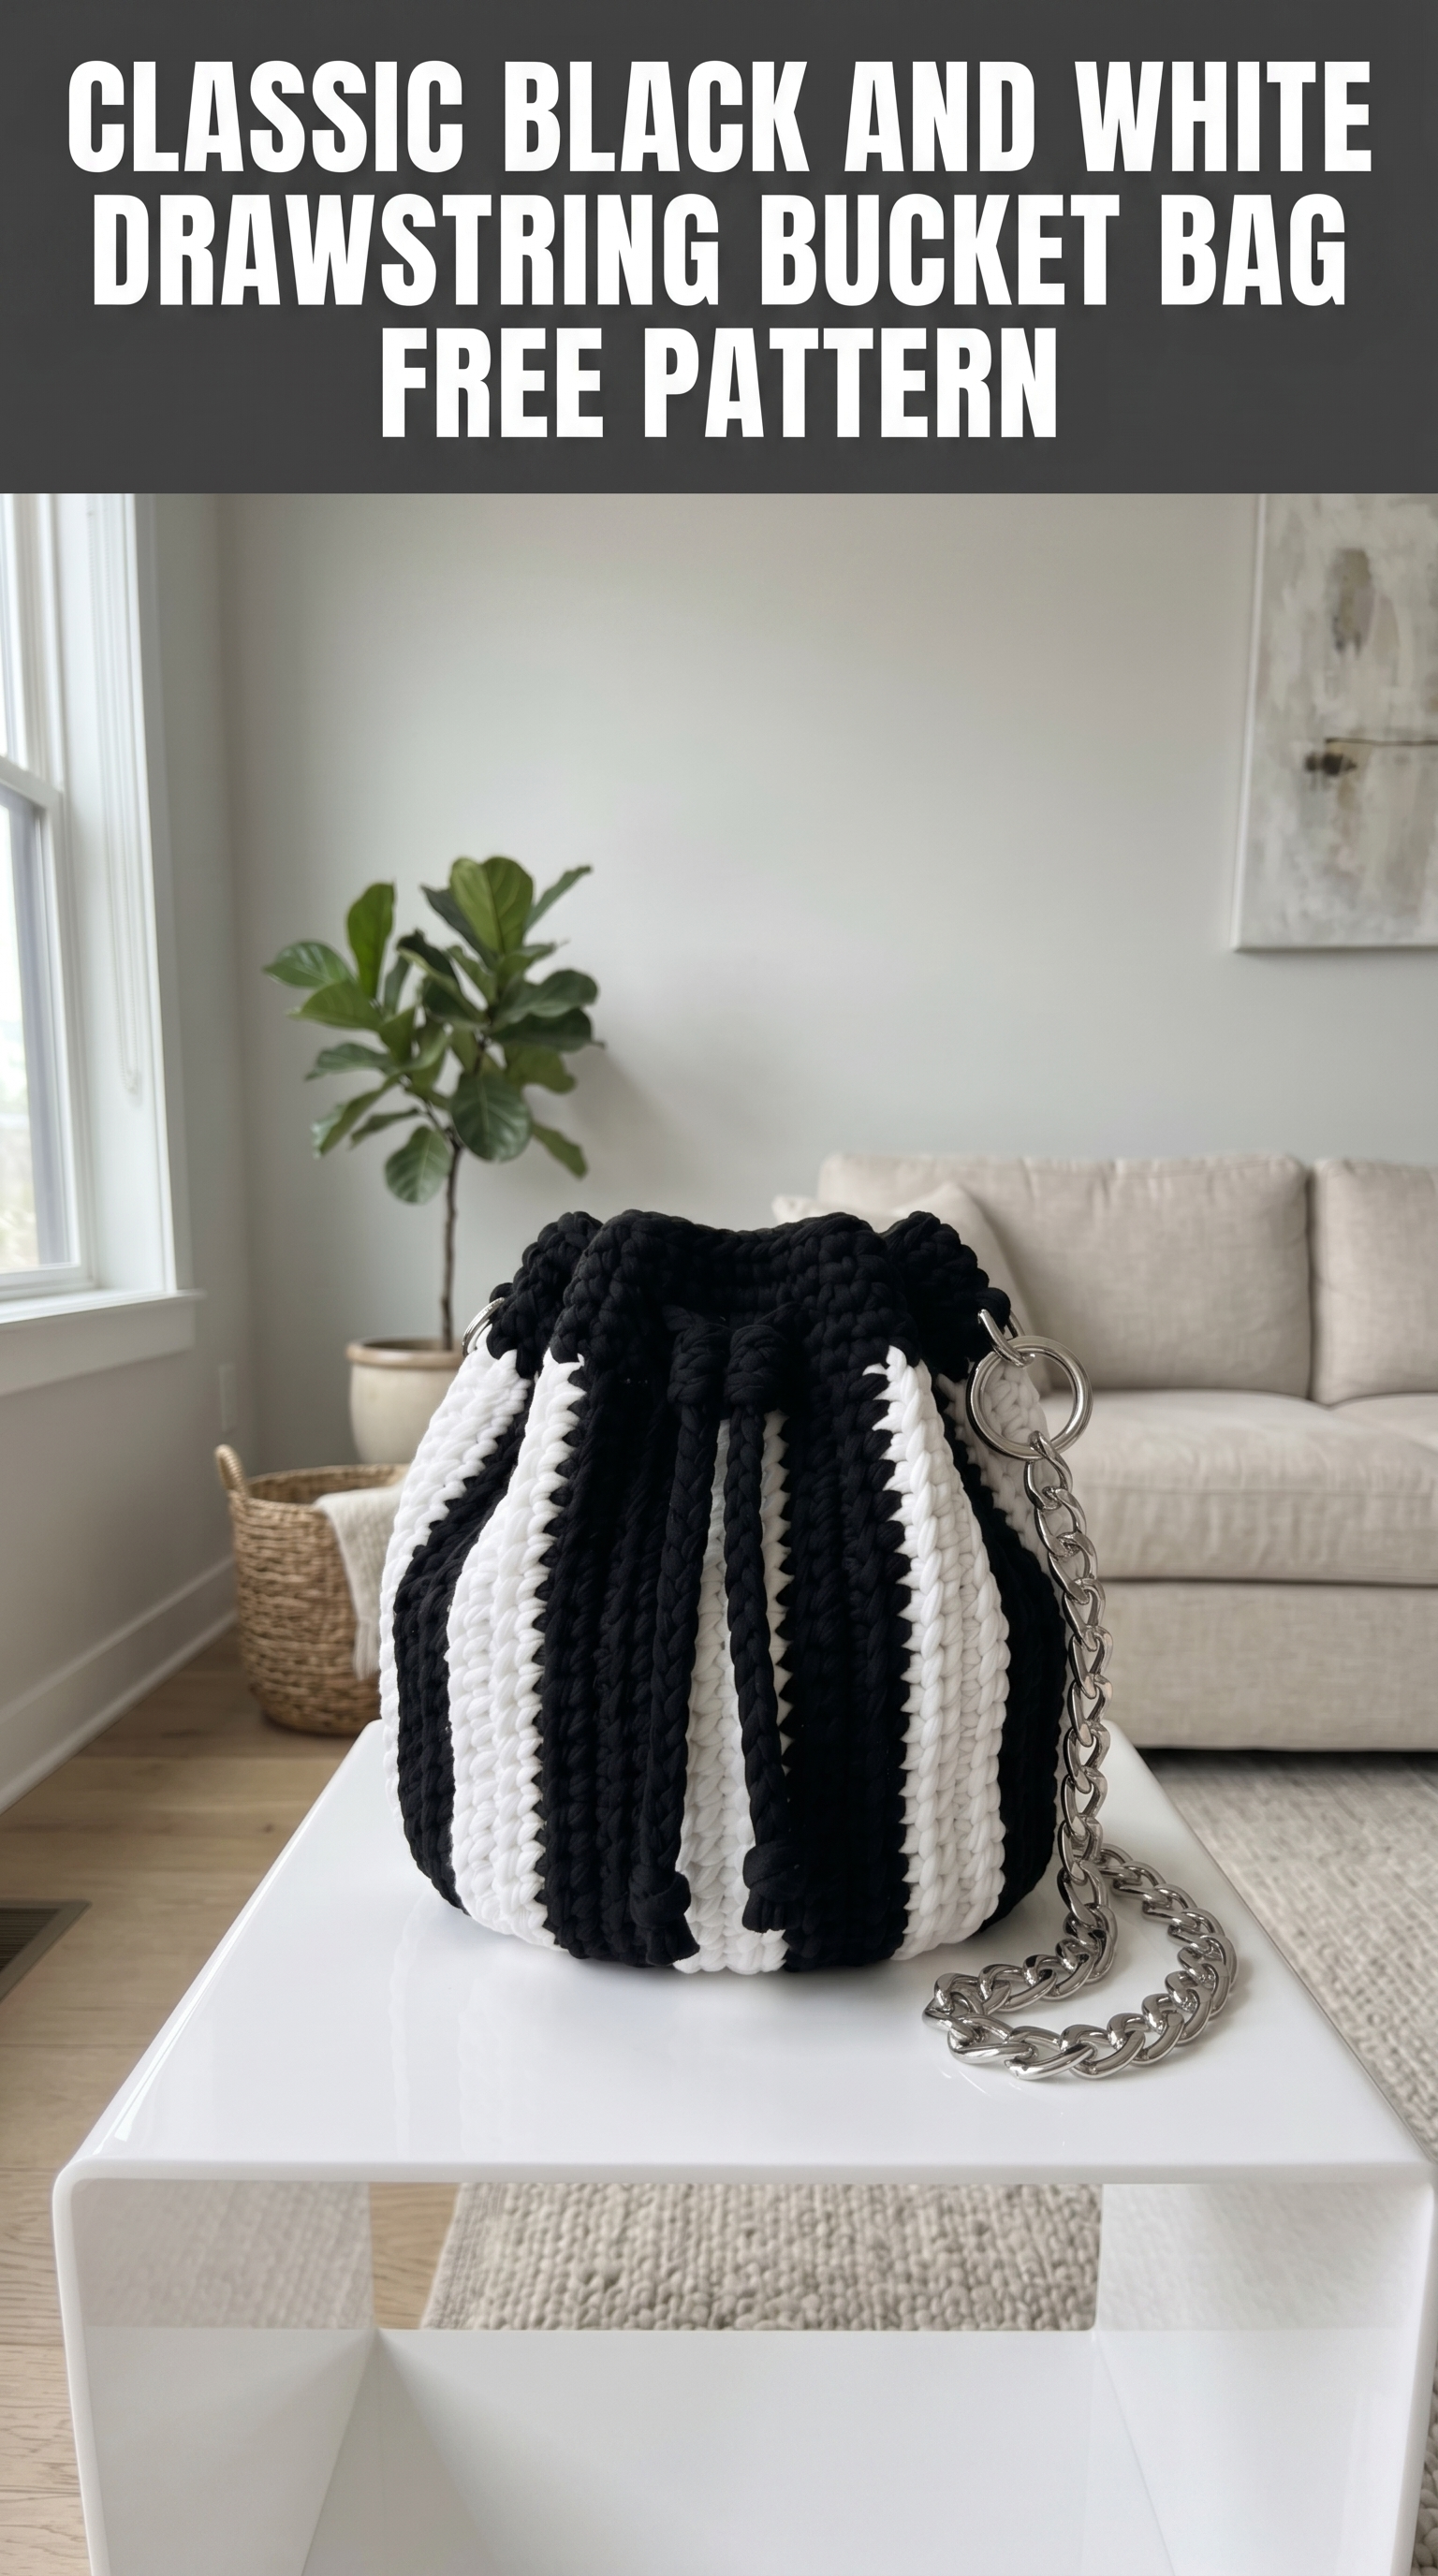
The bold vertical stripes create such a striking visual impact. The chunky silver chain strap adds that modern edge we all love right now. And here is the best part. This crochet pattern uses basic stitches worked in a clever construction method. If you can single crochet and follow a simple color change sequence, you have everything you need.
I designed this crochet bucket bag pattern with busy crafters in mind. The thick t-shirt yarn works up fast. We are talking a weekend project, maybe even a single cozy evening if you get in the zone. The structured shape holds its form beautifully without any special lining or interfacing required.
Let me walk you through every single step. By the end of this tutorial, you will have a gorgeous handmade accessory that looks absolutely nothing like a beginner project.
Why This Crochet Bucket Bag Pattern Works So Well
Before we dive into the instructions, let me explain what makes this design special.
The vertical stripe construction happens through a technique called short rows combined with joining. Instead of crocheting in continuous rounds and trying to carry multiple colors, we work each stripe section separately. Then we join them together. This approach gives you those crisp, clean color transitions you see in the photo.
The pumpkin-like shape at the bottom comes from strategic increases in the base. The gentle cinching at the top uses a simple drawstring closure worked through the final round.
The yarn choice does a lot of heavy lifting here. T-shirt yarn (also called trapillo or ribbon yarn) creates that chunky, substantial texture. It also has enough body to help the bag stand upright on its own.
Materials You Will Need
Gather these supplies before you start. Having everything ready makes the process so much smoother.
Yarn:
Hook:
Notions:
Gauge:
8 single crochet stitches and 8 rows = 4 inches in single crochet with t-shirt yarn
*Gauge matters for this project. A looser gauge creates a floppier bag. A tighter gauge makes a stiffer, smaller bag. Aim for a firm fabric that still has slight flexibility.*
Skill Level and Stitches Used
I would call this an easy to intermediate crochet pattern. The individual techniques are all beginner level. The construction requires some attention to assembly, which bumps it up slightly.
Abbreviations and Definitions:
Finished Dimensions
These measurements are approximate because t-shirt yarn varies between brands.
Step by Step Crochet Pattern Instructions

Part 1: The Base (Worked in Black)
We start with a circular base worked in continuous spiral rounds. Place a stitch marker at the beginning of each round and move it up as you go.
Round 1: Using black yarn, create a magic ring. Work 6 sc into the ring. Pull tight. (6 sts)
Round 2: Inc in each stitch around. (12 sts)
Round 3: *Sc 1, inc* repeat around. (18 sts)
Round 4: *Sc 2, inc* repeat around. (24 sts)
Round 5: *Sc 3, inc* repeat around. (30 sts)
Round 6: *Sc 4, inc* repeat around. (36 sts)
Round 7: *Sc 5, inc* repeat around. (42 sts)
Round 8: *Sc 6, inc* repeat around. (48 sts)
Your base should measure approximately 6 inches across. Slip stitch to join. Fasten off and weave in the end.
*Quick tip: If your circle is cupping upward, your tension is too tight. Try going up a hook size.*
Part 2: The Stripe Panels (Make 12 Total)
Here is where the magic happens. We create individual panels that form those gorgeous vertical stripes.
Make 8 Black Panels and 4 White Panels
Each panel starts at the base and works upward.
For Each Panel:
Row 1: Ch 5, sc in second ch from hook and in each ch across. (4 sts)
Rows 2 through 22: Ch 1, turn. Sc in each st across. (4 sts)
Shaping the Top (Rows 23 to 26):
Row 23: Ch 1, turn. Sc2tog, sc 2. (3 sts)
Row 24: Ch 1, turn. Sc in each st across. (3 sts)
Row 25: Ch 1, turn. Sc2tog, sc 1. (2 sts)
Row 26: Ch 1, turn. Sc2tog. (1 st)
Fasten off, leaving a 12 inch tail for assembly.
Repeat until you have 8 black panels and 4 white panels. Yes, this feels repetitive. Put on a podcast. You will be done before you know it.
Part 3: Assembly
Now we connect everything. Lay out your panels in this order around the base:
Black, Black, White, Black, Black, White, Black, Black, White, Black, Black, White
This creates the balanced stripe pattern you see in the photo with wider black sections separated by single white stripes.
Attaching Panels to the Base:
1. Position the first black panel with its starting edge against the outer edge of the circular base.
2. Using black yarn and your tapestry needle, whip stitch the bottom edge of the panel to 4 stitches along the base perimeter.
3. Continue around, attaching each panel in sequence. The 48 stitches of your base will accommodate all 12 panels (4 stitches each).
Joining Panels to Each Other:
1. Working from the base up, use a slip stitch seam to join adjacent panels along their side edges.
2. When joining black to white, use the darker color (black) for a cleaner look.
3. Work through both edge stitches, creating a nearly invisible seam on the inside.
*Feeling confused? This is totally normal. Take your time. Pin the panels together first if it helps you visualize the construction.*
Part 4: The Top Band and Drawstring Channel
Once all panels are joined, we create a unified top edge.
Round 1: Join black yarn at any seam. Ch 1, work 1 sc into each row end around the top opening. You should have approximately 60 sc. Adjust as needed to keep your work flat. Sl st to join. (approximately 60 sts)
Round 2: Ch 1, sc in BLO around. Sl st to join. (60 sts)
This creates a subtle ridge.
Round 3: Ch 3 (counts as first dc), skip first st. *Dc in next st, ch 1, skip 1 st* repeat around. Sl st to top of ch 3 to join.
This open round creates the channel for your drawstring.
Round 4: Ch 1, sc in each dc and ch 1 space around. Sl st to join. (60 sts)
Round 5: Ch 1, sc in each st around. Sl st to join. Fasten off. (60 sts)
Part 5: Drawstring Cord
Using black yarn:
Ch 120 (or until cord measures approximately 24 inches when slightly stretched).
Sl st in second ch from hook and in each ch across.
Fasten off.
Thread the drawstring through the openings in Round 3 of the top band. Start and end at the front center.
Part 6: Attaching the Hardware
D-Ring Attachment Points (Make 2):
Using black yarn:
Row 1: Ch 6, sc in second ch from hook and across. (5 sts)
Rows 2 through 4: Ch 1, turn. Sc across. (5 sts)
Fasten off with a long tail.
Fold each small rectangle through a D-ring. Sew the ends securely to the inside top edge of the bag, positioning one on each side.
Clip your chain strap to the D-rings.
*No D-rings? You can crochet a simple chain strap instead. Just make it long enough to wear crossbody.*
Helpful Tips for Success
About t-shirt yarn: This yarn can be tricky. It twists and tangles. Work slowly at first. Keep your yarn ball in a container to prevent it from rolling away.
Keeping stripes straight: Block your finished panels lightly before assembly. Lay them flat, spritz with water, and let dry. This evens out any wonky edges.
Customization ideas: Want a solid color bag? Make all 12 panels the same color. Prefer a different stripe pattern? Try alternating single colors: black, white, black, white. The construction method stays identical.
Strap alternatives: If chunky chains are not your style, crochet a long strap using the same drawstring method. Or attach leather handles for a different vibe.
Care Instructions
Spot clean your bucket bag with a damp cloth. T-shirt yarn is essentially cotton jersey, so it can handle gentle washing if needed. Lay flat to dry to maintain the shape.
You Did It
Look at you with your gorgeous new crochet bucket bag. This accessory will turn heads wherever you go. People will ask where you bought it. You get to smile and say you made it yourself.
I genuinely love seeing what you create. If you make this black and white drawstring bucket bag, please share a photo with me on Instagram or Facebook. Tag me so I can celebrate your finished project. There is nothing better than seeing these patterns come to life in your hands.
Thank you so much for choosing this pattern and trusting me to guide you through the process. Happy crocheting, friend. You have got this.
