Let me bust a myth right now. This stunning braided purse looks like it requires years of crochet experience and some kind of secret technique that only professional bag makers know. It doesn’t. I promise you, if you can work a single crochet and follow a simple color change sequence, you can absolutely make this bag. The braided texture that looks so intricate? It’s actually created using a straightforward stitch pattern that just *looks* complicated. Whether you’re an adventurous beginner ready to level up or an experienced crocheter looking for your next satisfying project, this Lavender Dreams Purple Ombre Braided Purse pattern breaks everything down into manageable steps. Take a breath. You’ve got this.
Why This Braided Crochet Purse Pattern Works So Well
The construction of this bag is genuinely clever without being fussy. You’ll work the body in flat panels using t-shirt yarn, which is that thick, stretchy fabric yarn that’s become incredibly popular for bag making. The braided appearance comes from working stitches in a specific way that creates overlapping texture resembling a herringbone or chevron braid.
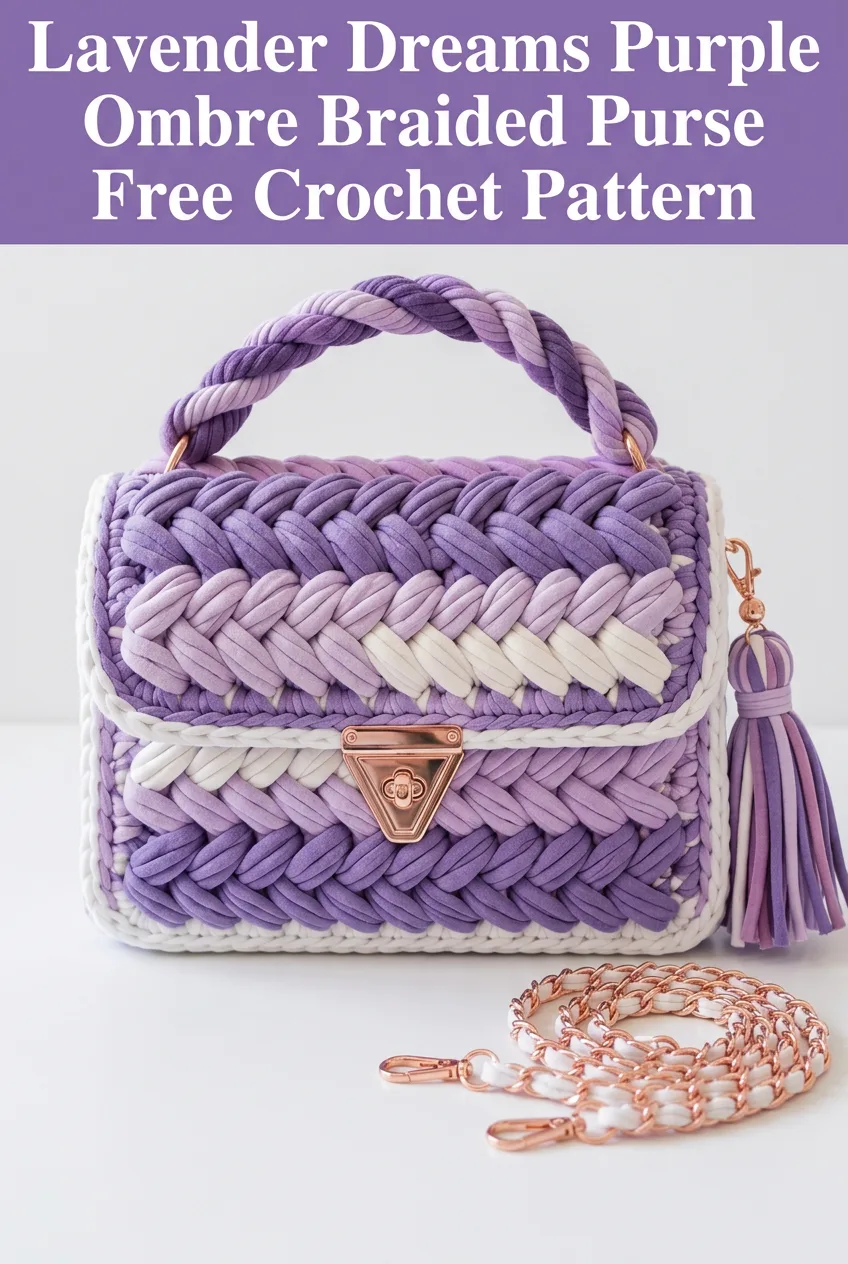
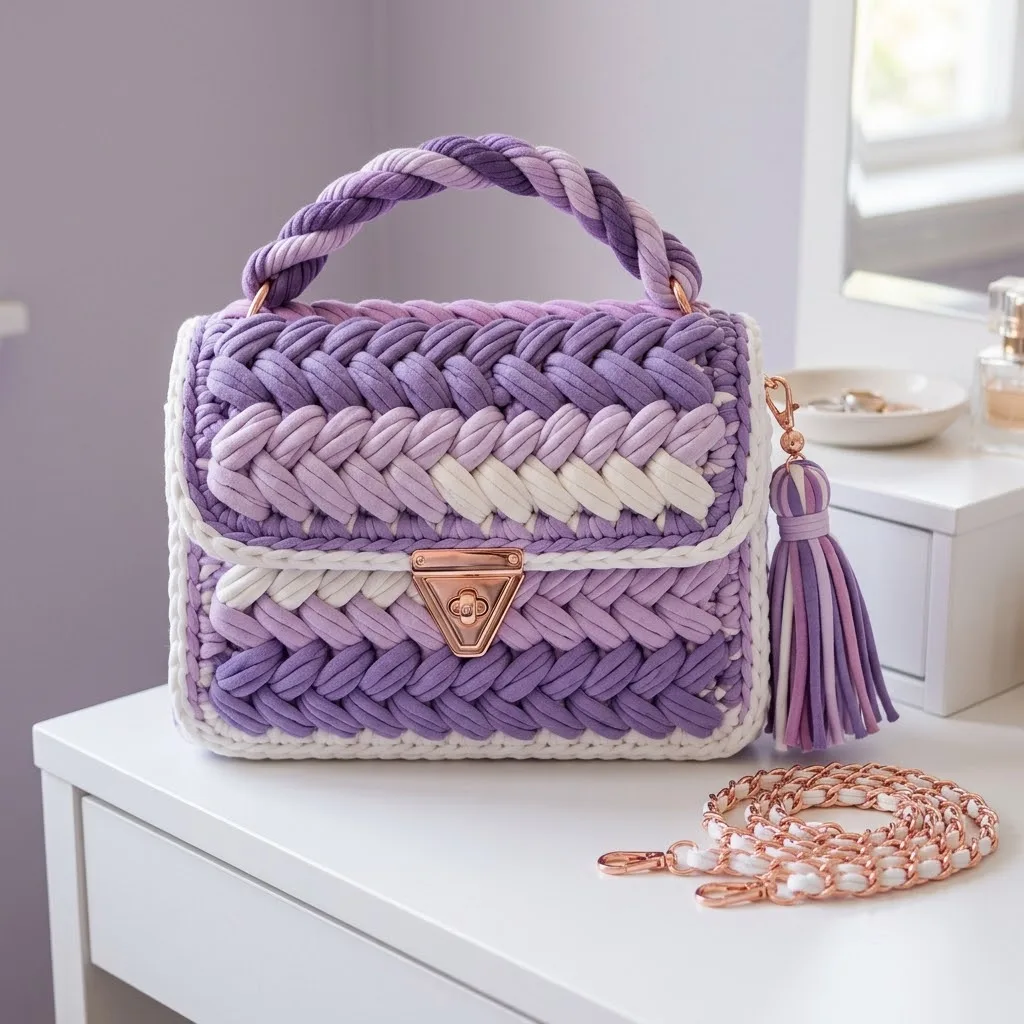
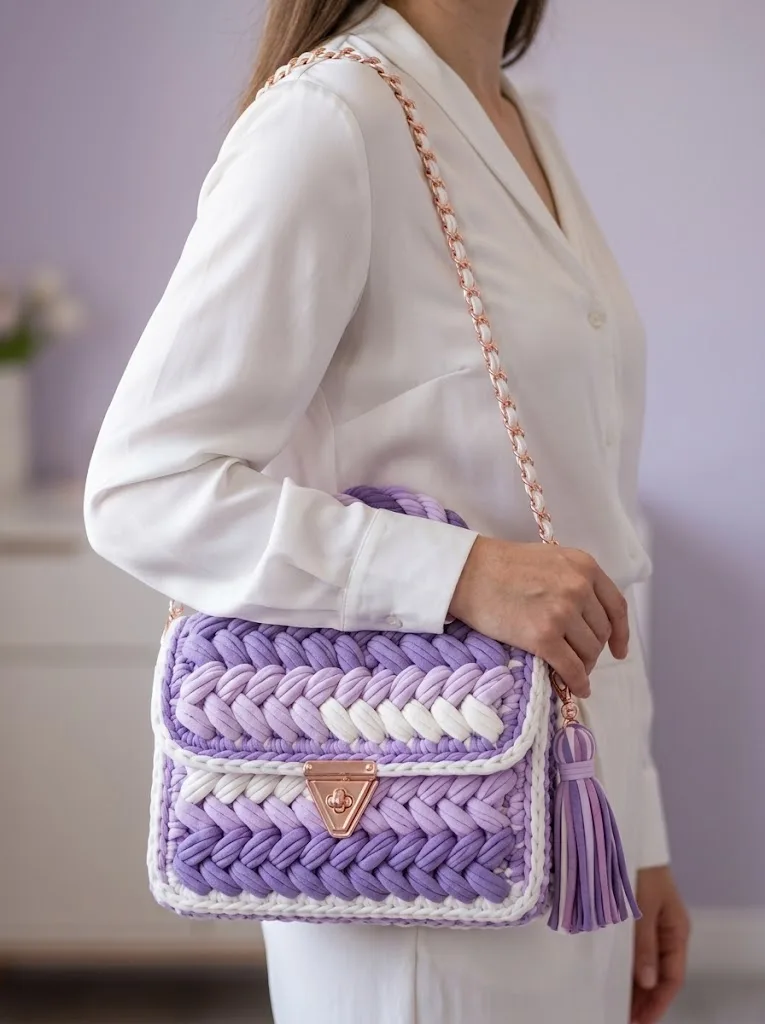
What makes this purse special is the ombre color effect. You’ll transition from deep purple through soft lavender to cream, creating that gorgeous gradient that catches the eye. The white border provides clean, crisp edges that make the whole design look polished and professional.
The hardware details elevate this from a craft project to something you’d genuinely carry every day. A rose gold turn lock closure, D-rings for attaching straps, and a matching chain crossbody strap give this bag a designer feel. Plus, that twisted rope handle and coordinating tassel add the perfect finishing touches.
Materials You’ll Need
Before you start, gather these supplies. Having everything ready makes the process so much smoother.
Yarn:
– Deep purple: approximately 150 grams
– Light lavender: approximately 100 grams
– Cream/off-white: approximately 80 grams
– White: approximately 50 grams for edging
T-shirt yarn typically comes in 100-gram balls containing roughly 30-35 meters. The exact amount depends on your tension and the final size you want.
Hook:
Hardware:
Tools:
Notions:
Skill Level
Intermediate. You should be comfortable with basic stitches and feel ready to try something new. The hardest part is maintaining even tension with bulky yarn, and I’ll walk you through that.
Finished Dimensions
Your exact size may vary slightly based on your tension and the specific t-shirt yarn brand you use.
Abbreviations and Stitch Definitions
Let me explain every stitch you’ll use. No guessing required.
ch = chain. Wrap yarn over hook, pull through loop. This creates your foundation.
sl st = slip stitch. Insert hook, yarn over, pull through both the stitch and the loop on your hook in one motion. Used for joining and creating flat seams.
sc = single crochet. Insert hook into stitch, yarn over, pull up a loop (2 loops on hook), yarn over, pull through both loops.
hdc = half double crochet. Yarn over, insert hook into stitch, yarn over, pull up a loop (3 loops on hook), yarn over, pull through all 3 loops at once.
BLO = back loop only. Instead of inserting your hook under both loops at the top of a stitch, insert it under only the back loop. This creates ribbed texture.
puff st = puff stitch. Yarn over, insert hook, pull up a loop, repeat this 3-4 times in the same stitch (7-9 loops on hook), yarn over, pull through all loops. This creates the "braided" bump texture.
Understanding the Braided Texture
Here’s what creates that beautiful woven look. The "braided" appearance in this purse comes from working modified puff stitches or elongated half double crochets at angles. When you work these stitches leaning to the left in one row and to the right in the next, they overlap and interlock visually.
Think of it like this: each puffy stitch is a little pillow that sits at a slight diagonal. Line them up in alternating directions, and suddenly you have what looks like braided fabric.
Don’t overthink it. Just follow the pattern row by row, and the texture builds itself.
The Pattern
Front Panel (Make 1)
You’ll work this in rows, changing colors as you go for the ombre effect.
Foundation (in deep purple):
Row 1: Ch 21. Sc in 2nd ch from hook and in each ch across. (20 sc)
Row 2: Ch 1, turn. Working in BLO, sc in each st across. (20 sc)
Begin braided texture (still in deep purple):
Row 3: Ch 2 (does not count as a stitch throughout), turn. *Puff st in next st, skip 1 st* repeat across, ending with puff st in last st. (10 puff sts)
Row 4: Ch 2, turn. Sc in the space between first two puff sts, *puff st in next space* repeat across, sc in last space. (9 puff sts, 2 sc)
Row 5: Ch 2, turn. *Puff st in sc, puff st in space* repeat across. (10 puff sts)
Rows 6-7: Repeat Rows 4-5.
Color change to light lavender:
Row 8: Change to light lavender in the last yarn over of Row 7. Ch 2, turn. Repeat Row 4 pattern. (9 puff sts, 2 sc)
Rows 9-11: Continue in established pattern with light lavender. (10 puff sts per puff row)
Color change to cream:
Row 12: Change to cream. Ch 2, turn. Continue pattern. (9 puff sts, 2 sc)
Rows 13-14: Continue in cream. (10 puff sts)
Top border (in white):
Row 15: Change to white. Ch 1, turn. Sc in each st and space across, working into the tops of puff stitches. Count as you go to maintain 20 sts. (20 sc)
Row 16: Ch 1, turn. Sc in BLO across. (20 sc)
Fasten off. Weave in ends.
Back Panel (Make 1)
Work exactly as the Front Panel. You want them to match perfectly.
Base Panel (Make 1)
This creates the rectangular bottom of your purse.
Using white yarn:
Row 1: Ch 21. Sc in 2nd ch from hook and in each ch across. (20 sc)
Rows 2-8: Ch 1, turn. Sc in each st across. (20 sc)
Fasten off. The base should measure approximately 20cm x 8cm.
Side Panels (Make 2)
Using white yarn:
Row 1: Ch 9. Sc in 2nd ch from hook and in each ch across. (8 sc)
Rows 2-16: Ch 1, turn. Sc in each st across. (8 sc)
Fasten off. Each side panel should match the height of your front and back panels plus the base depth.
Flap
The flap is where the turn lock will attach. You’ll work it in the ombre colors to match the front.
Foundation (in deep purple):
Row 1: Ch 21. Sc in 2nd ch from hook and in each ch across. (20 sc)
Row 2: Ch 1, turn. Sc in BLO across. (20 sc)
Braided texture section:
Rows 3-7: Work in puff stitch pattern as established for front panel, using deep purple. (10 puff sts)
Rows 8-10: Change to light lavender. Continue pattern. (10 puff sts)
Rows 11-13: Change to cream. Continue pattern. (10 puff sts)
Border:
Row 14: Change to white. Ch 1, turn. Sc evenly across. (20 sc)
Row 15: Ch 1, turn. Sc in BLO across. (20 sc)
Do not fasten off. Continue with edging around all sides:
Edging: Ch 1, work sc evenly around all four sides of the flap, placing 3 sc in each corner to keep edges flat. Sl st to join. Fasten off.
Assembly
This is where your bag comes together. Take your time here.
Step 1: Attach base to front panel
Hold the base and front panel with wrong sides together. Using white yarn and your hook, sl st through both layers along the bottom edge, joining them. (20 sl sts)
Step 2: Attach base to back panel
Repeat Step 1, attaching the other long edge of the base to the back panel.
Step 3: Add side panels
Position one side panel between the front and back, matching up the edges. Sl st through all layers to join. The side panel should connect to the front edge, the base edge, and the back edge in one continuous seam.
Repeat for the second side panel.
Step 4: Border the top opening
Join white yarn at one corner of the top opening. Sc evenly around the entire top edge, keeping stitches snug but not too tight. Sl st to join. Fasten off.
Step 5: Attach the flap
Position the flap against the back panel, with the foundation row of the flap meeting the top edge of the back. Whip stitch or sl st across to attach securely.
Making the Twisted Rope Handle
This handle looks impressive but requires zero crochet skill.
Step 1: Cut six strands of yarn, each approximately 100cm long. Use two strands each of deep purple, light lavender, and cream.
Step 2: Knot all six strands together at one end. Secure this knot to something stable, like a doorknob or hook.
Step 3: Twist the strands together tightly in one direction until the rope starts to kink when you release tension slightly.
Step 4: Fold the twisted rope in half, holding the center. Let go, and the rope will twist back on itself, creating a thick, corded handle.
Step 5: Knot the loose ends together. Trim evenly.
Step 6: Attach each end of the rope handle to a D-ring. Sew or glue the D-rings to the sides of the bag, positioned about 2cm below the top edge.
Adding the Hardware
Turn lock: Position the decorative plate of the turn lock on the front panel, centered and about 3cm from the top edge. Mark where the prongs will go. Use small scissors or an awl to create tiny holes. Push prongs through, bend to secure on the inside. Attach the twist portion to the flap in the corresponding position.
D-rings for strap: These should already be attached with your handle. The chain strap clips onto these rings, giving you the option of carrying your bag as a handbag or crossbody.
Creating the Tassel
Step 1: Wrap yarn around a piece of cardboard approximately 10cm tall, about 20-25 times.
Step 2: Slide a separate piece of yarn under the wraps at one end and tie tightly. This becomes your hanging loop.
Step 3: Cut the loops at the opposite end.
Step 4: Wrap another piece of yarn around all the strands about 1.5cm below the top, creating the tassel "head." Secure with a knot and tuck ends inside.
Step 5: Attach a small lobster clasp to the hanging loop. Clip to your bag’s D-ring.
Tips for Working with T-Shirt Yarn
T-shirt yarn can feel strange if you’ve never used it before. Here’s what helps:
Keep loose tension. This yarn has natural stretch. If you crochet too tightly, your fabric becomes stiff and your hands will ache.
Use your whole arm. The thickness means you’re moving yarn with bigger motions than usual. Let your arm do the work, not just your wrist.
Check for twists. T-shirt yarn likes to twist as you work. Pause occasionally to let your yarn untwist, or your stitches will look uneven.
Embrace imperfection. The texture of this yarn is forgiving. Minor inconsistencies disappear into the overall look.
Customization Ideas
Want to make this purse your own? Try these variations:
Different color schemes: Think sunset ombre with coral, peach, and cream. Or go moody with charcoal, gray, and silver.
Add a lining: Cut fabric to match each interior panel. Hand stitch or fabric glue to the inside for a polished look and extra structure.
Skip the chain strap: If you prefer handles only, attach two twisted rope handles instead.
Larger or smaller size: Add or subtract stitches from your foundation chain. Just keep the number even for the puff stitch pattern to work correctly.
How Long Does This Crochet Purse Take?
Plan for approximately 6-10 hours total, depending on your experience with t-shirt yarn. The panels work up quickly because of the thick yarn and large hook. Assembly and hardware attachment add time but aren’t difficult.
This makes a wonderful weekend project. You could easily finish the panels on Saturday and complete assembly on Sunday.
I really hope you love making this Lavender Dreams Purple Ombre Braided Purse as much as I loved designing it. The moment you attach that final hardware piece and see it all come together is genuinely satisfying. If you make one, please tag me on Instagram or share in my Facebook group. I’d absolutely love to see your color choices and styling.
If this pattern is going in your "make soon" pile, be sure to pin it to your crochet project board on Pinterest so you can find it when you’re ready. And if you have any questions or just want to share how yours turned out, drop a comment below. I read every single one, and this community is the best part of sharing patterns. Happy crocheting!
