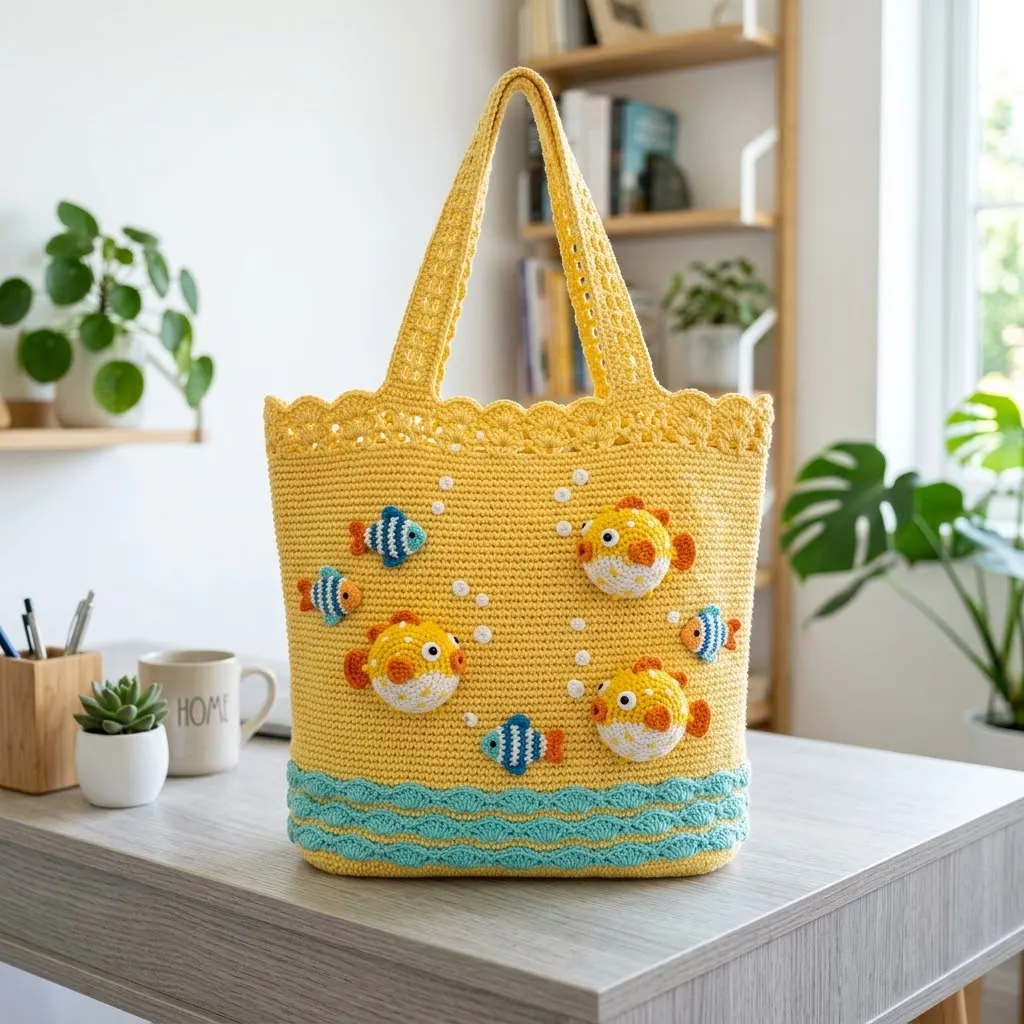
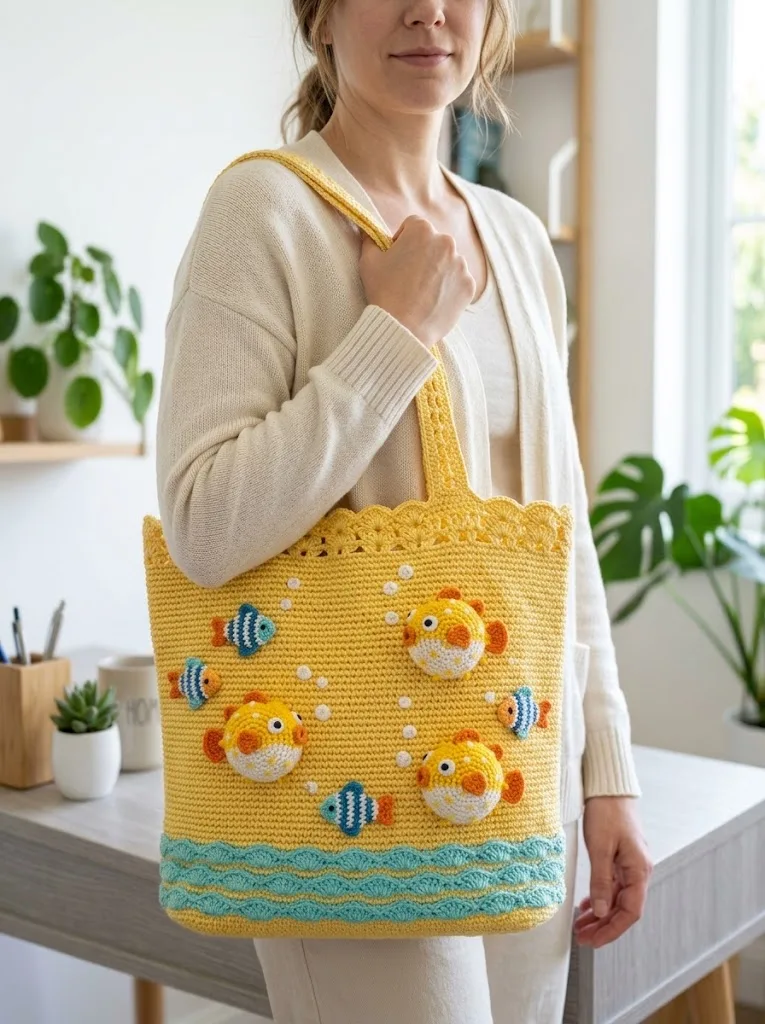
SUPER EASY and absolutely adorable! This tropical puffer fish crochet tote bag is one of those projects that looks incredibly impressive but comes together faster than you would expect. I finished mine in just a few evenings of relaxed stitching while watching TV. The cheerful yellow base, playful fish appliqués, and wavy ocean trim make this bag a total showstopper. If you need a quick gift for a beach lover or just want to brighten your own summer wardrobe, this crochet pattern delivers BIG results with beginner friendly techniques.

Why You Will Love This Crochet Tote Bag Pattern
This tropical tote combines simple construction with whimsical details that make it truly special. The main body uses basic single crochet stitches worked in continuous rounds, which means minimal counting and no confusing seams. The real magic happens with the adorable amigurumi style puffer fish and striped tropical fish appliqués, plus those gorgeous wave stitches along the bottom third.
The scalloped lace trim along the top edge adds a feminine touch without complicated lacework. And those little white bubble details? Simple French knots or small crocheted bobbles that take seconds to add but create such charming visual interest.
Perfect for: Beach days, farmers market trips, library runs, or gifting to anyone who loves the ocean.
Skill level: Confident beginner to intermediate. If you can single crochet in the round and follow basic amigurumi instructions, you can absolutely make this bag.
Materials Needed for Your Puffer Fish Tote
Gathering your supplies before you start makes the whole process smoother. Here is everything you will need:
Yarn
Cotton yarn works best for tote bags because it has minimal stretch and holds its shape beautifully. I recommend Lily Sugar’n Cream or Paintbox Cotton Aran for durability and stitch definition.
Tools
Finished Dimensions
Abbreviations and Stitch Definitions
Let me walk you through every stitch you will use. Even if you know these already, a quick refresher never hurts.
Ch = Chain. Wrap yarn over hook, pull through loop on hook. This creates your foundation.
Sl st = Slip stitch. Insert hook, yarn over, pull through stitch AND loop on hook in one motion. Used for joining and moving across stitches without adding height.
Sc = Single crochet. Insert hook into stitch, yarn over, pull up a loop (2 loops on hook), yarn over, pull through both loops. Your workhorse stitch for this project.
Hdc = Half double crochet. Yarn over, insert hook, pull up loop (3 loops on hook), yarn over, pull through all 3 loops. Slightly taller than sc.
Dc = Double crochet. Yarn over, insert hook, pull up loop, yarn over, pull through 2 loops, yarn over, pull through remaining 2 loops. Creates nice height for the scalloped edge.
Inc = Increase. Work 2 stitches into the same stitch. This makes your fabric grow.
Dec = Decrease (invisible decrease preferred). Insert hook through front loops only of next 2 stitches, yarn over, pull through both, yarn over, pull through 2 loops. Creates a cleaner look than standard decrease.
MR = Magic ring. An adjustable starting loop that closes completely with no hole. Essential for amigurumi.
BLO = Back loop only. Work into just the back loop of the stitch to create a ridge effect.
Crochet Pattern Instructions
Bag Base (Oval)
The base determines your bag’s footprint. Work in continuous rounds without joining unless specified. Use a stitch marker to track your rounds.
With MC (yellow) and 4.0mm hook:
Round 1: Ch 25. Sc in 2nd ch from hook, sc in next 22 ch, 3 sc in last ch (this turns the corner). Working along opposite side of foundation chain, sc in next 22 ch, 2 sc in last ch. Place marker. (50 sts)
Round 2: Inc in first st, sc in next 22 sts, inc in next 3 sts, sc in next 22 sts, inc in next 2 sts. (56 sts)
Round 3: Sc in first st, inc, sc in next 22 sts, (sc, inc) 3 times, sc in next 22 sts, (sc, inc) 2 times. (62 sts)
Round 4: Sc in next 2 sts, inc, sc in next 22 sts, (sc in next 2 sts, inc) 3 times, sc in next 22 sts, (sc in next 2 sts, inc) 2 times. (68 sts)
Round 5: Sc in next 3 sts, inc, sc in next 22 sts, (sc in next 3 sts, inc) 3 times, sc in next 22 sts, (sc in next 3 sts, inc) 2 times. (74 sts)
Round 6: Sc in each st around. (74 sts)
Do not fasten off. Continue to bag body.
Bag Body
Now we build upward. This is where you will see your tote take shape quickly.
Rounds 7 to 10: Working in BLO for Round 7 only (creates a defined edge at the base), sc in each st around. For Rounds 8 to 10, work through both loops as normal. (74 sts each round)
Rounds 11 to 45: Sc in each st around. (74 sts)
At Round 45, your bag body should measure approximately 10 to 11 inches from the base. If you want a taller bag, continue for additional rounds.
Wave Border Section
This is where the fun begins. The wave pattern creates that beautiful ocean effect along the bottom portion.
Fasten off MC. Join CC1 (aqua) at any stitch.
Round 46: With CC1, ch 1, sc in each st around. Sl st to first sc to join. (74 sts)
Round 47: Ch 3 (counts as first dc), skip first st, dc in next 2 sts, hdc in next st, sc in next 2 sts, hdc in next st, *dc in next 3 sts, hdc in next st, sc in next 2 sts, hdc in next st*. Repeat from * around. Sl st to top of ch 3 to join.
Round 48: Join CC2 (teal). Ch 1, working in BLO, sc in each st around. Sl st to join. (74 sts)
Round 49: With CC1, repeat Round 47 wave pattern.
Round 50: With MC, ch 1, sc in each st around. Sl st to join. Fasten off.
This creates approximately 2 to 3 inches of wave detail at the bottom.
Scalloped Top Edge
Rejoin MC at top edge of bag body.
Round 1: Ch 1, sc in each st around. Sl st to join. (74 sts)
Round 2: Ch 1, sc in first st, *skip 2 sts, 5 dc in next st (shell made), skip 2 sts, sc in next st*. Repeat from * around, adjusting final repeat as needed to end evenly. Sl st to first sc. Fasten off.
If your stitch count does not divide evenly, simply work a few extra sc between shells to compensate. Nobody will notice, I promise.
Handles (Make 2)
With MC and 4.0mm hook:
Row 1: Ch 65 (or desired length for handle drop).
Row 2: Sc in 2nd ch from hook and in each ch across. (64 sts)
Rows 3 to 5: Ch 1, turn, sc in each st across. (64 sts)
Fasten off, leaving a long tail for sewing.
To attach: Position handles about 3 inches from each side edge of the bag. Using yarn needle, whip stitch securely to inside of bag, reinforcing several times for durability.
Puffer Fish Appliqué (Make 3)
These cuties are what make the bag so special. Take your time with them.
Body:
With bright yellow and 3.5mm hook:
Round 1: MR, 6 sc into ring. Pull tight. (6 sts)
Round 2: Inc in each st around. (12 sts)
Round 3: (Sc, inc) 6 times. (18 sts)
Round 4: (Sc in next 2 sts, inc) 6 times. (24 sts)
Rounds 5 to 8: Sc in each st around. (24 sts)
Insert safety eyes between Rounds 5 and 6, about 4 stitches apart. Stuff lightly with fiberfill.
Round 9: (Sc in next 2 sts, dec) 6 times. (18 sts)
Round 10: (Sc, dec) 6 times. (12 sts)
Stuff a bit more if needed.
Round 11: Dec 6 times. (6 sts)
Fasten off, close hole with yarn needle.
Fins (Make 2 per fish):
With orange yarn, ch 4. Sl st in 2nd ch from hook, sc in next ch, hdc in last ch. Fasten off.
Tail:
With orange yarn, ch 5. Sc in 2nd ch from hook, hdc in next 2 ch, sc in last ch. Fasten off.
Mouth: Embroider a small curved line with white yarn.
Sew fins to sides and tail to back of puffer fish.
Striped Tropical Fish Appliqué (Make 3 to 4)
With white and 3.5mm hook:
Round 1: MR, 6 sc. (6 sts)
Round 2: Inc around. (12 sts)
Round 3: (Sc, inc) 6 times. (18 sts)
Rounds 4 to 6: Sc around, switching to blue yarn for Rounds 5 and back to white for Round 6 to create stripes. (18 sts)
Round 7: (Sc, dec) 6 times. (12 sts)
Stuff lightly, add eyes.
Round 8: Dec 6 times. Close.
Add orange fins and tail as with puffer fish.
Bubble Details
Using white yarn, create small bobbles or French knots scattered around the fish. Alternatively, ch 3, sl st in first ch to make tiny circles. Sew randomly between fish for a playful underwater effect.
Assembly and Finishing
1. Position your appliqués on the bag front before sewing. Take a photo to remember placement.
2. Sew each fish securely using matching yarn and whip stitch around edges.
3. Add bubbles in clusters of 2 to 4 near each fish.
4. Weave in all ends on the inside of the bag.
5. Block gently if desired by dampening and laying flat to dry.
Pro tip: For extra durability, add a fabric lining to your tote. This also hides all those ends and prevents small items from poking through stitches.
Pattern Notes and Tips
This crochet tote pattern works up quickly once you get into a rhythm. The body is meditative, repetitive stitching, which is perfect for TV watching or audiobooks. The appliqués require more attention but are small enough to finish in one sitting each.
Gauge check: If your bag seems too floppy, go down a hook size. Too stiff? Go up. Cotton yarn has minimal give, so gauge matters more than with acrylic.
Color variations: Try coral pink with turquoise fish, navy blue with orange clownfish, or natural cream with rainbow tropical fish. This pattern adapts beautifully to any color palette.
Wrapping Up Your Tropical Puffer Fish Crochet Tote
You did it! This cheerful tropical puffer fish crochet tote bag is ready to accompany you on all your warm weather adventures. The combination of simple construction and eye catching details makes this crochet pattern perfect for confident beginners looking to level up their skills. The amigurumi fish add personality without overwhelming difficulty, and that scalloped edge gives the whole bag a polished, boutique quality finish.
I hope this step by step crochet tutorial gave you everything you need to create your own ocean inspired masterpiece. Whether you keep this beauty for yourself or gift it to someone special, it is guaranteed to bring smiles wherever it goes.
Thank you so much for choosing this pattern. It truly means the world to me when you trust my designs for your precious crafting time. If you make this tote, I would absolutely love to see it! Tag me on Instagram or share a photo in my Facebook group. Seeing your creations is the best part of my job.
If this tropical puffer fish crochet tote pattern caught your eye, go ahead and pin it to your Pinterest boards so you can find it whenever you are ready to start. And please drop a comment below to let me know if you have any questions or just to say hi. I read every single one and love hearing from you!
