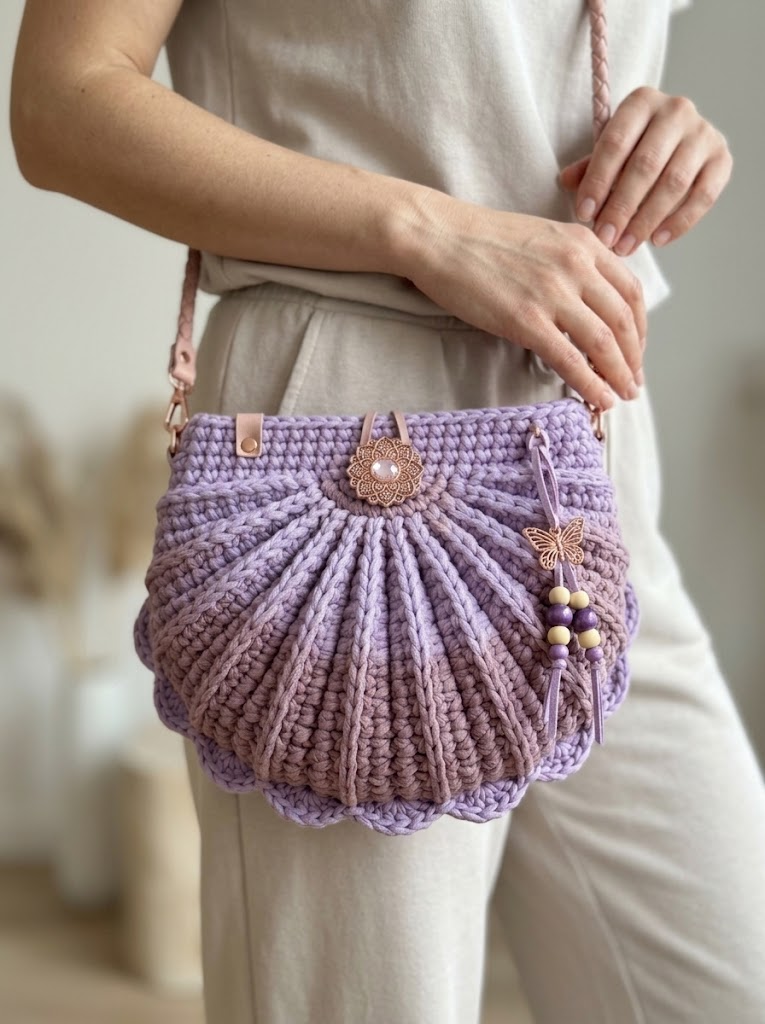
This stunning seashell bag is the kind of project that makes people stop and ask, “You *made* that?” The sculptural shell shape, those dramatic radiating ridges, and the soft lavender color combine into something truly special. And here is the best part. If you can work basic crochet stitches in the round, you can absolutely make this bag.
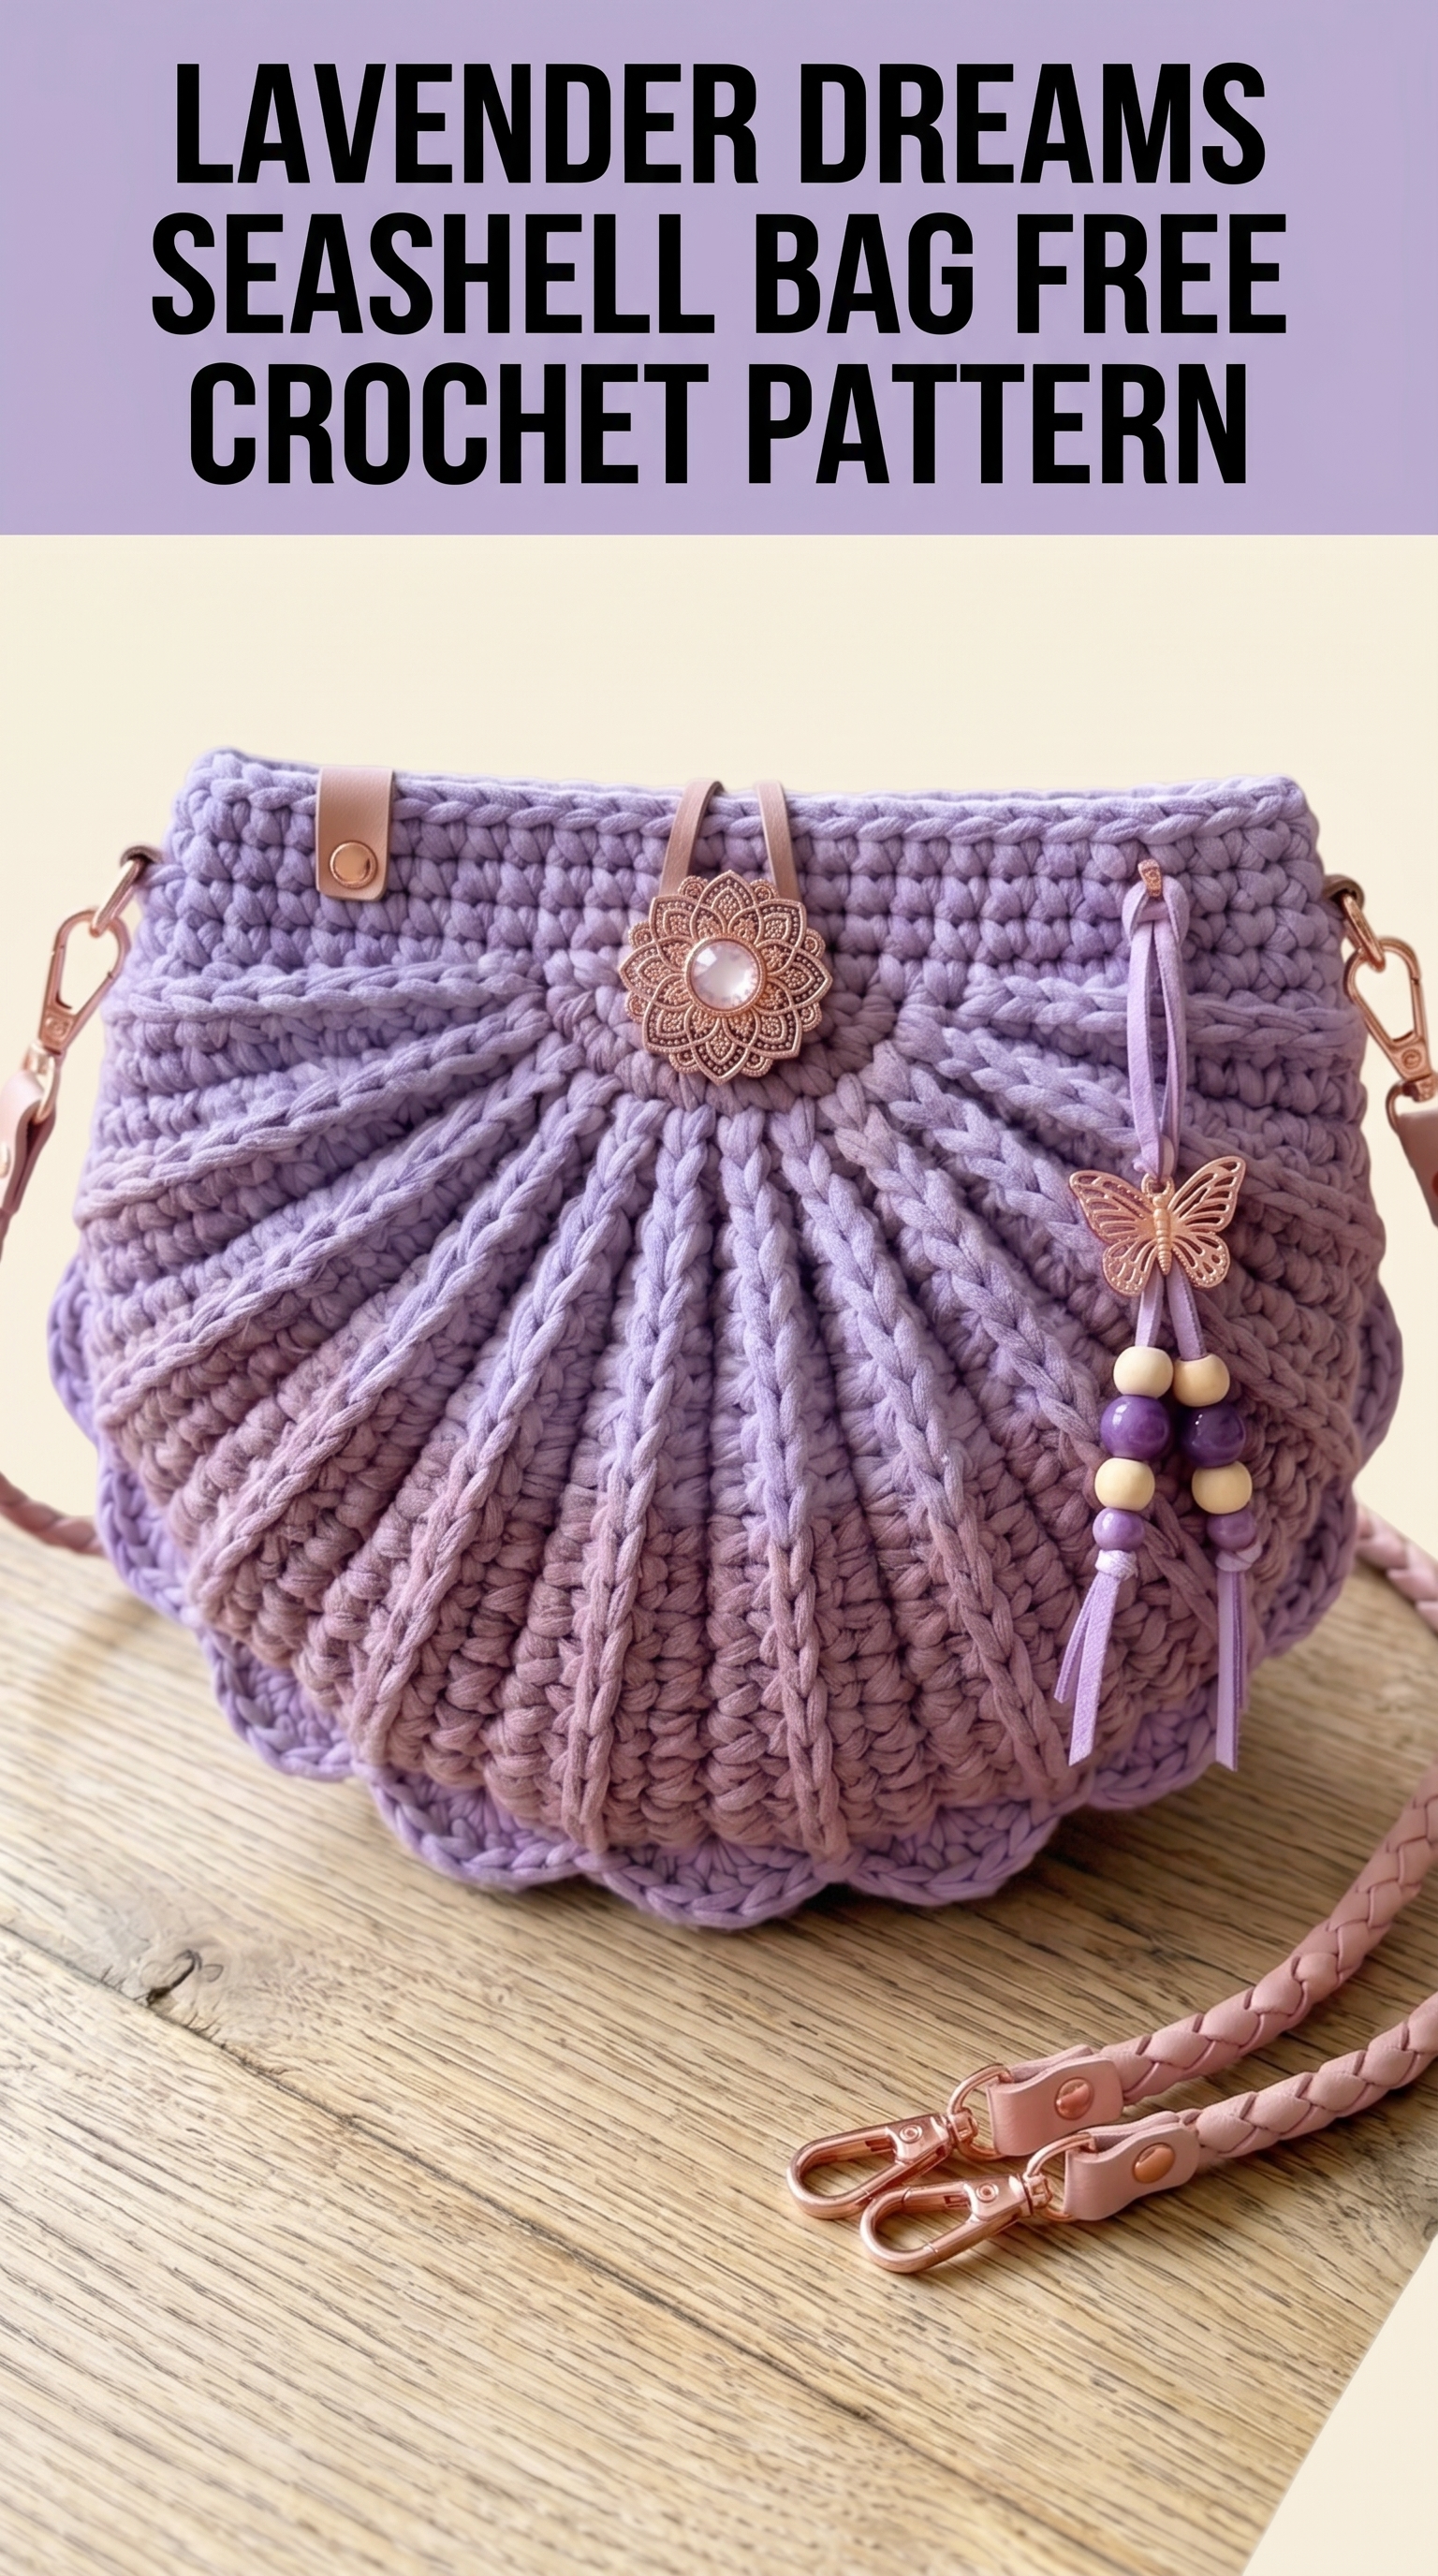
I designed this crochet pattern to look far more complicated than it actually is. The secret to those beautiful ridges? Simple post stitches worked in a strategic pattern. Once you understand the rhythm, your hands will take over and the shell shape emerges almost magically.
Let me walk you through every step of this seashell bag crochet tutorial so you can create your own gorgeous accessory.
Why This Crochet Seashell Bag Pattern Works So Well
The construction is clever but not tricky. You work the shell portion flat in rows, creating wedge-shaped sections that naturally curve. Then you join them, add a structured top band, and attach hardware. The whole thing comes together faster than you might expect.
Skill level: Confident beginner to intermediate. If you have never worked post stitches before, this is a wonderful project to learn them. I will explain everything.
Finished dimensions: Approximately 10 inches wide by 8 inches tall, not including the strap.
Materials You Will Need
Gathering your supplies before you start makes everything smoother. Here is what I used for this step by step crochet bag pattern.

Yarn
T-shirt yarn works perfectly here because it has weight and structure. Regular worsted or aran weight yarn would create a much smaller, floppier bag. If you cannot find t-shirt yarn locally, look for brands like Hoooked Zpagetti, Bobilon, or similar tube-style recycled cotton yarns.
Hook
Hardware and Notions
Stitches and Abbreviations Used
Let me define every stitch before we begin. Understanding these will make the pattern flow smoothly.
Ch = Chain. Wrap yarn over hook, pull through loop on hook. This creates your foundation and turning chains.
Sl st = Slip stitch. Insert hook, yarn over, pull through both the stitch and the loop on your hook in one motion. Used for joining and invisible movement.
Sc = Single crochet. Insert hook into stitch, yarn over and pull up a loop (2 loops on hook), yarn over and pull through both loops. The shortest basic stitch.
Hdc = Half double crochet. Yarn over, insert hook, yarn over and pull up a loop (3 loops on hook), yarn over and pull through all 3 loops.
Dc = Double crochet. Yarn over, insert hook, yarn over and pull up a loop (3 loops on hook), yarn over and pull through 2 loops, yarn over and pull through remaining 2 loops. Creates a taller stitch.
FPdc = Front post double crochet. This is the magic stitch for our ridges. Instead of inserting your hook into the top of the stitch, you insert it from front to back to front around the *post* (the vertical body) of the stitch below. Then complete a normal dc. This pushes the stitch forward, creating raised texture.
BPdc = Back post double crochet. Same concept, but insert hook from back to front to back around the post. This recesses the stitch.
Inc = Increase. Work 2 stitches into the same stitch.
Dec = Decrease. Work 2 stitches together as one.
Understanding the Shell Construction
Before we dive into the row by row instructions, let me explain how this seashell bag crochet pattern comes together structurally.
The shell body consists of 12 wedge sections that radiate from a central point at the bottom. Each wedge is created by working increases along a center spine while the post stitches create those dramatic vertical ridges.
You will work flat rows back and forth, then seam the piece into a half-circle shell shape. After that, you add a structured top band, attach your hardware, and finish with any decorative elements.
It sounds like a lot, but each step is straightforward. Trust the process.
Shell Body Pattern Instructions
Foundation and Setup
Row 1: Ch 4.
Row 2: Turn. Sc in 2nd ch from hook, sc in next ch, 3 sc in last ch (this creates the bottom point). Working along the other side of the chain, sc in next 2 ch. (7 sts)
Row 3: Ch 1, turn. Sc in first st, hdc in next st, 3 dc in center st (the tip), hdc in next st, sc in last st. (9 sts)
Place a stitch marker in that center stitch. This marks your spine where increases will happen.
Building the Wedge Shape
Row 4: Ch 2, turn. Dc in each st to center marked st, 3 dc in center st (move marker to new center), dc in each st to end. (11 sts)
Row 5: Ch 2, turn. *Dc in first st, FPdc around post of next st.* Repeat from * to * until center st. Work 3 dc in center st. Continue pattern to end. (13 sts)
This is where the texture begins. Those FPdc stitches will stack on top of each other as you continue, creating the vertical ridges.
Row 6: Ch 2, turn. Dc in first st, FPdc around FPdc from previous row, dc in next st. Continue in established pattern, working FPdc around each FPdc and dc in the dc spaces. Work 3 dc in center. Mirror pattern on other side. (15 sts)
Rows 7 through 14: Continue in established pattern. Each row adds 2 stitches (one on each side of center). The FPdc columns will grow taller and more pronounced.
By Row 14, you should have approximately (27 sts) and visible ridge lines running from the bottom point outward.
Continuing the Expansion
Rows 15 through 20: Continue pattern, but now work increases only every other row to create the curved shell shape rather than a sharp triangle.
Row 15: Work in pattern with 3 dc in center. (29 sts)
Row 16: Work in pattern, but only 2 dc in center (no increase). (29 sts)
Row 17: Work in pattern with 3 dc in center. (31 sts)
Row 18: Work in pattern, 2 dc in center. (31 sts)
Continue this alternating increase pattern through Row 20. Your final row should have approximately (33 to 35 sts) depending on your tension.
Creating the Scalloped Edge
The bottom edge of the shell has those lovely scalloped curves. Here is how to create them.
Scallop Row: Do not turn. Working along the side edge of your wedge, sl st into the end of Row 1, ch 3, 4 dc into same space, skip next row end, sl st into next row end. *Ch 3, 4 dc into same space, skip 1, sl st into next.* Repeat around the curved bottom edge.
This creates approximately 6 scallops along the bottom curve of your wedge.
Make 2 identical wedge panels. These will become the front and back of your bag.
Joining the Shell Panels
Place both panels with wrong sides together. The textured ridges should face outward on both sides.
Using sl st or sc, seam along the scalloped bottom edge and partially up each side. Leave the top 2 to 3 inches open on each side. This creates the bag opening.
Weave in all ends securely. The seam should be nearly invisible against the textured fabric.
Top Band Pattern
The structured band at the top gives the bag its finished look and provides attachment points for hardware.
Round 1: Join yarn at side seam. Ch 1, work sc evenly around the top opening. Aim for approximately (50 to 54 sts) total, keeping the count even. Sl st to join. (52 sts)
Round 2: Ch 1, sc in each st around. Sl st to join. (52 sts)
Round 3: Ch 2, dc in each st around. Sl st to join. (52 sts)
Rounds 4 through 6: Repeat Round 3 three more times. This creates a sturdy 1.5 inch band.
Round 7: Ch 1, sc in each st around. Sl st to join. Fasten off. (52 sts)
The band should stand upright and hold its shape. If it flops, your tension may be too loose. Blocking can help.
Attaching Hardware and Finishing
Strap Tab Placement
Position your leather strap tabs at the side seams, approximately 1 inch down from the top edge. The tabs should sit flat against the band with the D-ring or attachment point facing upward.
If your tabs have rivets, you may need a leather punch and rivet setter. If you prefer an easier method, look for tabs with screw-back posts or tabs designed to be sewn on.
Adding the Strap
Clip your braided strap to both D-rings. Adjust length as desired for crossbody or shoulder wear.
Decorative Elements
The flower brooch at center front adds a beautiful focal point. Position it where the ridges meet at the top of the shell shape. A pin-back brooch allows you to remove it for washing.
The beaded tassel charm is entirely optional but adds lovely movement. Attach it to one of the D-rings or create a small loop at the side seam.
Tips for Success With This Pattern
Tension matters here. T-shirt yarn can be stretchy. Work firmly enough that the fabric holds its shape but not so tight that your hook struggles. Your finished bag should feel substantial, almost like soft leather.
Block before assembly if needed. Wet blocking helps even out stitches and sets the scalloped shape. Lay flat, pin into shape, and let dry completely.
The ridges improve with use. The FPdc columns become more defined after the first few times you handle the bag. Do not worry if they look subtle at first.
Hardware quality matters. Cheap lobster clasps break. Invest in solid metal hardware that will last. Rose gold finishes coordinate beautifully with lavender, as shown.
Customization Ideas
This beginner friendly bag crochet pattern adapts beautifully to different looks.
Color options: Deep ocean blue and gold hardware creates a nautical vibe. Coral pink feels tropical. Cream or ivory with silver hardware reads elegant and neutral.
Size adjustments: Add or subtract rows proportionally to create a larger tote or smaller clutch. The construction method scales nicely.
Interior lining: For added structure and pocket functionality, hand-sew a fabric lining inside. Cotton poplin in a coordinating color works well.
You Did It!
This seashell bag pattern combines sculptural shaping, satisfying texture work, and a genuinely useful finished product. Every time you wear it, someone will compliment it. I guarantee it.
Thank you so much for trusting me with your crafting time. This pattern means a lot to me, and I hope the process brought you as much joy as designing it brought me.
I would absolutely love to see your finished Lavender Dreams Seashell Bag. Tag me on Instagram or share in our Facebook community. Seeing your color choices and styling always makes my day.
Happy hooking, friend. You have got this.
