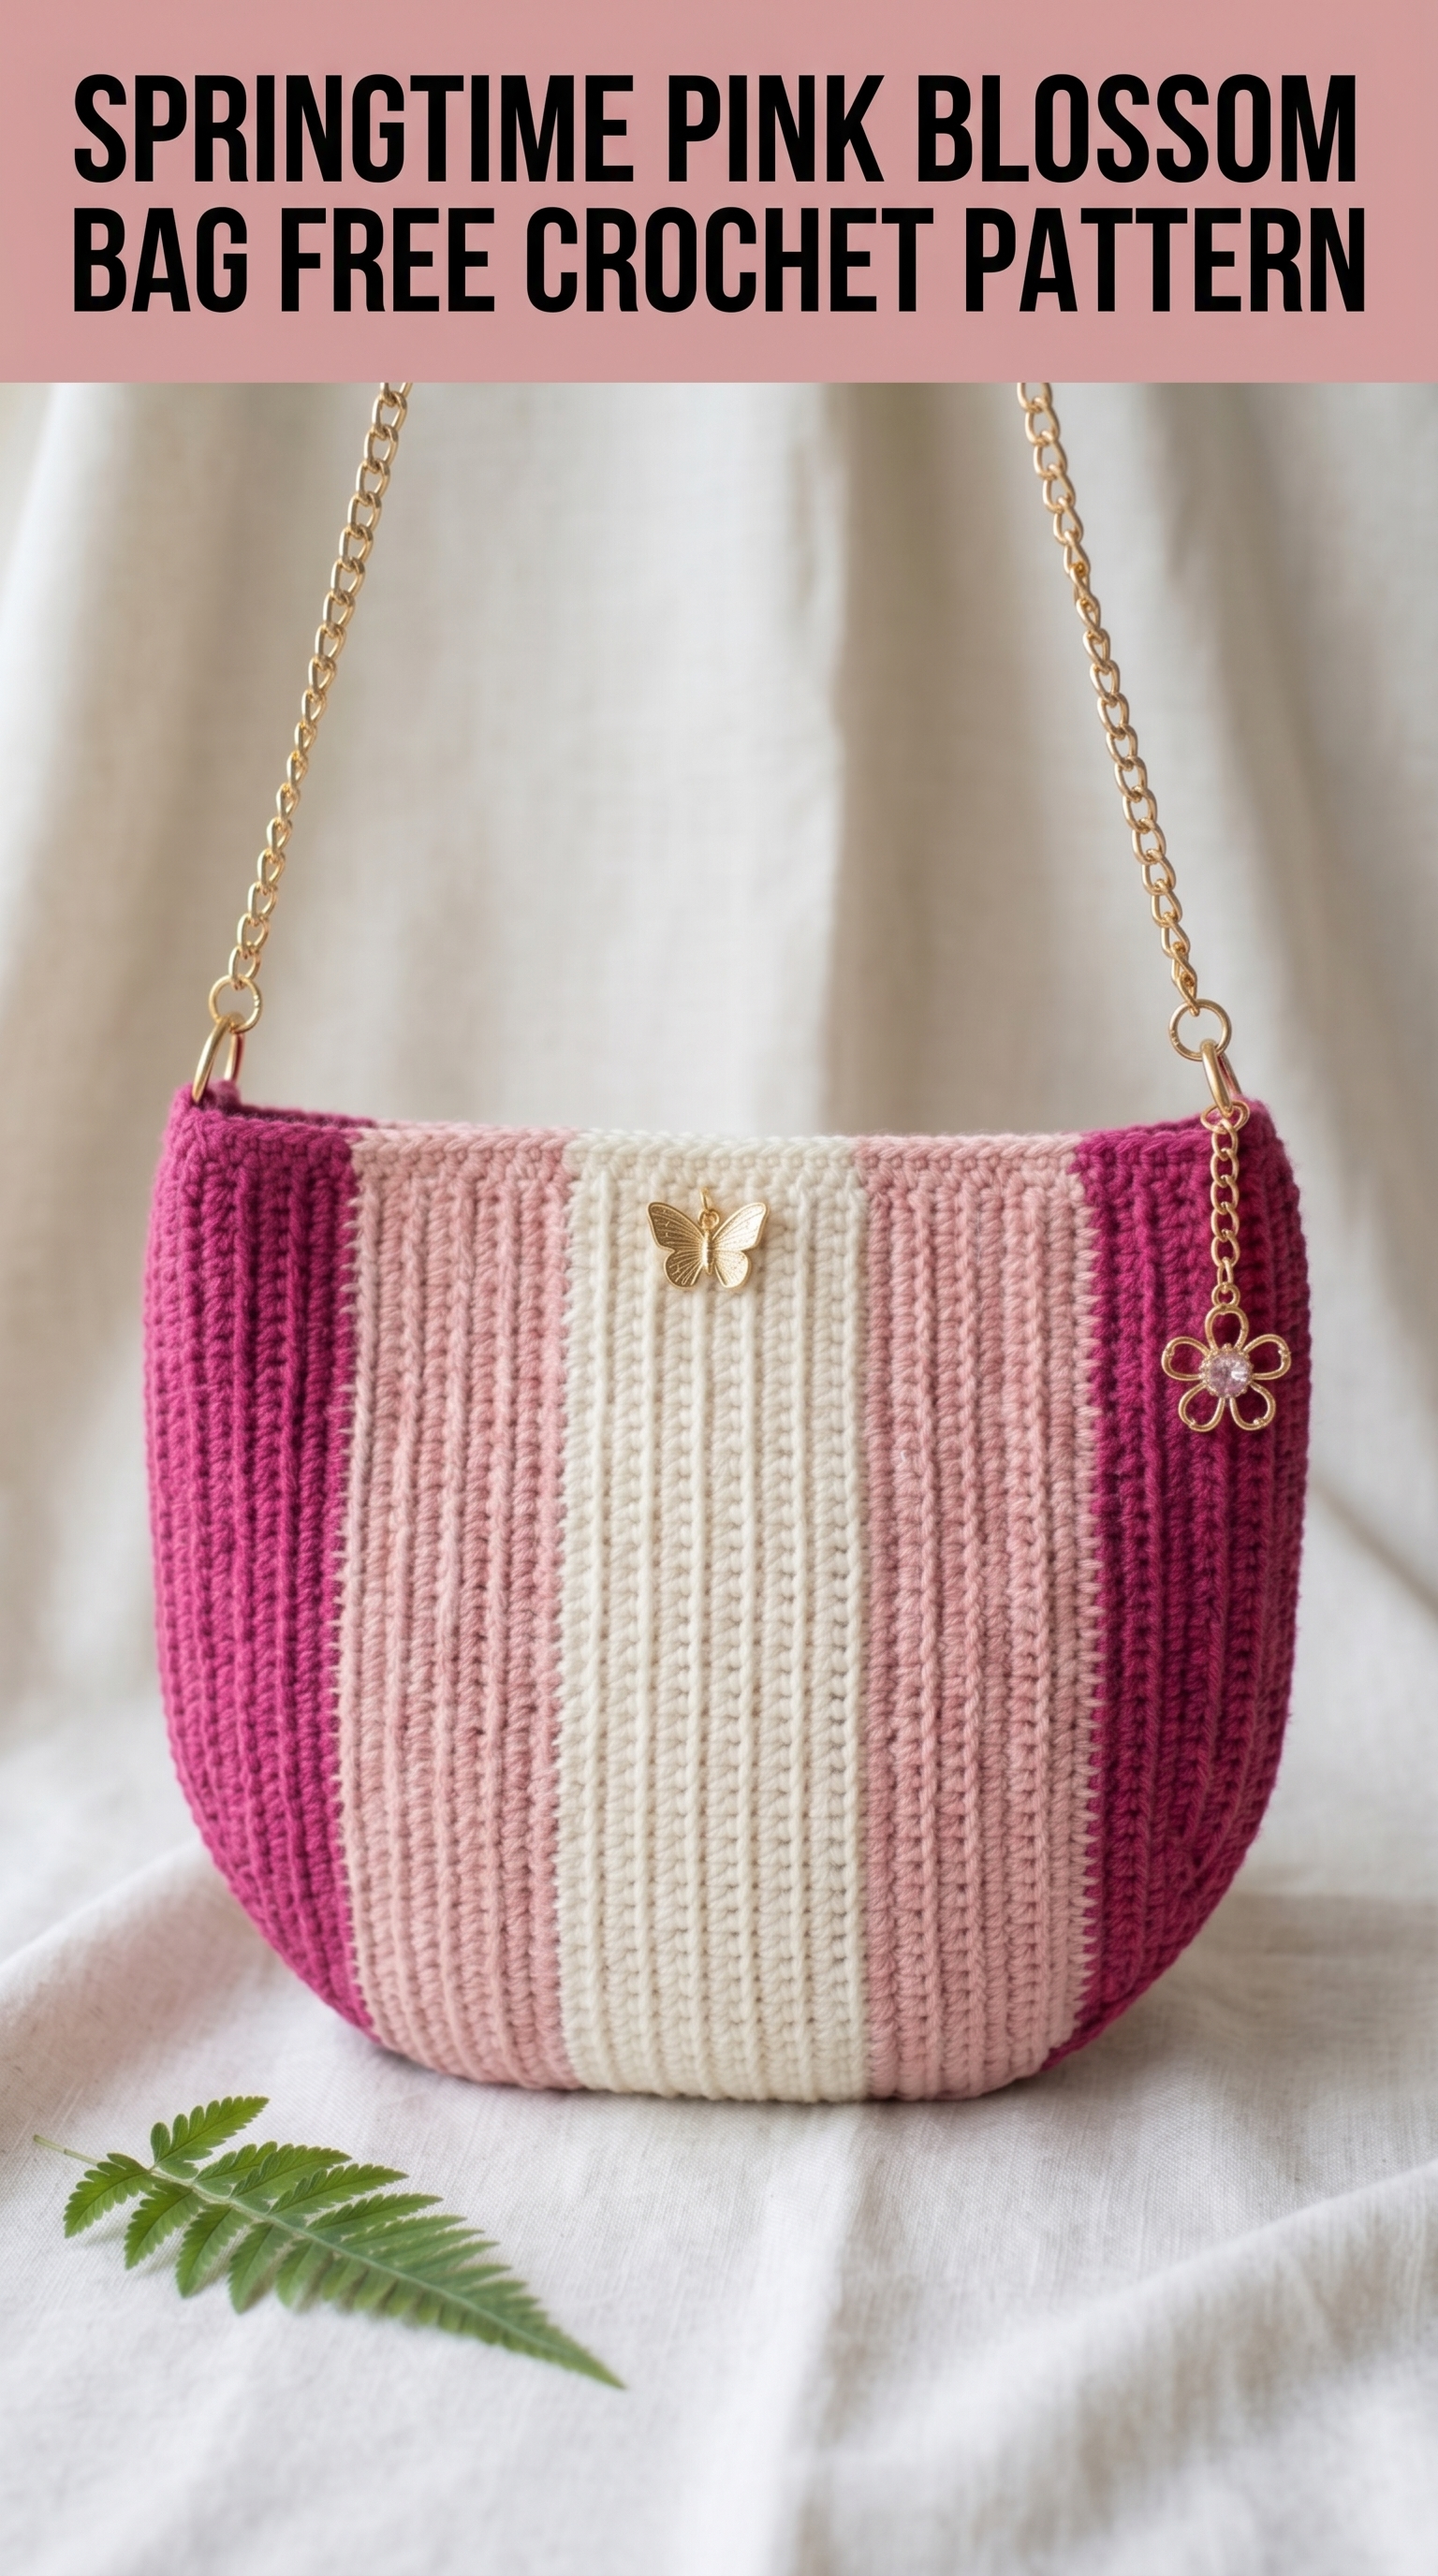
There is something about a handmade bag that just feels right. This Springtime Pink Blossom Bag is exactly the kind of project that reminds me why I fell in love with crochet in the first place. It is elegant without being fussy, structured without being stiff, and absolutely perfect for spring outings, brunches, or just adding a pop of color to your everyday wardrobe.
If you have been crocheting for a little while and want to try your hand at bag making, this crochet pattern is a wonderful next step. The construction is straightforward, the stitches are familiar, and the result looks far more impressive than the effort required. I promise you can do this.
Let me walk you through everything you need to recreate this beautiful piece from scratch.
What Makes This Crochet Bag Pattern Special
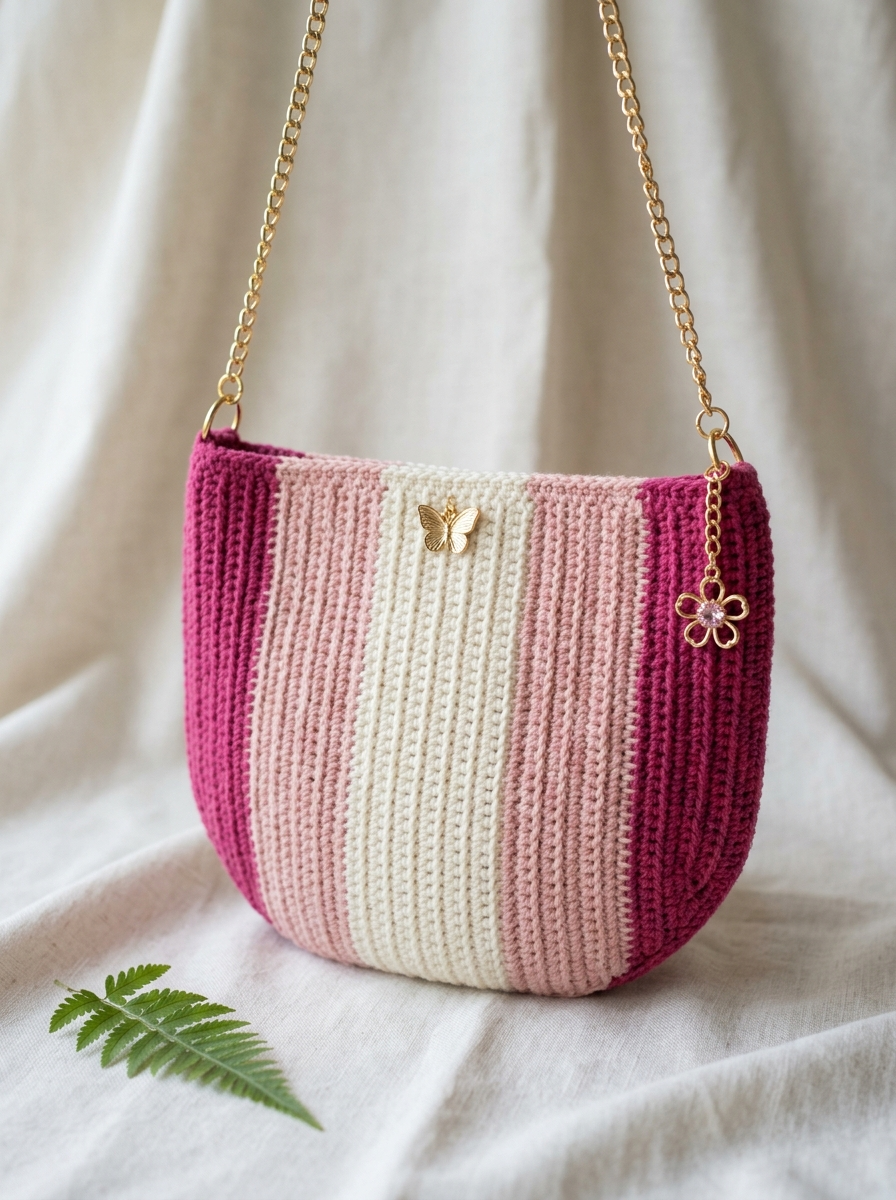
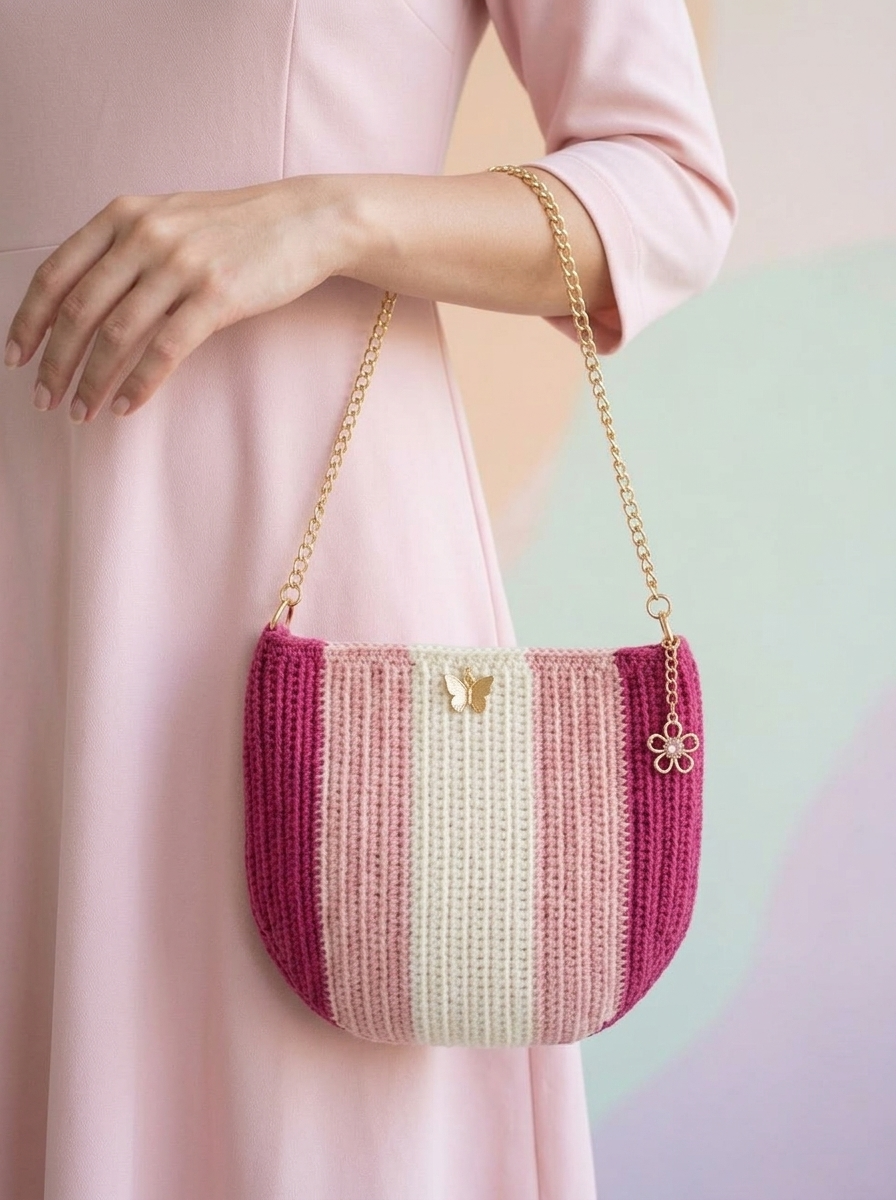
This bag features a gorgeous vertical stripe design in three coordinating pink tones plus cream. The stripes run up and down rather than side to side, which creates a slimming effect and gives the bag a modern, polished look. The rounded bottom adds softness to the silhouette, while the structured top edge keeps everything neat and tidy.
The real showstopper? That gold chain strap paired with delicate butterfly and flower charms. These finishing touches elevate the whole piece from handmade to boutique quality. You will be amazed at how professional this looks when you are done.
Skill Level for This Crochet Tutorial
I would call this an easy to intermediate project. If you can work single crochet confidently and are comfortable changing colors, you have all the skills you need.
Here is what you should know before starting:
If any of those feel unfamiliar, do not worry. I will explain each technique as we go.
Materials You Will Need
Gathering your supplies before you start makes the whole process smoother. Here is everything required for this step by step crochet pattern.
Yarn
You will need sport weight yarn (also called DK light or size 2) in four colors:
I recommend a cotton or cotton blend yarn for this project. Cotton holds its shape beautifully for bags and gives you that crisp stitch definition you see in the photos. Something like Scheepjes Catona, Drops Safran, or any mercerized cotton would work wonderfully.
Hook
3.0mm crochet hook (US size C/2 or D/3)
Work a gauge swatch first. Your stitches should be tight and dense so the bag holds its shape and items do not poke through. If your fabric feels loose or floppy, go down a hook size.
Notions and Hardware
Gauge and Finished Measurements
Gauge: 22 stitches and 24 rows = 4 inches (10cm) in single crochet using 3.0mm hook
Finished bag dimensions:
Always check your gauge. A bag that is too loose will stretch out of shape when you put things inside. Too tight and your hands will cramp. Find that sweet spot.
Abbreviations and Stitch Definitions
Let me define every stitch and term before we begin. This way you can reference back whenever needed.
ch = chain: Yarn over, pull through loop on hook. Creates foundation or height.
sc = single crochet: Insert hook into stitch, yarn over and pull up a loop (two loops on hook), yarn over and pull through both loops. This is your main stitch for the entire bag.
inc = increase: Work two single crochet stitches into the same stitch. This adds one stitch to your count.
sl st = slip stitch: Insert hook, yarn over, pull through stitch and loop on hook in one motion. Used for joining or moving across stitches invisibly.
st(s) = stitch(es)
BLO = back loop only: Insert your hook under only the back loop of the stitch instead of both loops. This creates the ribbed texture you see in the vertical stripes.
Understanding the Construction
Before we dive into the row by row instructions, let me explain how this bag comes together. Understanding the big picture helps everything make sense.
This bag is worked in two identical flat panels that are then seamed together along the sides and bottom. Each panel is worked in rows from side to side, which is why the stripes appear vertical when the bag is assembled.
The ribbed texture comes from working every stitch in the back loop only. This is what creates those beautiful defined lines running up and down the bag.
The rounded bottom is achieved by decreasing stitches at the beginning and end of certain rows in a specific section.
Ready? Let us make something beautiful.
How to Crochet the Springtime Pink Blossom Bag
Panel One (Make Two)
Both sides of the bag are identical. You will make this panel twice.
Foundation Chain
With Color A (deep magenta) and 3.0mm hook, ch 39.
Row 1: Sc in 2nd ch from hook and in each ch across. (38 sts)
Row 2: Ch 1, turn. Working in BLO, sc in each st across. (38 sts)
Rows 3 through 12: Repeat Row 2. (38 sts each row)
You now have the first magenta stripe. Time to change colors.
Color Change to Dusty Rose
Row 13: At the end of Row 12, on your final yarn over and pull through, use Color B (dusty rose) instead. Cut Color A leaving a 6 inch tail for weaving in later.
Ch 1, turn. Working in BLO, sc in each st across with Color B. (38 sts)
Rows 14 through 20: Ch 1, turn. BLO sc across. (38 sts each row)
Shaping the Bottom Curve
Here is where we create that lovely rounded bottom. Do not let the shaping intimidate you. We are simply skipping stitches at the edges for a few rows.
Row 21: Ch 1, turn. BLO sc in each st across, stopping 2 sts before end. Leave final 2 sts unworked. (36 sts)
Row 22: Ch 1, turn. Skip first st, BLO sc across to last st, leave last st unworked. (34 sts)
Row 23: Ch 1, turn. Skip first st, BLO sc across to last st, leave last st unworked. (32 sts)
Color Change to Cream
Row 24: Change to Color C (cream) on final pull through of Row 23.
Ch 1, turn. BLO sc across. (32 sts)
Rows 25 through 35: Ch 1, turn. BLO sc across. (32 sts each row)
This cream section forms the center stripe of your bag.
Color Change to Blush Pink
Row 36: Change to Color D (light blush) on final pull through.
Ch 1, turn. BLO sc across. (32 sts)
Rows 37 through 43: Ch 1, turn. BLO sc across. (32 sts each row)
Building Back Up
Now we reverse the shaping to mirror the other side.
Row 44: Ch 1, turn. Sc 2 in first st (inc made), BLO sc across to last st, sc 2 in last st. (34 sts)
Row 45: Ch 1, turn. Sc 2 in first st, BLO sc across to last st, sc 2 in last st. (36 sts)
Row 46: Ch 1, turn. Sc 2 in first st, BLO sc across to last st, sc 2 in last st. (38 sts)
Color Change to Dusty Rose
Row 47: Change to Color B (dusty rose).
Ch 1, turn. BLO sc across. (38 sts)
Rows 48 through 54: Ch 1, turn. BLO sc across. (38 sts each row)
Final Magenta Stripe
Row 55: Change to Color A (deep magenta).
Ch 1, turn. BLO sc across. (38 sts)
Rows 56 through 66: Ch 1, turn. BLO sc across. (38 sts each row)
Fasten off, leaving a long tail approximately 24 inches for seaming.
Panel Two
Repeat all instructions above to create your second identical panel.
Assembling Your Crochet Bag
Now for the satisfying part. Bringing it all together.
Step 1: Lay both panels with wrong sides facing out. Line up the edges carefully, matching stripe to stripe.
Step 2: Using the long tail from one panel and your tapestry needle, whip stitch or mattress stitch along one side edge, across the curved bottom, and up the other side edge. Leave the top open.
Step 3: Turn the bag right side out. Those seams should now be hidden inside.
Step 4: Weave in all remaining yarn tails securely. I like to weave through at least 2 inches of stitches, then double back for extra security.
Adding the Top Edge (Optional but Recommended)
For a cleaner finish along the top opening, work one round of single crochet around the entire top edge using Color A.
Join Color A at one side seam. Sc evenly around the entire opening, working approximately 66 to 70 stitches total (adjust as needed to keep edge flat). Sl st to first sc to join. Fasten off and weave in ends.
Attaching the Chain Strap
Step 1: Decide where you want your strap to attach. About 1 inch down from the top edge on each side seam works well.
Step 2: Open a jump ring and thread it through several stitches at your chosen point. Close the ring securely.
Step 3: Attach your gold chain to the jump rings on each side.
Step 4: Add your decorative charms. The butterfly charm looks lovely centered near the top of the cream stripe. The flower charm can dangle from the chain near one corner.
Tips for Crochet Bag Success
Tension matters. Keep your stitches consistent and snug throughout. This creates a fabric sturdy enough to carry your essentials.
Block before seaming. Lightly steam or wet block both panels before joining them. This evens out any wonky stitches and makes seaming much easier.
Line your bag. For extra durability, consider adding a simple fabric lining. This protects the crochet from stretching and keeps small items from poking through.
Substitute the chain. Not a gold chain person? Try a braided crochet strap in coordinating colors, leather handles, or wooden ring handles instead.
Color Variations to Try
This beginner friendly crochet pattern works beautifully in endless color combinations. Here are some ideas:
Play with what speaks to you. That is the beauty of making things yourself.
Wrapping Up Your Springtime Pink Blossom Bag
You did it. Or you are about to do it. Either way, I am genuinely excited for you.
This crochet pattern combines simple techniques with stunning results. The vertical stripes, the soft rounded bottom, and those golden finishing touches all work together to create something truly special. Whether you carry it to the farmers market, a garden party, or just out for coffee, this bag will get compliments.
Thank you so much for choosing to make this project. It means everything to me that you trust my patterns and want to create alongside me.
When you finish yours, I would absolutely love to see it. Tag me on Instagram or share in my Facebook group so I can celebrate your work. Seeing your creations genuinely makes my day.
Happy crocheting, friend. You have got this.
