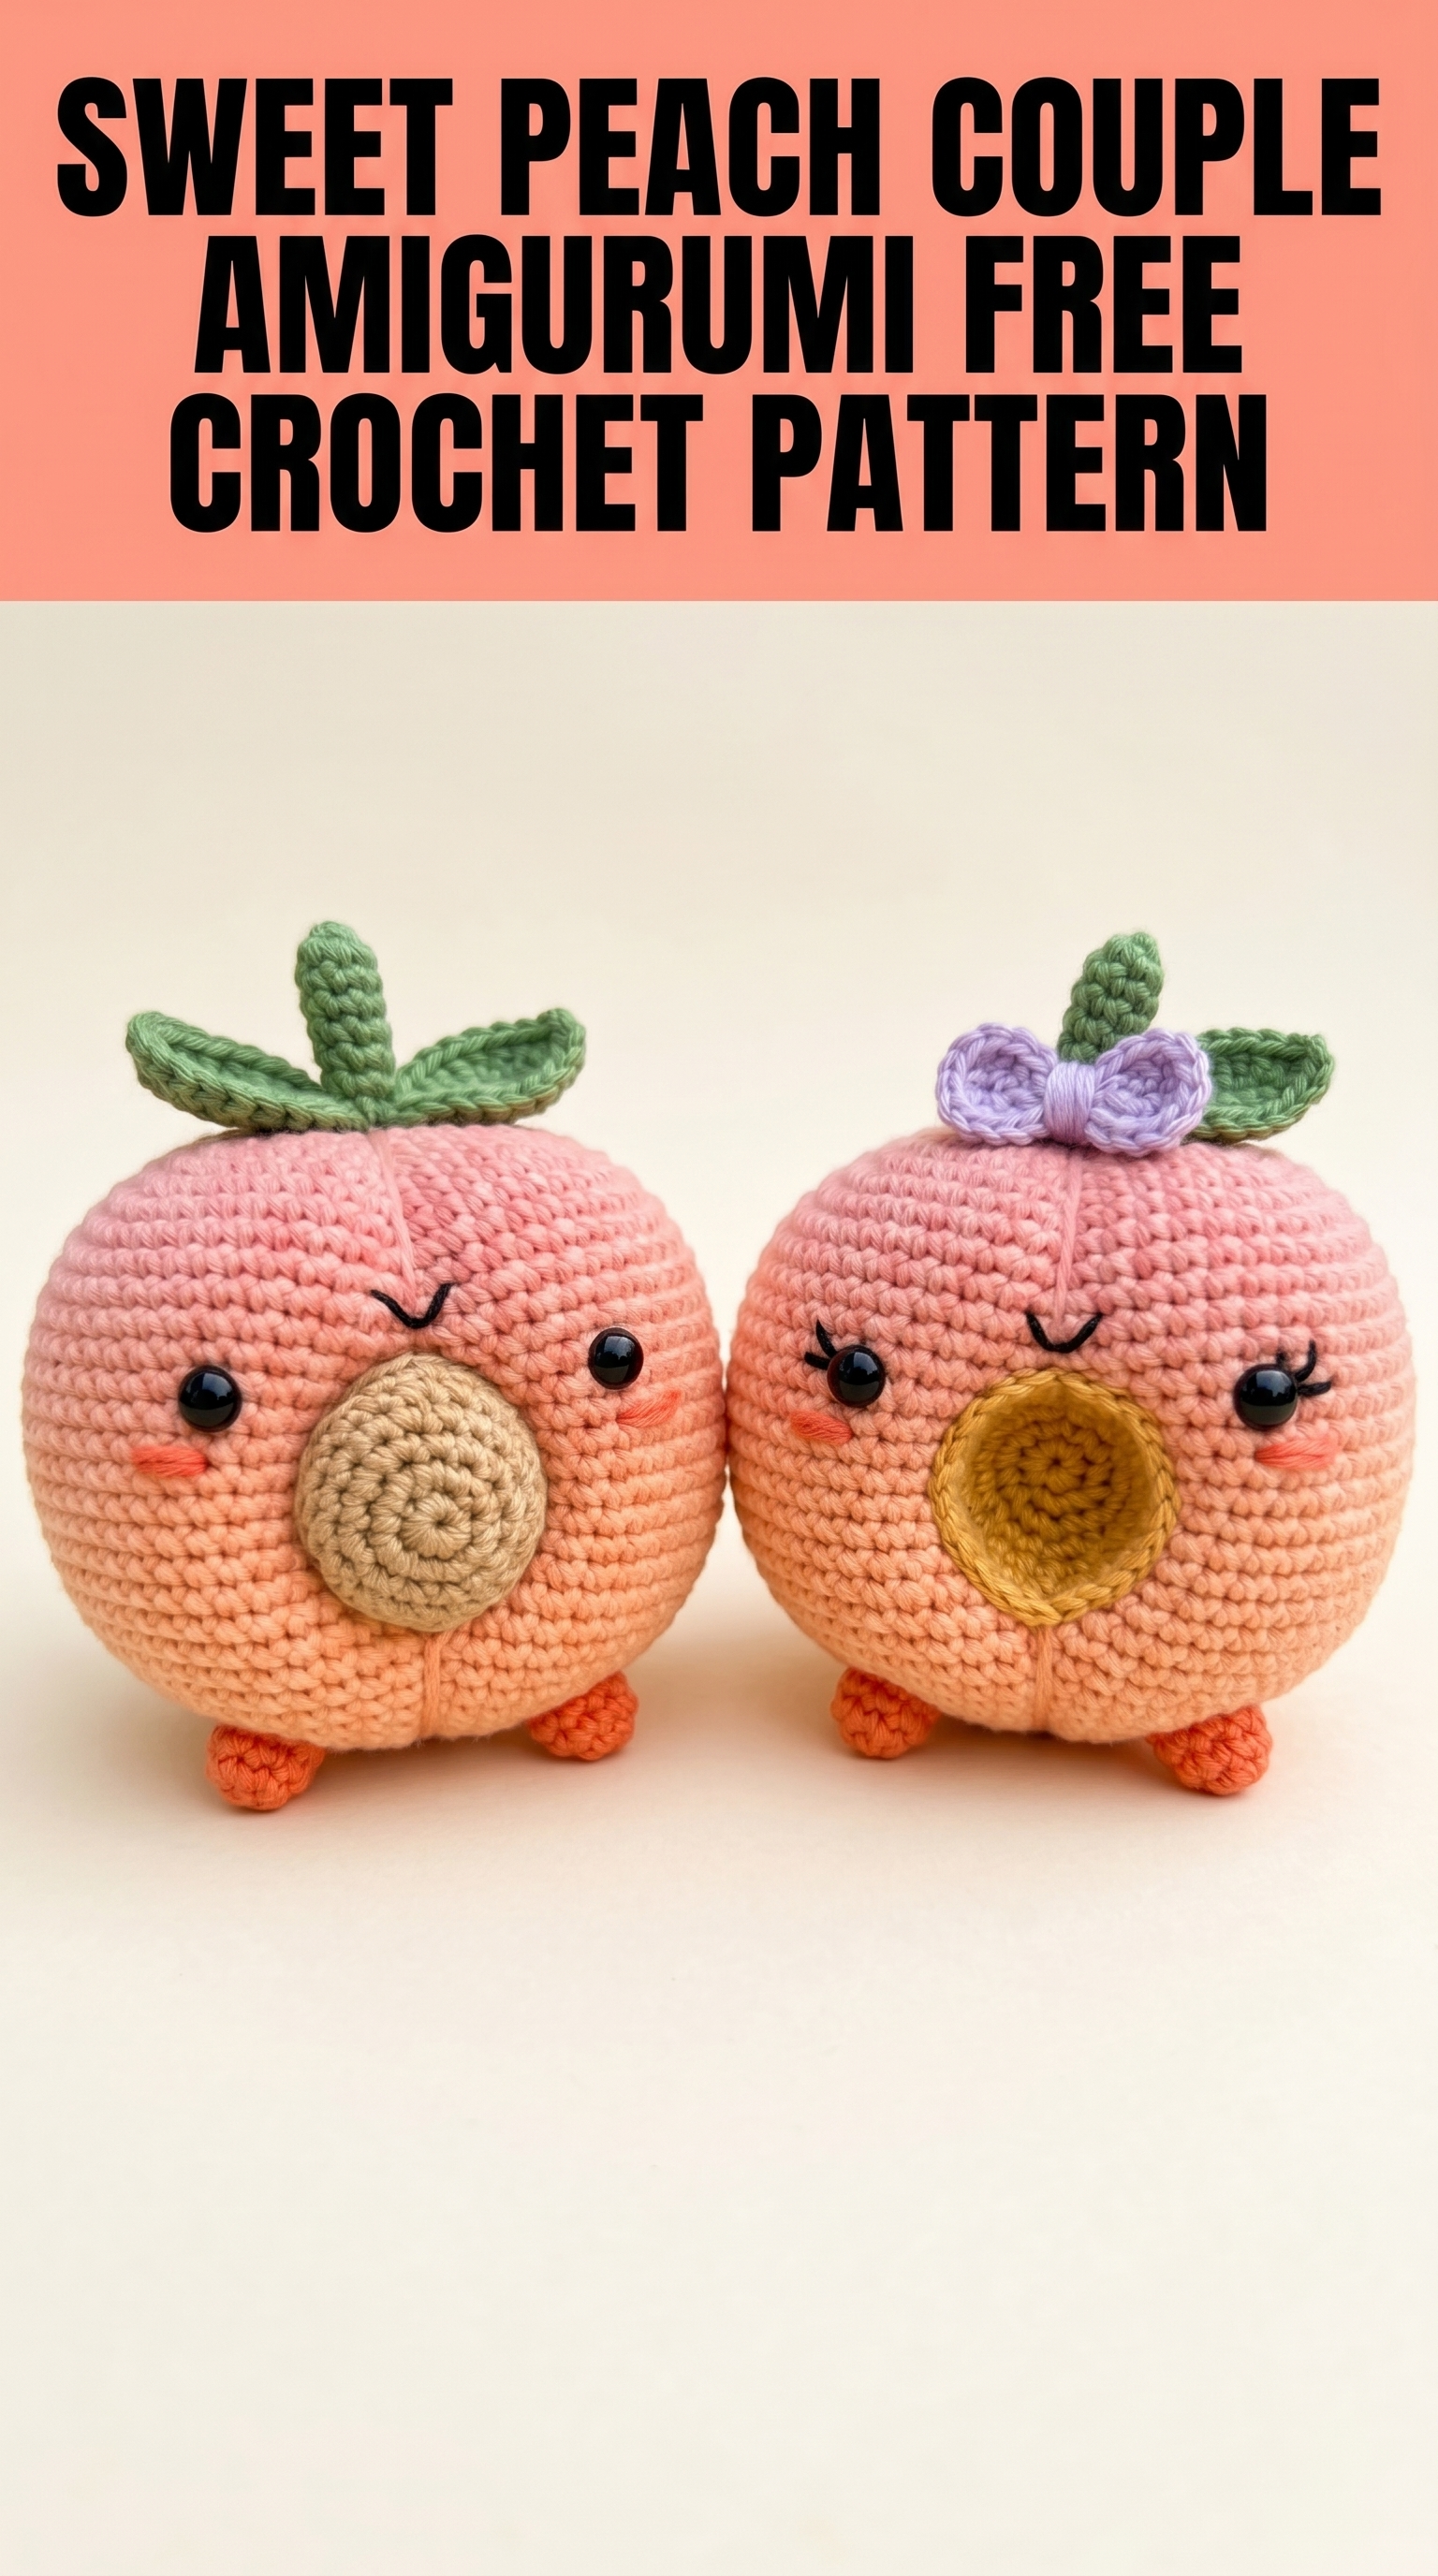
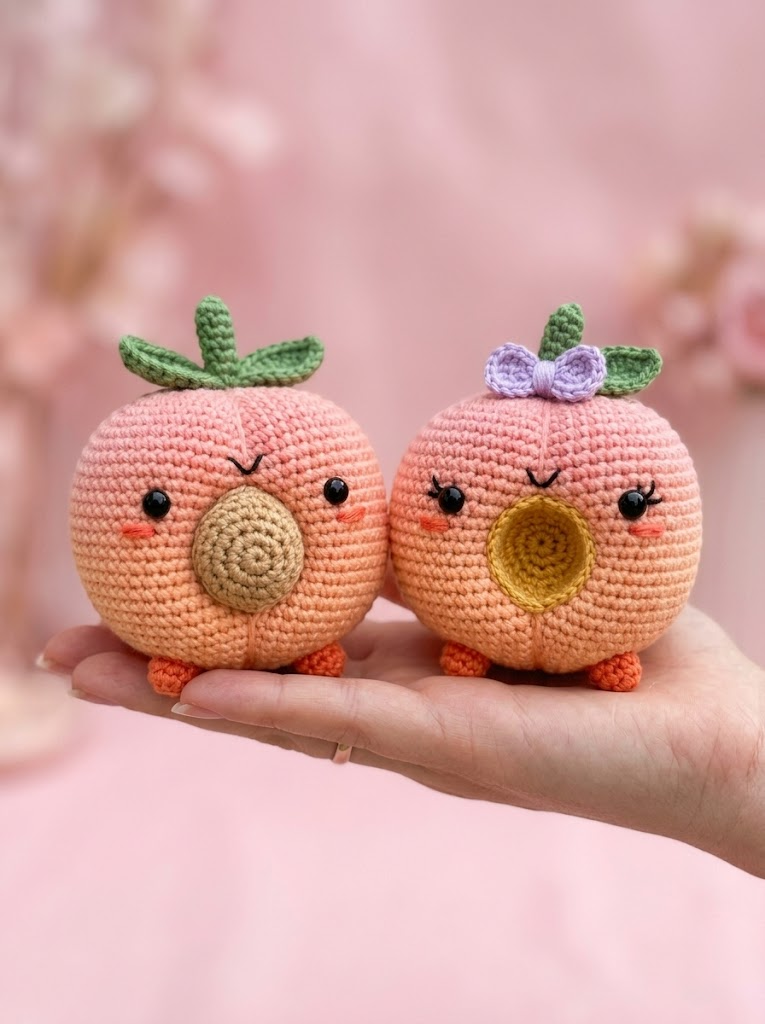
These adorable little peach friends are about to become your new favorite project. Looking at this sweet peach couple amigurumi, I just fell in love with their chubby round bodies, those tiny embroidered blush cheeks, and the way the color gradient shifts from soft pink to warm peach. One has a simple leafy stem while the other sports a dainty lavender bow. They are perfect as a pair or charming all on their own.
If you have basic amigurumi experience, you can absolutely make these cuties. The construction is straightforward. We are working in continuous rounds to create that smooth spherical body. The details like the belly button spiral, leaves, feet, and bow are all simple additions that attach at the end. I will walk you through every single step.
What Makes This Sweet Peach Couple Crochet Pattern Special
This crochet pattern creates two matching peach amigurumi that stand roughly 3 to 4 inches tall. The bodies feature a beautiful ombre effect achieved by changing yarn colors partway through. Each peach has a crocheted spiral belly button in a contrasting neutral tone, giving them that realistic fruit look with a kawaii twist.
The facial features combine small black safety eyes with hand-embroidered details. Those little curved eyebrows, rosy cheeks, and delicate eyelashes add so much personality. You can customize each peach to have its own expression.
What I love most is how these work up as a couple. The slight differences between them, like the bow accessory and the belly button color variation, make them feel like they belong together. They would make a thoughtful handmade gift for a wedding, anniversary, or just to celebrate a special friendship.
Materials You Will Need
Before we dive into this step by step crochet tutorial, gather these supplies.
Yarn
You will need worsted weight yarn (also called medium weight or category 4 yarn) in the following colors:
I recommend a cotton or cotton blend yarn for crisp stitch definition. Acrylic works fine too and is more budget friendly. Just make sure your yarn has a smooth texture so those stitches pop.
Hook
Use a 2.5mm crochet hook for tight amigurumi fabric. This is smaller than what the yarn label suggests, and that is intentional. We want a dense fabric so the stuffing does not show through.
Notions
Abbreviations and Stitch Definitions
Let me explain every stitch term before we begin. If you are newer to crochet patterns, bookmark this section.
Magic ring (MR): An adjustable loop that lets you start working in the round with a closed center. You pull the tail tight after the first round so there is no hole.
Chain (ch): The foundation stitch. Yarn over, pull through the loop on your hook. Creates a linked chain.
Single crochet (sc): Insert hook into stitch, yarn over, pull up a loop (2 loops on hook), yarn over, pull through both loops. This is your bread and butter stitch for amigurumi.
Increase (inc): Work 2 single crochet stitches into the same stitch. This adds one stitch to your count.
Invisible decrease (dec): Insert hook under the front loops only of the next 2 stitches, yarn over, pull through both front loops, yarn over, pull through both loops on hook. This creates a neater decrease than the traditional method.
Slip stitch (sl st): Insert hook, yarn over, pull through the stitch and the loop on your hook in one motion. Used for joining or creating a flat finish.
Fasten off (FO): Cut yarn, pull tail through final loop, and pull tight to secure.
How to Crochet the Peach Body
This is the main piece. We work from the top down in continuous spirals, which means you do not join at the end of each round. Use your stitch marker to track the beginning of each round.
Rounds 1 through 10: Light Pink Section
Round 1: Make a magic ring. Work 6 sc into the ring. Pull tail to close. (6 sts)
Round 2: Inc in each st around. (12 sts)
Round 3: *Sc 1, inc* repeat around. (18 sts)
Round 4: *Sc 2, inc* repeat around. (24 sts)
Round 5: *Sc 3, inc* repeat around. (30 sts)
Round 6: *Sc 4, inc* repeat around. (36 sts)
Round 7: *Sc 5, inc* repeat around. (42 sts)
Rounds 8 through 10: Sc in each st around. (42 sts each round)
At the end of Round 10, change to your peach colored yarn. To change colors neatly, complete the last stitch of Round 10 but stop before the final yarn over. Drop your pink yarn and complete the stitch with peach. This keeps the color change smooth.
Rounds 11 through 18: Peach Section
Rounds 11 through 15: Sc in each st around. (42 sts each round)
Round 16: *Sc 5, dec* repeat around. (36 sts)
Round 17: *Sc 4, dec* repeat around. (30 sts)
Round 18: *Sc 3, dec* repeat around. (24 sts)
Pause here. Insert your safety eyes between Rounds 8 and 9, spacing them about 8 stitches apart. The exact placement depends on your preference, so use pins first to test positions. Once you are happy, push the posts through and secure with the washers on the inside.
Stuff the body firmly with fiberfill. You want it nice and plump like a real peach.
Rounds 19 through 21: Closing
Round 19: *Sc 2, dec* repeat around. (18 sts)
Round 20: *Sc 1, dec* repeat around. (12 sts)
Add more stuffing if needed. Really pack it in.
Round 21: Dec around. (6 sts)
Fasten off, leaving a long tail. Thread through your yarn needle and weave through the front loops of the remaining 6 stitches. Pull tight to close. Weave in the end.
Belly Button Spiral
This little detail adds so much character. You will make a flat spiral that attaches to the front of the peach.
Round 1: Magic ring, 6 sc into ring. (6 sts)
Round 2: Inc in each st around. (12 sts)
Round 3: *Sc 1, inc* repeat around. (18 sts)
Sl st to next stitch. Fasten off, leaving a long tail for sewing.
The spiral creates visible ridges naturally from working in rounds. Pin the belly button to the center front of the peach body, positioning it below the eyes between Rounds 13 and 17. Whip stitch around the edge to secure.
Leaves (Make 2 Per Peach)
These little leaves sit at the top of each peach. They are worked flat.
Row 1: Ch 7. Starting in the 2nd ch from hook: sl st, sc, hdc, dc, hdc, sc. (6 sts)
Do not turn. Continue around the chain. Working into the bottom of the same chain: sc, hdc, dc, hdc, sc, sl st. (6 sts on this side)
Fasten off, leaving a tail for sewing.
This creates an oval leaf shape with pointed ends. Make 2 leaves per peach for a fuller look. Sew them to the top of the head, angling them outward.
Small Feet (Make 2 Per Peach)
These tiny orange feet are quick to work.
Round 1: Magic ring, 5 sc into ring. (5 sts)
Round 2: Inc in each st around. (10 sts)
Rounds 3 and 4: Sc in each st around. (10 sts each round)
Sl st to finish. Fasten off with a long tail. Stuff lightly if desired, though they are small enough to leave unstuffed. Flatten the opening and sew to the bottom front of the peach body so your amigurumi can sit upright.
Bow Accessory (Optional)
For the feminine peach, add this sweet lavender bow.
Bow Center:
Ch 4. Sl st to first ch to form a ring. Ch 1, work 8 sc into the ring. Sl st to join. Fasten off with a long tail.
Bow Loops:
Ch 10. Sl st to first ch to form a loop. Ch 10 again. Sl st to the base where you started. Fasten off.
Wrap the center piece around the middle of the bow loops and sew in place. Attach the finished bow to one side of the leaves at the top of the head.
Embroidered Face Details
This is where your peaches really come alive.
Cheeks: Thread pink embroidery floss onto your yarn needle. Using a satin stitch or small straight stitches, create oval rosy cheeks below and slightly outside each eye.
Eyebrows: With black floss, embroider small curved lines above each eye. For the masculine peach, make them simple and straight. For the feminine peach, give them a slight arch.
Eyelashes: Add 2 or 3 small straight stitches fanning out from the outer corner of each eye on the feminine peach. This tiny detail makes a big difference.
Take your time with the embroidery. Use pins to plan placement first. You can always remove stitches and try again.
Assembly Tips
Lay out all your pieces before sewing. Pin everything in position and look at your peach from different angles. Check that the eyes are level, the belly button is centered, and the feet are symmetrical.
I like to sew using a whip stitch and matching yarn colors. Work slowly and keep your stitches small. Hide your yarn tails inside the body by threading them through your needle and passing them through the stuffing.
Skill Level and Beginner Tips
I would call this crochet pattern beginner friendly with some experience needed. If you have made a basic amigurumi ball before, you are ready.
The trickiest parts are placing safety eyes evenly and embroidering the face. My advice? Do not stress about perfection. Handmade charm comes from small variations. Your peaches will have their own personalities.
If continuous rounds confuse you, just remember to always move your stitch marker up at the start of each new round. Count your stitches after every round at first. It becomes second nature quickly.
Wrapping Up This Sweet Peach Couple Crochet Pattern
You did it. You now have everything you need to crochet this adorable sweet peach couple amigurumi from start to finish. From the ombre body to those tiny embroidered faces, every detail is covered in this step by step tutorial.
I really hope you enjoy making these as much as I enjoyed designing them. They work up surprisingly fast once you get going, and they make the sweetest gifts. Imagine them as wedding cake toppers, nursery decor, or just sitting on your desk keeping you company.
Thank you so much for choosing this pattern. Truly. It means a lot that you are here.
When your peaches are finished, I would absolutely love to see them. Tag me on Instagram or share your photo in my Facebook group. Seeing your creations is the best part of my day.
Happy crocheting, friend. You have got this.
