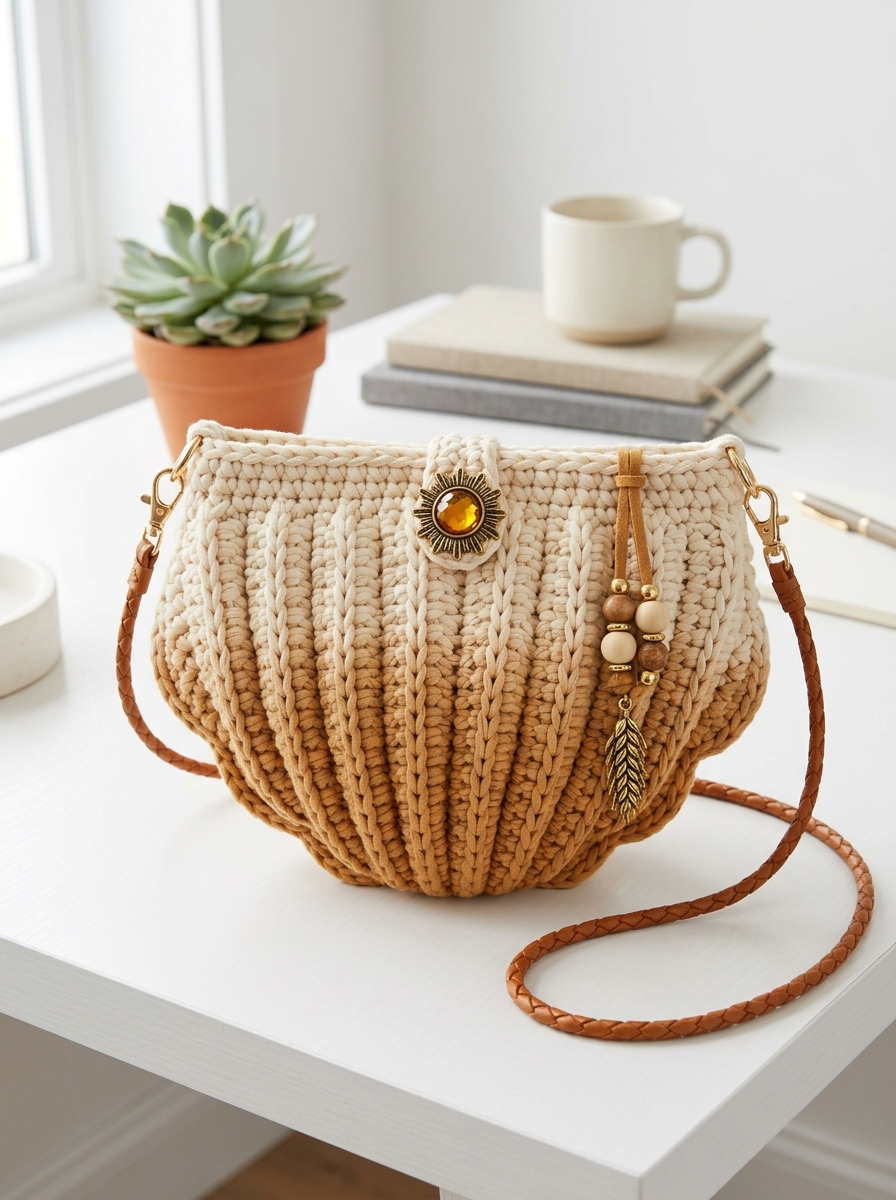
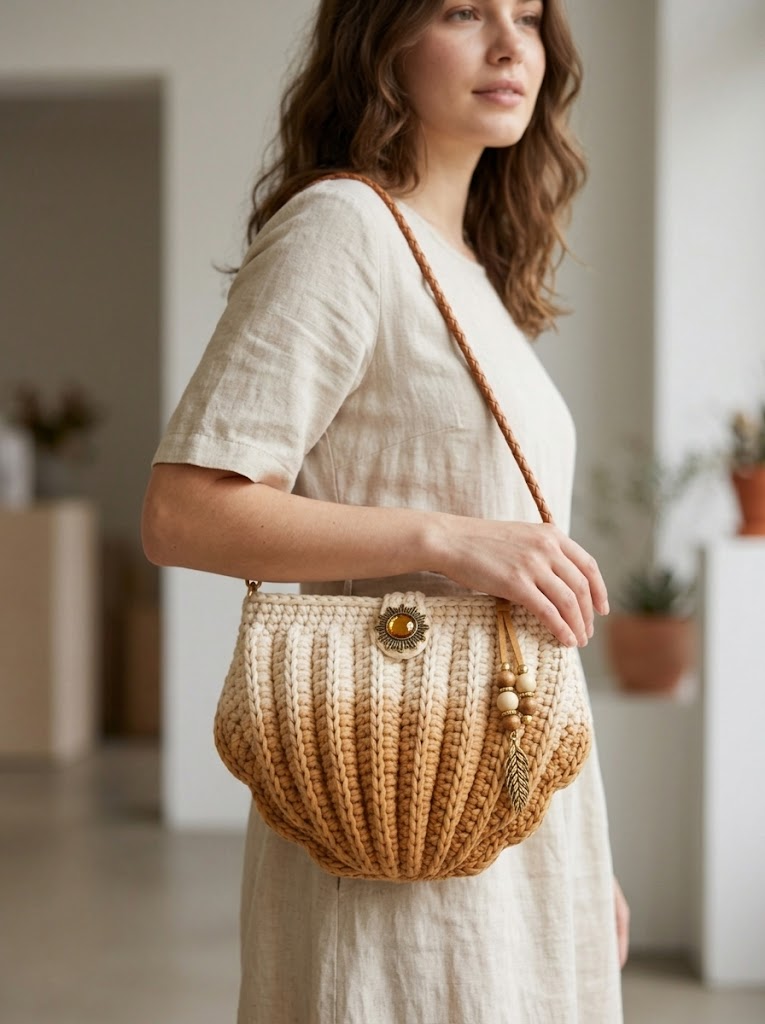
I absolutely fell in love with this bag the moment I finished it. There is something so satisfying about a crochet project that looks high end but comes together with basic stitches you already know. This Cream and Caramel Neutral Shell Bag has that beautiful scalloped shell shape, gorgeous ribbed texture, and an ombre color gradient that makes it look like you spent way more time on it than you actually did.
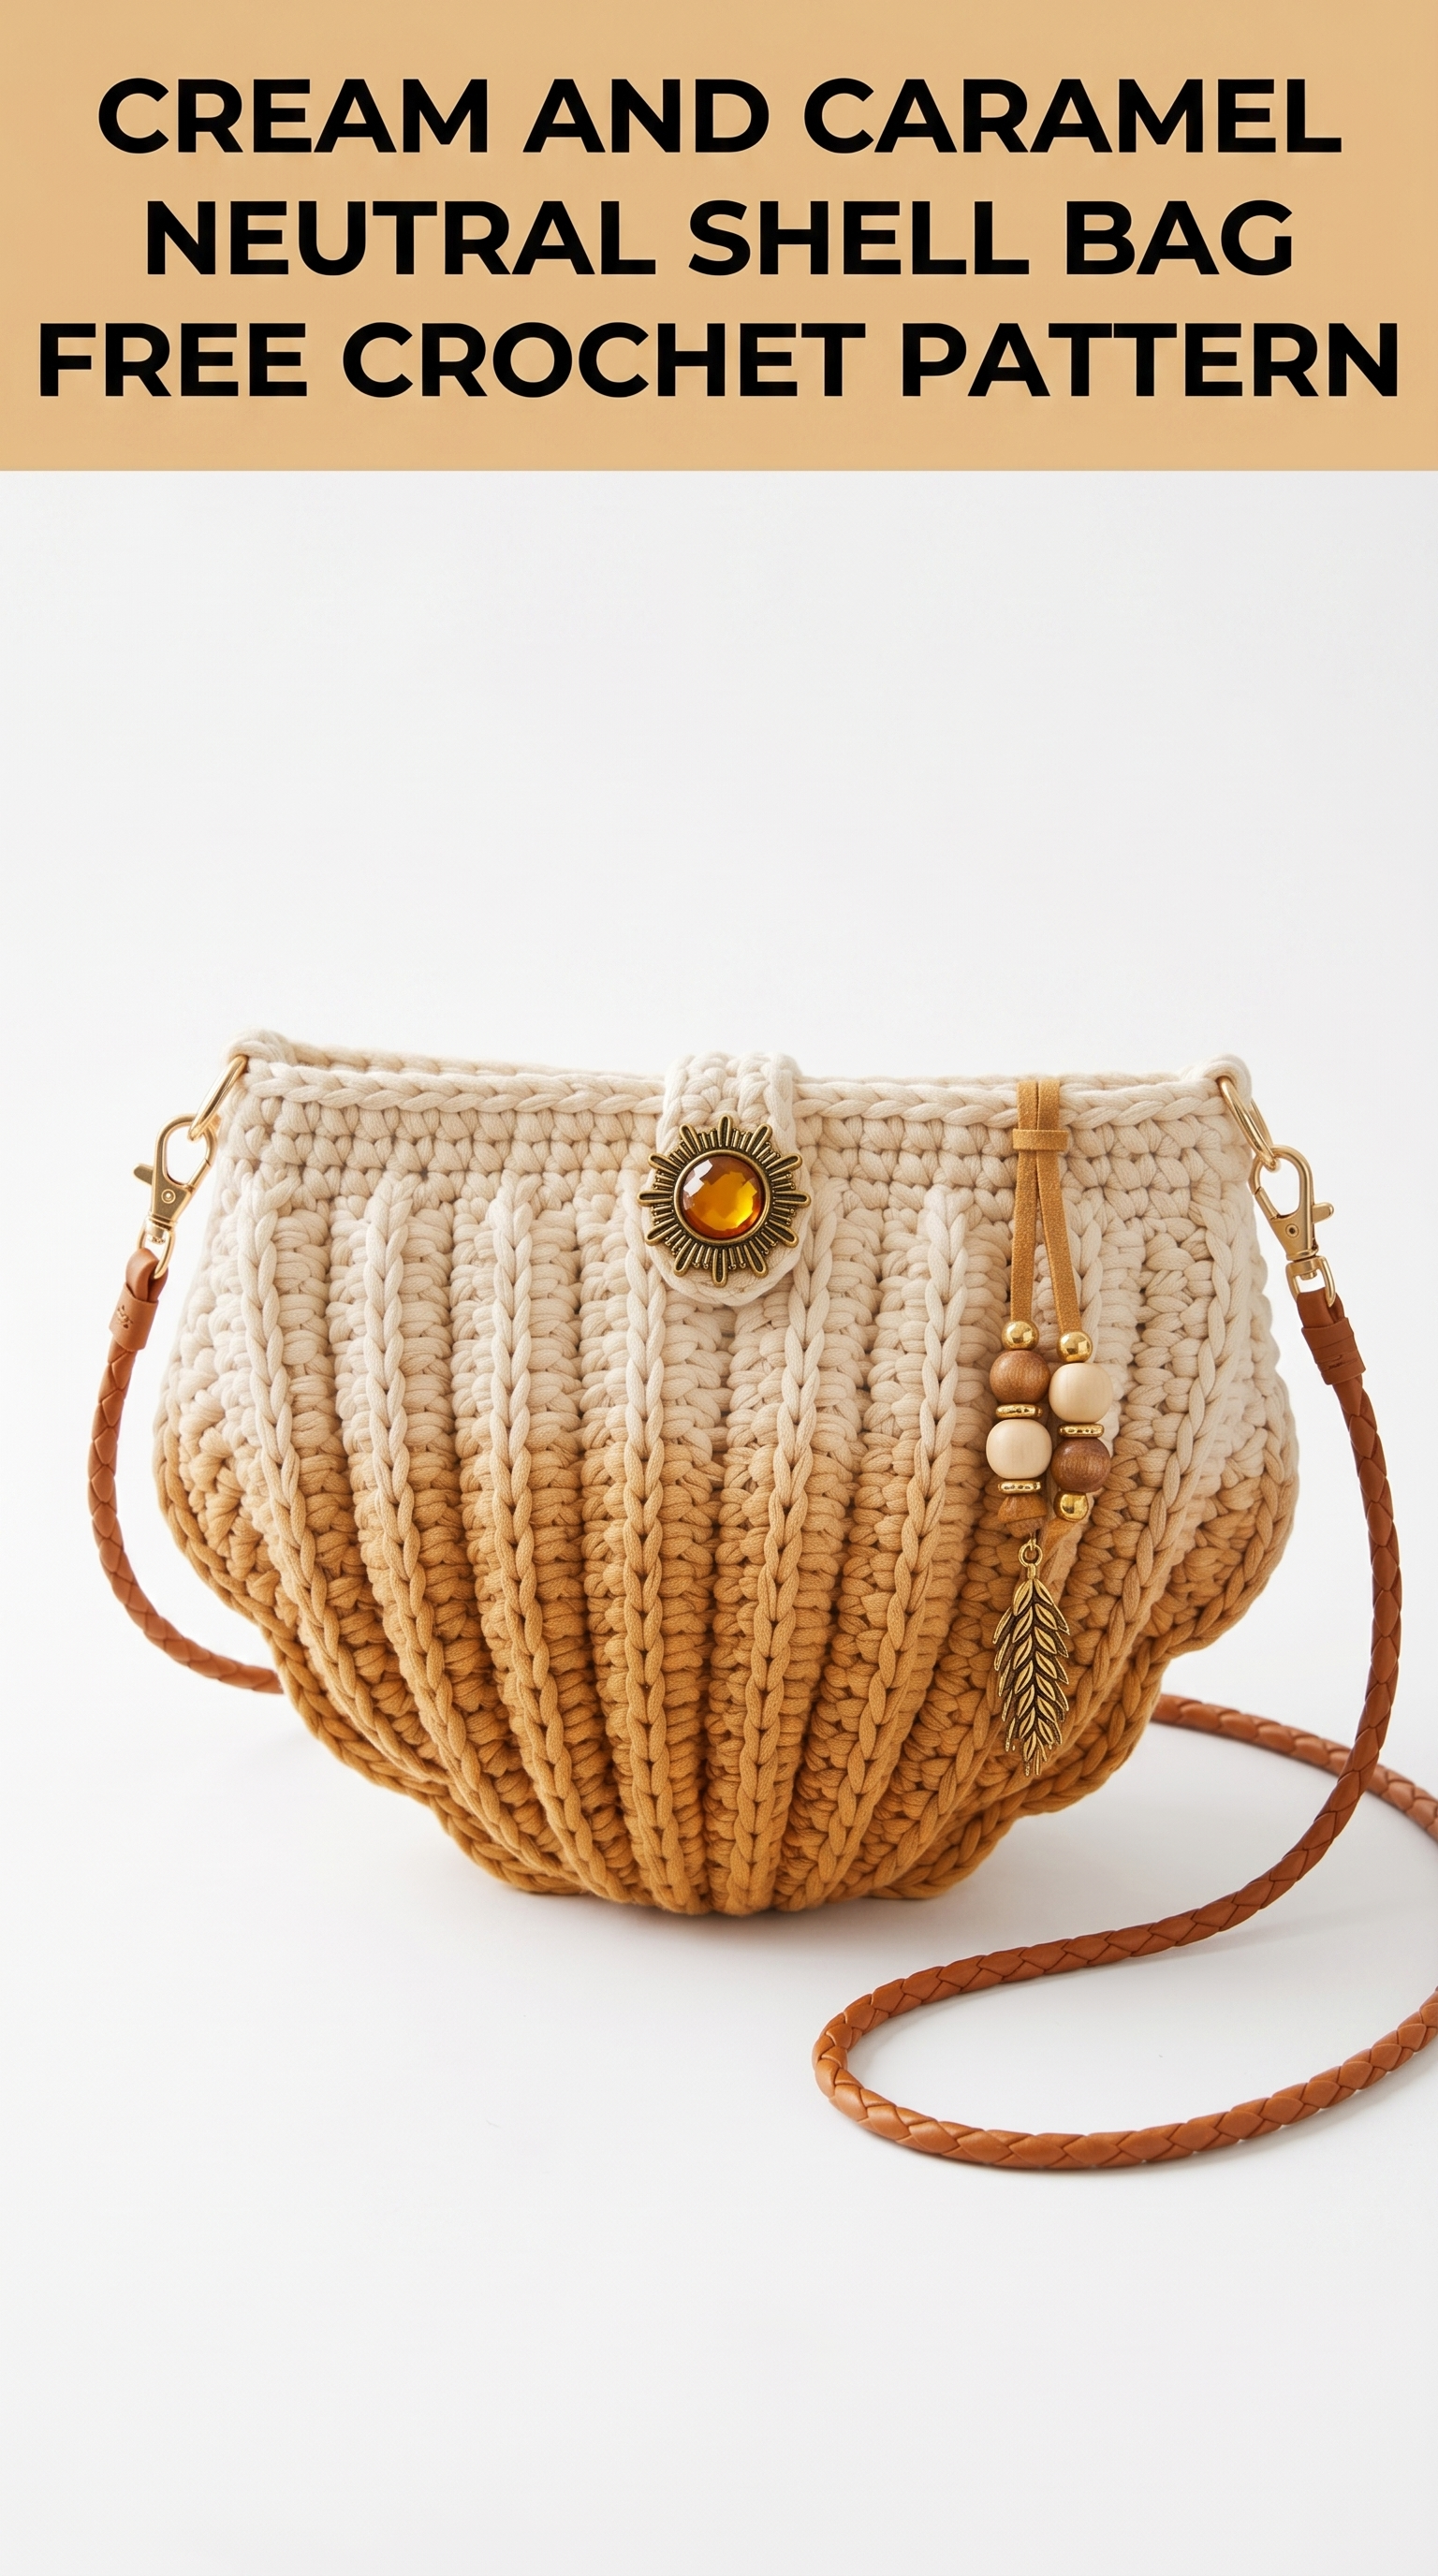
If you can work single crochet and know how to crochet in the round, you can make this bag. I promise. The vertical ribbing effect comes from a simple technique I will walk you through step by step. By the end of this crochet tutorial, you will have a stunning crossbody bag perfect for farmers markets, beach days, or everyday errands.
Let me show you exactly how to crochet this beauty from start to finish.
Why This Crochet Pattern Works So Well
The magic of this shell bag crochet pattern is in the construction. You work the body in continuous rounds from the bottom up. The ribbed texture comes from working into the back loop only (BLO), which creates those vertical ridges running from bottom to top.
The color gradient happens naturally as you switch yarns. No complicated colorwork. No carrying multiple strands. Just simple color changes at specific rounds.
The rounded shell shape forms through strategic increases at the bottom and a gentle tapering as you work upward. It sounds fancy but the stitch counts guide you through every round.
Skill Level
Confident Beginner to Intermediate
You should be comfortable with:
If any of those feel shaky, no worries. I explain everything below.
Finished Dimensions
Materials Needed for Your Shell Bag Crochet Pattern
Yarn
This bag uses a bulky weight cotton or cotton blend yarn. The thick, slightly stiff quality of cotton gives the bag structure so it holds its shape without a liner. You could add a fabric liner if you prefer, but the dense stitch work keeps small items secure.
Yarn Requirements:
Suggested Yarns:
The sample appears to use a tape style yarn with a slight sheen. This gives that polished, professional look. Regular bulky cotton works beautifully too.
Hook
Adjust hook size to achieve gauge. A larger hook creates a softer, more flexible fabric. A smaller hook creates a stiffer, more structured bag.
Notions
The hardware and strap elevate this from craft project to boutique quality bag. You can find purse hardware at craft stores or online. Search for “swivel clasp for purse strap” or “lobster clasp bag hardware.”
Gauge
10 stitches and 12 rows = 4 inches in single crochet BLO worked in rounds
Take time to check gauge. Bag projects need accurate sizing so your hardware fits properly.
Abbreviations and Stitch Definitions
Let me break down every stitch and term before we begin. No confusion allowed.
ch = chain. Wrap yarn over hook, pull through loop on hook. This creates foundation stitches.
sl st = slip stitch. Insert hook, yarn over, pull through stitch AND loop on hook in one motion. Used for joining or moving across stitches invisibly.
sc = single crochet. Insert hook into stitch, yarn over, pull up a loop (2 loops on hook), yarn over, pull through both loops. One of the most basic stitches.
sc BLO = single crochet in back loop only. Instead of inserting your hook under both top loops of the stitch below, insert only under the back loop (the one farthest from you). This creates ribbed texture.
inc = increase. Work 2 single crochet stitches into the same stitch. This adds one stitch to your count.
2sc in next st = same as increase. Two single crochets in one stitch.
st(s) = stitch(es)
rnd = round
Special Techniques
Working in Back Loop Only (BLO)
This is the key to the vertical ribbing on this bag. When you look at a stitch from above, you see two loops forming a V shape. The back loop is the one away from you. The front loop is closest to you.
By working into only the back loop, the front loop remains visible and creates a horizontal ridge. When worked in rounds, these ridges stack vertically and form the beautiful textured lines you see in the photos.
Pro tip: If your ribbing looks horizontal instead of vertical, you might be working in rows instead of rounds, or working in the front loop. Double check your technique.
Continuous Rounds vs Joined Rounds
This bag is worked in continuous spiral rounds. You do not slip stitch to join at the end of each round. You simply keep crocheting round and round. Use a stitch marker to track where each round begins.
Move your marker up as you complete each round. This prevents losing count and creating accidental increases or decreases.
The Pattern: Step by Step Instructions
Bottom of Bag (Oval Base)
You will create an elongated oval shape that forms the bag bottom.
Using Color A (Caramel):
Foundation: Ch 16
Rnd 1: Starting in 2nd ch from hook, work 2 sc in first ch, sc in next 13 ch, 3 sc in last ch. Now working along opposite side of foundation chain, sc in next 13 ch, 1 sc in same ch as first 2 sc. Place marker. (32 sts)
Rnd 2: 2 sc in next 2 sts, sc in next 13 sts, 2 sc in next 3 sts, sc in next 13 sts, 2 sc in next st. (38 sts)
Rnd 3: [Sc in next st, 2 sc in next st] 2 times, sc in next 13 sts, [sc in next st, 2 sc in next st] 3 times, sc in next 13 sts, sc in next st, 2 sc in next st. (44 sts)
Rnd 4: [Sc in next 2 sts, 2 sc in next st] 2 times, sc in next 13 sts, [sc in next 2 sts, 2 sc in next st] 3 times, sc in next 13 sts, sc in next 2 sts, 2 sc in next st. (50 sts)
Rnd 5: [Sc in next 3 sts, 2 sc in next st] 2 times, sc in next 13 sts, [sc in next 3 sts, 2 sc in next st] 3 times, sc in next 13 sts, sc in next 3 sts, 2 sc in next st. (56 sts)
You now have a flat oval. Set your work on the table. It should lie flat without curling.
Body of Bag (Sides)
Now you will work upward to form the bag sides. This is where the BLO magic happens.
Rnd 6: Working in BLO only from this point forward, sc BLO in each st around. (56 sts)
This round creates the ridge that transitions from bottom to sides.
Rnds 7 through 18: Sc BLO in each st around. (56 sts each round)
Continue with Color A through Round 18. This creates approximately 4 inches of caramel colored body.
Color Change to Gradient:
Rnd 19: Switch to Color B (Cream). Sc BLO in each st around. (56 sts)
To change colors cleanly: On the last stitch of Round 18, insert hook, yarn over with Color A, pull up loop. Drop Color A. Yarn over with Color B, pull through both loops. Continue with Color B.
Rnds 20 through 26: Sc BLO in each st around with Color B. (56 sts each round)
Your bag body is now complete. The color gradient transitions smoothly from caramel at the bottom to cream at the top.
Top Edging
Rnd 27: Switch to working through BOTH loops. Sc in each st around. (56 sts)
Rnd 28: Sc in each st around. Sl st to next st to join. Fasten off. (56 sts)
This creates a clean, stable edge at the bag opening.
Closure Tab (Make 1)
This small tab holds the decorative button and helps secure the bag opening.
Using Color B (Cream):
Row 1: Ch 6, sc in 2nd ch from hook and in each ch across. (5 sts)
Rows 2 through 8: Ch 1, turn, sc in each st across. (5 sts)
Row 9: Ch 1, turn, sc2tog, sc in next st, sc2tog. (3 sts)
Row 10: Ch 1, turn, sc3tog. (1 st)
Fasten off leaving a long tail for sewing.
Fold tab in half lengthwise. The pointed end faces outward. Sew the straight end to the center back of the bag opening, on the inside. The tab should flip forward over the front.
Attach your decorative button or brooch to the pointed end of the tab.
Hardware Loops (Make 2)
These small loops attach your strap hardware to the bag.
Using Color B (Cream):
Ch 12. Sl st to first ch to form a loop. Fasten off leaving a long tail.
Fold the loop so it wraps around the straight bar of your swivel clasp. Sew both ends of the loop securely to the inside of the bag, approximately 1 inch down from the top edge. Position one loop on each side of the bag where the curved sides meet the straight front and back.
Finishing Your Shell Bag
Weaving Ends
Weave all yarn tails to the inside of the bag using your yarn needle. Weave through at least 2 inches of stitches before trimming.
Attaching Strap
Clip your crossbody strap to both swivel clasps. Adjust strap length to your preference. The sample uses a braided leather strap in cognac brown, which complements the caramel yarn beautifully.
Optional Embellishments
The sample features a beaded tassel charm attached to one hardware loop. You can create this with wooden beads, metal beads, and a feather charm threaded onto a leather cord. This is completely optional but adds lovely bohemian flair.
Troubleshooting Tips
My ribbing looks wrong. Make sure you are working in the back loop only, not the front loop. Also confirm you are working continuous rounds, not joining each round.
My bag is too floppy. Try using a smaller hook or choose a stiffer yarn. Cotton tape yarn or T-shirt yarn provides excellent structure.
My color change looks messy. Change colors on the last yarn over of the previous stitch. This hides the color transition inside the stitch.
My bottom is curling up. Your tension may be too tight. Try relaxing your grip or going up a hook size for the base rounds.
Pattern Customization Ideas
Want to make this shell bag your own? Here are some ideas:
You Did It
I am so proud of you for tackling this project. This cream and caramel neutral shell bag crochet pattern creates something truly special. Every time you grab it heading out the door, you will remember you made that.
Thank you for spending your crafting time with me today. Seriously, I appreciate you trusting me with your yarn and your hours.
When you finish your bag, I would absolutely love to see it. Tag me on Instagram or share in my Facebook group. Seeing your versions makes my whole week.
Now go show off that gorgeous handmade bag. You earned it.
Happy hooking, friend.
