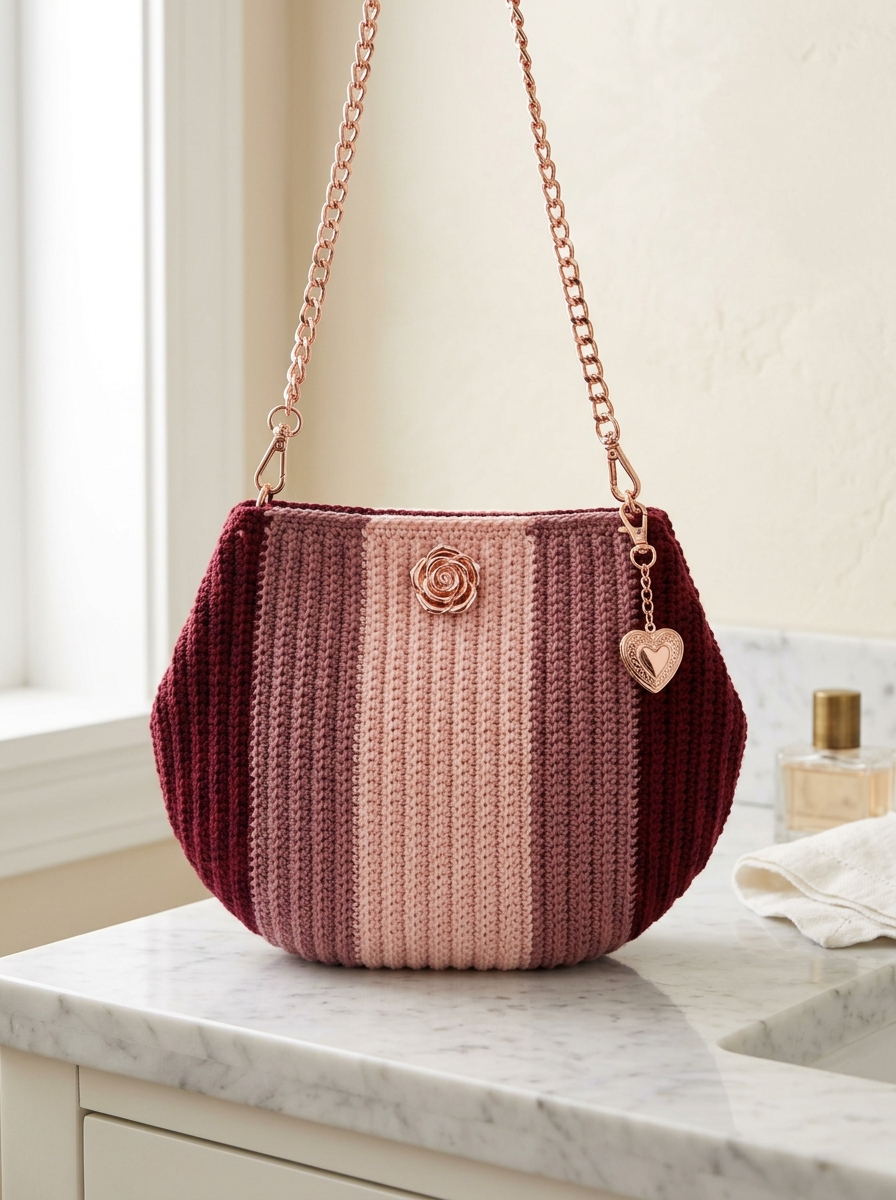
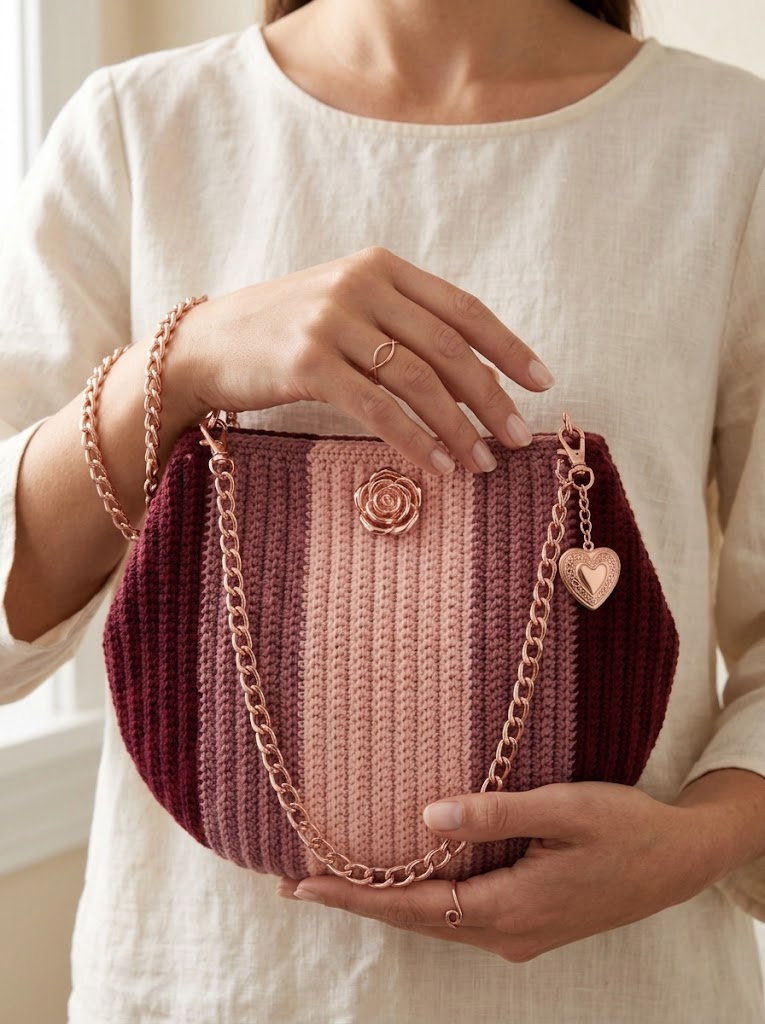
This gorgeous crochet purse is exactly the kind of project that makes you feel like a true artisan. The Classic Burgundy Wine Elegant Purse combines rich ombre stripes with a sophisticated rounded shape that looks far more complicated than it actually is. If you can work a single crochet stitch and change colors, you can absolutely make this bag.
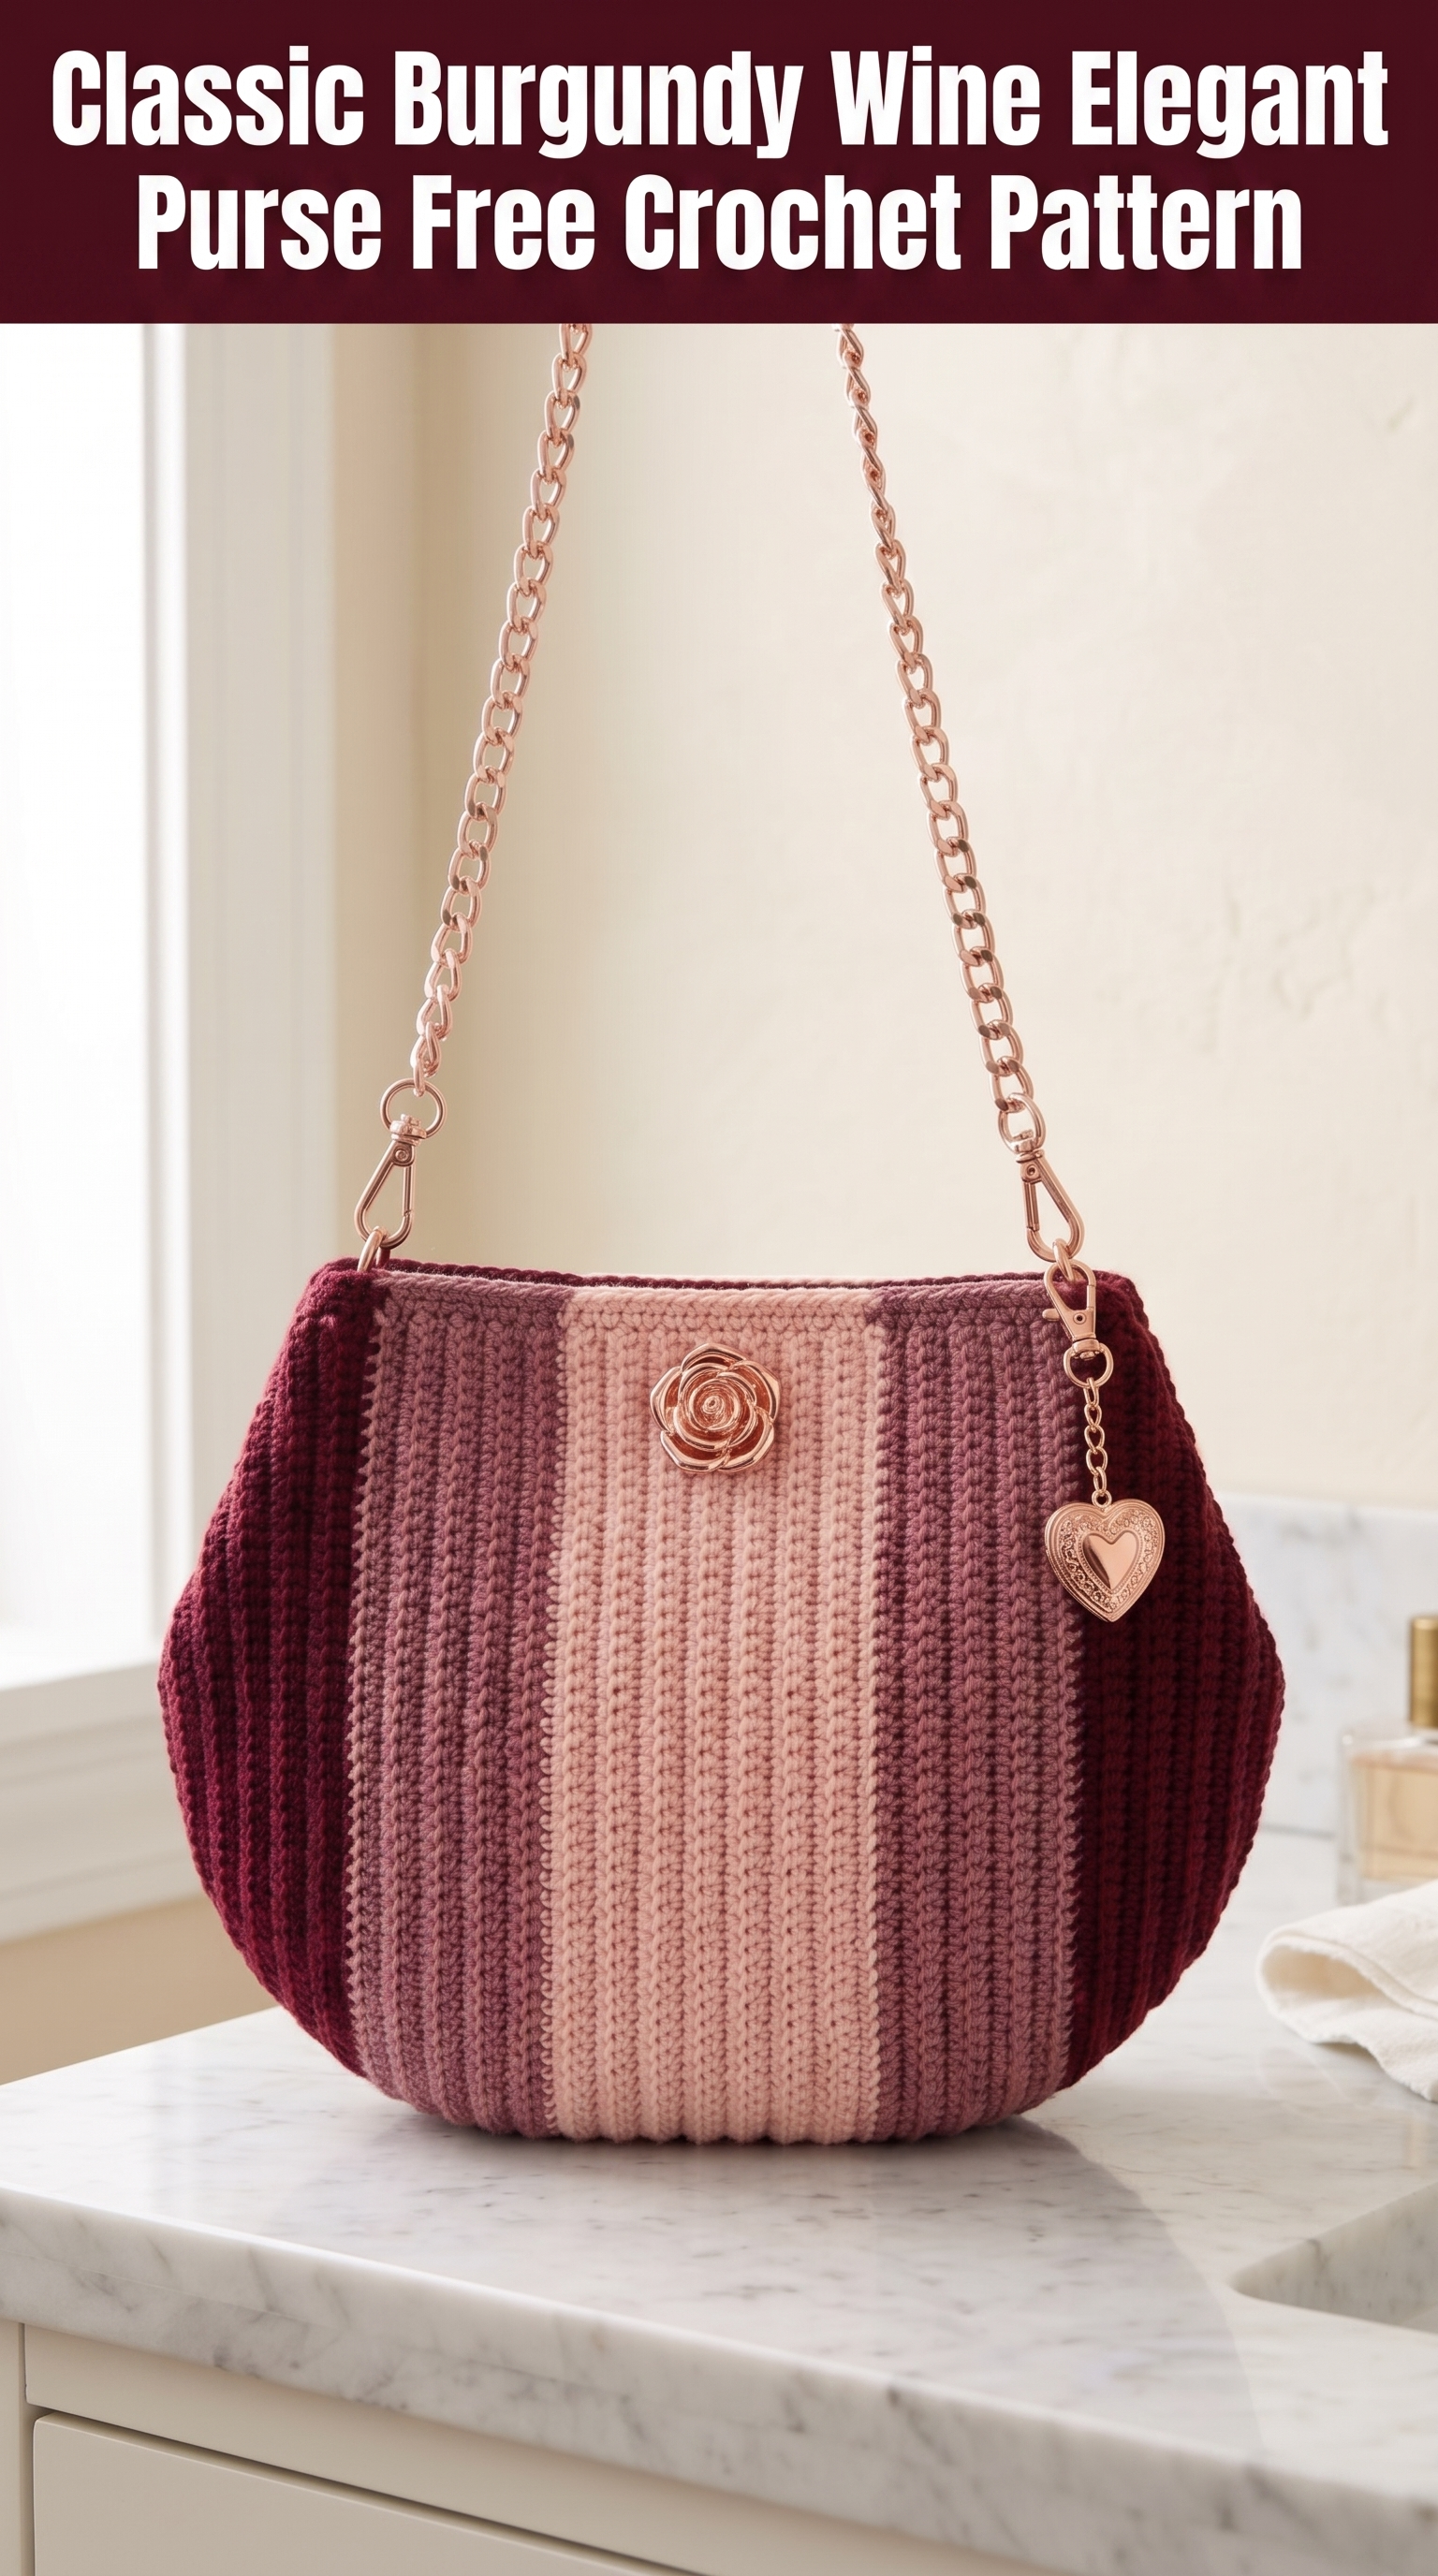
I designed this crochet pattern with intermediate beginners in mind. The construction uses simple stitches worked in rows, then seamed together to create that beautiful curved silhouette. The vertical ribbing gives it texture and structure without any tricky stitch work. And those rose gold hardware accents? They take this purse from handmade to high end.
Let me walk you through everything you need to recreate this elegant crochet purse from scratch.
Why This Crochet Purse Pattern Works So Well
The secret to this bag’s polished look is the vertical stripe construction. Instead of working in rounds like most bags, you crochet flat panels with color changes that create those stunning gradient stripes. The result is a purse with natural structure and visual interest.
The ombre color scheme moves from deep burgundy on the edges through dusty rose tones to a soft blush pink at the center. This creates a focal point right where the decorative rose hardware sits. Very intentional, very chic.
Because you work the body in rows of single crochet through the back loop, the fabric has a ribbed texture that mimics knitting. This technique also makes the material denser and sturdier, which is exactly what you want in a bag that needs to hold its shape.
Materials You Will Need
Yarn:
I recommend using worsted weight yarn (weight category 4) in a cotton or cotton blend. Cotton gives the bag structure and prevents stretching. Acrylic works too but may soften over time. Look for yarn with good stitch definition so your ribbing really pops.
Suggested yarns: Lion Brand 24/7 Cotton, Paintbox Yarns Cotton DK, or Drops Muskat.
Hook:
Notions:
Finished Dimensions
Gauge
18 stitches and 20 rows = 4 inches in single crochet through back loop only.
Check your gauge before starting. If your swatch is too small, go up a hook size. Too big? Go down. Gauge matters here because the bag needs enough density to hold items without sagging.
Abbreviations and Stitch Definitions
ch = chain: Yarn over, pull through loop on hook. Creates foundation or turning chains.
sc = single crochet: Insert hook, yarn over, pull up loop (2 loops on hook), yarn over, pull through both loops. This is your main stitch.
sc-blo = single crochet through back loop only: Work a regular single crochet but insert your hook under only the back loop of the stitch below, not both loops. This creates the ribbed texture.
sl st = slip stitch: Insert hook, yarn over, pull through stitch and loop on hook in one motion. Used for joining.
dec = decrease: Work two stitches together as one. For single crochet decrease, insert hook in first stitch, pull up loop, insert hook in next stitch, pull up loop (3 loops on hook), yarn over, pull through all 3 loops.
st(s) = stitch(es)
RS = right side (the side facing out when worn)
WS = wrong side
Skill Level
Intermediate Beginner. You should be comfortable with single crochet and basic color changes. The shaping involves simple decreases at predictable intervals. If you have made a scarf or dishcloth, you can handle this purse.
Step by Step Crochet Pattern Instructions
This purse is made of two identical panels that are seamed together. You will work each panel flat in rows, changing colors to create the striped effect.
Panel Construction (Make 2)
Color Sequence:
Work the color changes as follows to create the symmetrical ombre effect:
This creates the gradient stripe from dark to light and back to dark.
Body of Panel
Foundation Row:
With Color A, ch 35.
Row 1 (RS): Sc in 2nd ch from hook and in each ch across. (34 sts)
Row 2: Ch 1, turn. Sc-blo in each st across. (34 sts)
Rows 3 to 8: Repeat Row 2. At the end of Row 8, change to Color B on your last yarn over. (34 sts each row)
*To change colors cleanly: On the last stitch of the row, work until you have 2 loops on your hook, then yarn over with the new color and pull through both loops.*
Rows 9 to 14: With Color B, ch 1, turn. Sc-blo in each st across. Change to Color C at end of Row 14. (34 sts each row)
Rows 15 to 22: With Color C, ch 1, turn. Sc-blo in each st across. Change to Color B at end of Row 22. (34 sts each row)
Rows 23 to 28: With Color B, ch 1, turn. Sc-blo in each st across. Change to Color A at end of Row 28. (34 sts each row)
Rows 29 to 36: With Color A, ch 1, turn. Sc-blo in each st across. (34 sts each row)
Fasten off after Row 36. You now have a rectangular panel with vertical stripes. The ribbed texture should be clearly visible.
Shaping the Curved Bottom
Now you will shape the panel to create the rounded purse silhouette. Work along the foundation chain edge (the bottom of your panel).
Setup: With RS facing, join Color A to the first stitch of the foundation edge with a sl st.
Shaping Row 1: Ch 1. Sc in first 4 sts, dec over next 2 sts, sc in next 22 sts, dec over next 2 sts, sc in last 4 sts. (32 sts)
Shaping Row 2: Ch 1, turn. Sc in first 3 sts, dec, sc in next 22 sts, dec, sc in last 3 sts. (30 sts)
Shaping Row 3: Ch 1, turn. Sc in first 2 sts, dec, sc in next 22 sts, dec, sc in last 2 sts. (28 sts)
Shaping Row 4: Ch 1, turn. Sc in first st, dec, sc in next 22 sts, dec, sc in last st. (26 sts)
Shaping Row 5: Ch 1, turn. Dec, sc in next 22 sts, dec. (24 sts)
Fasten off and weave in ends.
Repeat the shaping on your second panel.
Assembly
Place both panels with wrong sides together. The RS of each panel should face outward.
Using Color A and your tapestry needle, whip stitch the panels together along the curved bottom edge and up both side edges. Leave the top edge open.
*Whip stitch tip: Insert your needle through both layers, then bring it over the edge and insert again about 1/4 inch away. Keep your tension even for a neat seam.*
Work approximately 1/2 inch up from the curved shaping along each side, then stop. This leaves the top portion of the sides open, which gives the bag a wider opening.
Top Edging
Join Color A at one side seam with a sl st.
Round 1: Ch 1. Sc evenly around the entire top opening, working through both layers at the seams and into the row ends along each panel. Place a stitch marker at each front corner. Join with sl st to first sc.
Round 2: Ch 1. Sc in each st around. Join with sl st. (Count should be approximately 72 to 76 sts depending on your tension)
Round 3: Ch 1. Sc in each st around. Join with sl st.
Fasten off and weave in all ends.
Hardware Attachment Points
You need two small loops for attaching the chain strap hardware.
Tab (Make 2):
With Color A, ch 8.
Row 1: Sc in 2nd ch from hook and in each ch across. (7 sts)
Rows 2 to 3: Ch 1, turn. Sc in each st across. (7 sts)
Fasten off, leaving a long tail.
Fold each tab in half to create a loop. Using your tapestry needle, sew the tab securely to the inside of the bag at each top corner. Make sure the loop extends slightly above the top edge so your D-ring or lobster clasp can attach.
Finishing Touches
Attach the hardware: Slide a D-ring or jump ring through each tab loop. Attach your lobster clasps to each end of your chain strap, then clip onto the D-rings.
Add the decorative charm: Position your rose button or charm at center front, about 1.5 inches below the top edge. Sew securely from the inside or use a small safety pin style backing.
Optional heart charm: Add a heart locket or charm to one of your D-rings for extra personality.
Lining (recommended): Cut fabric to match your panel shape plus 1/2 inch seam allowance. Sew fabric panels together, fold top edge under, and hand stitch inside the bag just below the crochet edging. Lining prevents items from catching in stitches and adds durability.
Tips for Success
Tension consistency matters. Try to keep your tension even throughout, especially when changing colors. This keeps your stripes uniform.
Weave in ends as you go. With multiple color changes, you will have many tails. Weave them in before seaming so they are hidden inside the fabric layers.
Block your panels. Lightly steam or wet block each panel before seaming. This evens out stitches and makes assembly much easier.
Choose quality hardware. Rose gold or gold tone hardware elevates the entire look. Check craft stores, jewelry supply shops, or online retailers for chain straps and clasps.
Make It Your Own
This crochet purse pattern is wonderfully adaptable. Try a monochromatic version in all one color for a minimalist look. Or go bold with contrasting colors like navy and coral, or forest green and cream.
You could also adjust the size by adding or removing rows to the body. More rows equals a wider bag. Fewer shaping rows creates a less dramatic curve.
You Did It
Thank you so much for making this Classic Burgundy Wine Elegant Purse with me. I genuinely hope you love how yours turns out. This is the kind of project that makes people ask where you bought it, and you get to say you made it yourself.
I would absolutely love to see your finished purse. Tag me on Instagram or share in our Facebook group so I can admire your beautiful work. Every version of this bag has its own personality, and yours will be no exception.
Happy crocheting, friend. You have got this.
