I don’t know about you, but I have always dreamed of wrapping myself in something that feels like a wearable garden. All the vintage charm of granny squares with none of the frumpy vibes. This crochet robe is exactly that. It combines a gorgeous sunset ombre effect with the sweetest 3D rose granny squares, and the result is honestly one of the most stunning garments I have ever made.
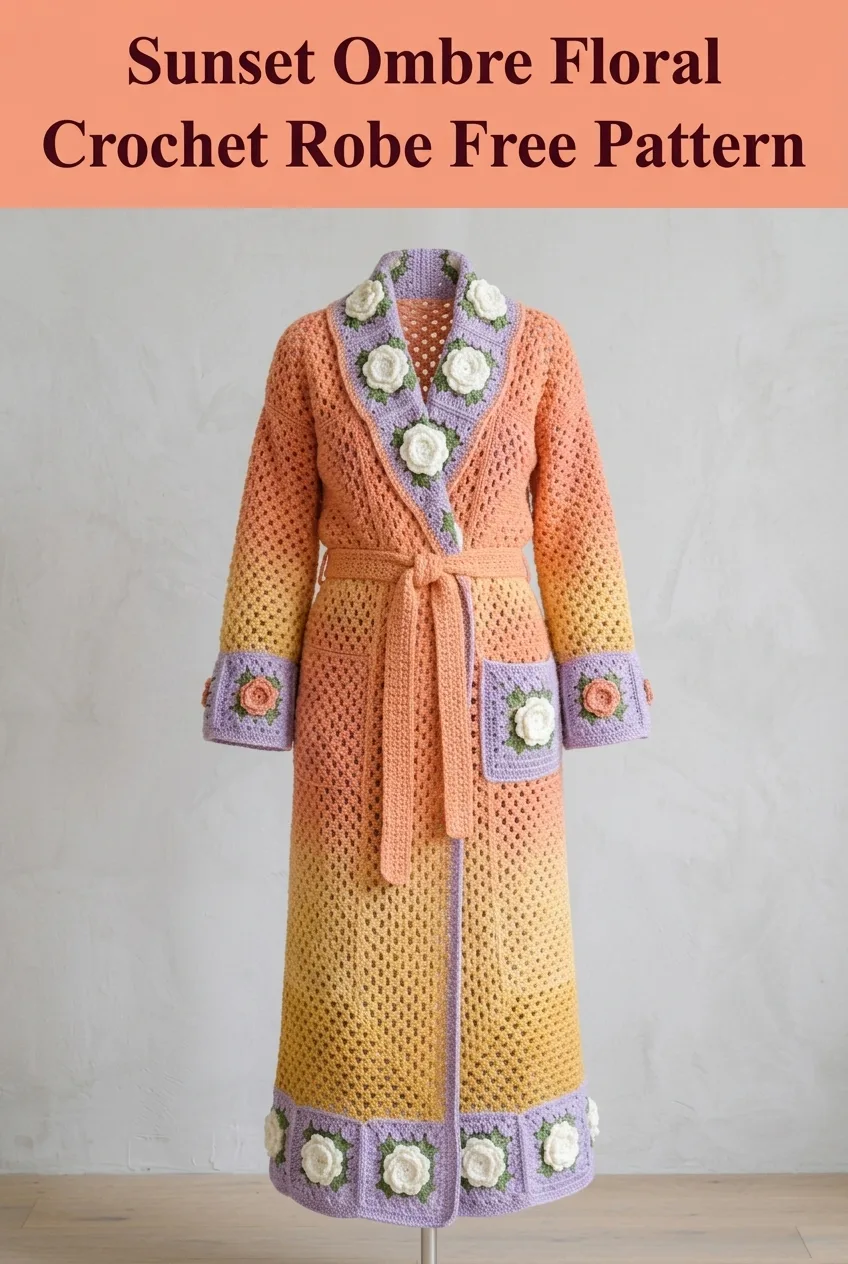
This is not a quick weekend project. Let me be upfront about that. But if you have been craving something truly special, something that makes you feel like you stepped out of a 1970s bohemian dream, this robe is absolutely worth every stitch. The construction is more straightforward than it looks, I promise. We are working with basic granny stitch mesh for the body and classic granny squares for the embellishments. If you can chain, double crochet, and follow a repeat, you can make this.
Why This Crochet Robe Pattern Works
The genius of this design is how it balances visual impact with manageable techniques. The body panels use a simple granny mesh stitch, which is essentially double crochets separated by chain spaces. It creates that lovely open, lacy look without any complicated stitch manipulation.
The show-stopping elements are the 3D rose granny squares. These feature a raised flower center that sits on top of a classic granny square background. They look incredibly impressive but only require basic stitches worked in a specific way to create dimension.
The ombre color transition happens naturally as you work from the hem upward. You will switch yarn colors at strategic points to create that beautiful sunset fade from golden yellow through peachy coral to soft orange.
Materials You Will Need
Yarn:
– Color A: Golden yellow, approximately 400 grams
– Color B: Soft peach or coral, approximately 350 grams
– Color C: Light orange, approximately 300 grams
– Color D: Lavender or light purple, approximately 200 grams
– Color E: Cream or off-white, approximately 150 grams
– Color F: Sage green, approximately 75 grams
A yarn with good stitch definition works best here. Cotton blends or acrylic with a slight sheen will show off the texture beautifully. I recommend something like Paintbox Yarns Cotton DK or Lion Brand 24/7 Cotton for drape and stitch clarity.
Hook:
Notions:
Gauge:
For the granny mesh body: 14 stitches and 8 rows = 4 inches (10 cm)
For the 3D rose granny square: Each square measures approximately 4 inches (10 cm) after blocking
Always check your gauge before starting. This garment has significant yardage, and even a small gauge difference will dramatically affect fit and fabric drape.
Skill Level
Intermediate. This pattern requires comfort with basic stitches, working in rows and rounds, color changes, seaming panels together, and assembling granny squares. The 3D rose technique may be new to you, but I will walk you through it step by step.
If you have made a granny square blanket and a basic cardigan before, you are ready for this.
Stitch Abbreviations and Definitions
Ch = Chain: Wrap yarn over hook, pull through loop on hook. This creates the foundation for most crochet work.
Sl st = Slip stitch: Insert hook, yarn over, pull through both the stitch and the loop on your hook in one motion. Used for joining and moving across stitches invisibly.
Sc = Single crochet: Insert hook, yarn over, pull up a loop (2 loops on hook), yarn over, pull through both loops. A short, tight stitch.
Dc = Double crochet: Yarn over, insert hook, yarn over, pull up a loop (3 loops on hook), yarn over, pull through 2 loops, yarn over, pull through remaining 2 loops. A taller stitch that creates the body of this robe.
Tr = Treble crochet: Yarn over twice, insert hook, yarn over, pull up a loop (4 loops on hook), then yarn over and pull through 2 loops three times. An even taller stitch used in the rose centers.
Dc3tog = Double crochet 3 together: A decrease that combines 3 double crochets into one stitch. Work a dc until 2 loops remain on hook, repeat in next 2 stitches (4 loops on hook), yarn over, pull through all 4 loops.
FPdc = Front post double crochet: Yarn over, insert hook from front to back around the post (vertical part) of the stitch below, complete as a regular dc. Creates raised texture.
Sk = Skip: Miss the indicated number of stitches.
Sp = Space: The gap created by chain stitches in the previous row.
Size Information
This pattern is written for size Medium, fitting bust measurements of 36 to 40 inches. The robe has approximately 4 inches of positive ease for a relaxed fit.
Finished Measurements:
To adjust sizing, add or subtract multiples of 6 stitches to the starting chain for width, and add or remove rows for length before color transitions.
Pattern Instructions
Granny Mesh Body Panel (Make 2)
The back and two front panels are worked separately, then seamed together. Each front panel is half the width of the back panel.
Back Panel:
With Color A and 5.0 mm hook, ch 78.
Row 1: Dc in 4th ch from hook (counts as first dc), dc in next ch, *ch 1, sk 1, dc in next 2 ch*, repeat from * to * across. Turn. (76 sts including chains)
Row 2: Ch 3 (counts as dc), dc in next dc, *ch 1, sk ch-1 sp, dc in next 2 dc*, repeat from * to * across. Turn.
Repeat Row 2 until panel measures 24 inches from beginning, changing to Color B.
Continue in pattern with Color B for 12 inches.
Change to Color C and continue for remaining 12 inches until total length is 48 inches.
Fasten off. Weave in ends.
Front Panel (Make 2):
With Color A and 5.0 mm hook, ch 42.
Work same as back panel with 40 stitches across. Follow same color change sequence at same intervals.
Sleeves (Make 2)
With Color A and 5.0 mm hook, ch 48.
Row 1: Dc in 4th ch from hook, dc in next ch, *ch 1, sk 1, dc in next 2 ch*, repeat across. Turn. (46 sts)
Continue in granny mesh pattern, changing to Color B after 12 inches.
Continue with Color B until sleeve measures 20 inches total.
Cuff Shaping:
Change to Color D (lavender). Work 4 rows in granny mesh pattern.
Fasten off, leaving a long tail for seaming.
3D Rose Granny Square (Make 24)
These squares create the collar, hem border, cuff accents, and pockets. The rose sits raised in the center of a traditional granny square.
Rose Center (worked in Color E or Color B for variety):
Ch 4, sl st to form ring.
Round 1: Ch 1, work 8 sc into ring, sl st to first sc to join. (8 sc)
Round 2: Ch 3, dc in same st, 2 dc in each sc around, sl st to top of ch-3. (16 dc)
Round 3 (Petal Round): *Ch 3, sk 1 dc, sl st in next dc*, repeat around. (8 ch-3 loops)
Round 4: Working behind petals from Round 3, sl st around post of skipped dc from Round 3, *ch 4, sl st around post of next skipped dc*, repeat around. (8 ch-4 loops)
Round 5: In each ch-4 loop, work (sl st, ch 1, 4 dc, ch 1, sl st). (8 larger petals)
Fasten off rose center. Weave in ends.
Granny Square Background:
With Color D (lavender), join yarn to back of rose center with sl st.
Round 6: Ch 3, 2 dc in same sp, ch 2, *3 dc in next sp between petals, ch 2*, repeat 3 more times to create 4 corner groups, sl st to top of ch-3.
Round 7: Ch 3, 2 dc in same corner sp, ch 1, 3 dc in same corner sp (corner made), *ch 1, 3 dc in next ch-2 sp, ch 1, (3 dc, ch 1, 3 dc) in corner sp*, repeat around, sl st to join.
Round 8: Join Color F (sage green) in any corner ch-1 sp. Work 1 round of single crochet, placing 3 sc in each corner ch-1 sp and 1 sc in each dc and ch-1 sp around.
Fasten off. Square should measure 4 inches.
Assembly
Step 1: Seam Body Panels
Place back panel right side up. Position front panels on each side, overlapping at center for the wrap style. Using mattress stitch or whip stitch, seam shoulder seams for 4 inches on each side, leaving center open for neck.
Step 2: Attach Sleeves
Fold each sleeve in half lengthwise to find center. Align sleeve center with shoulder seam. Pin in place. Seam sleeve to body, working down both sides of armhole opening.
Step 3: Seam Sides and Sleeves
Starting at hem, seam each side panel from bottom to underarm. Continue seaming down sleeve from underarm to cuff.
Step 4: Add Granny Square Collar
Join 8 rose granny squares in a long strip. Attach strip around neckline and down both front opening edges, overlapping at center.
Step 5: Add Hem Border
Join 10 rose granny squares in a long strip. Seam to bottom hem of robe.
Step 6: Create Pockets (Make 2)
Join 2 rose granny squares for each pocket. Seam to front panels at hip height.
Step 7: Add Cuff Accents
Attach 1 rose granny square to each cuff, centered on the outside.
Belt
With Color B, ch 200.
Row 1: Sc in 2nd ch from hook and each ch across. Turn. (199 sc)
Rows 2 through 5: Ch 1, sc in each sc across. Turn.
Fasten off. Weave in ends.
Finishing Touches
Block all pieces before final assembly if possible. Wet blocking or steam blocking will open up the granny mesh and help the rose squares lay flat.
Weave in all remaining ends securely. For a garment this size, I recommend weaving each end through at least 3 inches of stitches and back again.
Try on the robe and adjust belt placement as desired. You can add belt loops by crocheting small chains and attaching them at waist height on each side seam.
Tips for Success
Color Placement: The roses can be worked in Color E (cream) or Color B (peach) for variety. Looking at the finished garment, alternating rose colors creates visual interest.
Blocking Matters: Seriously, block your squares before joining. Unblocked squares will pucker and refuse to lay flat.
Gauge Swatch: With this much yardage, running out of yarn in your final color is heartbreaking. Swatch, measure, and calculate carefully.
Take Breaks: This is a marathon, not a sprint. Break the project into sections. Celebrate finishing each panel.
Why Make This Crochet Robe Pattern
This sunset ombre floral crochet robe is the kind of project that becomes an heirloom. It is the robe you reach for on slow Sunday mornings, the one guests always compliment, the one you will pass down someday. The combination of techniques makes it educational without being frustrating.
You will practice granny mesh, master 3D crochet flowers, improve your seaming skills, and create something genuinely wearable and beautiful. This step by step crochet tutorial gives you everything you need to succeed.
Thank you so much for choosing this pattern for your next big project. I genuinely cannot wait to see your version come to life. If you make this robe, please tag me on Instagram or share a photo in our Facebook group. Your makes inspire me and other crocheters every single day.
If this pattern spoke to you, go ahead and save it to your Pinterest boards so you can find it when you are ready to start. And please leave a comment below if you have questions or just want to share your excitement. I read every single one, and I would love to hear from you.
