Go ahead and dig into that stash right now. I know you have some gorgeous dark grays, charcoals, and blacks tucked away waiting for the perfect project. This Midnight Black Snake Plant Amigurumi is exactly what those skeins have been waiting for. The construction here is genuinely interesting because you will create flat chevron-patterned leaves using tapestry crochet techniques, then join them together into a dimensional plant that never needs watering. Fair warning, this is an intermediate project. The color changes require attention and the shaping takes patience. But if you have worked tapestry crochet before or you are ready to level up your skills, this is absolutely worth the effort.
Why You Will Love This Crochet Snake Plant Pattern
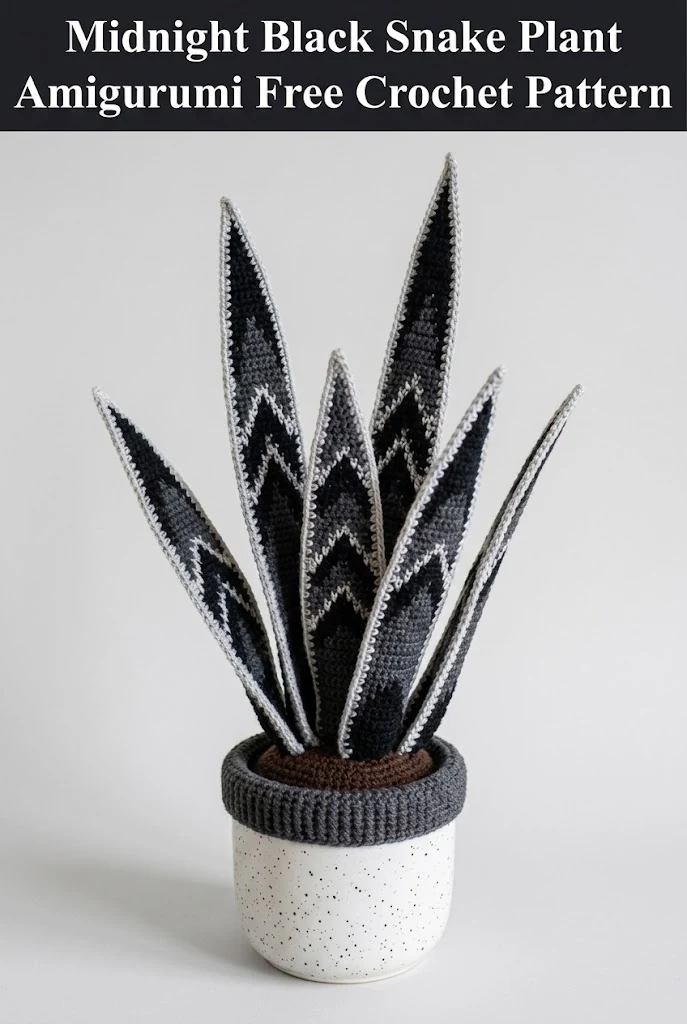
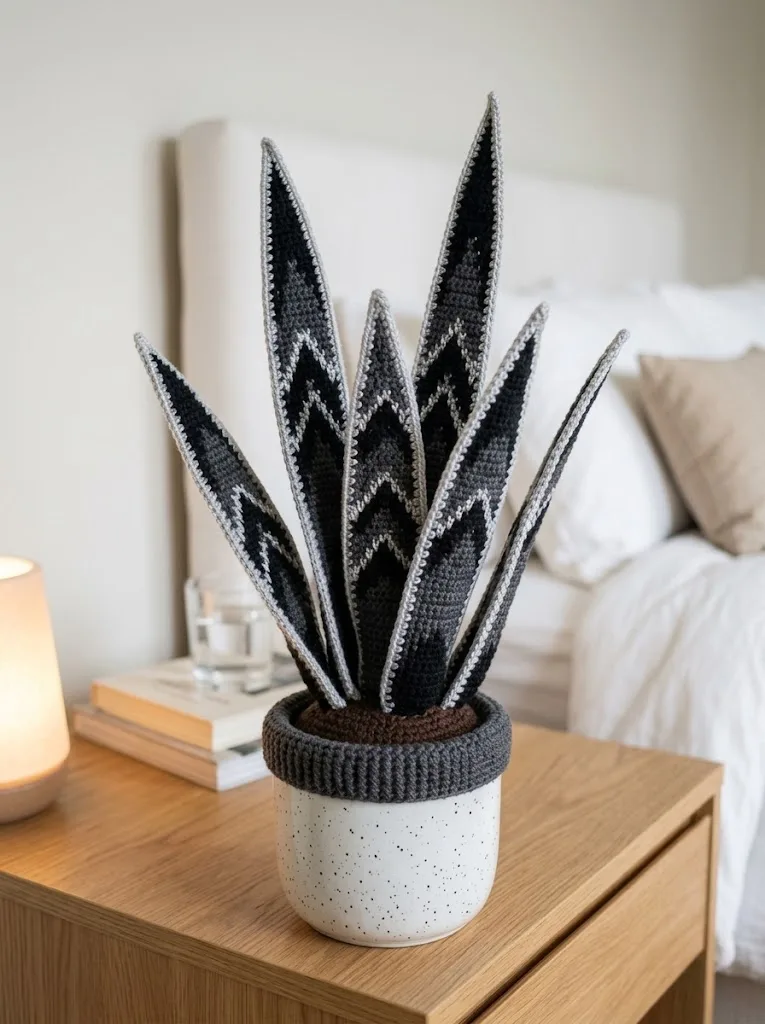
This crochet snake plant brings all the drama of a statement houseplant without any of the maintenance. The striking zigzag pattern in gradients of gray, charcoal, and black creates a modern, sophisticated look that fits perfectly in minimalist spaces. I designed it to sit beautifully in a standard ceramic pot with a crocheted soil topper, making it look remarkably realistic from across the room.
Unlike real snake plants that need specific light conditions and careful watering schedules, this amigurumi version thrives anywhere. Place it in a dark corner, a sunny windowsill, or even a bathroom with no natural light. It will look stunning forever.
The finished plant stands approximately 14 to 16 inches tall and fits into a 4 to 5 inch diameter pot. Each leaf features that gorgeous chevron colorwork that mimics the natural variegation of a Sansevieria, also known as a snake plant or mother-in-law’s tongue.
Materials Needed for Your Crochet Snake Plant
Yarn:
– Black (Color A), approximately 150 yards
– Dark charcoal gray (Color B), approximately 100 yards
– Medium gray (Color C), approximately 75 yards
– Light silver gray (Color D), approximately 50 yards
– Dark brown (Color E) for soil, approximately 30 yards
I recommend using 100% cotton or a cotton blend for this project. Cotton holds its shape beautifully and gives the leaves that crisp, structured look you see in the photos. Acrylic will work but may result in slightly softer, floppier leaves.
Hook:
Additional Supplies:
Gauge and Skill Level
Gauge: 18 stitches and 20 rows equals 4 inches in single crochet
Skill Level: Intermediate
This pattern assumes you are comfortable with basic crochet stitches and ready to tackle tapestry crochet colorwork. If you have never done tapestry crochet before, I recommend practicing a small swatch first to get the hang of carrying yarn and changing colors mid-row.
Abbreviations and Stitch Definitions
Before we dive into the step by step instructions, let me define every stitch and abbreviation you will encounter:
ch = chain. Wrap yarn over hook and pull through the loop on your hook. This creates a foundation or adds height.
sl st = slip stitch. Insert hook into stitch, yarn over, pull through both the stitch and the loop on your hook in one motion. Used for joining or moving across stitches without adding height.
sc = single crochet. Insert hook into stitch, yarn over and pull up a loop (two loops on hook), yarn over and pull through both loops. The most basic fabric-building stitch.
sc2tog = single crochet two together. A decrease stitch. Insert hook into first stitch, pull up a loop, insert hook into next stitch, pull up a loop (three loops on hook), yarn over and pull through all three loops. This turns two stitches into one.
inc = increase. Work two single crochet stitches into the same stitch. This adds one stitch to your count.
BLO = back loop only. Instead of inserting your hook under both loops of the V at the top of a stitch, insert it only under the back loop. This creates a ridged texture.
FO = fasten off. Cut yarn and pull the tail through the last loop to secure your work.
Crochet Snake Plant Leaf Pattern (Make 7 to 9 Leaves)
The leaves are the heart of this amigurumi snake plant. Each leaf is worked flat in rows, then folded and seamed to create dimension. The chevron pattern is achieved through tapestry crochet, which means you will carry the unused color along the back of your work and switch colors as indicated.

Understanding the Colorwork
The zigzag pattern moves up the leaf in bands. You will work with two colors at a time, switching between them to create the chevron points. When carrying yarn, lay the unused strand along the top of your previous row and crochet over it. This traps it neatly inside your stitches.
Leaf Instructions
I will provide instructions for a medium-sized leaf. For variety, you can make some leaves longer by adding additional pattern repeats, and some shorter by working fewer repeats.
Foundation:
With Color A (black), ch 21.
Row 1: Sc in 2nd ch from hook and in each ch across. (20 sts)
Row 2: Ch 1, turn. Sc in each st across. (20 sts)
Rows 3-4: Repeat Row 2.
Begin Chevron Pattern:
For the colorwork section, you will work the chevron motif across the width of the leaf. The pattern uses a simple sequence where you alternate between your main color and your accent color to create the zigzag effect.
Row 5: Ch 1, turn. Attach Color D (light gray). Work the following pattern across: *4 sc with Color A, 2 sc with Color D* repeat across, ending with 2 sc in Color A. (20 sts)
Row 6: Ch 1, turn. *3 sc with Color A, 4 sc with Color D, 3 sc with Color A* repeat across. (20 sts)
Row 7: Ch 1, turn. *2 sc with Color A, 6 sc with Color D, 2 sc with Color A* repeat across. (20 sts)
Row 8: Ch 1, turn. *1 sc with Color A, 8 sc with Color D, 1 sc with Color A* repeat across. (20 sts)
Row 9: Ch 1, turn. Reverse the pattern, beginning to close the chevron point. *2 sc with Color A, 6 sc with Color D, 2 sc with Color A* repeat across. (20 sts)
Row 10: Ch 1, turn. *3 sc with Color A, 4 sc with Color D, 3 sc with Color A* repeat across. (20 sts)
Row 11: Ch 1, turn. *4 sc with Color A, 2 sc with Color D* repeat across, ending with 2 sc in Color A. (20 sts)
Rows 12-14: With Color A only, ch 1, turn. Sc in each st across. (20 sts)
Second Chevron Band:
Repeat Rows 5-14 using Color C (medium gray) instead of Color D.
Third Chevron Band:
Repeat Rows 5-14 using Color B (dark charcoal) instead of Color D.
Begin Shaping the Point:
Now we will decrease to create the pointed tip of the leaf.
Row 35: Ch 1, turn. Sc2tog, sc across to last 2 sts, sc2tog. (18 sts)
Row 36: Ch 1, turn. Sc in each st across. (18 sts)
Rows 37-38: Repeat Rows 35-36. (16 sts after Row 37)
Continue alternating decrease rows and plain rows, decreasing 2 stitches every other row until you have 4 stitches remaining.
Final Rows: Sc2tog twice. (2 sts)
Sc2tog. (1 st)
FO and weave in ends.
Edge Border
To create that beautiful silver outline visible in the photos, add an edge border around each leaf.
With Color D (light silver gray), join yarn at the base of the leaf. Working along the side edge, sc evenly up to the tip, work 3 sc in the tip stitch to turn the corner, then sc evenly back down the other side. Sl st to join. FO.
Assembling Each Leaf
1. Fold the leaf in half lengthwise with wrong sides together.
2. Insert a piece of floral wire or pipe cleaner inside the fold for stability.
3. Using your tapestry needle and matching yarn, whip stitch the edges together, leaving the base open.
4. The wire allows you to gently bend and position each leaf naturally.
Soil Topper Pattern
The soil topper creates that realistic potted plant look. It sits inside your pot and holds all the leaves together.
With Color E (dark brown):
Round 1: Create a magic ring. Work 6 sc into the ring. Pull tight. (6 sts)
Round 2: Inc in each st around. (12 sts)
Round 3: *Sc 1, inc* repeat around. (18 sts)
Round 4: *Sc 2, inc* repeat around. (24 sts)
Round 5: *Sc 3, inc* repeat around. (30 sts)
Continue increasing by 6 stitches each round until the circle fits snugly inside your pot opening. For a 4-inch pot, you will likely need approximately 54 to 60 stitches.
Border Rounds: Once your circle is the correct diameter, work 3 to 4 rounds even in BLO to create a raised rim. This gives the appearance of soil mounded above the pot edge.
FO, leaving a long tail for attaching leaves.
Assembling Your Crochet Snake Plant
Now comes the satisfying part where everything comes together.
1. Prepare the pot: If your pot has a drainage hole, cover it with tape or fabric from the inside.
2. Stuff the pot: Fill the bottom of your pot with fiberfill, plastic bags, or fabric scraps to create a stable base.
3. Position the soil topper: Place the crocheted soil piece on top, tucking the edges down into the pot.
4. Arrange the leaves: Insert each leaf through the soil topper, positioning them in a natural, slightly random arrangement. Real snake plants have leaves pointing in various directions at different angles.
5. Secure everything: Use your tapestry needle to tack the leaves to the soil topper from underneath, securing them in place. Add additional stuffing around the leaf bases if needed for stability.
6. Adjust and style: Gently bend the floral wire inside each leaf to create natural curves and movement. Some leaves should stand straight up, others can lean outward slightly.
Tips for Success with This Amigurumi Pattern
Tension matters. Keep your stitches consistent throughout the colorwork sections. Uneven tension will make your chevrons look wobbly.
Carry your yarn loosely. When doing tapestry crochet, avoid pulling the carried strand too tight. This causes puckering and distorts your fabric.
Make leaves different lengths. Real snake plants have leaves at various stages of growth. Make 2 shorter leaves, 4 medium leaves, and 2 or 3 tall leaves for the most realistic look.
Block your leaves if needed. If your leaves curl after crocheting, wet block them flat before assembly. Pin them to a blocking mat and let them dry completely.
Customization Ideas
This pattern works beautifully in the dramatic black and gray palette shown, but you could easily adapt it for different looks:
You can also vary the pot by crocheting a pot cozy in any color that matches your decor, or simply use a beautiful ceramic pot as shown.
Thank you so much for choosing this pattern for your next project. I genuinely hope you love making your Midnight Black Snake Plant as much as I loved designing it. If you create one, please tag me on Instagram or share it in our Facebook group. I absolutely love seeing your finished plants come to life.
If this crochet snake plant pattern inspired you, save it to your Pinterest boards so you can find it easily when you are ready to start. And please drop a comment below when you make yours. I would love to hear which colors you chose and how it turned out!
