I don’t know about you, but I live for that perfect lightweight layer. The one you throw on over a tank top when the air conditioning is just a bit too aggressive, or when summer evenings turn breezy but you’re not ready to commit to a real sweater. This coral peach mesh shrug is exactly that kind of piece. All the style, none of the bulk, and honestly? It works up faster than you’d think looking at all those pretty openwork details.
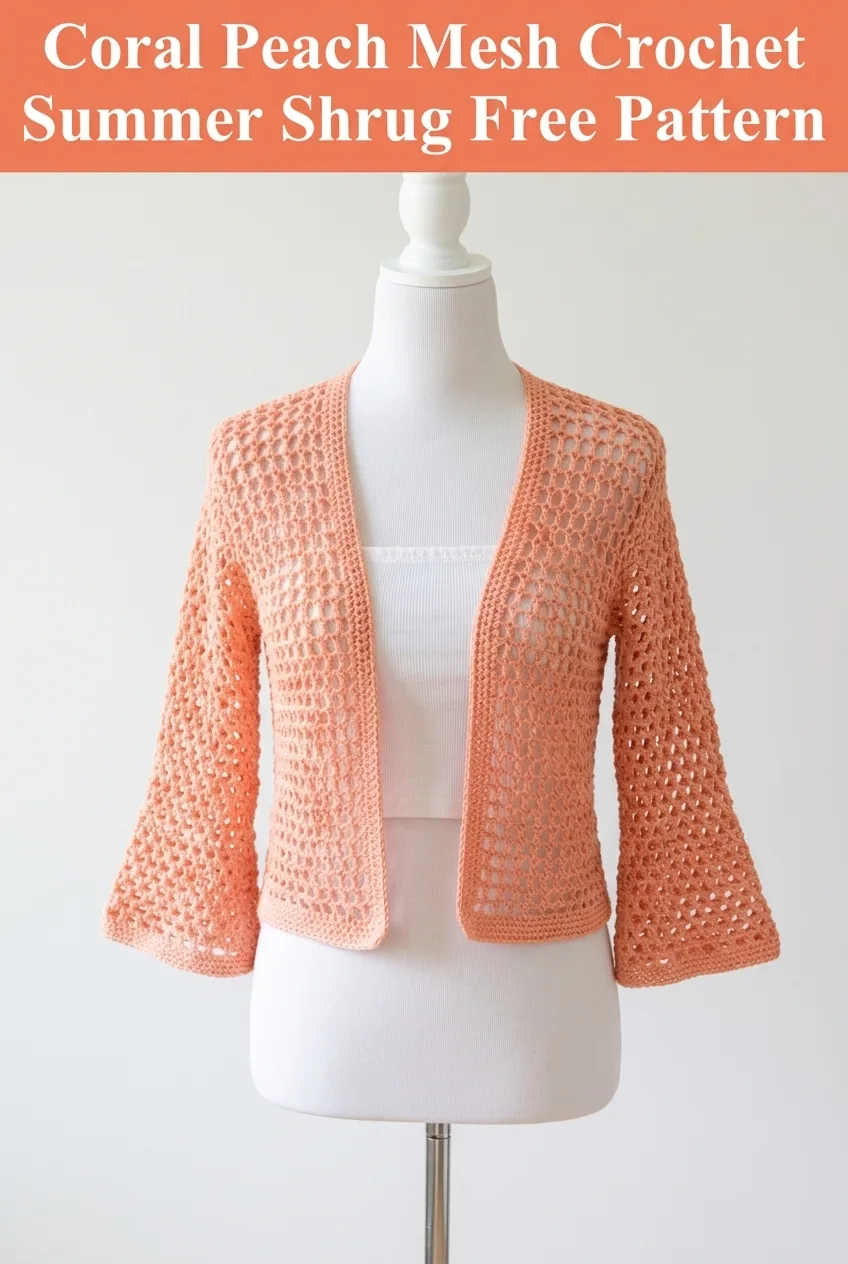
This crochet summer shrug pattern gives you that effortless, airy look that’s perfect for transitional weather. The mesh stitch creates beautiful texture while keeping the garment breathable and lightweight. Whether you’re layering it over sundresses or pairing it with jeans and a camisole, this piece earns its place in your handmade wardrobe.
Why You’ll Love This Crochet Shrug Pattern
This isn’t your grandmother’s heavy cardigan. The open mesh construction makes this shrug incredibly lightweight, which means you can wear it comfortably even on warmer days. The coral peach color is absolutely gorgeous for spring and summer, but you could easily make this in any shade that speaks to you.
The construction is simpler than it looks. You’ll work the body as one flat rectangle, then seam it strategically to create the armholes and shape. The sleeves feature a subtle flare at the cuffs, giving this piece that relaxed, bohemian vibe without any complicated shaping.
Skill level: Intermediate beginner. If you can chain, single crochet, and double crochet, you can absolutely make this. The mesh pattern uses basic stitches in a repeating sequence. Once you get the rhythm, it practically works itself.
Materials Needed
Yarn:
Suggested yarn alternatives: Lion Brand 24/7 Cotton, Paintbox Yarns Cotton DK, or any mercerized cotton in DK weight
Hook:
Notions:
Gauge
Gauge matters for garments, so please don’t skip this step.
Mesh pattern gauge: 4 pattern repeats and 8 rows = 4 inches square
To check your gauge, chain 25 and work the mesh pattern for about 12 rows. Measure the center section. If your swatch is too big, go down a hook size. Too small? Go up a hook size.
I know swatching isn’t the fun part. But trust me, spending 20 minutes on a gauge swatch beats frogging an entire shrug because it turned out three sizes too big.
Finished Measurements
This pattern is written for size Small/Medium with a relaxed, open front fit.
For larger sizes: Add multiples of 4 chains to your foundation chain and work additional pattern repeats. Each pattern repeat adds roughly 2 inches to the width.
Abbreviations and Stitch Definitions
Let me break down every stitch you’ll need for this crochet tutorial. Even if you know these stitches well, take a moment to read through, because the way we combine them creates the mesh effect.
Ch = Chain. Wrap yarn over hook, pull through loop on hook. This creates the foundation and the open spaces in our mesh.
Sl st = Slip stitch. Insert hook, yarn over, pull through both loops at once. Used for joining and moving across stitches without adding height.
Sc = Single crochet. Insert hook, yarn over and pull up a loop (2 loops on hook), yarn over and pull through both loops. A short, tight stitch.
Dc = Double crochet. Yarn over, insert hook, yarn over and pull up a loop (3 loops on hook), yarn over and pull through 2 loops, yarn over and pull through remaining 2 loops. This is the main stitch in our mesh pattern.
Ch-sp = Chain space. The gap or hole created by chains in the previous row. You’ll work into these spaces, not into individual chain stitches.
Skip = Pass over the indicated number of stitches without working into them.
The Mesh Stitch Pattern
Before we dive into the full pattern, let’s practice the mesh stitch on its own. This is the same technique you’ll use throughout the body and sleeves.
Foundation: Chain a multiple of 4, plus 2. For practice, chain 22.
Row 1: Dc in 6th chain from hook (the skipped chains count as dc plus ch-1), *ch 1, skip 1 chain, dc in next chain*, repeat from * across. Turn. (9 dc, 8 ch-1 spaces)
Row 2: Ch 4 (counts as dc plus ch-1), skip first dc, dc in next dc, *ch 1, skip ch-1 space, dc in next dc*, repeat from * across, placing final dc in 3rd chain of turning chain. Turn.
Repeat Row 2 for pattern.
See how the chain spaces stack on top of each other? That’s what creates those beautiful little windows in the mesh. The key is consistency. Keep your tension even, and your mesh will look professional and uniform.
Step by Step Crochet Pattern
Body Panel (Make 1)
The body is worked as one large rectangle, then folded and seamed to create the shrug shape with armholes.
Foundation: Ch 170 (or a multiple of 4 plus 2 for your desired width).
Row 1: Dc in 6th ch from hook, *ch 1, skip 1 ch, dc in next ch*, repeat from * to end. Turn. (83 dc, 82 ch-1 spaces)
Row 2: Ch 4 (counts as dc plus ch-1 here and throughout), skip first dc, dc in next dc, *ch 1, skip ch-1 space, dc in next dc*, repeat from * across, placing final dc in 3rd ch of turning chain. Turn.
Rows 3 through 52: Repeat Row 2.
Your rectangle should measure approximately 42 inches wide and 16 inches tall. If you’re making a larger size, continue until you reach your desired length.
Fasten off and weave in your ends loosely for now. You’ll secure them more permanently after seaming.
Shaping the Armholes
Here’s where the magic happens. You’ll fold your rectangle and seam it to create the shrug shape.
1. Lay your rectangle flat with the right side facing up.
2. Fold both short ends toward the center, leaving a gap in the middle. This gap is your back opening.
3. Measure 8 inches from each folded edge. Place a stitch marker at this point on both the top and bottom edges. This marks where your armhole seams will be.
4. Using your tapestry needle and a length of matching yarn, seam from the corner to the stitch marker on each side. You’re creating two tubes, which become your sleeves.
5. Leave the center section open. This is the back of your shrug.
Seaming tip: Use a mattress stitch or whip stitch for a clean finish. Work on the wrong side so your seam stays hidden.
Sleeves (Worked in the Round)
Now you’ll add length to the sleeves by working directly onto the armhole openings.
Round 1: Join yarn at the underarm seam with a sl st. Ch 4, dc in same space, *ch 1, skip next stitch or space, dc in next stitch*, work evenly around the armhole opening, ending with ch 1, sl st to 3rd ch of beginning ch-4 to join. (approximately 36 dc)
Round 2: Sl st into first ch-1 space, ch 4, dc in same space, *ch 1, dc in next ch-1 space*, repeat around, sl st to join.
Rounds 3 through 20: Repeat Round 2.
Your sleeve should measure approximately 10 inches from the armhole seam.
Cuff edging:
Round 21: Ch 1, sc in each dc and each ch-1 space around, sl st to join. (approximately 72 sc)
Rounds 22 and 23: Ch 1, sc in each sc around, sl st to join.
Fasten off and weave in ends.
Repeat for the second sleeve.
Front and Bottom Edging
This edging frames the entire open front of your shrug, giving it a polished, finished look.
Row 1: Join yarn at the bottom corner of one front panel with a sl st. Ch 1, sc evenly along the bottom edge, up the front opening, across the back neckline, down the other front opening, and along the remaining bottom edge. Work approximately 3 sc for every 2 rows along the vertical edges, and 1 sc in each stitch along the horizontal edges. Sl st to join at starting point.
Row 2: Ch 1, sc in each sc around entire perimeter, sl st to join.
Row 3: Repeat Row 2.
Fasten off and weave in all remaining ends.
Finishing Your Crochet Summer Shrug
Blocking
Blocking makes a huge difference in how professional your finished garment looks. For cotton yarn, wet blocking works beautifully.
1. Soak your completed shrug in lukewarm water for 15 to 20 minutes.
2. Gently squeeze out excess water. Never wring or twist.
3. Lay flat on a blocking mat or clean towels.
4. Smooth the mesh pattern and pin the edges to your desired measurements.
5. Let dry completely, which may take 24 to 48 hours.
Weaving in Ends
Go back and secure all your yarn tails. Weave each end through at least 2 inches of stitches on the wrong side, then double back in the opposite direction. Trim close to the fabric.
Customization Ideas
Add length: Simply work more rows on the body panel before seaming. Every 4 rows adds approximately 1 inch.
Longer sleeves: Continue the mesh pattern for additional rounds before adding the cuff edging.
Different closure: Add a button loop and decorative button at the neckline if you prefer a more secure fit.
Color variations: This pattern looks stunning in neutrals like cream or taupe, bold colors like teal or mustard, or even variegated yarns for a more playful look.
Troubleshooting Common Issues
My mesh looks uneven: Check that you’re consistently working into the double crochets from the previous row, not into the chain spaces. Keep your chain-1 spaces loose enough that they match the width of your double crochets.
The sleeves are too tight: Add extra stitches evenly around the armhole in Round 1. Work a few extra stitches at the underarm area if needed.
My edges are wavy: This usually means your tension changed throughout the project. Blocking will help significantly, but try to maintain consistent tension on future projects.
I lost count: Place a stitch marker every 20 stitches along your foundation chain. It makes counting much easier and helps you catch mistakes early.
Care Instructions
Washing: Machine wash on gentle cycle with cold water, or hand wash for best results.
Drying: Lay flat to dry. Cotton yarn can stretch if hung while wet.
Storage: Fold neatly and store flat. Avoid hanging for extended periods.
This coral peach mesh crochet summer shrug is the kind of project that looks impressive but won’t stress you out. The repeating mesh pattern becomes almost meditative once you get going, and before you know it, you’ll have a gorgeous lightweight layer ready for all those transitional weather moments.
Thank you so much for choosing this pattern. I genuinely hope you love making it as much as I loved designing it. If you complete your shrug, I would absolutely love to see it. Tag me on Instagram or share your photos in my Facebook group. Seeing your makes truly brightens my day.
If this pattern is calling your name but you’re not quite ready to start today, go ahead and pin it to your favorite Pinterest board so you can find it easily later. And if you do make this shrug, please drop a comment below. I love hearing which colors you chose and how it turned out.
