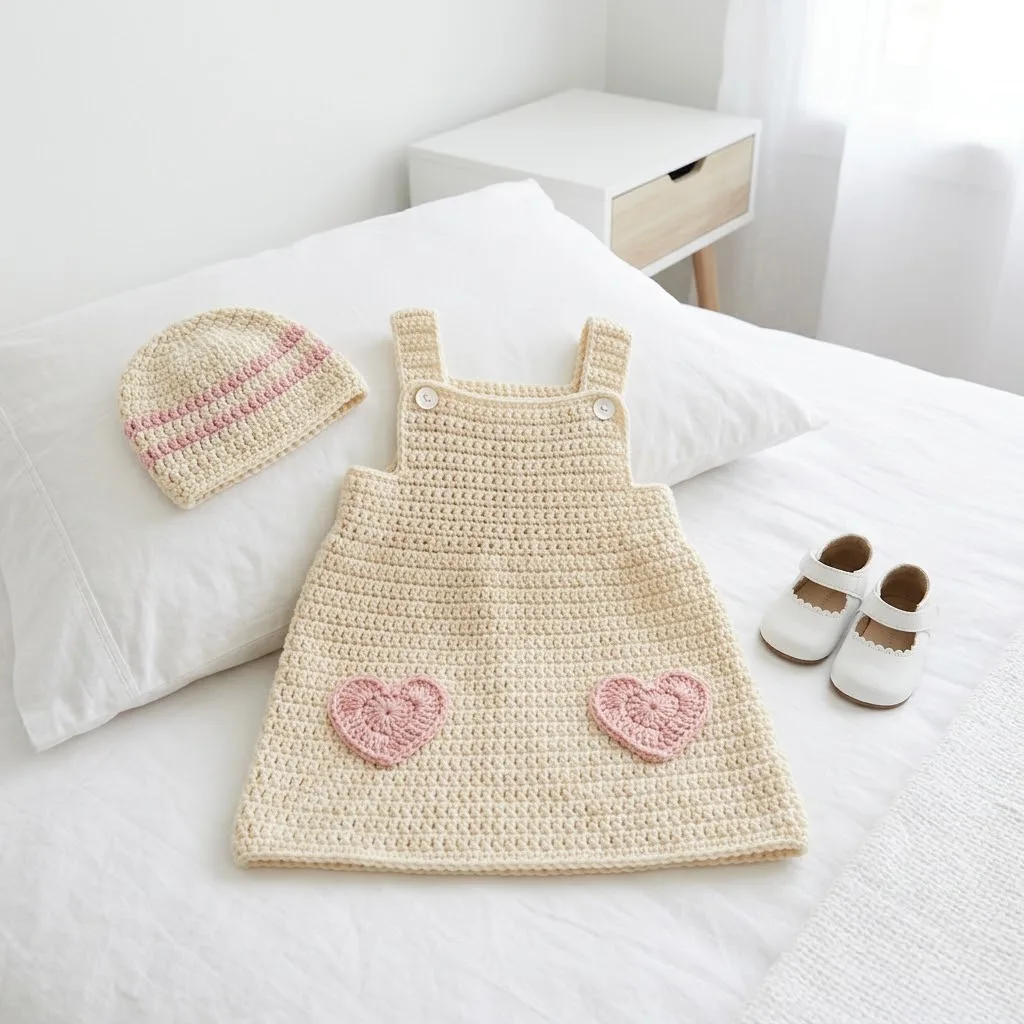
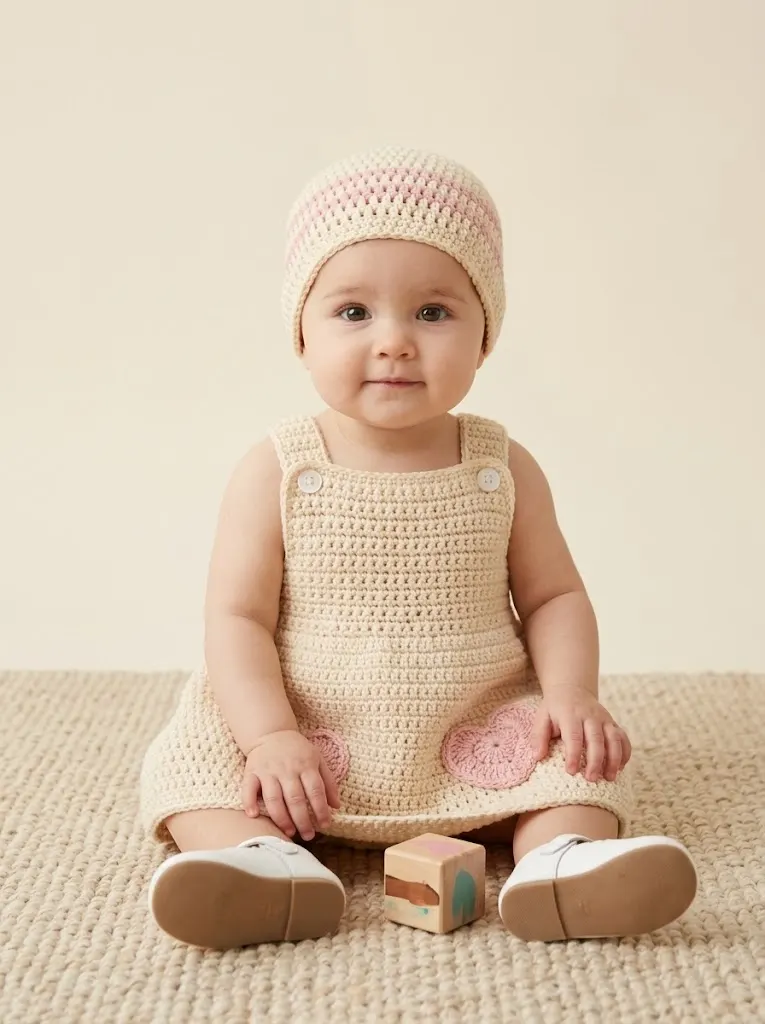
I’ve been dreaming about designing the perfect baby pinafore for months now. Something classic, something sweet, something that would make every crafter say "I need to make that." I wanted a design that beginners could tackle confidently, with clean lines and just enough charm to make it special. When I finally finished this little dress with its matching striped beanie and those darling pink heart appliqués, I actually squealed. I am SO pleased with how it turned out, and I cannot wait to share every single detail with you.
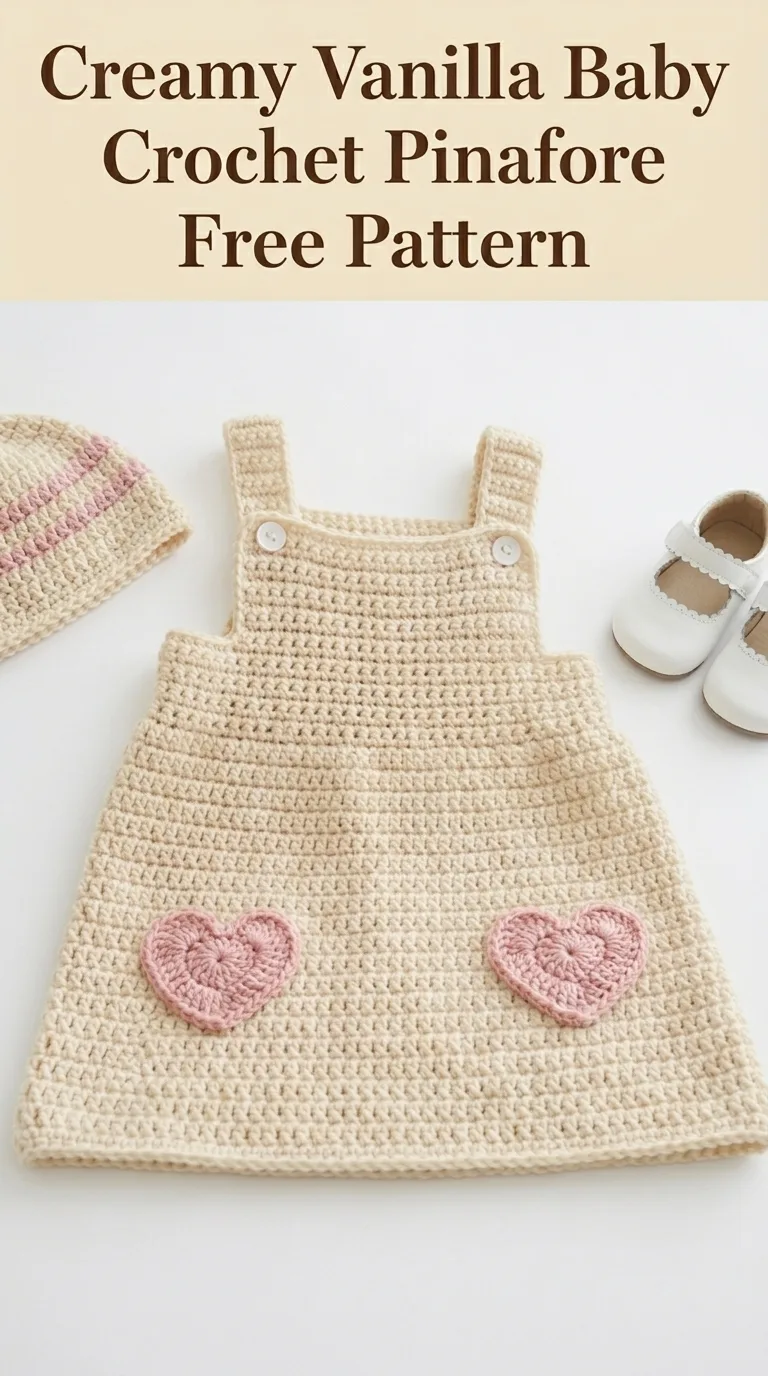
This creamy vanilla baby crochet pinafore pattern creates an heirloom-quality dress that works up beautifully in worsted weight yarn. The simple construction uses basic stitches throughout, making it perfect for confident beginners ready to try their first garment project. Those pink crocheted hearts on the front? Absolutely optional, but they add the sweetest finishing touch.
Why You’ll Love This Baby Pinafore Crochet Pattern
This crochet baby dress pattern hits all the right notes. The classic A-line silhouette looks adorable on every baby. The button straps make dressing and diaper changes so much easier for parents. And that neutral cream color pairs beautifully with literally everything in a baby’s wardrobe.
The construction is wonderfully straightforward. You’ll work the body in rows from the bottom up, shape the bodice with simple decreases, then add the straps separately. No complicated shaping, no confusing increases, no joining in weird places. Just honest, satisfying crochet that builds into something truly special.
Skill level: Confident beginner to intermediate. If you can work single crochet and double crochet in rows, you can absolutely make this pinafore.
Materials Needed for the Baby Pinafore Pattern
Yarn:
I recommend using a soft acrylic or cotton blend yarn for baby items. Look for something labeled machine washable, because parents will thank you. The yarn in the photo appears to be a light worsted weight with a smooth, slightly matte finish.
Hook:
Notions:
Gauge for This Crochet Baby Dress
14 stitches and 16 rows = 4 inches in single crochet
Please, please check your gauge before starting. I know it feels tedious, but baby garments need to fit properly. Work a small swatch, measure it, and adjust your hook size if needed. Too many stitches per inch? Go up a hook size. Too few? Go down.
Finished Measurements
This pattern is written for size 6-12 months.
Abbreviations and Stitch Definitions
Let me walk you through every stitch abbreviation you’ll encounter. Even if you know these by heart, a quick refresher never hurts.
Ch = Chain. Wrap yarn over hook, pull through loop on hook. This creates the foundation for most crochet projects.
Sl st = Slip stitch. Insert hook into stitch, yarn over, pull through both the stitch and the loop on your hook in one motion. Used for joining and moving across stitches without adding height.
Sc = Single crochet. Insert hook into stitch, yarn over and pull up a loop (two loops on hook), yarn over and pull through both loops. The shortest regular stitch, creates a dense, sturdy fabric.
Dc = Double crochet. Yarn over, insert hook into stitch, yarn over and pull up a loop (three loops on hook), yarn over and pull through two loops (two loops remain), yarn over and pull through remaining two loops. Taller than single crochet, creates a slightly lacier fabric.
Sc2tog = Single crochet two together (a decrease). Insert hook into first stitch, yarn over and pull up a loop, insert hook into next stitch, yarn over and pull up a loop (three loops on hook), yarn over and pull through all three loops. This turns two stitches into one.
St(s) = Stitch(es)
Rep = Repeat
MC = Main color
CC = Contrast color
Step-by-Step Crochet Pinafore Pattern Instructions
Take a deep breath. We’re going to work through this together, one section at a time. The pinafore is worked from the bottom hem up to the bodice, then the straps are added at the end.
Skirt Section
The skirt starts wider at the hem and gradually narrows toward the waist. This creates that classic A-line shape.
Foundation Row: With MC, ch 72.
Row 1: Sc in 2nd ch from hook and in each ch across. Turn. (71 sts)
Rows 2-4: Ch 1, sc in each st across. Turn. (71 sts)
Here’s where we start the gentle shaping. Don’t worry, it’s just a decrease at each end every few rows.
Row 5: Ch 1, sc2tog, sc in each st to last 2 sts, sc2tog. Turn. (69 sts)
Rows 6-8: Ch 1, sc in each st across. Turn. (69 sts)
Row 9: Ch 1, sc2tog, sc in each st to last 2 sts, sc2tog. Turn. (67 sts)
Rows 10-12: Ch 1, sc in each st across. Turn. (67 sts)
Row 13: Ch 1, sc2tog, sc in each st to last 2 sts, sc2tog. Turn. (65 sts)
Rows 14-16: Ch 1, sc in each st across. Turn. (65 sts)
Row 17: Ch 1, sc2tog, sc in each st to last 2 sts, sc2tog. Turn. (63 sts)
Rows 18-20: Ch 1, sc in each st across. Turn. (63 sts)
Row 21: Ch 1, sc2tog, sc in each st to last 2 sts, sc2tog. Turn. (61 sts)
Rows 22-24: Ch 1, sc in each st across. Turn. (61 sts)
Row 25: Ch 1, sc2tog, sc in each st to last 2 sts, sc2tog. Turn. (59 sts)
Rows 26-28: Ch 1, sc in each st across. Turn. (59 sts)
Row 29: Ch 1, sc2tog, sc in each st to last 2 sts, sc2tog. Turn. (57 sts)
Rows 30-32: Ch 1, sc in each st across. Turn. (57 sts)
Continue this pattern (decrease row, then 3 plain rows) until you have 49 stitches remaining. This should take approximately 48 rows total for the skirt section.
Your skirt should measure roughly 12 inches from the foundation chain at this point. If you want a longer dress, simply add more plain rows before beginning the bodice.
Bodice Section
Now we’ll shape the front bodice. The back of this pinafore is open, which is traditional for baby pinafores and makes it much easier to dress little ones.
Row 1 (Bodice): Ch 1, sc in each st across. Turn. (49 sts)
Rows 2-6: Ch 1, sc in each st across. Turn. (49 sts)
This creates about 1.5 inches of straight bodice below the armholes.
Shaping the Armholes
Row 7: Ch 1, sl st in first 5 sts, ch 1, sc in next 39 sts, leave remaining 5 sts unworked. Turn. (39 sts)
Row 8: Ch 1, sc2tog, sc to last 2 sts, sc2tog. Turn. (37 sts)
Row 9: Ch 1, sc2tog, sc to last 2 sts, sc2tog. Turn. (35 sts)
Rows 10-14: Ch 1, sc in each st across. Turn. (35 sts)
Fasten off and weave in ends.
Making the Straps (make 2)
The straps are worked separately and then attached to the bodice with buttons. This is such a smart design because it allows for adjustability as baby grows.
Row 1: With MC, ch 8. Sc in 2nd ch from hook and in each ch across. Turn. (7 sts)
Rows 2-24: Ch 1, sc in each st across. Turn. (7 sts)
Your strap should measure approximately 6 inches. Adjust the number of rows for a longer or shorter strap if needed.
Buttonhole Row: Ch 1, sc in first 2 sts, ch 2, skip 2 sts, sc in last 3 sts. Turn. (5 sc + ch-2 space)
Final Row: Ch 1, sc in first 3 sts, 2 sc in ch-2 space, sc in last 2 sts. (7 sts)
Fasten off and weave in ends.
Repeat for the second strap.
Attaching the Straps
Position the straps on the back of the bodice, spacing them evenly (approximately 8-10 stitches in from each side edge). The buttonhole end should extend over the front bodice.
Using your yarn needle and a length of MC, whip stitch the bottom of each strap securely to the back top edge of the bodice. Make sure they’re attached firmly since these will bear some weight.
Sew buttons to the front bodice, positioning them to align with the buttonholes when the straps cross over the shoulders.
Crocheted Heart Appliqué Pattern (Make 2)
These sweet little hearts are the finishing touch that takes this pinafore from lovely to absolutely irresistible. They’re worked in a magic ring, which sounds intimidating but is actually quite simple once you get the hang of it.
With CC:
Round 1: Make a magic ring (or ch 4 and sl st to form a ring if magic rings make you nervous). Ch 3 (counts as first dc), 3 dc into ring, 4 tr into ring, ch 1, 1 tr into ring, ch 1, 4 tr into ring, 4 dc into ring, ch 3, sl st into ring.
Pull the magic ring tight and fasten off, leaving a long tail for sewing.
The heart should measure approximately 2 inches wide. If yours looks a bit wonky, don’t panic. Block it lightly by pinning it into shape and spritzing with water. Let dry completely.
Attaching the Hearts
Position both hearts on the lower front of the pinafore, near the hem and spaced evenly apart (as shown in the photo). Using your yarn needle and the long tail, whip stitch around the entire edge of each heart to secure it to the dress.
Take your time here. Neat, even stitches make all the difference in the finished look.
Matching Striped Beanie Pattern (Bonus!)
Because what’s cuter than a matching set? This simple beanie uses the same yarn and works up in about an hour.
Size: 6-12 months (approximately 16 inch circumference)
Beanie Instructions
With MC:
Round 1: Make a magic ring. Ch 1, 8 sc into ring. Pull tight, sl st to first sc to join. (8 sts)
Round 2: Ch 1, 2 sc in each st around. Sl st to join. (16 sts)
Round 3: Ch 1, *sc in first st, 2 sc in next st* rep around. Sl st to join. (24 sts)
Round 4: Ch 1, *sc in first 2 sts, 2 sc in next st* rep around. Sl st to join. (32 sts)
Round 5: Ch 1, *sc in first 3 sts, 2 sc in next st* rep around. Sl st to join. (40 sts)
Round 6: Ch 1, *sc in first 4 sts, 2 sc in next st* rep around. Sl st to join. (48 sts)
Round 7: Ch 1, *sc in first 5 sts, 2 sc in next st* rep around. Sl st to join. (56 sts)
Rounds 8-10: Ch 1, sc in each st around. Sl st to join. (56 sts)
Change to CC for stripe:
Rounds 11-12: Ch 1, sc in each st around. Sl st to join. (56 sts)
Change back to MC:
Rounds 13-17: Ch 1, sc in each st around. Sl st to join. (56 sts)
Change to CC for second stripe:
Rounds 18-19: Ch 1, sc in each st around. Sl st to join. (56 sts)
Change back to MC:
Rounds 20-24: Ch 1, sc in each st around. Sl st to join. (56 sts)
Fasten off and weave in all ends.
Finishing Your Baby Crochet Pinafore
Once all pieces are complete and assembled, give your pinafore a gentle blocking. Lay it flat on a towel, shape it with your hands, and let it rest overnight. This evens out any uneven stitches and helps the garment drape beautifully.
Weave in any remaining yarn tails. I like to weave mine through at least 2-3 inches of stitches, then reverse direction for extra security. Baby clothes get washed frequently, so those ends need to stay put.
Care Instructions
Include these care instructions when gifting:
Tips for Customizing This Pattern
Want a different size? Add or subtract stitches from your foundation chain in multiples of 2, and adjust the decrease schedule accordingly.
Prefer a different neckline? You could work the bodice a bit longer before adding straps for more coverage.
Not a fan of hearts? Try flowers, stars, or leave the pinafore plain. It’s gorgeous either way.
Making it as a gift? This pattern makes a beautiful baby shower present, especially when paired with the matching beanie.
Thank you so much for choosing this pattern for your next project. I truly hope you love making this sweet little pinafore as much as I loved designing it. If you make one, I would absolutely love to see it! Tag me on Instagram or share a photo in our Facebook group. Seeing your creations honestly makes my whole day.
If this baby crochet pinafore pattern has you excited to get started, go ahead and save it to your Pinterest boards so you can find it easily when you’re ready to cast on. And please drop a comment below if you make one. I’d love to hear which color combination you choose, and any questions along the way are always welcome!
