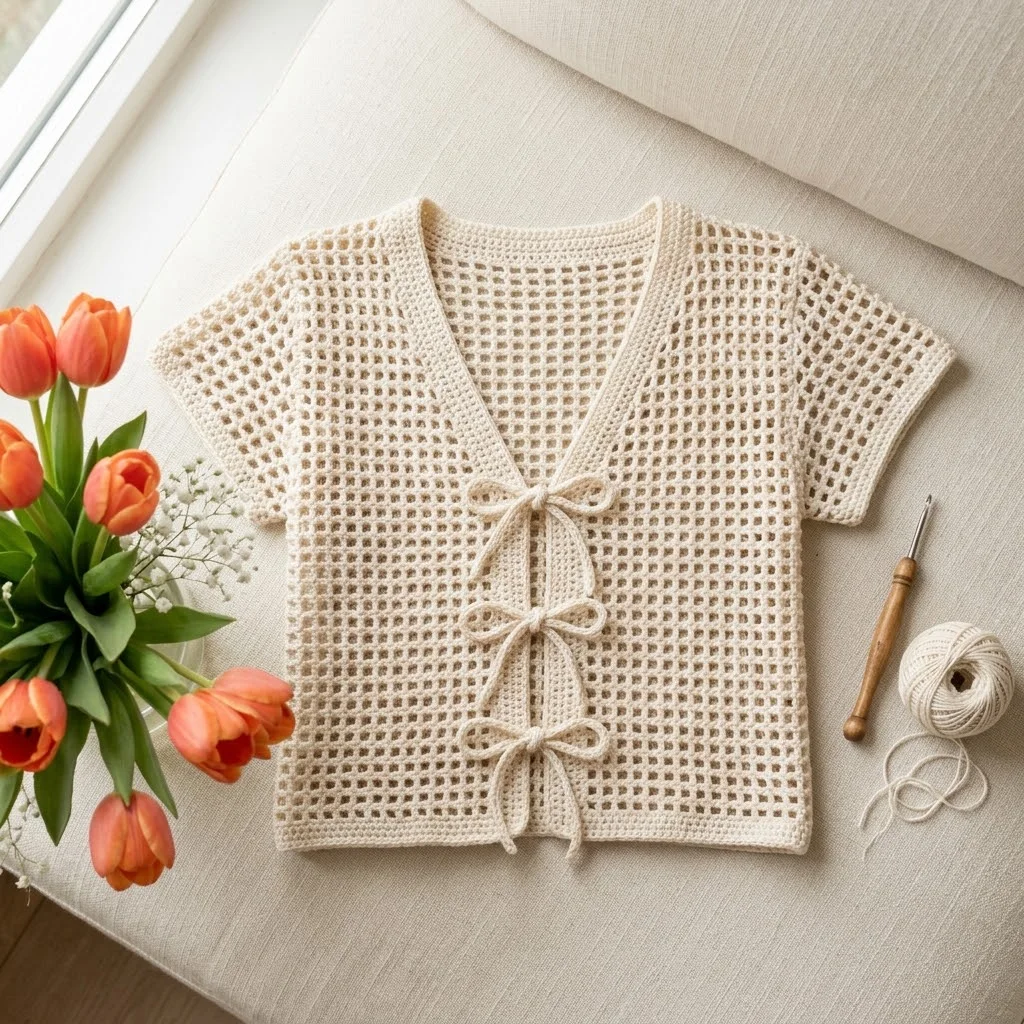
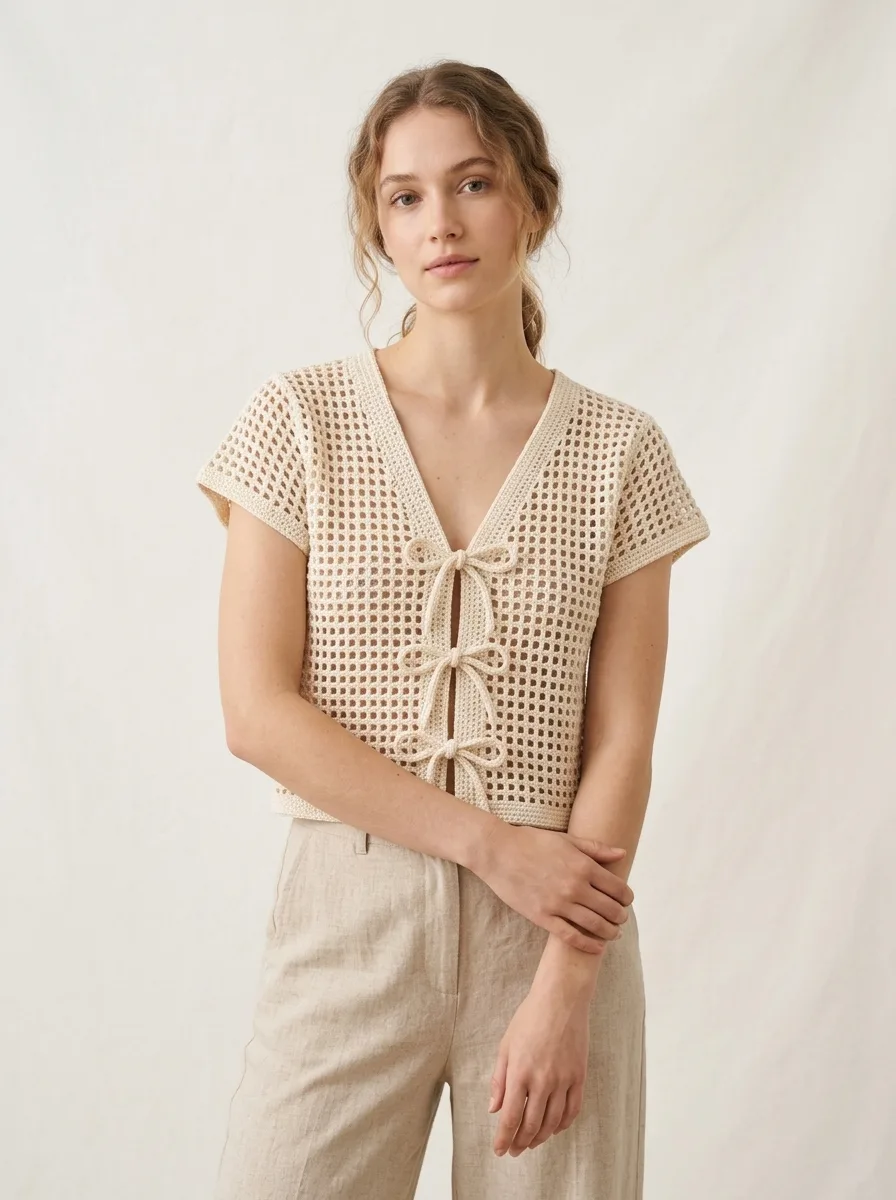
This is a lightweight wrap cardigan with an open mesh stitch pattern and tie front closure. It uses basic stitches in a simple repeat. The construction is beginner friendly with minimal shaping.
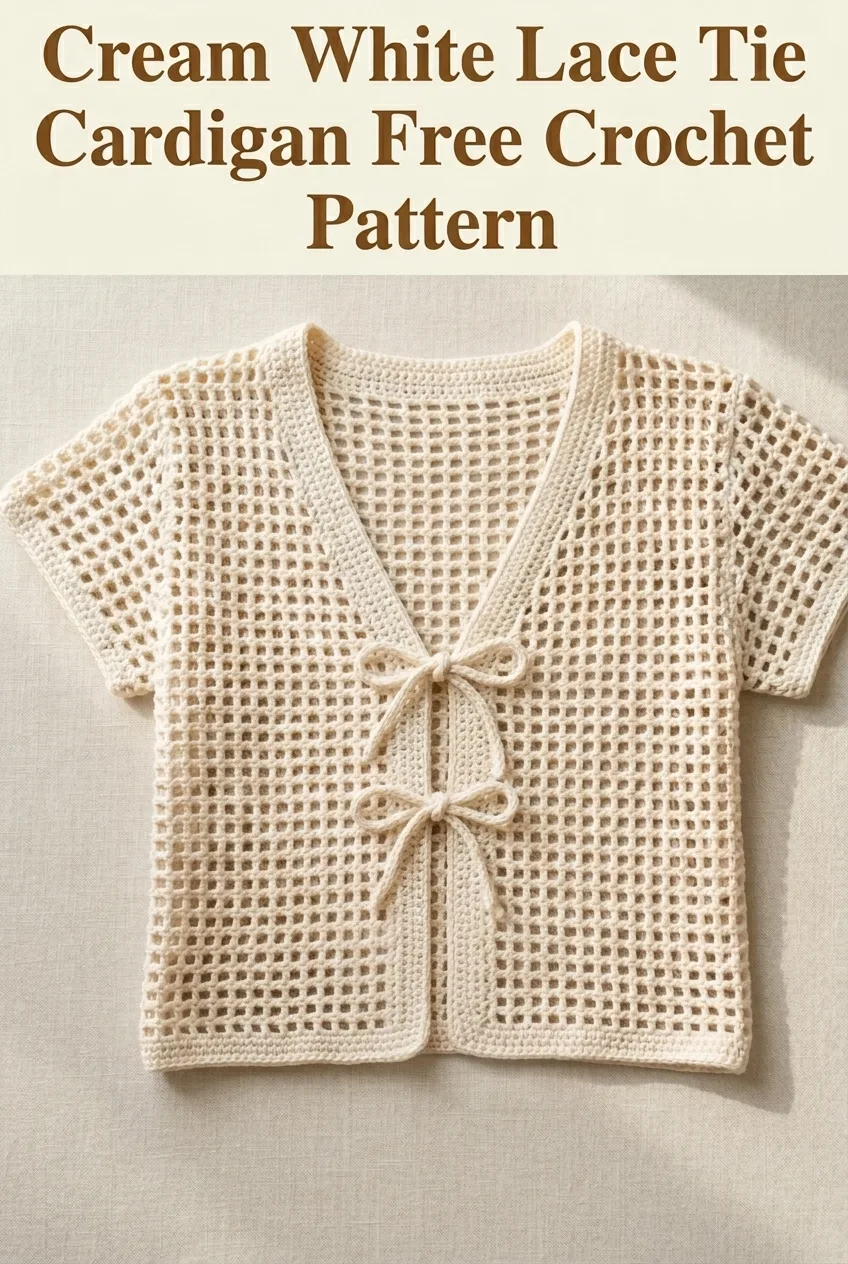
I designed this piece for warm weather layering. The open grid pattern creates breathability while the cropped length keeps it modern. Four tie closures at the front give you control over the fit. You can wear it loose and flowy or cinched close to the body.
Why You Will Love This Crochet Cardigan Pattern
This cardigan looks intricate but relies on one easy stitch combination repeated throughout. The mesh creates visual interest without complicated techniques. Once you establish the pattern, you can work almost on autopilot.
The cropped length makes this a quick project compared to full length cardigans. You will finish the body in a weekend if you work consistently. The short sleeves add just a few more hours of work.
The tie front closure eliminates the need for buttons, buttonholes, or zippers. You simply attach crocheted ties at strategic points along the front edges. This is perfect if you have avoided garment projects because of finishing details.
Materials Needed for Your Lace Tie Cardigan
Yarn: Approximately 800 to 1200 yards of fingering weight yarn (also called sock weight or category 1). Look for cotton, cotton blend, or bamboo for the best drape in warm weather. The sample uses a cream or natural ecru shade. You will need more yardage for larger sizes.
Hook: 3.25mm (US D/3) crochet hook. Adjust up or down to match gauge.
Notions: Yarn needle for weaving ends, stitch markers, measuring tape, scissors.
Gauge: 20 stitches and 10 rows equals 4 inches in the mesh pattern after blocking. Gauge matters for garment fit so please swatch first.
Skill Level
This pattern is beginner to intermediate friendly. You should be comfortable with basic stitches and counting. The mesh pattern uses a two row repeat that becomes intuitive quickly.
If you have never made a garment before, this is a great first project. The pieces are worked flat and seamed. No complicated shaping or picking up stitches required.
Stitch Abbreviations and Definitions
Ch (chain): Yarn over, pull through loop on hook. This creates your foundation and spaces in the mesh.
Sc (single crochet): Insert hook, yarn over, pull up loop, yarn over, pull through both loops. Creates a short dense stitch.
Dc (double crochet): Yarn over, insert hook, yarn over, pull up loop, yarn over, pull through two loops, yarn over, pull through remaining two loops. This is the main stitch in your mesh pattern.
Sk (skip): Pass over the indicated number of stitches without working into them.
Sp (space): The gap created by chain stitches. You will work into these spaces rather than into individual stitches.
St/sts (stitch/stitches): Individual stitch or multiple stitches.
Rep (repeat): Work the instructions again as directed.
Understanding the Mesh Stitch Pattern
The open grid look comes from a simple filet mesh pattern. Filet crochet traditionally uses double crochet stitches separated by chain spaces. This creates a regular grid of holes.
Here is how the basic mesh works:
Foundation: Chain a multiple of 3 plus 1.
Row 1: Dc in 5th ch from hook (skipped chains count as dc plus ch 1), *ch 1, sk 1 ch, dc in next ch*, rep from * across. Turn.
Row 2: Ch 4 (counts as dc plus ch 1), sk first dc and ch 1 sp, dc in next dc, *ch 1, sk ch 1 sp, dc in next dc*, rep from * across. Turn.
Repeat Row 2 for pattern.
The ch 4 turning chain counts as your first dc plus the ch 1 space. This keeps your edges neat and your grid aligned.
Sizing Information
This pattern includes instructions for size Small. The finished bust measurement is approximately 36 inches with the fronts meeting at center. Adjust your starting chain count for larger or smaller sizes. Add or subtract in multiples of 3 to maintain the mesh pattern.
| Size | Finished Bust | Starting Chain (Back) |
|---|---|---|
| XS | 32 inches | 82 |
| S | 36 inches | 94 |
| M | 40 inches | 106 |
| L | 44 inches | 118 |
| XL | 48 inches | 130 |
Step by Step Crochet Pattern Instructions
Back Panel
The back is worked flat from bottom to top in the mesh pattern.
Foundation: Ch 94 (or adjust for your size).
Row 1: Dc in 5th ch from hook, *ch 1, sk 1 ch, dc in next ch*, rep from * across. Turn. (46 dc, 45 ch 1 sps)
Rows 2 through 50: Ch 4, sk first dc and ch 1 sp, dc in next dc, *ch 1, sk ch 1 sp, dc in next dc*, rep from * across. Turn. (46 dc, 45 ch 1 sps)
Your back panel should measure approximately 18 inches wide and 15 inches tall after 50 rows. Adjust row count for desired length.
Armhole Shaping:
Row 51: Sl st across first 6 sts (3 dc and 3 ch sps), ch 4, continue in mesh pattern until 6 sts remain, leave remaining sts unworked. Turn. (40 dc, 39 ch 1 sps)
Rows 52 through 65: Continue in mesh pattern across all stitches. Turn. (40 dc, 39 ch 1 sps)
Fasten off and weave in ends. Your back panel is complete.
Left Front Panel
Foundation: Ch 46.
Row 1: Dc in 5th ch from hook, *ch 1, sk 1 ch, dc in next ch*, rep from * across. Turn. (22 dc, 21 ch 1 sps)
Rows 2 through 50: Ch 4, sk first dc and ch 1 sp, dc in next dc, *ch 1, sk ch 1 sp, dc in next dc*, rep from * across. Turn. (22 dc, 21 ch 1 sps)
Armhole Shaping (worked at side edge):
Row 51: Sl st across first 6 sts, ch 4, continue in mesh pattern across. Turn. (19 dc, 18 ch 1 sps)
Rows 52 through 55: Continue in mesh pattern. Turn.
V Neck Shaping:
Row 56: Ch 4, work in mesh pattern until 3 sts remain at neck edge, leave remaining sts unworked. Turn. (18 dc, 17 ch 1 sps)
Row 57 through 65: Decrease 1 mesh unit at neck edge every row by leaving final 3 sts unworked. Continue until you have approximately 10 dc remaining for shoulder.
Fasten off.
Right Front Panel
Work the same as Left Front Panel, reversing all shaping. The armhole shaping occurs at the end of Row 51 instead of the beginning. Neck shaping occurs at the opposite edge.
Sleeves (Make 2)
The sleeves are worked flat and seamed.
Foundation: Ch 70.
Row 1: Dc in 5th ch from hook, *ch 1, sk 1 ch, dc in next ch*, rep from * across. Turn. (34 dc, 33 ch 1 sps)
Rows 2 through 15: Continue in mesh pattern. (34 dc, 33 ch 1 sps)
The sleeve should measure approximately 13 inches wide and 4.5 inches tall. Adjust length by adding or removing rows.
Fasten off, leaving a long tail for seaming.
Front Edging and V Neck Border
The solid edging around the front opening creates structure and provides attachment points for your ties.
Join yarn at bottom right front corner.
Row 1: Sc evenly up right front edge, around neckline, and down left front edge. Work approximately 3 sc for every 2 rows on the vertical edges. Work 1 sc in each st across back neck. Turn.
Rows 2 through 4: Ch 1, sc in each sc across. Turn.
Fasten off.
This creates a narrow solid border that frames the mesh beautifully.
Tie Closures (Make 8)
Each tie is a simple crocheted cord. You need 8 ties total for 4 sets of closures.
Foundation: Ch 60.
Row 1: Sc in 2nd ch from hook and in each ch across. (59 sc)
Fasten off, leaving a 6 inch tail for attaching.
If you prefer a more substantial tie, work a second row of sc. For a rounded cord, you can work sc in a spiral around the foundation chain without turning.
Assembly Instructions
Take your time with assembly. Proper seaming makes the difference between a handmade look and a professional finish.
Shoulder Seams
Place back panel and front panels right sides together. Using mattress stitch or whip stitch, join shoulder seams. Match your mesh grid carefully for invisible seams.
Side Seams
With right sides together, seam from bottom edge up to armhole opening. Leave armhole open.
Attach Sleeves
Fold sleeve in half to find center. Match center of sleeve cap to shoulder seam. Pin in place. Ease sleeve around armhole opening and pin at regular intervals. Seam using mattress stitch, working through both layers evenly.
Sleeve Seams
Fold sleeve with right sides together. Seam from cuff to underarm in one continuous line.
Attach Ties
Position your ties evenly spaced along the front edges. The sample shows 4 pairs of ties. Space them approximately 3 to 4 inches apart starting just below the bust line.
Thread the tail of each tie through to the wrong side of the front edging. Secure with several small stitches. Weave in ends thoroughly.
Blocking Your Finished Cardigan
Blocking transforms your cardigan from homemade to professional. For cotton and plant fiber yarns, wet blocking works best.
Soak your finished cardigan in cool water for 15 to 20 minutes. Gently squeeze out excess water without wringing. Roll in a clean towel to remove more moisture.
Lay flat on blocking mats or a clean towel. Shape to measurements. Pin the front edges straight. Open up the mesh grid with your fingers so all holes are uniform. Let dry completely before wearing.
Styling Your Lace Tie Cardigan
This versatile piece works with so many outfits. Layer it over a simple tank top and high waisted jeans for casual days. Pair with a maxi dress for a boho summer look. The cream color goes with everything in your closet.
For cooler evenings, wear a fitted long sleeve shirt underneath. The mesh allows the underlayer to show through for added visual interest.
The adjustable tie closure means you can style it different ways. Tie all four bows for a fitted look. Leave the bottom tie undone for more movement. Or drape it open entirely as a lightweight shrug.
Customization Ideas
Color: This pattern works beautifully in any color. Try soft pastels for spring, jewel tones for fall, or classic black for maximum versatility.
Length: Add more rows before armhole shaping for a longer cardigan. Subtract rows for a true bolero style.
Sleeves: Extend the sleeve length for three quarter sleeves. Or eliminate sleeves entirely for a vest version.
Closure: Replace ties with small buttons and button loops. Or skip closures entirely and wear it open.
Edging: Add a scalloped or picot edge instead of plain single crochet for a more decorative finish.
Troubleshooting Common Issues
Mesh holes are uneven: Check your tension. Looser tension creates larger holes. Try going down a hook size if your mesh looks too open.
Edges are wavy: Your turning chain may be too loose or too tight. Practice keeping consistent tension on those first few stitches of each row.
Front panels are different sizes: Count your stitches at the end of every row. Mark Row 1 with a stitch marker so you always know which side you started on.
Ties are twisting: Block your ties before attaching. Pin them straight and let them dry completely.
Care Instructions
Hand wash in cool water with mild detergent. Reshape while damp and lay flat to dry. Cotton yarn may shrink slightly in the dryer, so air drying is safest.
Store folded rather than hanging to prevent the mesh from stretching out of shape over time.
I hope you love making this cream white lace tie cardigan crochet pattern as much as I loved designing it. The combination of airy mesh and practical tie closures creates something truly special for your warm weather wardrobe. This step by step crochet tutorial gives you everything you need to create your own beautiful layering piece.
If you found this crochet cardigan pattern helpful, I would love to see your finished projects. The mesh stitch is so satisfying once you get into the rhythm, and I know yours will turn out beautifully.
Save this pattern to your Pinterest boards so you can find it when you are ready to start. And please leave a comment below if you make one. I genuinely love seeing what you create and hearing how the pattern worked for you. Happy crocheting!
