Looking for a layering piece that adds instant charm to any outfit? This crochet vest pattern combines textured puff stitches with sweet decorative bows for a look that works over button-downs, turtlenecks, or simple tees. The construction uses basic stitches arranged in an alternating pattern, making it approachable for confident beginners ready to try garment construction. It works up relatively quickly in worsted weight yarn, and the cropped length means you will not be working forever before seeing results. Whether you are making this for yourself or as a thoughtful handmade gift, this vest delivers cozy style without overwhelming complexity.
About This Peach Blossom Bow Crochet Vest Pattern
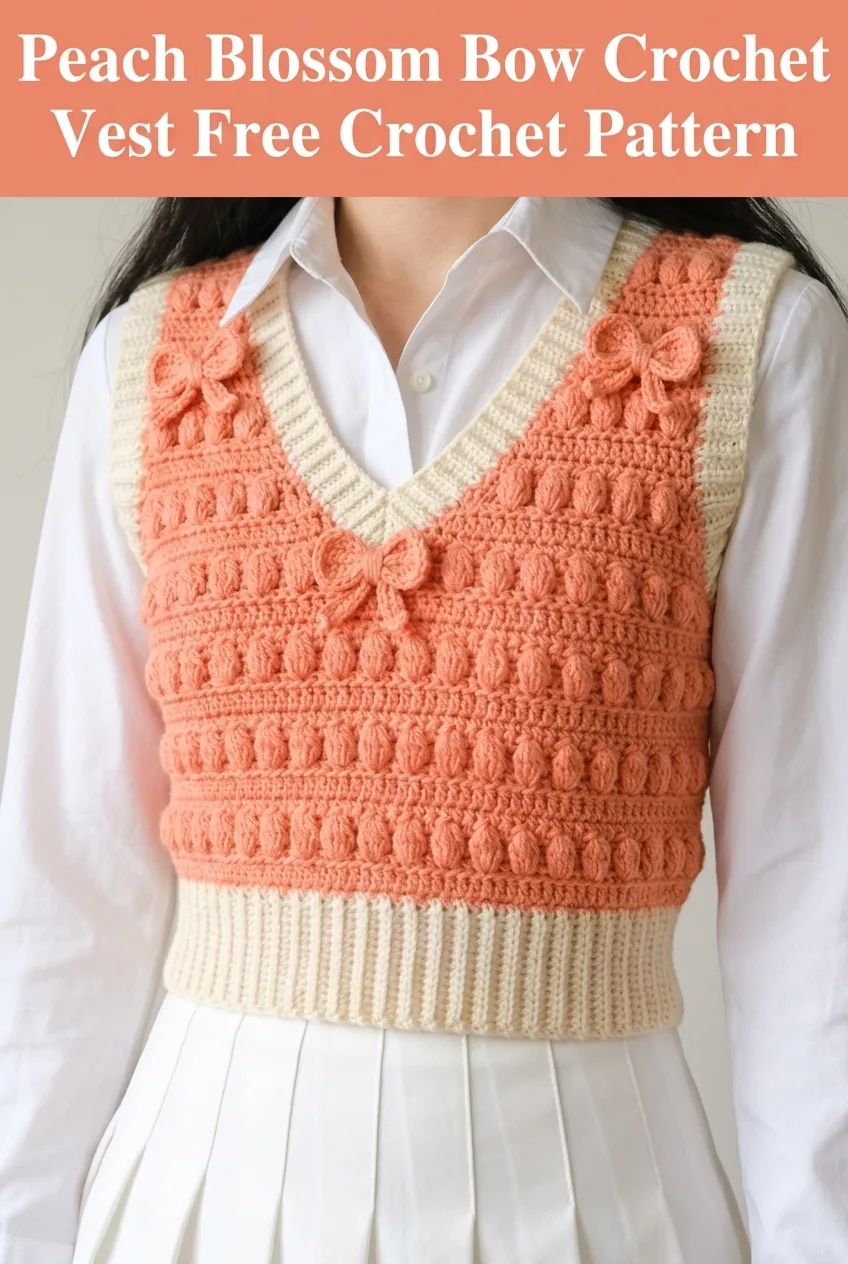
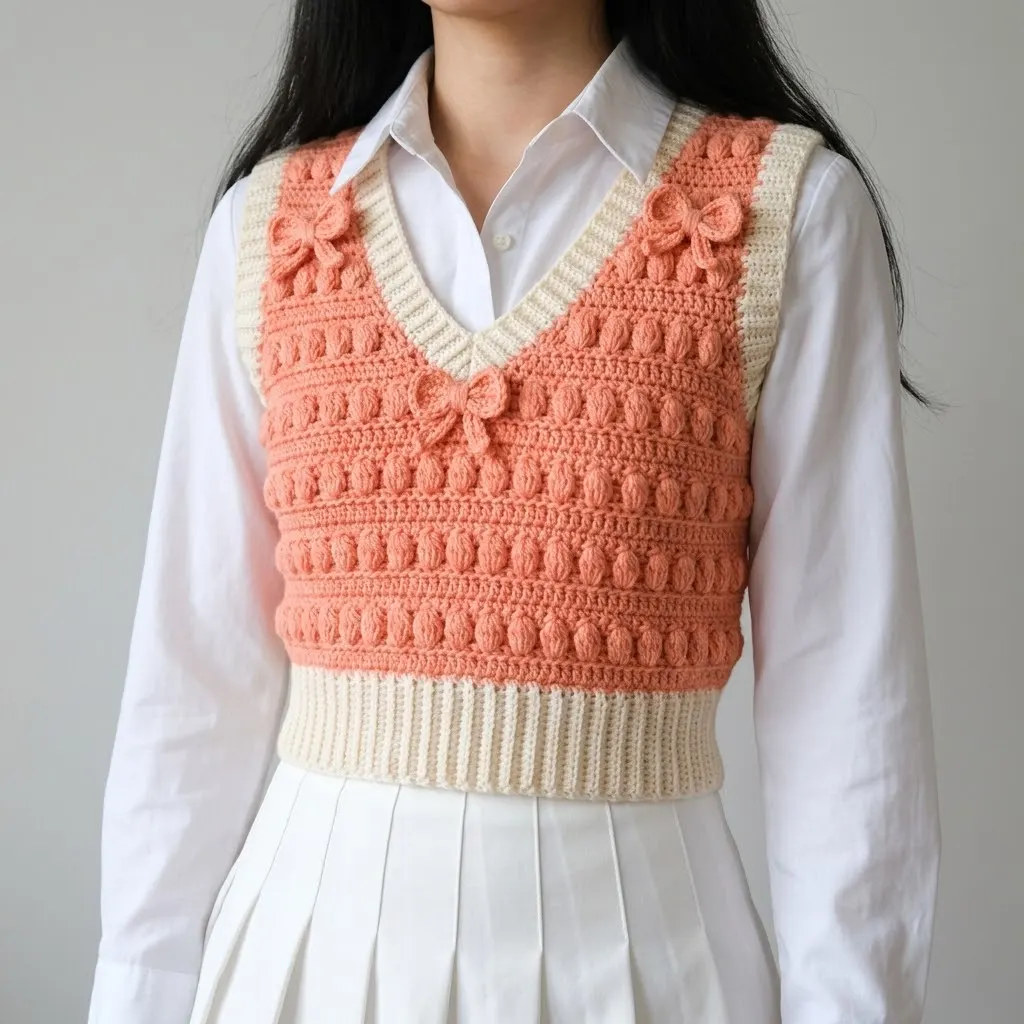
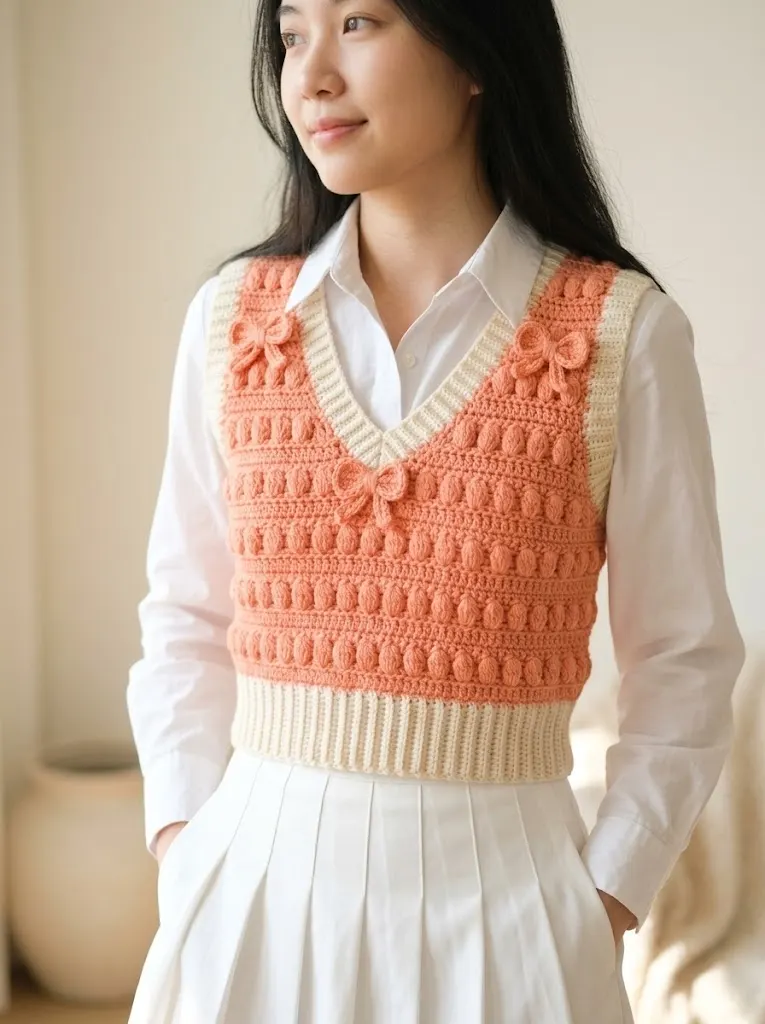
This cropped V-neck vest features a gorgeous textured body created by alternating rows of puff stitches with rows of single crochet. The ribbed trim at the hem and neckline adds stretch and polish in a contrasting cream color. Three adorable crocheted bow appliqués sit at the shoulders and center front, giving this piece its signature feminine touch.
The body is worked flat in two panels, front and back, then seamed at the shoulders and sides. The ribbed trim is added last, worked directly onto the edges. This construction method means no complicated shaping while you work, just straightforward rows that you seam together at the end.
Skill level: Intermediate beginner. You should be comfortable with basic stitches and ready to learn puff stitches if you have not tried them before.
Materials Needed
Yarn:
I recommend a smooth acrylic or cotton blend for stitch definition. The puff stitches really pop when the yarn has good structure without too much fuzziness.
Hook:
Notions:
Gauge
16 stitches and 12 rows = 4 inches in puff stitch pattern using 5.0mm hook.
Please check your gauge. Gauge matters for garments. If your gauge is off, your vest will not fit properly. Make a swatch, measure it, and adjust your hook size up or down as needed.
Finished Measurements
This pattern is written for size Small with a finished bust of approximately 34 inches and length of 16 inches from shoulder to hem. The cropped fit hits right at the natural waist.
Abbreviations and Stitch Definitions
ch = chain: Yarn over, pull through loop on hook. This creates the foundation for your work.
sl st = slip stitch: Insert hook, yarn over, pull through both the stitch and the loop on your hook in one motion. Used for joining and moving across stitches without adding height.
sc = single crochet: Insert hook into stitch, yarn over and pull up a loop (2 loops on hook), yarn over and pull through both loops. The shortest basic stitch.
hdc = half double crochet: Yarn over, insert hook into stitch, yarn over and pull up a loop (3 loops on hook), yarn over and pull through all 3 loops.
dc = double crochet: Yarn over, insert hook into stitch, yarn over and pull up a loop (3 loops on hook), yarn over and pull through 2 loops (2 loops remain), yarn over and pull through remaining 2 loops.
puff st = puff stitch: (Yarn over, insert hook into stitch, yarn over and pull up a loop) 3 times in the same stitch (7 loops on hook), yarn over and pull through all 7 loops. This creates a rounded, textured bump. Some patterns call this a bobble, but true puffs use half-pulled loops rather than completed stitches.
sk = skip: Miss the indicated stitch and work into the next one.
BLO = back loop only: Insert your hook under only the back loop of the stitch, leaving the front loop unworked. This creates the ribbed texture.
Special Techniques
Working the Puff Stitch
The puff stitch is the star of this vest. Here is a detailed breakdown:
1. Yarn over your hook
2. Insert hook into the designated stitch
3. Yarn over and pull up a loop, pulling it up to about the height of a double crochet (do not pull tight)
4. Repeat steps 1 through 3 two more times in the same stitch
5. You now have 7 loops on your hook
6. Yarn over and pull through all 7 loops at once
7. Chain 1 to close the puff (this chain locks the puff in place)
Tip: Keep your tension loose when pulling up loops. Tight loops make it nearly impossible to pull through all 7 at the end. If you are struggling, try pulling up slightly taller loops.
Pattern Instructions
Back Panel
With MC and 5.0mm hook, ch 69.
Row 1 (RS): Sc in 2nd ch from hook and in each ch across. (68 sc)
Row 2: Ch 1, turn. Sc in each st across. (68 sc)
Row 3: Ch 1, turn. Sc in first st, *puff st in next st, ch 1, sk next st, sc in next st; repeat from * across. (68 sts including chains)
Row 4: Ch 1, turn. Sc in each st and ch-1 space across. (68 sc)
Row 5: Ch 1, turn. Sc in each st across. (68 sc)
Row 6: Ch 1, turn. Sc in each st across. (68 sc)
Row 7: Ch 1, turn. Sc in first 2 sts, *puff st in next st, ch 1, sk next st, sc in next st; repeat from * to last st, sc in last st. (68 sts)
Row 8: Ch 1, turn. Sc in each st and ch-1 space across. (68 sc)
Repeat Rows 3 through 8 for pattern until piece measures approximately 10 inches from beginning, ending on a Row 4 or Row 8.
Armhole Shaping:
Next Row: Ch 1, turn. Sl st in first 6 sts, ch 1, sc in same st as last sl st, continue in pattern across to last 6 sts, leave remaining 6 sts unworked. (56 sts)
Continue in established pattern for 5 more inches.
Shoulder Shaping:
Right Shoulder: Ch 1, turn. Work in pattern across first 18 sts only. Turn and work 2 more rows on these 18 sts. Fasten off.
Left Shoulder: Skip center 20 sts for back neck. Join yarn to next st. Ch 1, work in pattern across remaining 18 sts. Work 2 more rows. Fasten off.
Front Panel
Work same as Back Panel through armhole shaping row. (56 sts)
V-Neck Shaping (worked simultaneously with armhole):
Right Front:
Row 1: Ch 1, turn. Work in pattern across first 27 sts. Leave remaining sts unworked. (27 sts)
Row 2: Ch 1, turn. Sc2tog over first 2 sts (this is your decrease for the V-neck), continue in pattern to end. (26 sts)
Row 3: Ch 1, turn. Work in pattern to last 2 sts, sc2tog. (25 sts)
Continue decreasing 1 st at neck edge every row until 18 sts remain. Work even until front measures same as back to shoulder. Fasten off.
Left Front:
Join yarn at center front. Work as for Right Front, reversing shaping (decrease at opposite end of rows).
Ribbed Bottom Trim
With CC and 4.5mm hook, ch 12.
Row 1: Sc in 2nd ch from hook and in each ch across. (11 sc)
Row 2: Ch 1, turn. Sc in BLO of each st across. (11 sc)
Repeat Row 2 until ribbing measures approximately 34 inches (to fit around entire bottom edge of joined front and back panels).
Slip stitch short ends together to form a loop. Set aside.
Ribbed V-Neck Trim
With CC and 4.5mm hook, ch 10.
Row 1: Sc in 2nd ch from hook and in each ch across. (9 sc)
Row 2: Ch 1, turn. Sc in BLO of each st across. (9 sc)
Repeat Row 2 until ribbing is long enough to fit around entire neckline, armhole edges, and shoulder straps. Measure carefully, as you need approximately 60 inches total for a continuous trim around the V-neck and shoulder straps.
Bow Appliqués (Make 3)
With MC and 5.0mm hook, ch 25.
Row 1: Dc in 4th ch from hook and in each ch across. (22 dc)
Row 2: Ch 3, turn. Dc in each st across. (22 dc)
Row 3: Ch 3, turn. Dc in each st across. (22 dc)
Fasten off, leaving a long tail.
Fold the rectangle in half lengthwise, bringing short ends together. Wrap yarn tightly around the center several times to create the bow shape. Secure with a knot on the back.
Bow Center Wrap:
Ch 8. Sc in 2nd ch from hook and in each ch across. (7 sc)
Wrap this small strip around the center of the bow, covering the gathered area. Sew ends together on the back.
Assembly
1. Block all pieces before seaming. Wet blocking or steam blocking will even out your stitches and make seaming much easier.
2. Seam shoulders: Place front and back panels with right sides together. Whip stitch or mattress stitch shoulder seams closed.
3. Seam sides: With right sides together, seam from bottom edge up to armhole opening on each side.
4. Attach bottom ribbing: Pin the ribbed bottom trim to the bottom edge of the vest, stretching slightly to fit. The ribbing should pull in slightly for a fitted look. Whip stitch in place.
5. Attach V-neck trim: Starting at one side seam under the arm, pin the long ribbed trim around the armhole, up and over the shoulder strap, down the V-neck, around the point of the V, up the other side, over the shoulder, and around the other armhole. Whip stitch in place, easing around curves.
6. Attach bows: Position one bow at each shoulder where the cream trim meets the peach body. Position the third bow at the center front V. Sew securely in place.
7. Weave in all ends.
Helpful Tips for Success
Tension consistency matters. Your puff stitches should all be roughly the same size. If some are tight and some are loose, your fabric will look uneven. Practice on a swatch first.
Count your stitches. The puff stitch pattern can be tricky to count. After each plain single crochet row, count to make sure you have 68 stitches before starting the next puff row.
Try the vest on as you go. Hold it up to yourself periodically to check length. Everyone’s torso is different, and you may want it slightly longer or shorter.
The bows are optional. If you prefer a more minimal look, simply leave them off. The vest is beautiful either way.
Customization Ideas
Want to make this vest your own? Here are some variations to consider:
Care Instructions
Hand wash in cool water with mild detergent. Lay flat to dry, reshaping while damp. Do not hang dry, as the weight of the wet yarn can stretch the vest out of shape. Store folded, not on a hanger.
I really hope you enjoy making this Peach Blossom Bow Crochet Vest pattern. It has such a lovely vintage-inspired feel while still looking fresh and modern. The texture from those puff stitches is so satisfying, and the little bows add just the right amount of whimsy.
If you make this pattern, I would absolutely love to see your finished vest. Tag me on Instagram or share a photo in my Facebook group. Seeing your creations is honestly the best part of sharing patterns.
If you love this pattern, go ahead and pin it to your favorite Pinterest board so you can find it when you are ready to start. And please drop a comment below to let me know if you have any questions or just to say hi. Happy crocheting, friend!
