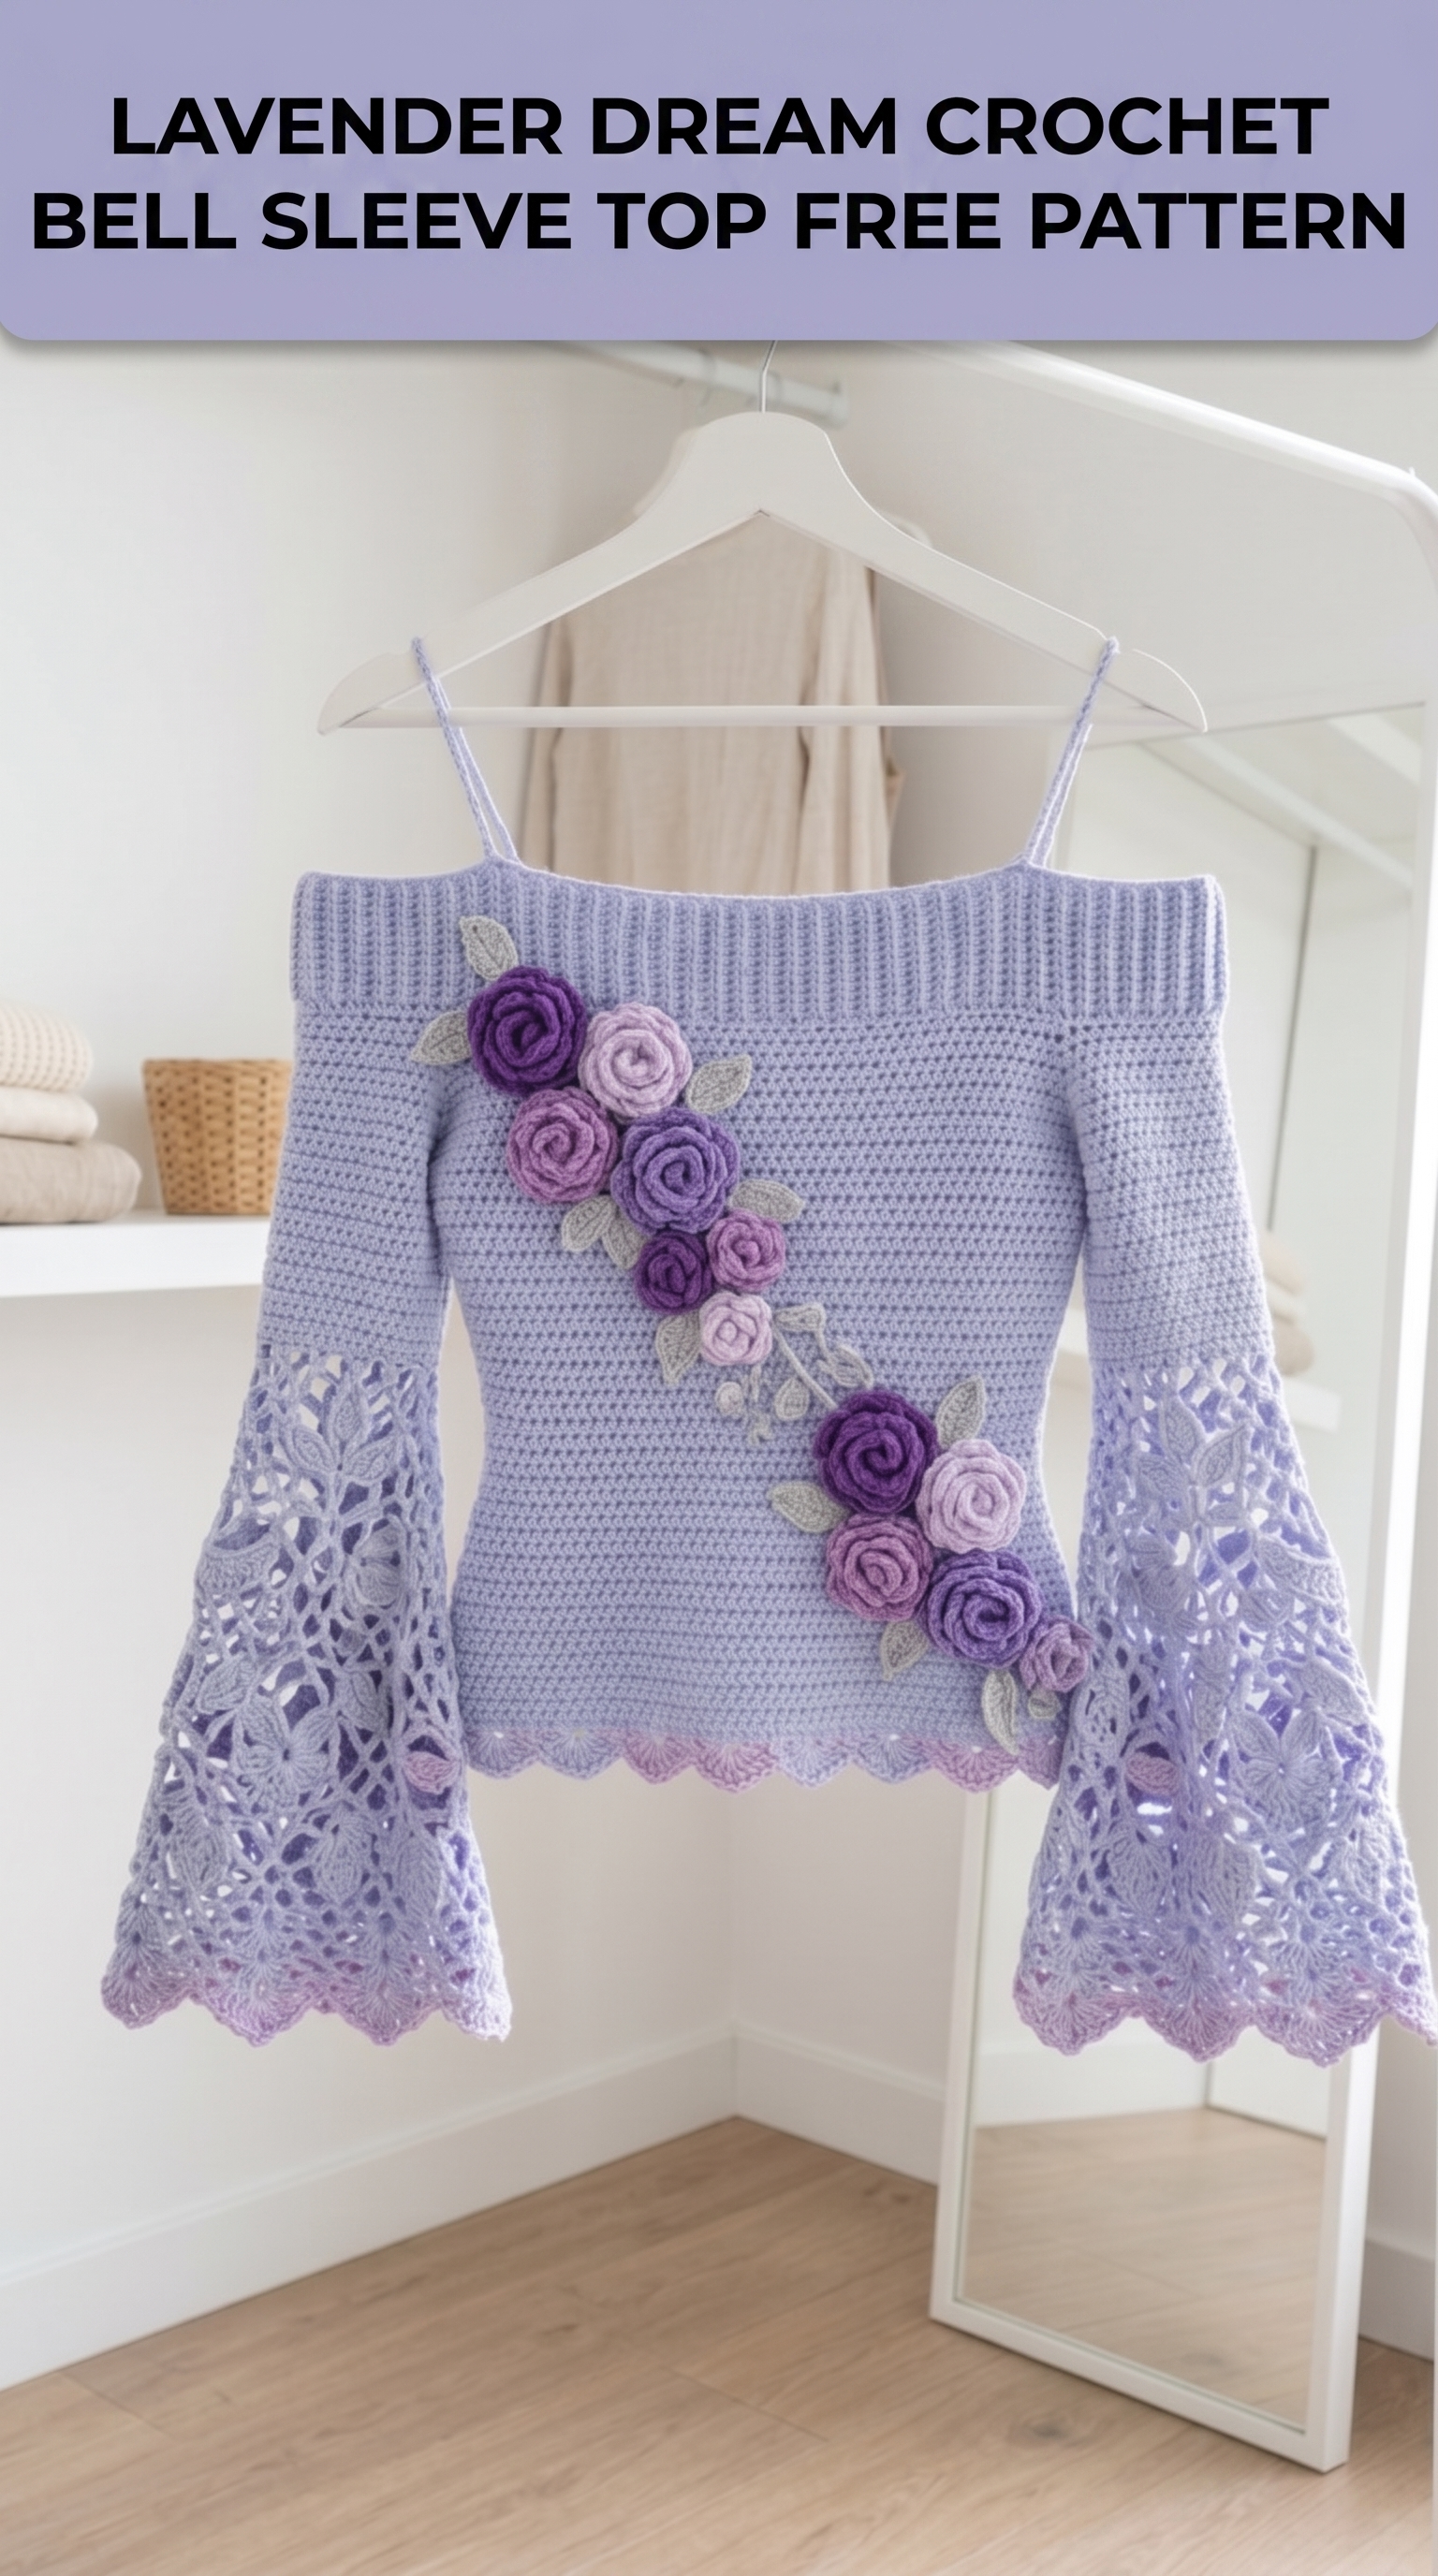
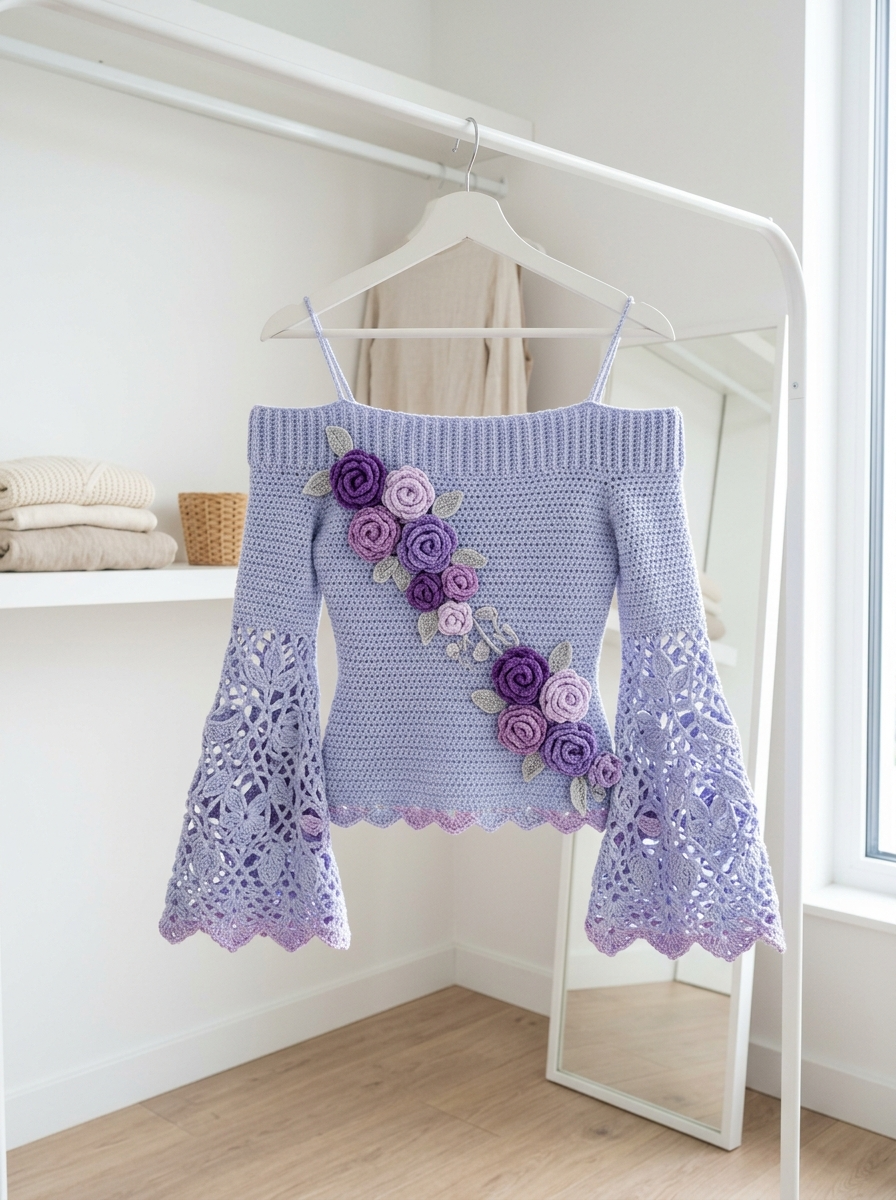
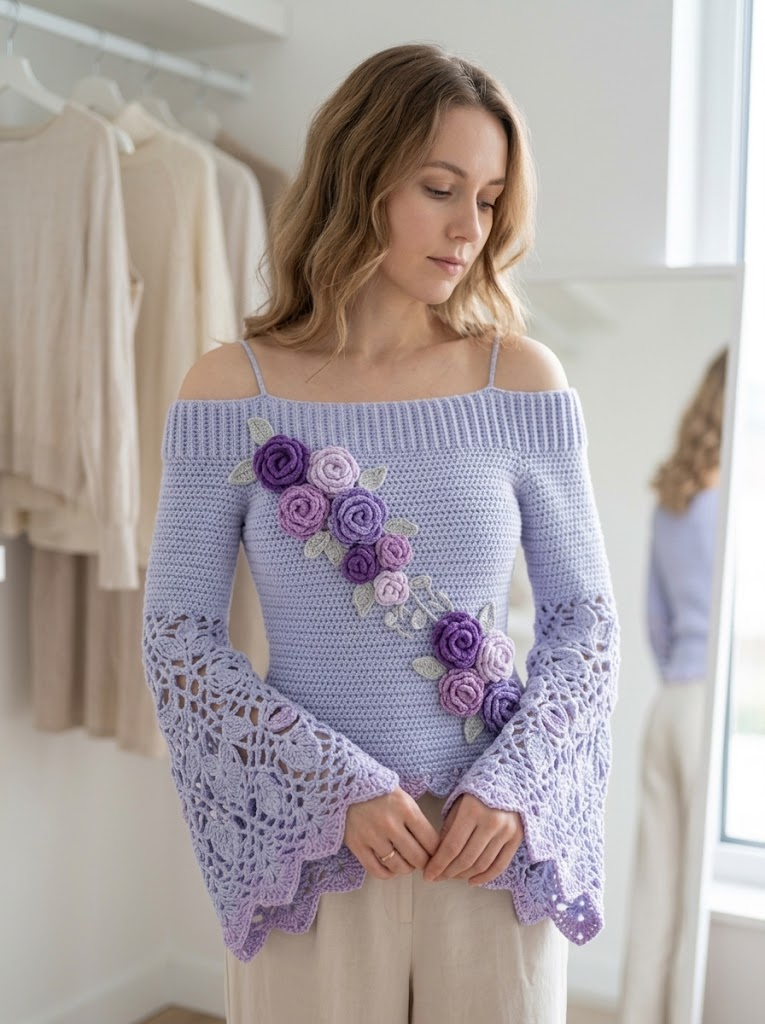
There is something absolutely magical about a garment that makes you feel like you stepped out of a romantic garden party. This Lavender Dream Crochet Bell Sleeve Top is exactly that kind of piece. It combines elegant off-shoulder styling with dramatic lace bell sleeves and the sweetest dimensional rose appliqués cascading down the bodice.
I designed this top for intermediate crocheters who want to challenge themselves without feeling overwhelmed. If you can work basic stitches in rows and rounds, you can absolutely make this. The construction is simpler than it looks. Promise.
Let me walk you through every single step.
Why This Crochet Bell Sleeve Top Pattern Works
This is not your average beginner project. But it is not impossibly difficult either. The bodice uses straightforward stitches worked in the round. The bell sleeves are made separately using a lace motif technique. The roses are small individual pieces you sew on at the end.
Breaking it into components makes the whole project manageable. You will never feel like you are juggling too many techniques at once.
The finished top features:
Skill Level
Intermediate. You should be comfortable with working in the round, increasing and decreasing, and reading stitch patterns. The lace sleeves require attention but use familiar stitches.
Materials Needed
Yarn:
Yarn Weight: Light worsted or DK weight (category 3). A cotton or cotton blend works beautifully for drape and stitch definition. I recommend a smooth mercerized cotton.
Hook Sizes:
Notions:
Gauge
With 4.0mm hook in single crochet:
18 stitches x 20 rows = 4 inches square
Check your gauge. This is a fitted garment. Gauge matters here.
Finished Measurements
This pattern is written for size Small. Adjust stitch counts proportionally for other sizes.
Abbreviations and Stitch Definitions
Let me explain every stitch before we begin. No surprises later.
The Pattern
Part 1: Ribbed Neckband
The neckband creates that stretchy off-shoulder look. We work it flat in rows, then join.
Using 3.5mm hook and MC, ch 11.
Row 1: Sc in 2nd ch from hook and in each ch across. (10 sts)
Row 2: Ch 1, turn. Sc BLO in each st across. (10 sts)
Rows 3-120: Repeat Row 2.
This creates approximately 26-28 inches of ribbing. Adjust rows to fit your upper chest measurement plus 2 inches of ease.
Joining: Fold ribbing so short ends meet. Sl st through both layers to join into a tube. Do not fasten off.
Part 2: Bodice
Now we pick up stitches along the bottom edge of the ribbing and work down.
Setup Round: Using 4.0mm hook, ch 1. Work 120 sc evenly spaced around the bottom edge of the neckband, placing stitches in the row ends. Sl st to first sc to join. Place marker. (120 sts)
Rounds 1-4: Ch 1, sc in each st around. Sl st to join. (120 sts)
Round 5 (Increase for bust): Ch 1, *sc in next 14 sts, 2 sc in next st* repeat around. Sl st to join. (128 sts)
Rounds 6-10: Ch 1, sc in each st around. Sl st to join. (128 sts)
Round 11 (Increase): Ch 1, *sc in next 15 sts, 2 sc in next st* repeat around. Sl st to join. (136 sts)
Rounds 12-30: Ch 1, sc in each st around. Sl st to join. (136 sts)
At Round 30, you will divide for armholes.
Part 3: Armhole Division
Round 31: Ch 1, sc in next 34 sts. Ch 8 (this creates the underarm). Skip next 34 sts. Sc in next 34 sts. Ch 8. Skip remaining 34 sts. Sl st to join.
You now have front and back panels connected by chain bridges.
Round 32: Ch 1, sc in each st and each ch around. Sl st to join. (84 sts: 34 front + 8 ch + 34 back + 8 ch)
Rounds 33-56: Ch 1, sc in each st around. Sl st to join. (84 sts)
Part 4: Waist Shaping
Round 57 (Decrease): Ch 1, *sc in next 12 sts, sc2tog* repeat around. Sl st to join. (78 sts)
Rounds 58-62: Ch 1, sc in each st around. (78 sts)
Round 63 (Decrease): Ch 1, *sc in next 11 sts, sc2tog* repeat around. Sl st to join. (72 sts)
Rounds 64-70: Ch 1, sc in each st around. (72 sts)
Part 5: Hip and Hem
Round 71 (Increase): Ch 1, *sc in next 11 sts, 2 sc in next st* repeat around. (78 sts)
Rounds 72-80: Ch 1, sc in each st around. (78 sts)
Scallop Edging:
Rnd 81: *Sk 1 st, 5 dc in next st (shell made), sk 1 st, sl st in next st* repeat around. Fasten off.
This creates a pretty scalloped hem that mirrors the sleeve edges.
Part 6: Bell Sleeves (Make 2)
The sleeves are the showstopper. We work lace motifs and connect them in a cone shape.
Lace Motif (Make 8 for each sleeve, 16 total):
Using 4.0mm hook and MC, ch 6. Sl st to first ch to form ring.
Rnd 1: Ch 3 (counts as dc), 15 dc in ring. Sl st to top of ch-3. (16 dc)
Rnd 2: Ch 5 (counts as dc + ch 2), *dc in next st, ch 2* repeat around. Sl st to 3rd ch of ch-5. (16 dc, 16 ch-2 sps)
Rnd 3: Sl st into ch-2 sp. Ch 3, 2 dc in same sp, ch 2, *3 dc in next ch-2 sp, ch 2* repeat around. Sl st to top of ch-3. (16 groups of 3 dc)
Rnd 4: Ch 1, sc in each dc and 2 sc in each ch-2 sp around. Sl st to join. (64 sts)
Fasten off, leaving 12-inch tail for sewing.
Assembling the Sleeve:
Arrange 8 motifs in two rows of 4. Sew motifs together using whip stitch, matching stitch for stitch. Form into a tube by sewing the side edges together.
Sleeve Cap:
Join MC at top edge of motif tube.
Rnd 1: Ch 1, sc evenly around top opening, working approximately 60 sc. Sl st to join.
Rnds 2-10: Ch 1, sc in each st around, decreasing 4 sts evenly each round until opening measures approximately 10-11 inches around. (Approximately 24 sts after all decreases)
Attaching to Bodice:
Place sleeve into armhole opening. Whip stitch sleeve cap to armhole edge, easing to fit. Repeat for second sleeve.
Cuff Edging:
Join MC at bottom of sleeve.
Work scallop edging same as bodice hem: *Sk 1 st, 5 dc in next st, sk 1 st, sl st in next st* repeat around. Fasten off.
Part 7: Shoulder Straps (Make 2)
Using 3.5mm hook and MC, ch 80 (or desired length to reach from neckband front to neckband back).
Row 1: Sc in 2nd ch from hook and each ch across. Fasten off.
Sew straps to inside of neckband, placing approximately 3 inches from center front and center back.
Part 8: Rose Appliqués
This is where the magic happens. These roses look complex but use a simple spiral technique.
Large Rose (Make 3 in CC1, 2 in CC2):
Using 3.5mm hook, ch 40.
Row 1: Dc in 4th ch from hook. *Sk 1 ch, 3 dc in next ch* repeat across. (Approximately 19 shells)
Fasten off, leaving 18-inch tail. Roll the strip from the starting end, coiling tightly at first, then loosening slightly. Secure with tail, stitching through all layers at base.
Small Rose (Make 2 in CC2, 1 in CC1):
Using 3.5mm hook, ch 28.
Row 1: Dc in 4th ch from hook. *Sk 1 ch, 3 dc in next ch* repeat across.
Roll and secure same as large rose.
Leaf (Make 8 in CC3):
Ch 10.
Row 1: Sc in 2nd ch from hook, hdc in next ch, dc in next 3 ch, hdc in next ch, sc in next ch, sl st in next ch. Working along opposite side of chain: sl st in next ch, sc in next ch, hdc in next ch, dc in next 3 ch, hdc in next ch, sc in last ch. Sl st to first sc. Fasten off.
Part 9: Assembly and Finishing
Arranging the Roses:
Looking at the bodice, the roses cascade diagonally from the right shoulder area down across the front to the left hip. Lay the top flat and arrange roses before sewing.
Start with two larger roses near the right shoulder. Add medium roses in between. Finish with smaller roses and leaves near the left hip. Tuck leaves behind and around roses.
Sewing:
Using matching yarn colors, sew each rose through the base only. Secure leaves along their center line, letting edges curl naturally.
Weaving Ends:
Weave in all remaining ends. Block the bodice lightly if needed, being careful not to flatten the roses.
Tips for Success With This Crochet Pattern
Yarn choice matters. Cotton or cotton blend gives the best drape and shows the lace pattern beautifully. Acrylic will work but may not drape as elegantly.
Count your stitches. Especially on the bodice. Place markers every 20 stitches to catch errors early.
Make the roses first. They are quick wins that build confidence before tackling the garment.
Try it on as you go. The bodice is worked seamlessly. Try it on after the armhole division to check fit.
Adjust for your size. Add or subtract stitches in multiples of the pattern repeat. Write down your modifications.
Customization Ideas
You could skip the roses entirely for a cleaner look. The lace sleeves are beautiful on their own.
Try different color combinations. Imagine this in cream with blush roses. Or black with red roses for drama.
Add more or fewer roses depending on your preference. Some makers prefer a single cluster at one shoulder.
The sleeves could be made shorter by using fewer rounds on the sleeve cap. Or longer by adding a third row of motifs.
Wrapping Up Your Lavender Dream Top
You made it. You now have every stitch, every measurement, and every detail to create this stunning Lavender Dream Crochet Bell Sleeve Top from start to finish.
This crochet pattern combines so many techniques in one gorgeous garment: ribbing, seamless construction, lace motifs, and dimensional embellishments. It is the kind of project that teaches you something and gives you a wearable piece of art.
I genuinely hope you enjoy making this as much as I enjoyed designing it. There is nothing quite like wearing something you made with your own hands.
When you finish yours, I would absolutely love to see it. Tag me on Instagram or share in my Facebook group. Seeing your creations is my favorite part of this whole journey.
Thank you for trusting me with your time and your yarn stash. Now go make something beautiful.
Happy crocheting, friend.
