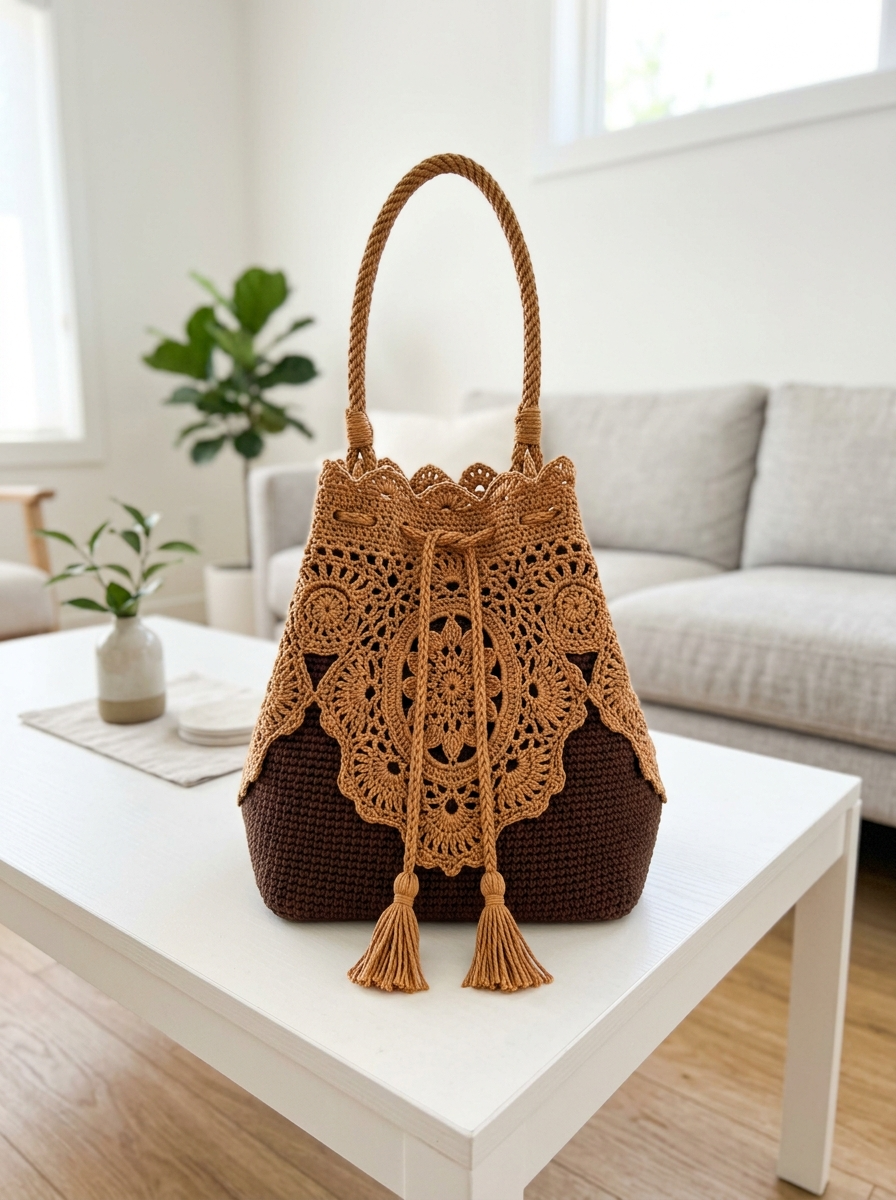
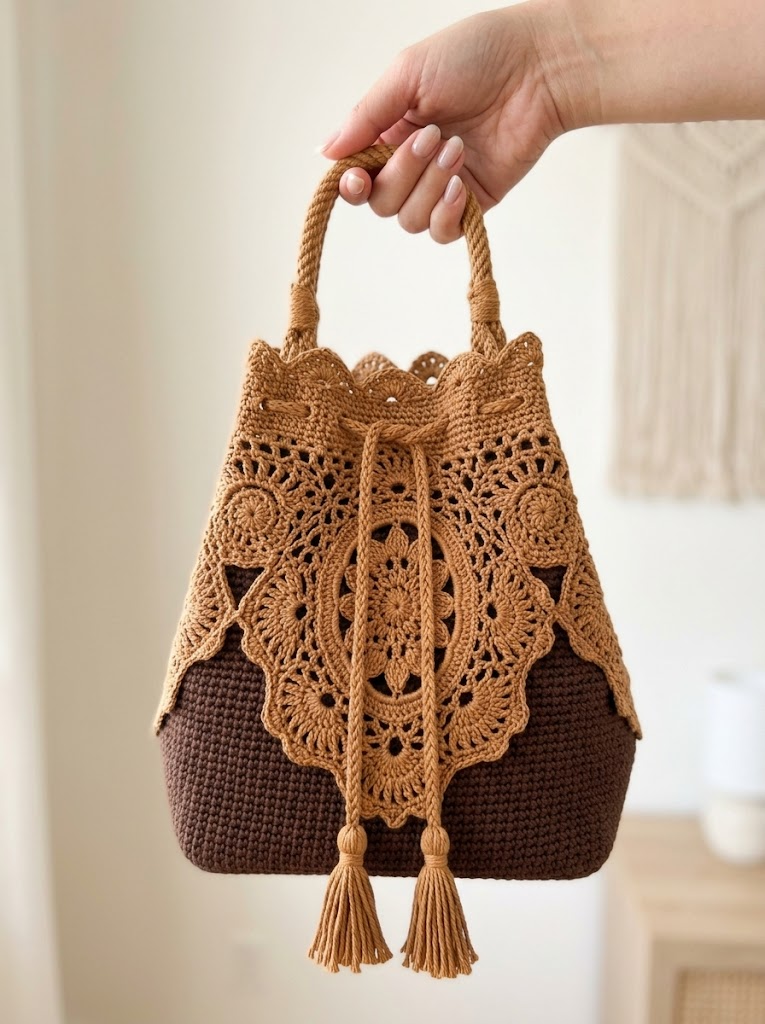
This stunning two-tone bucket bag combines elegant lace overlay work with a sturdy, practical base that you will actually want to carry everywhere. The contrast between the rich chocolate brown bottom and the warm caramel lace creates something that looks far more complicated than it really is. I promise you can make this gorgeous crochet bucket bag even if you have never tackled lace work before.
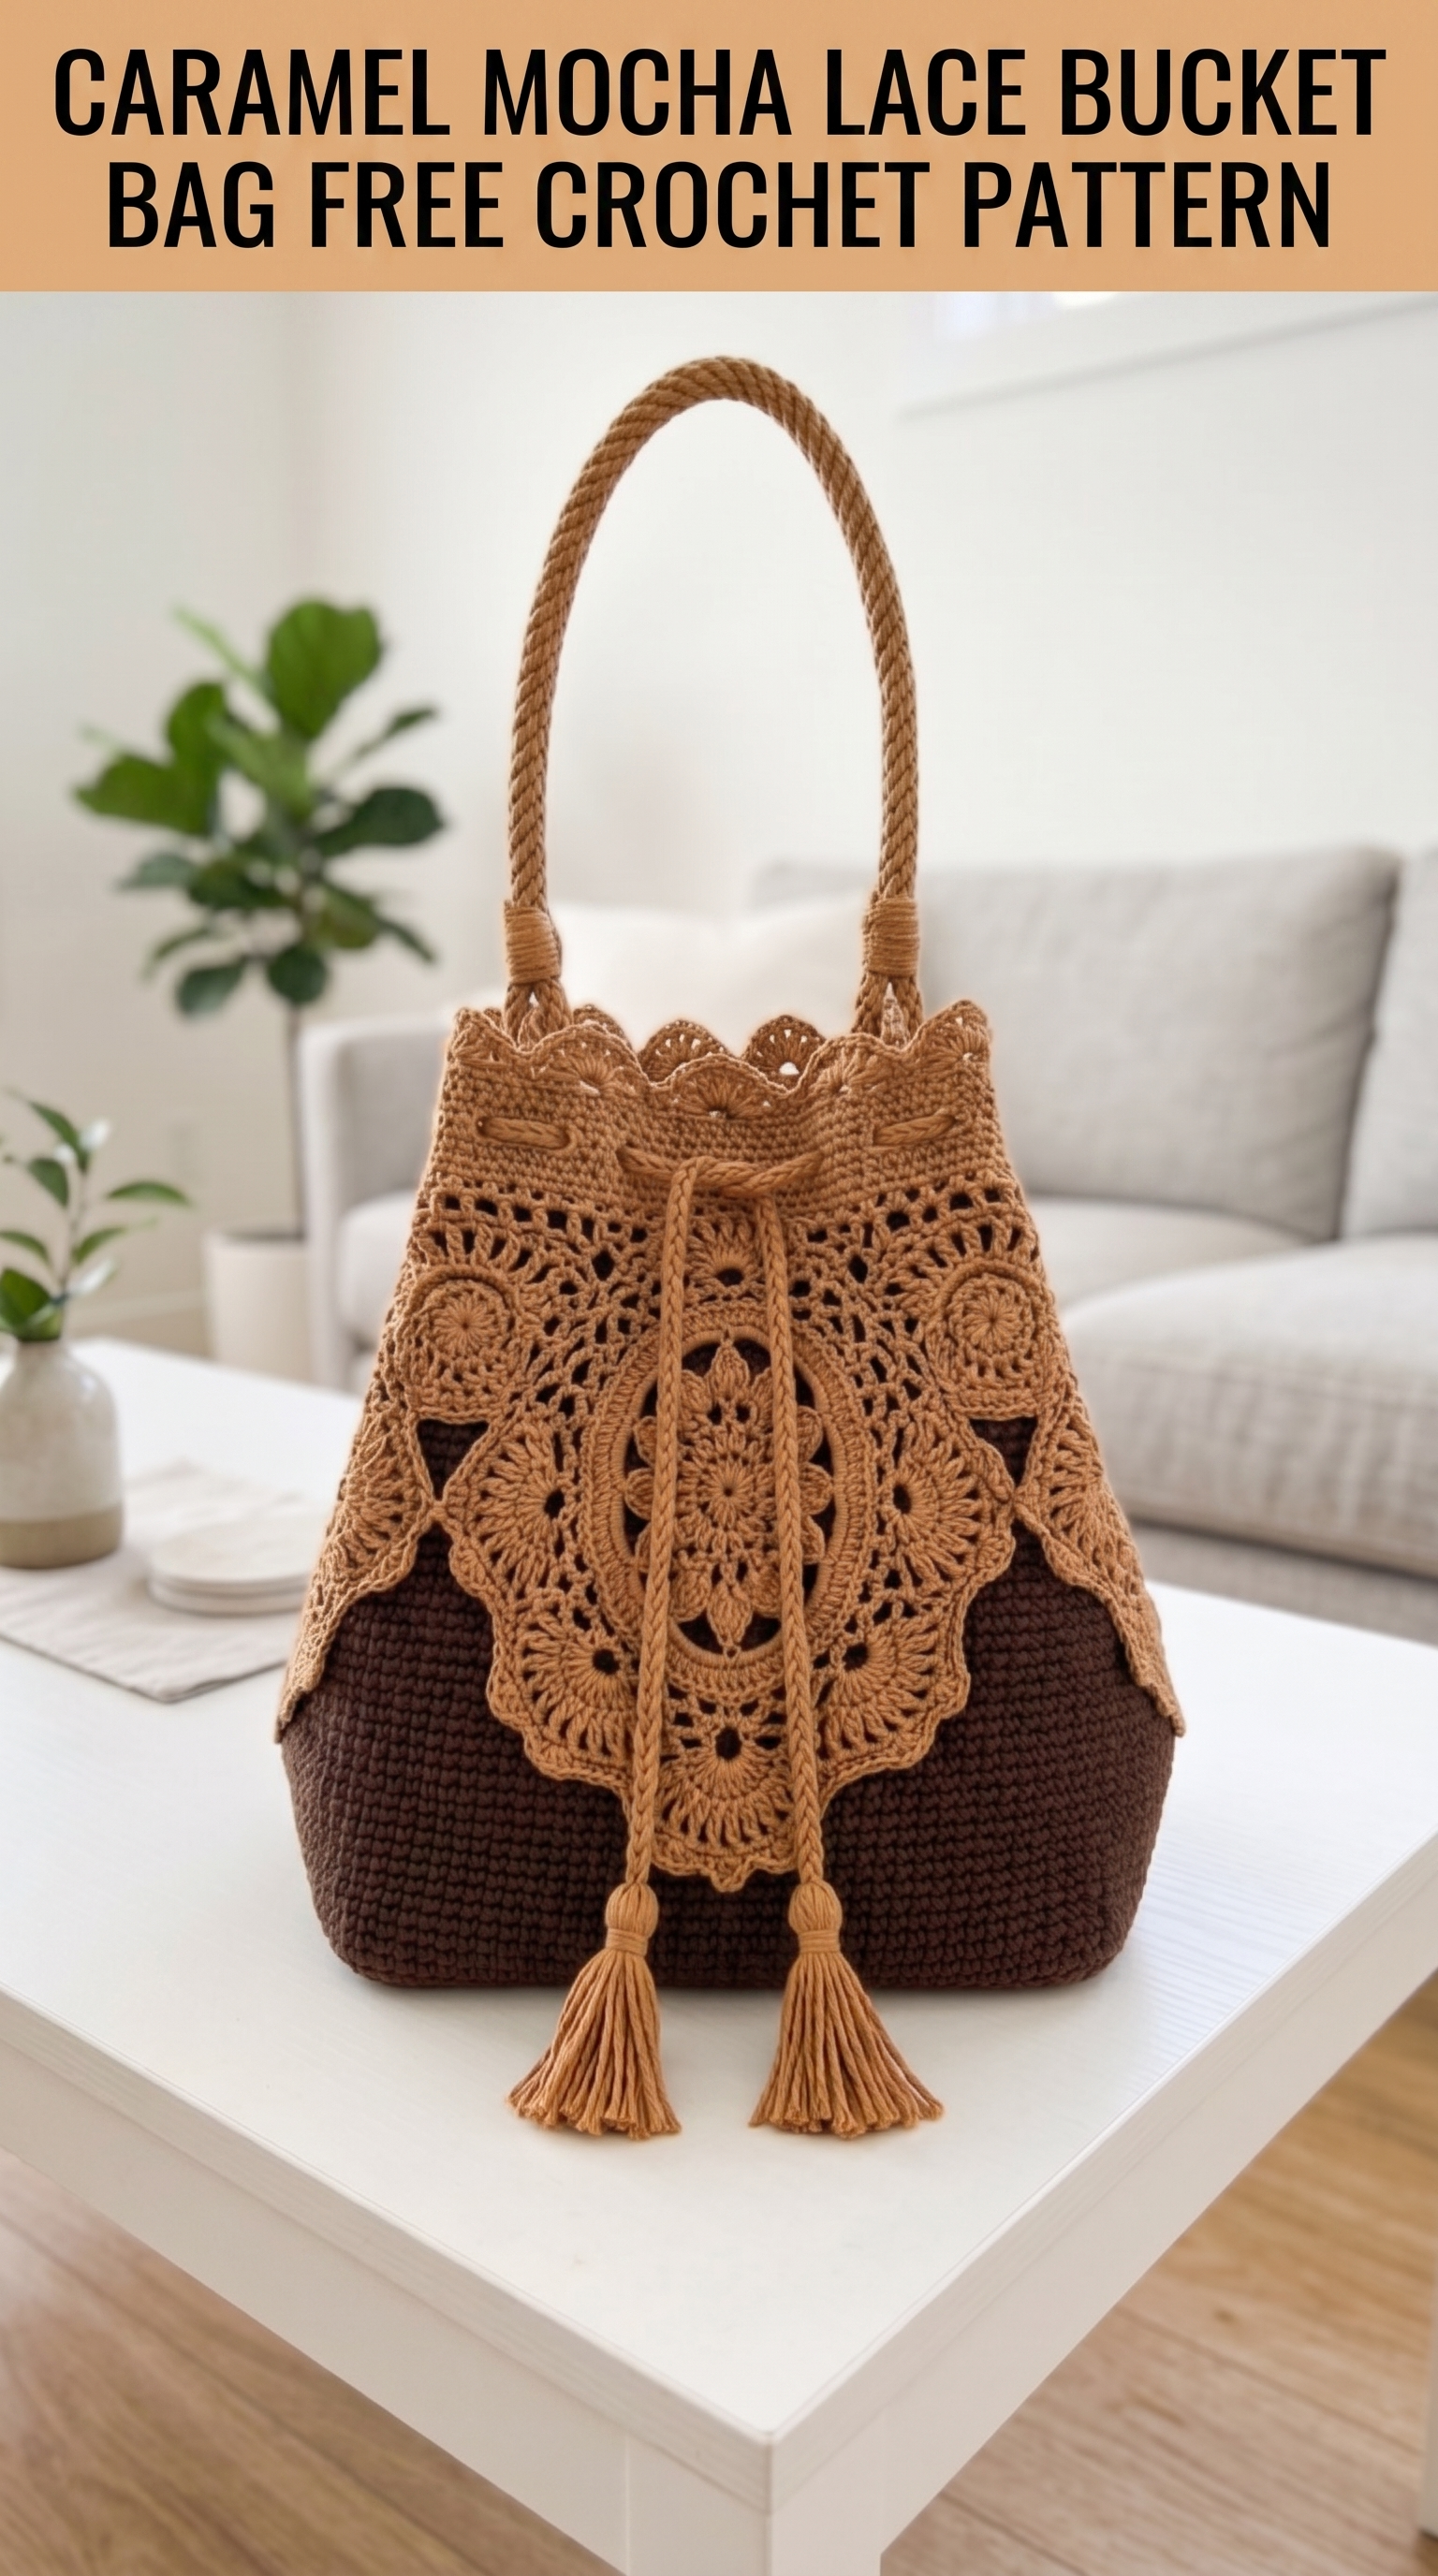
The decorative medallion panel and scalloped edging give this bag a vintage, bohemian feel while the drawstring closure and tassels add modern functionality. This crochet pattern walks you through every single step, from the solid base all the way to those perfect finishing tassels.
Why This Crochet Bucket Bag Pattern Works So Well
What I love most about this design is how the construction breaks down into manageable pieces. You are not crocheting one overwhelming project. Instead, you work a simple base, build up the body, create the lace overlay panel separately, and then bring everything together. Each section uses techniques you probably already know, just combined in a fresh way.
The lace panel looks incredibly intricate, but it is built from basic stitches arranged in a medallion pattern. If you can chain, single crochet, double crochet, and treble crochet, you have all the skills you need for this step by step crochet tutorial.
Materials You Will Need
Yarn:
Cotton yarn works best for bags because it holds its shape, does not stretch under weight, and showcases stitch definition beautifully. I recommend a mercerized cotton for that subtle sheen you see in the photos.
Hook:
Notions:
Gauge:
20 stitches and 22 rows = 4 inches in single crochet with Color A
Always check your gauge. A bag that is too loose will stretch and sag when you put things inside. Too tight and you will run out of yarn before finishing.
Skill Level
Intermediate. You should be comfortable reading written patterns and working basic stitches. The lace panel involves some stitch combinations that might be new, but I explain each one clearly.
Stitch Abbreviations and Definitions
Ch (Chain): Yarn over, pull through loop on hook. The foundation for most crochet projects.
Sl st (Slip Stitch): Insert hook, yarn over, pull through both loops at once. Used for joining and moving across stitches invisibly.
Sc (Single Crochet): Insert hook, yarn over, pull up loop (2 loops on hook), yarn over, pull through both loops. Your shortest basic stitch.
Hdc (Half Double Crochet): Yarn over, insert hook, yarn over, pull up loop (3 loops on hook), yarn over, pull through all 3 loops. Slightly taller than sc.
Dc (Double Crochet): Yarn over, insert hook, yarn over, pull up loop (3 loops on hook), yarn over, pull through 2 loops, yarn over, pull through remaining 2 loops. A medium height stitch that creates nice drape.
Tr (Treble Crochet): Yarn over twice, insert hook, yarn over, pull up loop (4 loops on hook), yarn over, pull through 2 loops three times. Taller stitch used in the lace sections.
Dc2tog (Double Crochet 2 Together): A decrease. Work a dc but stop before the final yarn over (2 loops remain). Start another dc in the next stitch, stop before final yarn over (3 loops remain). Yarn over, pull through all 3 loops.
Picot: Ch 3, sl st into first ch. Creates a small decorative bump.
Sk (Skip): Miss the indicated number of stitches.
Finished Dimensions
The Pattern: How to Crochet the Bucket Bag
Part 1: The Base (Color A)
The base is worked in a flat oval shape using continuous rounds of single crochet. This creates a sturdy bottom that will hold its shape.
Round 1: With Color A, ch 25. Sc in 2nd ch from hook, sc in next 22 ch, 3 sc in last ch. Working along the opposite side of the foundation chain, sc in next 22 ch, 2 sc in last ch. Do not join. Place marker to indicate beginning of round. (50 sts)
Round 2: 2 sc in first st, sc in next 22 sts, 2 sc in each of next 3 sts, sc in next 22 sts, 2 sc in each of last 2 sts. (58 sts)
Round 3: Sc in first st, 2 sc in next st, sc in next 22 sts, (sc in next st, 2 sc in next st) 3 times, sc in next 22 sts, (sc in next st, 2 sc in next st) twice. (66 sts)
Round 4: Sc in first 2 sts, 2 sc in next st, sc in next 22 sts, (sc in next 2 sts, 2 sc in next st) 3 times, sc in next 22 sts, (sc in next 2 sts, 2 sc in next st) twice. (74 sts)
Rounds 5 through 7: Continue increasing pattern, adding 8 sts per round evenly spaced at the curved ends. (98 sts after Round 7)
Your base should measure approximately 8 inches long by 4 inches wide. If it looks puckered, your tension is too tight. If it ruffles, too loose.
Part 2: The Body Lower Section (Color A)
Now you will work upward in joined rounds to create the solid chocolate brown portion.
Round 1: Working in back loops only this round (this creates the crisp edge at the base), sc in each st around, sl st to first sc to join. (98 sts)
Rounds 2 through 25: Ch 1, sc in each st around, sl st to first sc. (98 sts)
The lower body should measure approximately 4.5 inches tall. Fasten off Color A. Weave in ends.
Part 3: The Body Upper Section (Color B)
Join Color B in any stitch with a sl st.
Rounds 1 through 12: Ch 1, sc in each st around, sl st to first sc. (98 sts)
Eyelet Round: Ch 1, sc in first st, *ch 1, sk 1, sc in next st. Repeat from * around, ending with ch 1, sk 1, sl st to first sc. (49 sc, 49 ch-1 spaces)
This eyelet row creates the holes for your drawstring to weave through later.
Rounds 14 through 16: Ch 1, sc in each st and ch-1 space around, sl st to first sc. (98 sts)
Do not fasten off. Continue to scalloped edging.
Part 4: Scalloped Top Edging (Color B)
Scallop Round: *Sk 2 sts, 5 dc in next st (shell made), sk 2 sts, sl st in next st. Repeat from * around. You should have approximately 16 scallops. Fasten off and weave in ends.
The shells create that lovely wavy edge you see along the top of the bag.
Part 5: The Lace Overlay Panel (Color B)
This is where the magic happens. The panel is worked separately and then attached to the front of the bag. It consists of a center medallion with decorative borders.
Center Medallion:
Round 1: With Color B, ch 6, sl st to form ring. Ch 3 (counts as dc), 15 dc into ring, sl st to top of ch-3. (16 dc)
Round 2: Ch 4 (counts as dc + ch 1), *dc in next st, ch 1. Repeat from * around, sl st to 3rd ch of ch-4. (16 dc, 16 ch-1 spaces)
Round 3: Sl st into ch-1 space, ch 3, 2 dc in same space, ch 2, *3 dc in next ch-1 space, ch 2. Repeat from * around, sl st to top of ch-3. (16 groups of 3 dc)
Round 4: Sl st to center dc of group, ch 3, 2 dc in same st, ch 3, *3 dc in center dc of next group, ch 3. Repeat from * around, sl st to top of ch-3.
Rounds 5 through 8: Continue increasing chain spaces by 1 each round, maintaining 3 dc clusters.
Round 9: Work shell pattern: *5 dc in center dc of cluster, ch 4, sc in ch space, ch 4. Repeat from * around.
Outer Border Rounds 10 through 12: Continue building outward with alternating shells and chain spaces, creating the pointed petal shapes visible in the image.
Fasten off, leaving a long tail for sewing.
Part 6: Small Decorative Medallions (Make 2, Color B)
These smaller circles sit at the upper corners of the lace panel.
Round 1: Ch 4, sl st to form ring. Ch 3, 11 dc into ring, sl st to top of ch-3. (12 dc)
Round 2: Ch 4, *dc in next st, ch 1. Repeat from * around, sl st to 3rd ch. (12 dc, 12 ch-1 spaces)
Round 3: Sl st into space, ch 3, dc in same space, ch 2, *2 dc in next space, ch 2. Repeat from * around, sl st to top of ch-3.
Fasten off.
Part 7: Assembly of Lace Panel
Lay out your pieces: one large center medallion and two small medallions.
Position the small medallions above and to either side of the large medallion, overlapping edges slightly. Use a tapestry needle and matching yarn to whip stitch them together where they meet.
Pin the completed panel to the front of your bag, centering it with the lower point of the medallion about 2 inches from the bottom of the caramel section. Whip stitch around all edges, securing the lace to the bag body.
Part 8: The Handle (Color B)
The handle is a crocheted tube worked in rounds.
Foundation: Ch 4, sl st to form ring.
Round 1: 8 sc into ring. Do not join. Work in continuous spiral.
Rounds 2 through 180: Sc in each st around. (8 sts)
Your tube should measure approximately 28 inches. Stuff lightly with yarn scraps if desired for added stability, or leave hollow for flexibility.
Fasten off, leaving long tail. Attach ends to inside of bag at either side of the upper opening, approximately 2 inches below the scalloped edge.
Part 9: Drawstring (Color B)
Ch 150, or until chain measures approximately 30 inches. Sl st in 2nd ch from hook and each ch across. Fasten off.
Weave the drawstring through the eyelet round, starting and ending at center front.
Part 10: Tassels (Make 2, Color B)
Wrap yarn around a 4 inch piece of cardboard approximately 30 times. Slide a 10 inch piece of yarn under the wraps at one end and tie tightly. Cut the opposite end to release the tassel. Wrap another piece of yarn around the tassel about half an inch from the top and secure. Trim ends evenly.
Attach one tassel to each end of the drawstring.
Tips for Success With This Crochet Pattern
Blocking matters. Before assembly, wet block your lace panel by soaking it in lukewarm water, gently squeezing out excess moisture, and pinning it to shape on a blocking mat. Let dry completely. This opens up the lacework and makes it look professional.
Consider adding a lining. A fabric lining protects your belongings from poking through the lace openings and adds structure. Cut a simple drawstring bag shape from cotton fabric and hand sew it inside.
Count your stitches often. Especially in the body section. Losing or gaining even a few stitches changes your final dimensions and affects how the lace panel fits.
Wrapping Up Your Caramel Mocha Lace Bucket Bag
You did it. You now have a show stopping crochet bucket bag that looks like it came from a boutique. The combination of solid structure and delicate lace makes this bag versatile enough for farmers markets, beach days, or date nights.
I genuinely hope this crochet pattern brought you joy in the making and pride in the finished piece. There is something so satisfying about carrying a bag you made yourself, especially one this beautiful.
If you make your own Caramel Mocha Lace Bucket Bag, I would absolutely love to see it. Tag me on Instagram or share your photos in my Facebook group. Seeing your creations is honestly the best part of my day.
Happy crocheting, and thank you for spending time with me here.
