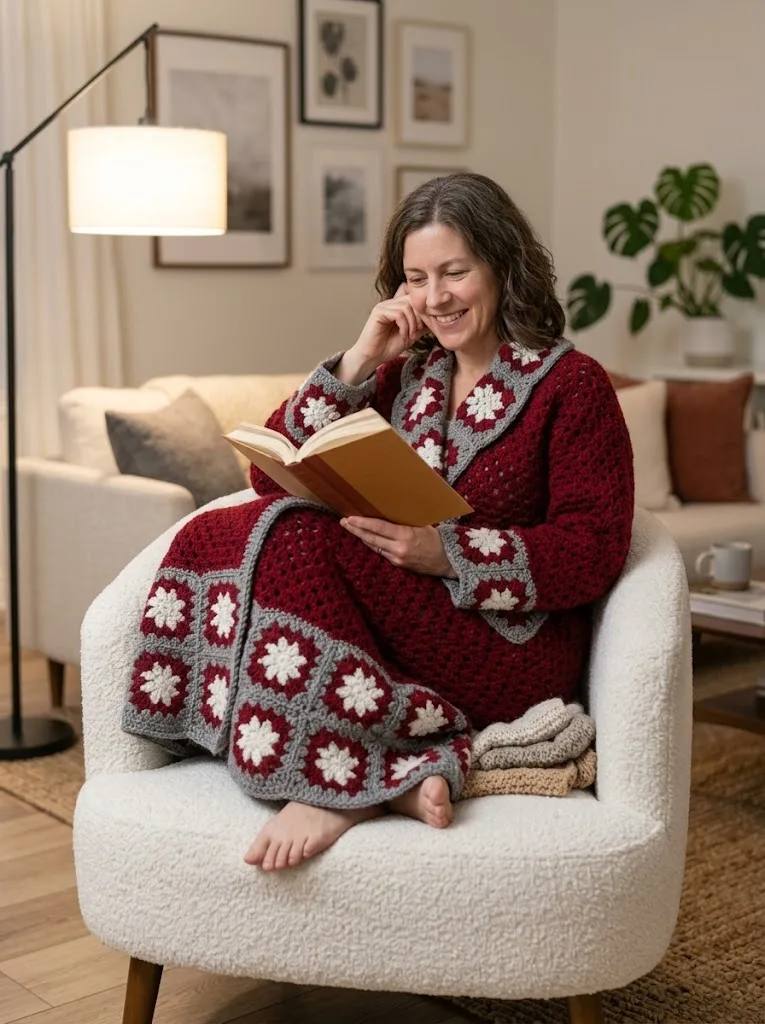
I don’t know about you, but I live for that moment when you slip into something cozy after a long day. A blanket works, sure, but wouldn’t it be better if that blanket could walk around with you? That’s exactly what this cranberry winter granny square robe delivers. All the warmth of your favorite throw, none of the "oops I tripped on the corner" moments.
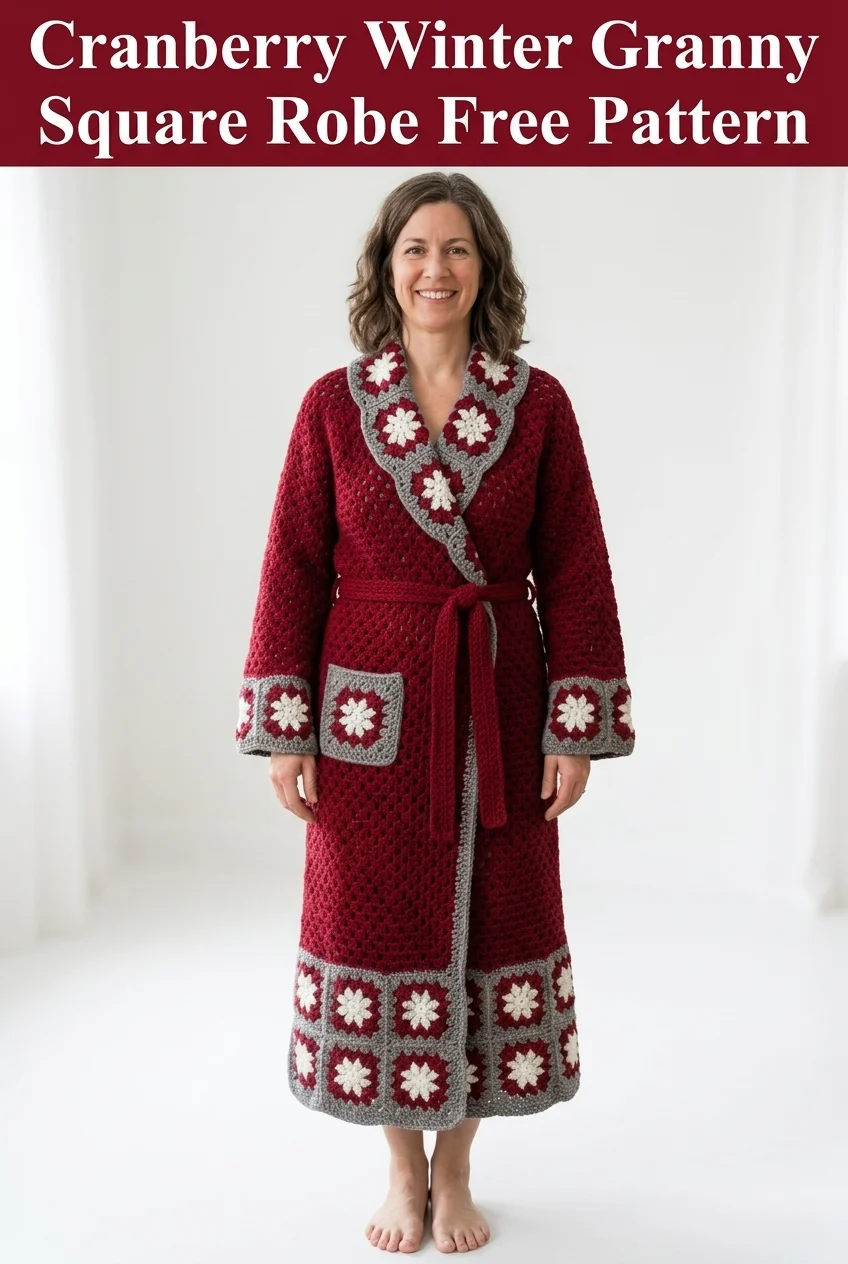
This stunning full-length robe combines classic granny square motifs with an elegant wrap silhouette that honestly feels like a wearable hug. The rich cranberry body pairs beautifully with gray-bordered white flower squares along the collar, cuffs, hem, and pocket. It’s the kind of handmade piece that makes people stop and say "wait, you MADE that?"
Let me walk you through everything you need to create your own cranberry winter granny square robe from start to finish.
Why This Granny Square Robe Pattern Works
The construction is surprisingly straightforward. The body uses a simple mesh or shell stitch pattern that works up quickly in rows, while the decorative granny squares are made separately and joined later. This means you can crochet squares while watching TV, then assemble everything without stress.
The wrap-front design eliminates the need for buttons or zippers. You simply tie the matching belt, and you’re done. The shawl collar frames your face beautifully and adds that polished, finished look that elevates this from "craft project" to "luxury loungewear."
Materials You Will Need
Yarn:
I recommend a soft acrylic blend or wool-acrylic blend for this project. You want something that feels cozy against your skin but can also handle regular wear and washing. Something like Lion Brand Vanna’s Choice, Red Heart Soft, or Caron Simply Soft would work wonderfully.
Hook:
Notions:
Gauge:
*Please, please, please check your gauge.* I know it’s tempting to skip this step, but with a garment this size, being off by even half a stitch per inch can mean the difference between a robe that fits and one that doesn’t.
Skill Level
This crochet pattern is rated intermediate. You should be comfortable with:
If you’ve made a granny square blanket and maybe a simple cardigan before, you’re ready for this project.
Abbreviations and Stitch Definitions
Before we dive in, let me define every stitch and term you’ll encounter:
Size Information
This pattern is written for size Medium (fits bust 36 to 40 inches) with a generous, relaxed fit. The finished robe measures approximately:
To adjust sizing, add or subtract multiples of 4 stitches to the body width and adjust the number of granny squares accordingly.
Granny Square Pattern
You will need to make the following granny squares:
Total: 32 granny squares
Round 1: With CB (cream), make a magic ring. Ch 3 (counts as first dc here and throughout), work 2 dc into ring, ch 2, *3 dc into ring, ch 2* three times. Join with sl st to top of beginning ch-3. Fasten off CB. (12 dc, 4 ch-2 spaces)
Round 2: Join CA (gray) in any ch-2 corner space. Ch 3, 2 dc in same sp, ch 1, *3 dc, ch 2, 3 dc* in next corner sp, ch 1. Rep from * twice more, 3 dc in first corner sp, ch 2. Join with sl st to top of beginning ch-3. (24 dc, 4 ch-2 corner spaces, 4 ch-1 spaces)
Round 3: Sl st to corner sp. Ch 3, 2 dc in same sp, ch 1, 3 dc in ch-1 sp, ch 1, *3 dc, ch 2, 3 dc* in corner sp, ch 1, 3 dc in ch-1 sp, ch 1. Rep from * twice more, 3 dc in first corner sp, ch 2. Join with sl st to top of beginning ch-3. (36 dc, 4 ch-2 corner spaces, 8 ch-1 spaces)
Round 4: Join MC (cranberry) in any ch-2 corner space. Work *3 dc, ch 2, 3 dc* in corner sp, ch 1, 3 dc in each ch-1 sp along side with ch 1 between each cluster. Rep from * around. Join with sl st. Fasten off. (48 dc)
Weave in all ends securely. Block each square to 4 inches by 4 inches.
Robe Body Pattern
The body is worked in two pieces (left front/back and right front/back), then seamed at center back. This allows for the wrap-front construction.
Foundation for Right Panel:
Ch 122.
Row 1 (RS): Dc in 4th ch from hook (skipped ch counts as dc), *ch 1, sk 1 ch, dc in next ch*. Rep from * across. Turn. (60 dc, 59 ch-1 spaces)
Row 2: Ch 3 (counts as dc), *dc in ch-1 sp, ch 1, sk next dc*. Rep from * across, dc in top of turning ch. Turn. (60 dc, 59 ch-1 spaces)
Repeat Row 2 until piece measures 52 inches from beginning.
Shaping the Neckline:
Continue in pattern, decreasing 1 stitch at the front edge every other row for 12 rows by working 2 dc together (dc2tog) at the beginning or end of the row as appropriate.
A dc2tog works like this: Yarn over, insert hook in first stitch, yarn over, pull up loop, yarn over, pull through 2 loops (2 loops remain), yarn over, insert hook in next stitch, yarn over, pull up loop, yarn over, pull through 2 loops, yarn over, pull through all 3 remaining loops.
Fasten off.
Left Panel:
Work as for right panel, reversing all shaping.
Sleeve Pattern (Make 2)
Ch 62.
Row 1: Dc in 4th ch from hook, *ch 1, sk 1 ch, dc in next ch*. Rep from * across. Turn. (30 dc, 29 ch-1 spaces)
Row 2: Ch 3, *dc in ch-1 sp, ch 1*. Rep from * across, dc in turning ch. Turn.
Repeat Row 2 until sleeve measures 20 inches.
Sleeve Shaping:
Increase 1 stitch at each end of every 4th row by working 2 dc in the first and last dc of the row. Continue until sleeve measures 24 inches total.
Fasten off, leaving a long tail for seaming.
Assembly Instructions
Step 1: Join Body Panels
Place right and left panels with wrong sides facing. Using MC and your tapestry needle, whip stitch or mattress stitch the center back seam from hem to approximately 8 inches below the shoulder line.
Step 2: Create Shoulder Seams
Fold the body so shoulder edges align. Seam approximately 5 inches from the outer edge toward the neck on each side, leaving the center open for the neckline.
Step 3: Attach Sleeves
Find the center point of the sleeve top edge. Align this with the shoulder seam. Pin the sleeve in place, easing fullness evenly. Whip stitch the sleeve to the armhole opening.
Step 4: Seam Sleeves and Sides
Fold the robe so the underarm edges align. Starting at the cuff, seam up the sleeve and continue down the side of the body. Leave the bottom 12 inches of each side unseamed for movement. Repeat on the other side.
Adding the Granny Square Details
Collar:
Arrange 10 granny squares in a curved strip. Join squares using a flat slip stitch method: Hold two squares with right sides together, insert hook through both loops of corresponding stitches on each square, yarn over, pull through all loops. Continue along the entire edge.
Once all 10 squares are joined in a strip, pin the strip along the front opening and around the back of the neck, easing it to lay flat. Whip stitch in place using gray yarn for a seamless look.
Sleeve Cuffs:
Join 4 squares into a strip for each sleeve. Attach the strip to the bottom edge of each sleeve, seaming the short ends together to form a tube.
Hem Border:
Join 12 squares in a long strip. Attach to the bottom edge of the robe body, distributing evenly across the front and back.
Pocket:
Join 2 squares side by side. Position on the left front panel at a comfortable height (approximately at hip level). Whip stitch the bottom and sides, leaving the top open.
Belt Pattern
Ch 250 (or desired length, approximately 70 inches).
Row 1: Sc in 2nd ch from hook and each ch across. Turn. (249 sc)
Rows 2 through 4: Ch 1, sc in each sc across. Turn.
Fasten off. Weave in ends.
Attach the belt to the robe at the side seams using two small belt loops. To make belt loops, ch 15 with MC, sl st to the side seam at waist height, ch 15, sl st about 1 inch below the first attachment. Fasten off.
Finishing Touches
Blocking:
Wet block your finished robe by soaking it in lukewarm water with a splash of wool wash. Gently squeeze out excess water (never wring), then lay flat on towels or a blocking mat. Shape the collar, cuffs, and hem to lay properly. Allow to dry completely.
Border (Optional):
For an extra polished look, work a single round of sc in CA (gray) around the entire front opening, collar, and hem. This creates a cohesive frame that ties all the granny square elements together.
Tips for Success with This Crochet Pattern
Yarn Management:
Wind your yarn into center-pull balls before starting. This prevents tangling and makes color changes smoother.
Counting Stitches:
Place a stitch marker every 20 stitches along your foundation row. This makes it much easier to catch mistakes early.
Joining Squares:
When joining your granny squares, try to use the same color yarn that borders the squares. This makes your joins nearly invisible.
Trying It On:
Don’t wait until the end to try on your robe. Once you have the body panels seamed, slip it on to check the length and fit. Adjustments are much easier to make before you’ve attached all the trim pieces.
Why You Should Make This Crochet Tutorial Your Next Project
This cranberry winter granny square robe is genuinely one of those projects that impresses everyone who sees it. The combination of the open mesh body with the solid granny square accents creates visual interest without overwhelming complexity.
It makes an incredible gift for someone special, though I’ll warn you now: once you finish it, you might not want to give it away. There’s something deeply satisfying about wrapping yourself in something you created stitch by stitch.
The skills you’ll practice here, including working flat panels, shaping necklines, joining motifs, and constructing a garment, translate beautifully to other projects. Consider this your gateway to crocheted sweaters, cardigans, and more.
Thank you so much for choosing this pattern for your next cozy project. I truly hope you love making it as much as I loved designing it. If you finish your robe, I would absolutely love to see it! Tag me on Instagram or share a photo in our Facebook group. Nothing makes my day quite like seeing your beautiful finished work.
If this cranberry winter granny square robe pattern inspired you, go ahead and save it to your Pinterest boards so you can find it easily when you’re ready to start. And please drop a comment below if you make one. I’d love to hear which colors you chose or any tips you discovered along the way!
