Last winter, I found myself shuffling around my kitchen in the most ridiculous pair of worn-out slippers you’ve ever seen. The sole had basically disintegrated, and my toes peeked through a hole I kept promising to fix. My daughter walked in, took one look at my feet, and said, "Mom, you literally teach people how to make things." She had a point. That afternoon, I sat down and started sketching what would become these gorgeous lace boots. I wanted something that felt like a warm hug for my feet but looked elegant enough that I wouldn’t be embarrassed when the delivery guy showed up.
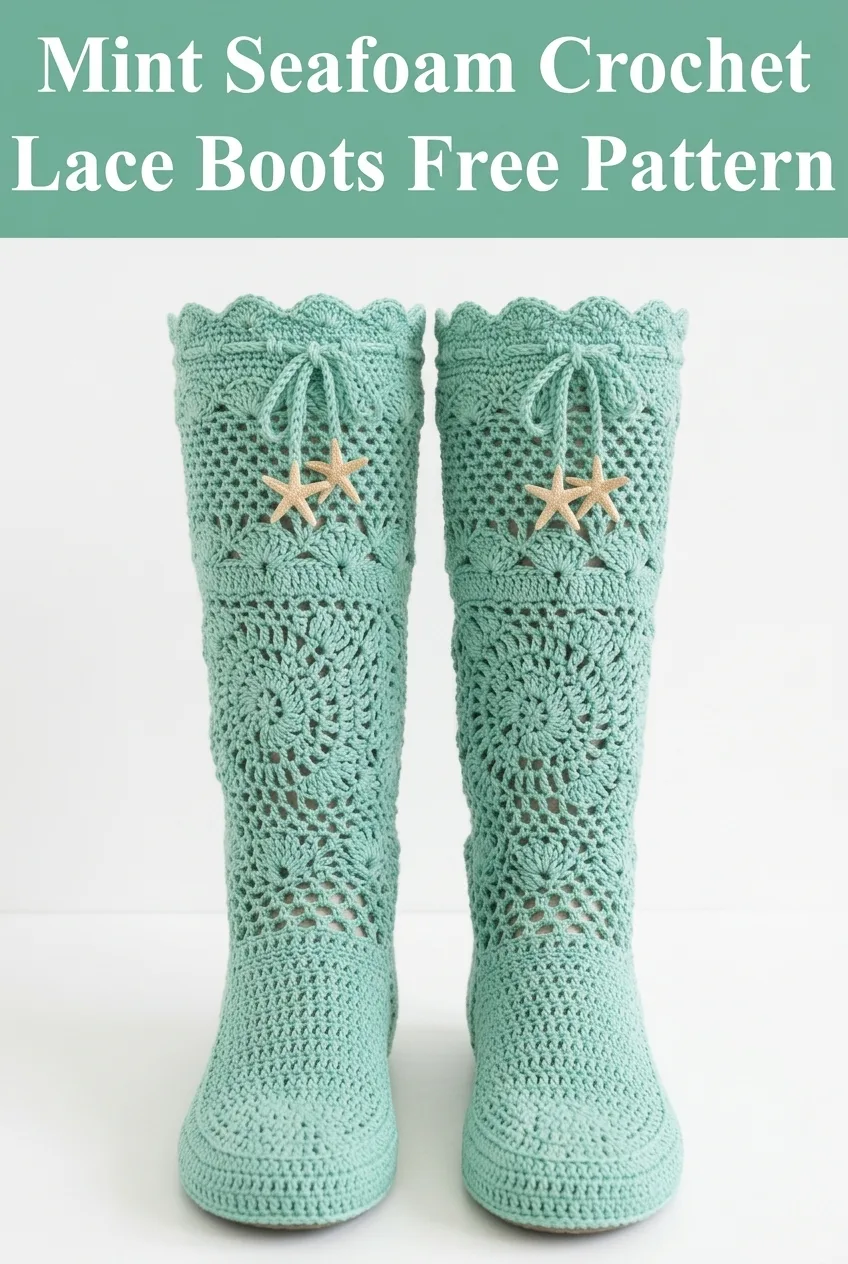
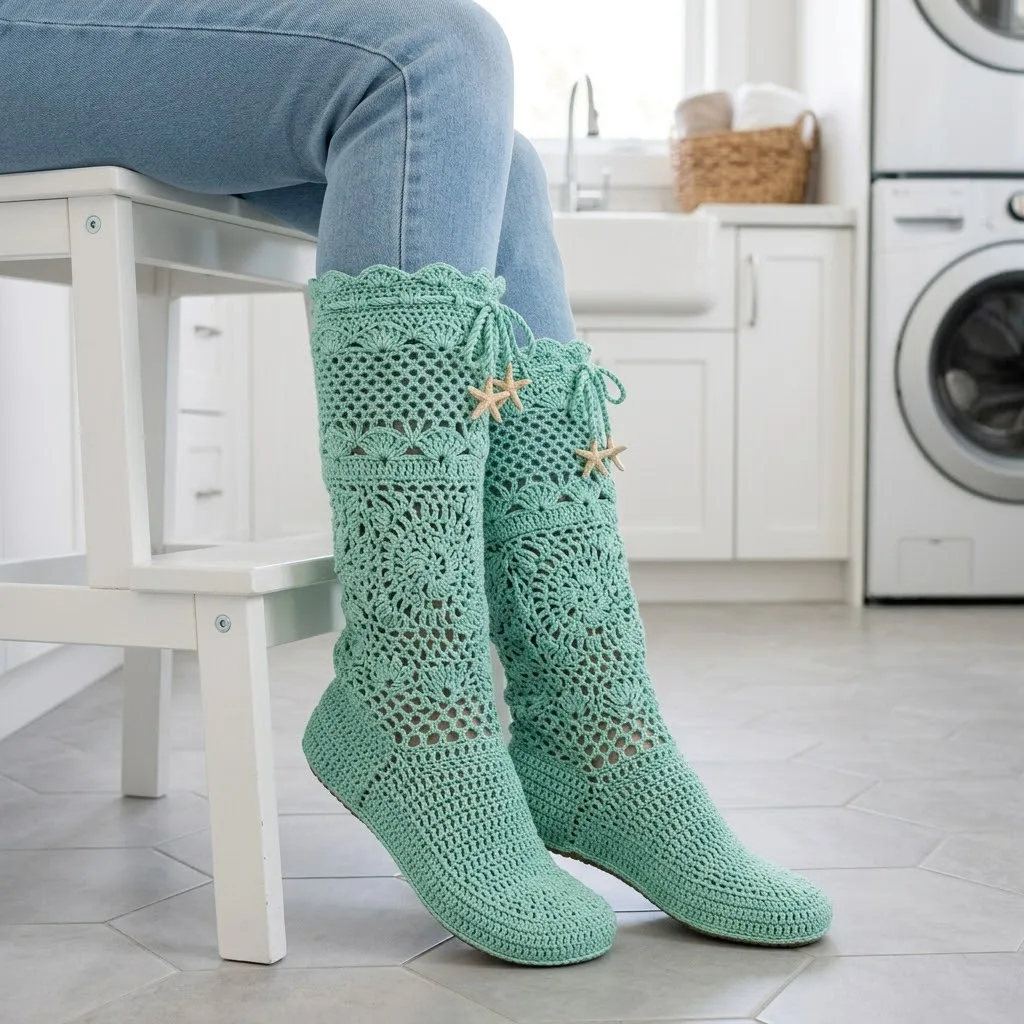
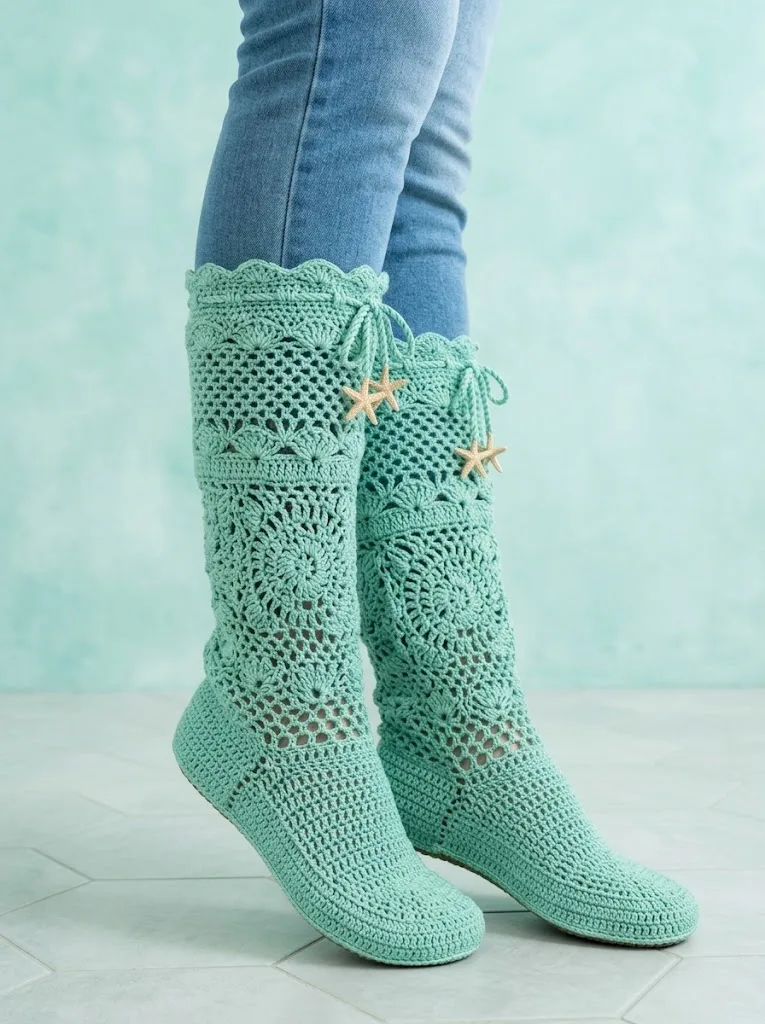
These Mint Seafoam Crochet Lace Boots combine delicate openwork lace panels with a sturdy, comfortable sole. They’re the kind of project that looks incredibly impressive but breaks down into manageable sections. The medallion motifs, the scalloped cuff, the sweet drawstring closure with starfish charms. Every detail came together beautifully, and I cannot wait to walk you through exactly how to make your own pair.
Why You’ll Love This Crochet Lace Boots Pattern
These boots hit the sweet spot between cozy house slippers and a statement piece you’d actually show off. The lace construction keeps them breathable, so your feet won’t overheat. But the solid sole and structured heel provide real warmth and support.
The seafoam mint color gives these boots a fresh, coastal vibe. The starfish embellishments on the drawstring ties are completely optional, but they add such a charming detail. You could swap them for wooden beads, pom poms, or leave the ties plain.
This pattern works up faster than you might expect. Each boot is constructed in sections, then joined together. Once you get into the rhythm of the lace panels, you’ll find yourself flying through the rounds.
Skill Level
Intermediate. If you’re comfortable working in the round, joining motifs, and following a multi-section pattern, you’ll do great here. Beginners who have completed a few projects and feel confident with basic stitches can absolutely tackle this with patience.
Materials Needed
Yarn:
The boots in the photo appear to use a smooth, slightly mercerized cotton with beautiful stitch definition. I recommend 100% cotton or a cotton blend for structure and breathability. Avoid anything too stretchy or fuzzy, as it will obscure the lace details.
Hook:
Notions:
Gauge
14 stitches and 16 rows = 4 inches in single crochet using 5.0 mm hook.
Gauge matters here for fit. Take time to make a small swatch before starting. If your swatch is too large, go down a hook size. If it’s too small, go up a hook size.
Finished Measurements
These instructions create boots for a women’s medium foot (US size 7-8). The boot shaft measures approximately 10 inches tall from the base of the heel to the top of the cuff.
To adjust sizing: Add or subtract rounds in the sole section, and adjust the number of rounds in the foot portion before beginning the leg.
Abbreviations and Stitch Definitions
Let me walk you through every stitch you’ll need. Read through these before starting so nothing catches you off guard.
ch = chain: Wrap yarn over hook, pull through loop on hook. This creates the foundation for most crochet work.
sl st = slip stitch: Insert hook into stitch, yarn over, pull through both the stitch and the loop on your hook in one motion. Used for joining and moving across stitches invisibly.
sc = single crochet: Insert hook into stitch, yarn over and pull up a loop (2 loops on hook), yarn over and pull through both loops. A short, tight stitch.
hdc = half double crochet: Yarn over, insert hook into stitch, yarn over and pull up a loop (3 loops on hook), yarn over and pull through all 3 loops. Slightly taller than single crochet.
dc = double crochet: Yarn over, insert hook into stitch, yarn over and pull up a loop (3 loops on hook), yarn over and pull through 2 loops, yarn over and pull through remaining 2 loops. A taller, more open stitch.
tr = treble crochet: Yarn over twice, insert hook into stitch, yarn over and pull up a loop (4 loops on hook), [yarn over and pull through 2 loops] 3 times. Creates a very tall stitch used in lace work.
dc2tog = double crochet 2 together (decrease): [Yarn over, insert hook in next stitch, yarn over, pull up loop, yarn over, pull through 2 loops] twice, yarn over, pull through all 3 loops on hook.
sk = skip: Pass over the indicated stitch without working into it.
sp = space: The gap created between stitches, often where you’ll work into rather than into a stitch itself.
Pattern Notes
Step-by-Step Crochet Pattern
Part 1: The Sole (Make 2)
The sole provides structure and comfort. We’ll work in rows, creating an oval shape.
Row 1: Ch 26. Sc in 2nd ch from hook and in each ch across. (25 sc)
Row 2: Ch 1, turn. 2 sc in first st, sc in next 23 sts, 2 sc in last st. (27 sc)
Row 3: Ch 1, turn. 2 sc in first st, sc in next 25 sts, 2 sc in last st. (29 sc)
Rows 4-6: Ch 1, turn. Sc in each st across. (29 sc)
Row 7: Ch 1, turn. Sc2tog, sc in next 25 sts, sc2tog. (27 sc)
Row 8: Ch 1, turn. Sc2tog, sc in next 23 sts, sc2tog. (25 sc)
Now we’ll work around the entire sole to create an edging.
Edging Round: Ch 1, do not turn. Work 3 sc in corner, sc evenly along the side edge (approximately 8 sc), work 3 sc in corner, sc in each foundation ch across bottom (25 sc), work 3 sc in corner, sc evenly along opposite side edge (approximately 8 sc), work 3 sc in corner, sl st to first sc to join. (approximately 60 sc)
Place a stitch marker here. This marks the center back of your heel.
Part 2: The Foot (Make 2)
We’ll now build up from the sole, working in continuous rounds to create the foot portion.
Round 1: Ch 1, working in back loops only, sc in each st around. Sl st to join. (60 sc)
Rounds 2-8: Ch 1, sc in each st around. Sl st to join. (60 sc)
Toe Shaping:
Identify the center front of your boot (opposite your heel marker). Place markers at the center 20 stitches for the toe section.
Round 9: Ch 1, sc in each st to 2 sts before first toe marker, sc2tog, sc in next 16 sts, sc2tog, sc in remaining sts. Sl st to join. (58 sc)
Round 10: Ch 1, sc in each st to 2 sts before toe section, sc2tog, sc in next 14 sts, sc2tog, sc in remaining sts. Sl st to join. (56 sc)
Round 11: Ch 1, sc in each st around. Sl st to join. (56 sc)
Rounds 12-14: Repeat Round 11. (56 sc)
Fasten off and weave in ends. Set aside.
Part 3: Medallion Motifs (Make 4 per boot, 8 total)
These beautiful circular motifs form the main decorative panels on the leg. Each one is worked from the center outward.
Round 1: Using magic ring, ch 3 (counts as dc), 11 dc into ring. Sl st to top of ch-3 to join. Pull ring tight. (12 dc)
Round 2: Ch 3 (counts as dc), dc in same st, 2 dc in each st around. Sl st to join. (24 dc)
Round 3: Ch 4 (counts as dc + ch 1), sk next st, *dc in next st, ch 1, sk next st* around. Sl st to 3rd ch of starting ch-4. (12 dc, 12 ch-1 sps)
Round 4: Sl st into ch-1 sp, ch 3, 2 dc in same sp, ch 1, *3 dc in next ch-1 sp, ch 1* around. Sl st to join. (36 dc, 12 ch-1 sps)
Round 5: Ch 1, sc in each dc and ch-1 sp around. Sl st to join. (48 sc)
Round 6: Ch 5 (counts as dc + ch 2), sk 2 sts, *dc in next st, ch 2, sk 2 sts* around. Sl st to 3rd ch of starting ch-5. (16 dc, 16 ch-2 sps)
Fasten off, leaving a long tail for joining.
Part 4: Mesh Panels (Make 2 per boot, 4 total)
The mesh panels connect the medallions and create the open, breathable look.
Row 1: Ch 22. Dc in 6th ch from hook, *ch 1, sk 1 ch, dc in next ch* across. (9 dc, 8 ch-1 sps)
Rows 2-12: Ch 4, turn. Dc in next dc, *ch 1, dc in next dc* across. (9 dc, 8 ch-1 sps)
Fasten off, leaving a long tail.
Part 5: Fan Lace Band (Make 2)
This decorative band sits between the medallion section and the mesh panel at the upper leg.
Row 1: Ch 50. Sc in 2nd ch from hook and in each ch across. (49 sc)
Row 2: Ch 3, turn. Sk 2 sts, *5 dc in next st (fan made), sk 2 sts, sc in next st, sk 2 sts* repeat across, ending with 5 dc in last st. (7 fans)
Row 3: Ch 1, turn. Sc in first dc, *ch 3, sc in center dc of fan, ch 3, sc in sc* repeat across, ending with sc in last dc.
Row 4: Ch 3, turn. 2 dc in first sc, *sc in next ch-3 sp, 5 dc in next sc* repeat across, ending with 3 dc in last sc.
Fasten off.
Part 6: Scalloped Cuff (Make 2)
The beautiful scalloped edge at the top of the boot adds a feminine finish.
Row 1: Ch 52. Sc in 2nd ch from hook and in each ch across. (51 sc)
Row 2: Ch 1, turn. Sc in each sc across. (51 sc)
Row 3: Ch 1, turn. *Sc in next st, sk 2 sts, 5 dc in next st, sk 2 sts* repeat across, ending with sc in last st. (8 scallops)
Fasten off.
Part 7: Assembly
Now comes the satisfying part. Lay out your pieces and prepare to join them.
Joining Medallions:
Arrange 4 medallions in a 2×2 grid. Using the long tails, whip stitch the edges together where they touch. The centers should align with small gaps between motifs.
Attaching Mesh Panels:
Whip stitch a mesh panel to each side of the medallion panel. This creates a tube shape.
Adding Fan Lace Band:
Sew the fan lace band horizontally across the top of the medallion section. This creates visual separation and added interest.
Creating Mesh Upper Section:
Work an additional mesh section above the fan band, following the mesh panel instructions but working in the round. Ch 56, join to work in rounds, then follow the mesh pattern for 8 rounds.
Attaching Scalloped Cuff:
Sew the scalloped cuff around the top edge. The scallops should face upward.
Joining Leg to Foot:
With wrong sides facing, align the bottom edge of the leg section with the top edge of the foot section. Whip stitch together carefully, easing any fullness.
Part 8: Drawstring Ties (Make 2)
Ch 100. Sl st in 2nd ch from hook and in each ch across. Fasten off.
Thread the drawstring through the mesh openings just below the scalloped cuff. Add starfish charms or beads to the ends if desired. Tie in a bow at the front or side.
Finishing Touches
Weave in all remaining ends using your tapestry needle. Block your boots lightly if desired, using steam or a damp cloth to shape the lace motifs.
For added durability, you can apply fabric stiffener to the sole or add a thin layer of puffy fabric paint to create grip.
Tips for Success
Take breaks. The leg sections have many small pieces. Work on one medallion at a time if it feels overwhelming.
Count your stitches. Especially in the mesh panels, losing or gaining a stitch throws off the pattern.
Try on as you go. After completing the foot section, slip it on to check the fit before committing to the leg.
Use stitch markers generously. Mark the beginning of rounds, the center front, and any tricky spots.
Make It Your Own
These boots beg for customization. Try them in cream for a vintage feel, or deep burgundy for cooler months. Swap the starfish for buttons, crystals, or leave them off entirely. Add a second layer to the sole for extra cushion. The possibilities are endless.
Final Thoughts on This Crochet Lace Boots Pattern
I hope you love making these Mint Seafoam Crochet Lace Boots as much as I loved designing them. They’re the perfect blend of pretty and practical. Whether you’re padding around your own kitchen or gifting them to someone special, these boots bring a little handmade joy to everyday moments.
If you give this crochet pattern a try, I would absolutely love to see your finished boots! Tag me on Instagram or share a photo in our Facebook group. Seeing your creations honestly makes my whole week.
If this pattern caught your eye, go ahead and pin it to your favorite Pinterest board so you can find it when you’re ready to cast on. And please drop a comment below if you make these boots or have any questions along the way. I read every single one and love hearing from you!
