OH MY GOODNESS, these sandals! If you have ever wanted to crochet something that looks absolutely stunning but comes together faster than you would expect, THIS is the project. I am talking gorgeous boho wedding sandals that you can finish in a weekend. The lacy motif design looks incredibly intricate, but once you understand the repeat, you will be flying through each little circle. These make the most beautiful bridal accessory, bridesmaid gift, or summer statement piece. Trust me, people will ask where you bought them, and you get to say you MADE them!
Why These Crochet Wedding Sandals Are Worth Making
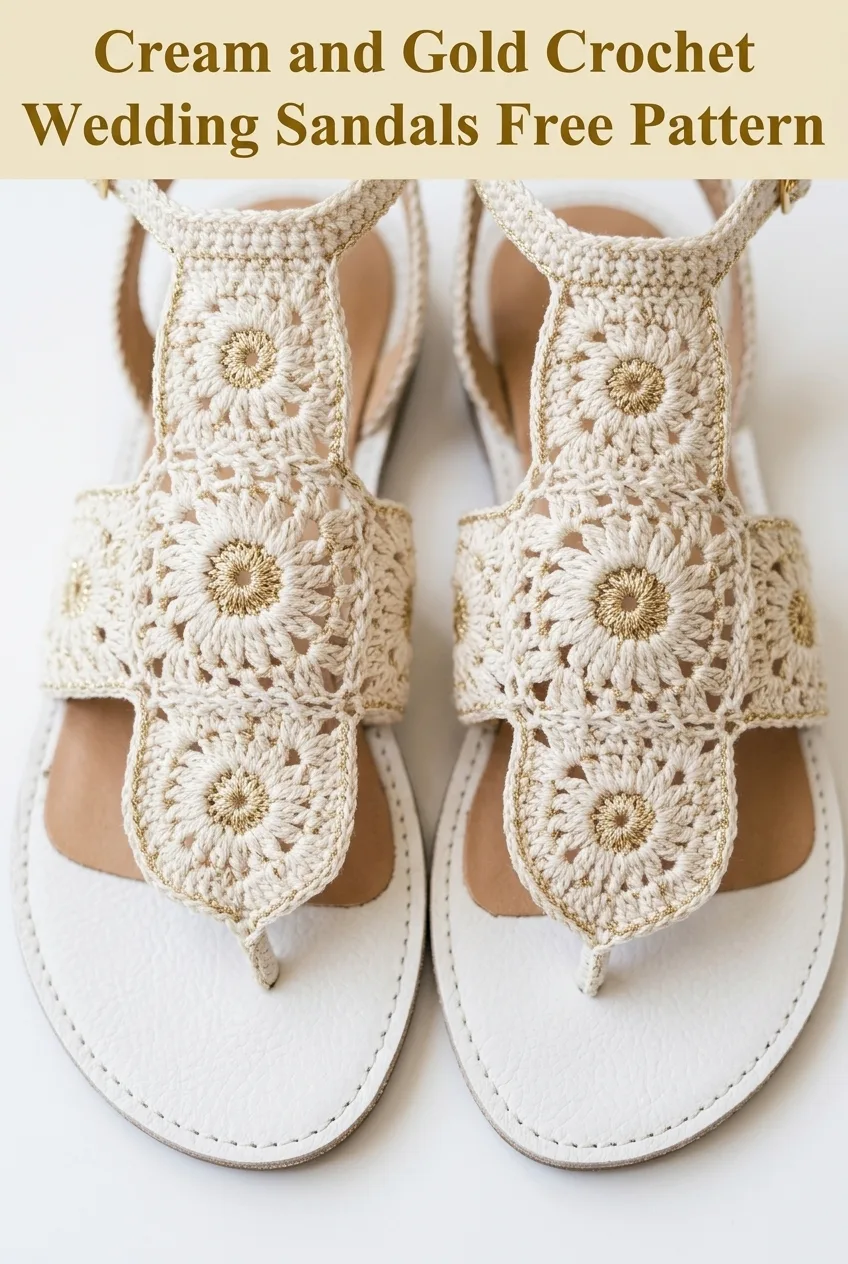
These cream and gold crochet wedding sandals combine delicate lacework with practical wearability. The design features circular flower motifs joined together to create a beautiful foot covering that attaches to a simple sandal base. The two tone color scheme uses cream as the primary shade with gold accents at each motif center, adding just the right amount of shimmer for a special occasion.
What makes this crochet pattern truly special is the construction method. Rather than crocheting directly onto a sole, you create individual motifs and join them as you go. This approach gives you complete control over the fit and allows you to customize the size easily.
The ankle strap adds both security and elegance. A small buckle closure keeps everything in place while maintaining that refined bridal aesthetic.
Skill Level
Intermediate
This crochet tutorial requires comfort with working in the round, joining motifs, and basic increasing. If you have made granny squares or any circular motif before, you have the skills needed.
Materials Needed
Yarn:
Recommended yarn types: Mercerized cotton thread works beautifully for this project. Look for Aunt Lydia’s Classic Crochet Thread or DMC Petra. For the gold accent, a metallic blend thread creates that gorgeous shimmer.
Hook:
Notions:
Gauge
One completed motif measures approximately 1.5 inches (4 cm) in diameter.
Gauge matters for this project! Your motifs need to fit together properly and cover the foot area appropriately. Make one test motif and measure before continuing.
Abbreviations and Stitch Definitions
Ch = Chain: Wrap yarn over hook, pull through loop on hook. This creates the foundation and spacing between stitches.
Sl st = Slip stitch: Insert hook into stitch, yarn over, pull through both the stitch and the loop on your hook in one motion. Used for joining and moving across stitches invisibly.
Sc = Single crochet: Insert hook into stitch, yarn over and pull up a loop (2 loops on hook), yarn over and pull through both loops.
Dc = Double crochet: Yarn over, insert hook into stitch, yarn over and pull up a loop (3 loops on hook), yarn over and pull through 2 loops, yarn over and pull through remaining 2 loops.
Tr = Treble crochet: Yarn over twice, insert hook into stitch, yarn over and pull up a loop (4 loops on hook), [yarn over, pull through 2 loops] three times.
Sp = Space: The gap created by chain stitches between other stitches.
RS = Right side: The front or public facing side of your work.
Pattern Notes
Step by Step Crochet Pattern
Individual Flower Motif (Make 12 Total, 6 Per Sandal)
With CC (gold), make a magic ring.
If you have never made a magic ring before, here is a quick explanation: wrap the yarn around your fingers to form a loop, insert your hook, yarn over and pull up a loop, then chain to secure. You will work your first round into this ring, then pull the tail tight to close the center.
Round 1 (RS): Ch 3 (counts as first dc throughout), work 11 dc into the ring, sl st to top of beginning ch 3 to join. Pull magic ring closed. (12 dc)
At this point, you should have a tiny gold circle with 12 double crochet stitches forming a little sun shape.
Fasten off CC. Join MC (cream) with sl st to any dc.
Round 2: Ch 1, sc in same st, ch 3, skip next dc, *sc in next dc, ch 3, skip next dc; repeat from * around, sl st to first sc to join. (6 sc, 6 ch-3 spaces)
You are creating the little arches that form the petals. Do not worry if they seem small right now.
Round 3: Sl st into first ch-3 sp, ch 3, 2 dc in same sp, ch 2, 3 dc in same sp (first corner made), *ch 1, (3 dc, ch 2, 3 dc) in next ch-3 sp; repeat from * around, ch 1, sl st to top of beginning ch 3 to join. (36 dc, 6 ch-2 corner spaces, 6 ch-1 spaces)
Now your motif is taking shape! You should see six distinct "petals" or shell groupings radiating from the center.
Round 4: Sl st to first ch-2 corner sp, ch 3, 2 dc in same sp, ch 3, 3 dc in same sp, *ch 1, 3 dc in next ch-1 sp, ch 1, (3 dc, ch 3, 3 dc) in next ch-2 corner sp; repeat from * around, ch 1, 3 dc in last ch-1 sp, ch 1, sl st to top of beginning ch 3 to join. (54 dc, 6 ch-3 corner spaces, 12 ch-1 spaces)
Fasten off and weave in ends.
Your completed motif should measure approximately 1.5 inches across and have a beautiful circular flower shape with the gold center peeking through.
Joining Motifs for Foot Panel
Here is where the magic happens! Instead of sewing motifs together later, you will join them on the final round. This creates a much stronger, more seamless connection.
First Motif: Complete rounds 1 through 4 as written above. This becomes your anchor motif.
Second Motif (and all subsequent joining motifs):
Work Rounds 1 through 3 as written.
Round 4 (Joining Round): Work to the first corner ch-3 sp where you want to join to the previous motif. Instead of ch 3, work: ch 1, sl st to corresponding ch-3 corner sp of adjacent motif, ch 1, then continue with 3 dc in same corner sp of current motif.
For the ch-1 spaces along the joining edge, work: 3 dc in ch-1 sp, sl st to corresponding ch-1 sp of adjacent motif (instead of ch 1).
Continue joining at each connection point, then complete the remaining sides of the motif as normal.
Foot Panel Layout
Arrange your motifs in a triangular formation that covers the top of the foot:
Row 1 (toe end): 2 motifs joined side by side
Row 2 (middle): 2 motifs joined below, connecting to Row 1
Row 3 (toward ankle): 2 motifs joined below, connecting to Row 2
The panel should form a gentle curve that follows the shape of the foot, wider at the top near the ankle and tapering slightly toward the toes.
Edging for Foot Panel
Once all motifs are joined, add a finishing edge around the entire panel.
Join MC to any outer corner of the panel.
Edging Round: Ch 1, sc evenly around entire outer edge of panel, working 3 sc in each outer corner ch-3 sp and 1 sc in each ch-1 sp along the sides. Work sc2tog (single crochet two together) at inner joining points to keep the edge flat. Sl st to first sc to join.
Fasten off.
Ankle Strap (Make 2)
The ankle strap provides both function and beauty. It wraps around the ankle and fastens with a small buckle.
With MC, ch 60 (or desired length to wrap around ankle plus 3 inches for buckle overlap).
Row 1: Sc in 2nd ch from hook and in each ch across. (59 sc)
Row 2: Ch 1, turn, sc in each sc across. (59 sc)
Row 3: Ch 1, turn, sc in each sc across. (59 sc)
Fasten off, leaving a long tail for attaching.
The strap should measure approximately 10 to 11 inches long and about 0.5 inches wide. Adjust the starting chain if you need a different length for your ankle measurement.
Toe Loop (Make 2)
This small loop anchors the sandal between the toes.
With MC, ch 8.
Row 1: Sc in 2nd ch from hook and in each ch across. (7 sc)
Rows 2 through 4: Ch 1, turn, sc in each sc across. (7 sc)
Fasten off, leaving long tails on both ends.
Assembly Instructions
Now for the exciting part. You get to bring everything together!
Step 1: Prepare Your Sandals
If your sandals have existing straps, carefully remove them or work around them. Clean the sole surface where you will attach the crochet pieces.
Step 2: Attach the Toe Loop
Fold the toe loop piece in half lengthwise. Position it where the thong post would typically sit (between big toe and second toe). Use fabric glue or stitch securely to the sandal sole. Allow to dry completely if using glue.
Step 3: Position the Foot Panel
Place the foot panel on top of your foot while wearing the sandal base. The narrower end should point toward your toes, with the bottom edge of the first motif row sitting just behind your toe knuckles. The wider end extends toward your ankle.
Mark where the side edges of the panel meet the sandal sole.
Step 4: Attach the Foot Panel
Using a sharp needle and matching thread, or fabric glue, secure the bottom edge of the foot panel to the sandal sole along both sides. Stitch through the crochet edging and into the sole material.
Alternatively, if your sandal sole has a lip or edge, you can tuck the crochet edging underneath and glue in place.
Step 5: Attach the Ankle Strap
Position one end of the ankle strap at the back inside edge of the sandal, near where the heel sits. Secure with stitching or glue.
Wrap the strap around to determine buckle placement. Attach the buckle to the opposite end of the strap, leaving enough length for adjustment.
Secure the buckle end of the strap to the other side of the sandal.
Step 6: Connect Panel to Straps
Use a few small stitches to connect the top corners of the foot panel to the ankle strap where they meet. This prevents the panel from shifting during wear.
Step 7: Final Adjustments
Try on your completed sandals. Check that the toe loop sits comfortably, the foot panel lays flat without bunching, and the ankle strap buckles at a comfortable tightness.
Sizing Adjustments
For smaller feet: Reduce to 4 motifs in the foot panel (2 rows of 2), or make the outer edging round tighter by skipping some spaces.
For larger feet: Add one more row of motifs (8 total per sandal) to extend coverage further up the foot.
For wider feet: Add an extra motif to each row, creating a wider panel.
For ankle strap length: Measure around your ankle and add 3 inches for buckle overlap. Adjust starting chain accordingly.
Care Instructions
Because these sandals have both crochet and sandal base components, care requires attention to both.
For the crochet portions: Spot clean with mild soap and cool water. Lay flat to dry away from direct sunlight to prevent fading.
For the sandal base: Follow manufacturer instructions for your specific sandal material.
Storage tip: Stuff the toe area with tissue paper to help the crochet motifs maintain their shape when not being worn.
Styling Tips for Your Crochet Wedding Sandals
These gorgeous sandals work beautifully for:
The cream and gold combination is classically elegant, but you could easily adapt this pattern using different color combinations. Imagine blush pink with rose gold centers, or ivory with silver accents.
Troubleshooting Common Issues
Motifs curling: This usually means your tension is too tight. Try going up one hook size or consciously relaxing your grip.
Motifs too floppy: Your tension may be too loose, or you might need to go down a hook size. The finished fabric should have body but still drape nicely.
Joining looks bumpy: Make sure you are slip stitching into the actual chain space, not into a stitch. Keep your joining slip stitches loose.
Panel does not lay flat on foot: You may need to adjust where you attach it to the sole, or add a few extra stitches along the edging to create more ease.
I really hope you love making these crochet wedding sandals as much as I enjoyed designing them! If you give this pattern a try, I would absolutely love to see your finished sandals. Tag me on Instagram or share a photo in our Facebook group. Seeing your creations truly makes my day!
If this pattern caught your eye, go ahead and save it to your Pinterest boards so you can find it easily when you are ready to start. And please drop a comment below if you make these beauties or have any questions along the way. I always love hearing from you!
