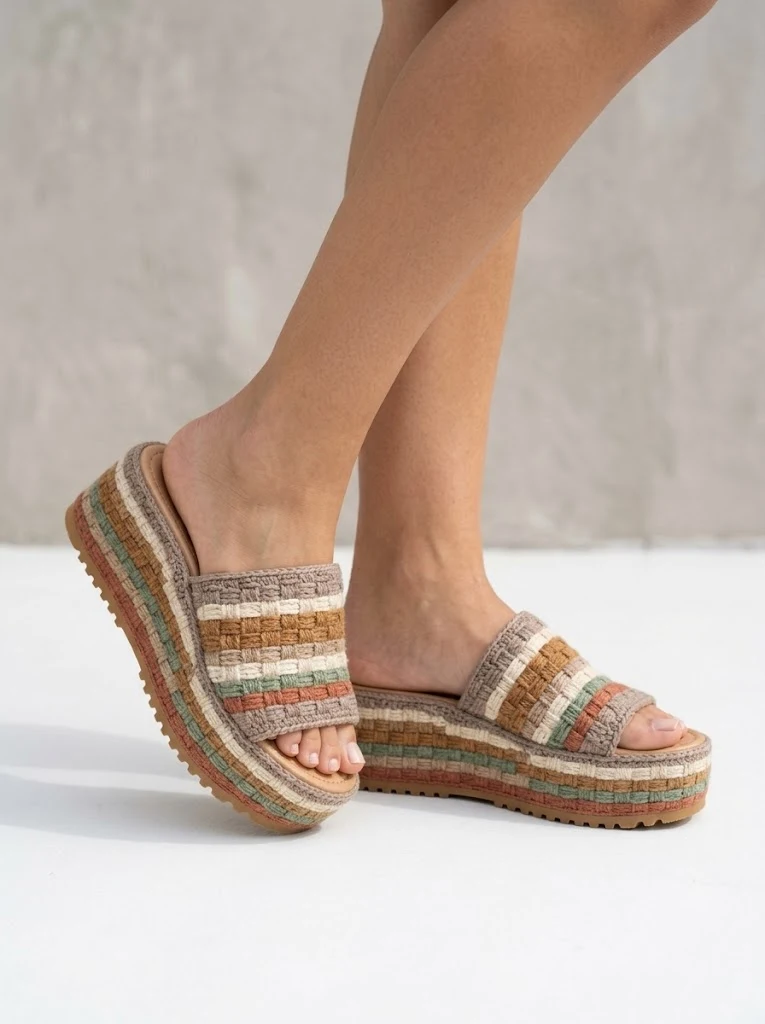
I’ve been looking for the perfect summer crochet project that combines fashion with function, and this is my absolute favourite find. These gorgeous platform wedge sandals feature a stunning basket weave texture in the most beautiful earthy color palette. Taupe, cream, sage green, terracotta, and golden mustard come together to create footwear that looks completely boutique-worthy. If you’ve ever wanted to crochet your own wearable shoes, this is the pattern I rounded up all my best techniques for.

Why You’ll Love This Crochet Platform Sandal Pattern
These aren’t your grandmother’s crochet slippers. We’re talking actual platform wedge sandals with a proper rubber sole, leather insole, and a professional finish that nobody would guess you made yourself. The basket weave stitch pattern creates incredible texture and visual interest, while the striped color design gives you that perfect boho aesthetic.
This crochet tutorial walks you through every step of creating statement footwear. Whether you’re heading to a summer festival, the farmer’s market, or just want to elevate your casual wardrobe, these sandals deliver style and comfort in equal measure.
Skill Level: Intermediate to Advanced
Don’t let that scare you off if you’re an ambitious beginner. The stitches themselves are straightforward. The challenge comes from working with a shoe sole base and maintaining consistent tension across color changes. I’ll walk you through everything step by step.
Materials You’ll Need
Yarn:
Cotton yarn works best for this project because it holds its shape, provides durability for footwear, and won’t stretch out over time. I recommend 100% cotton or a cotton blend for the best results. Brands like Lion Brand 24/7 Cotton, Lily Sugar’n Cream, or Drops Paris work beautifully.
Tools:
About the Sole Base:
You’ll need platform wedge soles with holes around the perimeter for crocheting. These typically come in standard shoe sizes. The platform height in this design appears to be approximately 1.5 to 2 inches. You can find these at craft supply stores, shoe repair suppliers, or online marketplaces. Search for "crochet sandal soles" or "espadrille soles with holes."
Gauge (Important for Fit)
Using worsted weight cotton and 4.0mm hook:
Check your gauge before starting. Footwear needs to fit properly, so take a few minutes to swatch. If your gauge is too loose, go down a hook size. Too tight? Go up a hook size.
Stitch Abbreviations and Definitions
Let me break down every stitch you’ll need:
Understanding the Basket Weave Construction
The beautiful woven texture you see on these sandals comes from alternating front post double crochet (FPdc) and back post double crochet (BPdc) stitches. When you work FPdc, the stitch pops forward toward you. When you work BPdc, the stitch recedes backward.
By grouping these stitches and alternating them every two rows, you create that signature basket weave appearance. It looks complicated but follows a simple repeating pattern once you get started.
Here’s a helpful way to think about it: imagine weaving strips of fabric over and under each other. That’s exactly what you’re replicating with your hook.
Pattern Instructions

Part 1: Preparing the Sole Base
Step 1: Examine your platform wedge soles. Count the pre-punched holes around the entire perimeter. Most soles have holes spaced approximately 0.5 inches apart. Write down your hole count for reference.
Step 2: Using your smaller hook (3.5mm) and Color A (taupe), attach yarn to any hole at the back center of the sole with a slip stitch.
Step 3: Work 2 single crochet stitches into each hole around the entire sole perimeter. This creates your foundation for attaching the crocheted pieces.
*Tip: If your holes are very close together, you may only need 1 sc per hole. The goal is a flat, even edge that doesn’t pucker or ruffle.*
Part 2: Crocheting the Platform Wedge Cover
This striped section wraps around the platform edge, giving your sandals that professional finished look.
Row 1 (Color A, taupe): Working into your sc foundation, ch 1, sc in each st around the platform edge. Sl st to join. Count your stitches. (Your total depends on sole size)
Row 2 (Color B, cream): Ch 2 (counts as first dc), dc in each st around. Sl st to join.
Row 3 (Color E, mustard): Ch 2, dc in each st around. Sl st to join.
Row 4 (Color C, sage): Ch 2, dc in each st around. Sl st to join.
Row 5 (Color D, terracotta): Ch 2, dc in each st around. Sl st to join.
Row 6 (Color A, taupe): Ch 2, dc in each st around. Sl st to join.
Continue this color sequence, adding the basket weave texture:
Row 7 (Color B, cream): Ch 2, *FPdc around next 2 sts, BPdc around next 2 sts* repeat around. Sl st to join.
Row 8 (Color E, mustard): Ch 2, *BPdc around next 2 sts, FPdc around next 2 sts* repeat around. Sl st to join.
Continue alternating the basket weave rows while maintaining the color stripe sequence until your cover reaches approximately 1.5 inches or covers your platform height.
Fasten off and weave in ends securely.
Part 3: Creating the Upper Strap Band
The wide strap across the top of the foot uses the same basket weave technique. This is worked flat in rows.
Using Color A (taupe) and 4.0mm hook:
Foundation Row: Ch 47 (or adjust for your foot width, maintaining a multiple of 4 plus 3).
Row 1: Dc in 4th ch from hook, dc in each ch across. (44 dc)
Row 2 (Color B, cream): Ch 2, turn, *FPdc around next 2 sts, BPdc around next 2 sts* repeat across, dc in last st. (44 sts)
Row 3 (Color E, mustard): Ch 2, turn, *BPdc around next 2 sts, FPdc around next 2 sts* repeat across, dc in last st. (44 sts)
Row 4 (Color C, sage): Repeat Row 2. (44 sts)
Row 5 (Color D, terracotta): Repeat Row 3. (44 sts)
Row 6 (Color A, taupe): Repeat Row 2. (44 sts)
Row 7 (Color B, cream): Repeat Row 3. (44 sts)
Row 8 (Color E, mustard): Repeat Row 2. (44 sts)
Row 9 (Color C, sage): Repeat Row 3. (44 sts)
Row 10 (Color A, taupe): Ch 1, turn, sc in each st across. (44 sts)
Fasten off, leaving a long tail for attaching to the sole.
Part 4: Edging the Strap
Border Round (Color A): Attach yarn at any corner of the strap. Ch 1, sc evenly around all four edges, working 3 sc in each corner. Sl st to join.
This creates a clean, finished edge and helps the strap maintain its shape.
Part 5: Assembly
Step 1: Position the upper strap across the sole where you want the band to sit (typically about 1 to 2 inches from the toe edge).
Step 2: Using your tapestry needle and matching yarn, whip stitch the strap edges securely to the platform cover you created earlier.
Step 3: Apply fabric glue to the underside of your crocheted platform cover and press firmly against the wedge sole. Allow to dry completely (usually 24 hours).
Step 4: Insert your leather insole to cover any interior stitching and provide comfort.
Step 5: Repeat all steps for the second sandal.
Sizing Adjustments for Your Crochet Sandal Pattern
The pattern as written fits approximately a women’s size 7 to 8. Here’s how to adjust:
For smaller sizes (5 to 6): Reduce foundation chain by 8 stitches. Use fewer rows on the platform cover.
For larger sizes (9 to 10): Add 8 stitches to foundation chain. Add 1 to 2 additional rows on platform cover.
Always try your strap across your foot before attaching permanently. It should fit snugly without pinching.
Care Instructions
These sandals are surprisingly durable when made with cotton yarn:
Troubleshooting Common Issues
My strap is too loose: Your tension may be too relaxed. Try using a smaller hook or working more tightly. You can also reduce your foundation chain.
The colors look muddy together: Carry your unused colors loosely along the back of your work, or cut and rejoin each color to keep the back neat.
My platform cover is rippling: You likely have too many stitches. Reduce by working 1 sc per hole instead of 2 in your foundation round.
The strap won’t stay attached: Use a strong adhesive like E6000 in addition to your stitching. Allow full cure time before wearing.
Final Thoughts on This Platform Wedge Sandal Crochet Pattern
Creating your own crochet platform wedge sandals feels incredibly rewarding. You end up with completely unique footwear that sparks conversations and showcases your skills. The earthy neutral color palette works with virtually any summer outfit, from sundresses to linen pants.
This step by step crochet tutorial gives you everything you need to make professional-looking sandals at home. While the pattern involves multiple techniques, each individual step is manageable when you take your time.
Thank you so much for choosing this pattern. I truly hope you love making these sandals as much as I enjoyed designing them. If you create a pair, please share photos with me on Instagram or Facebook. I absolutely love seeing your finished projects and which color combinations you choose.
If this pattern inspires you, go ahead and save it to your Pinterest boards so you can find it when you’re ready to start. And please drop a comment below if you make these sandals. I’d love to hear which colors you picked and how they turned out for you.
