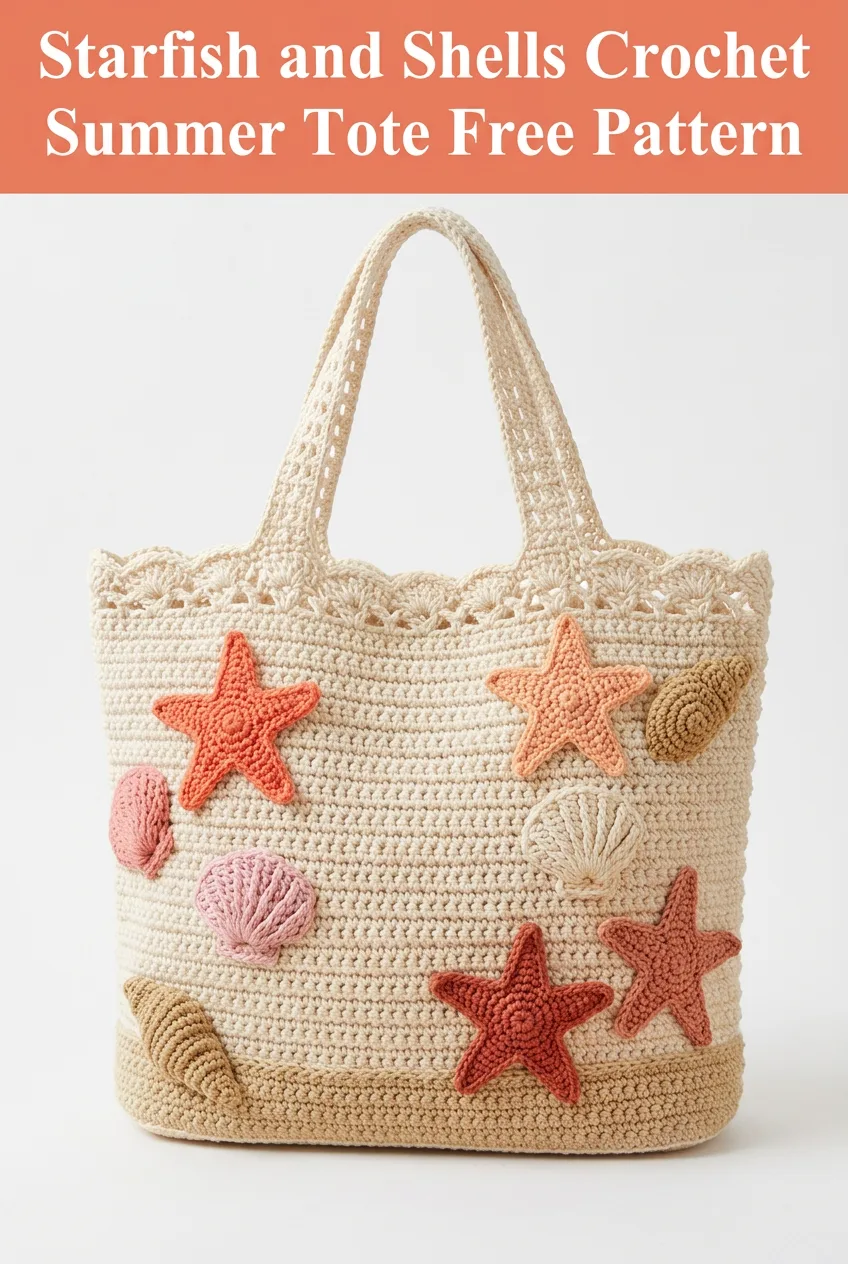
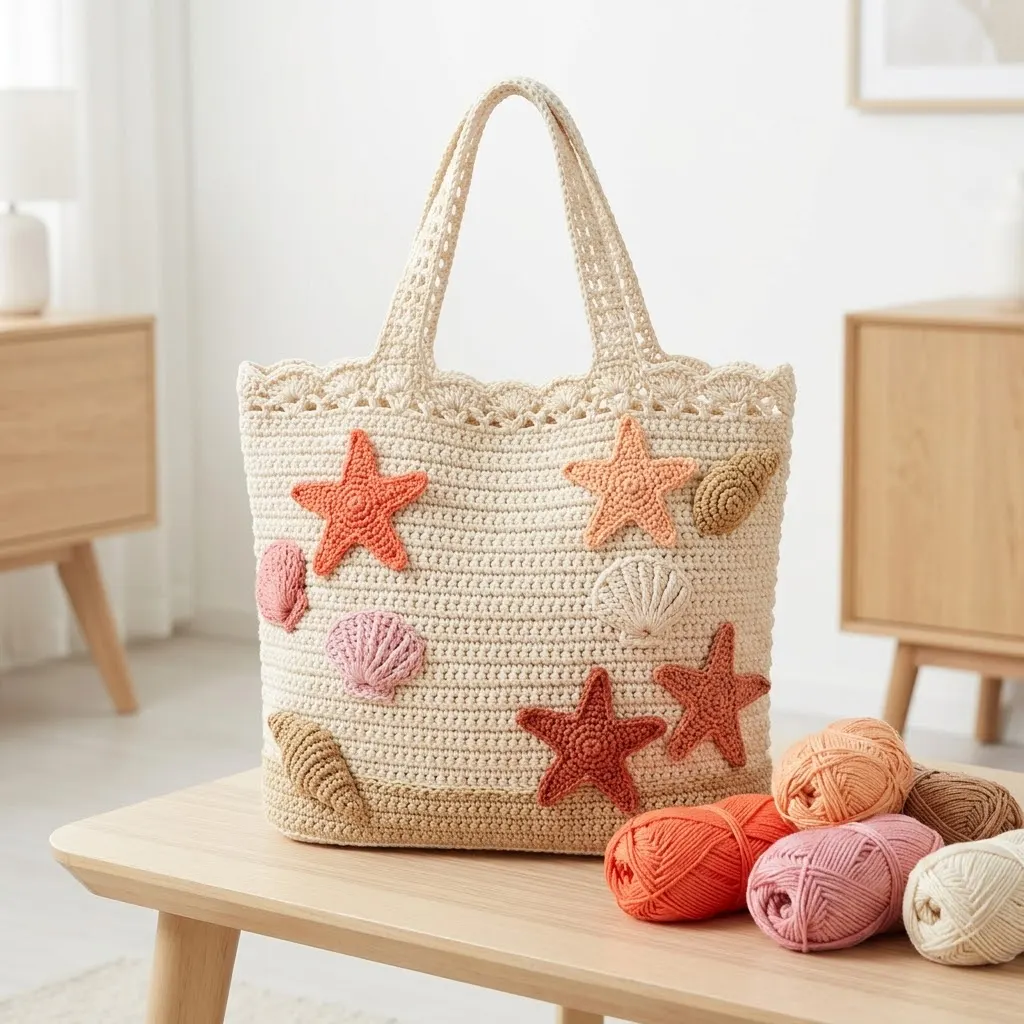
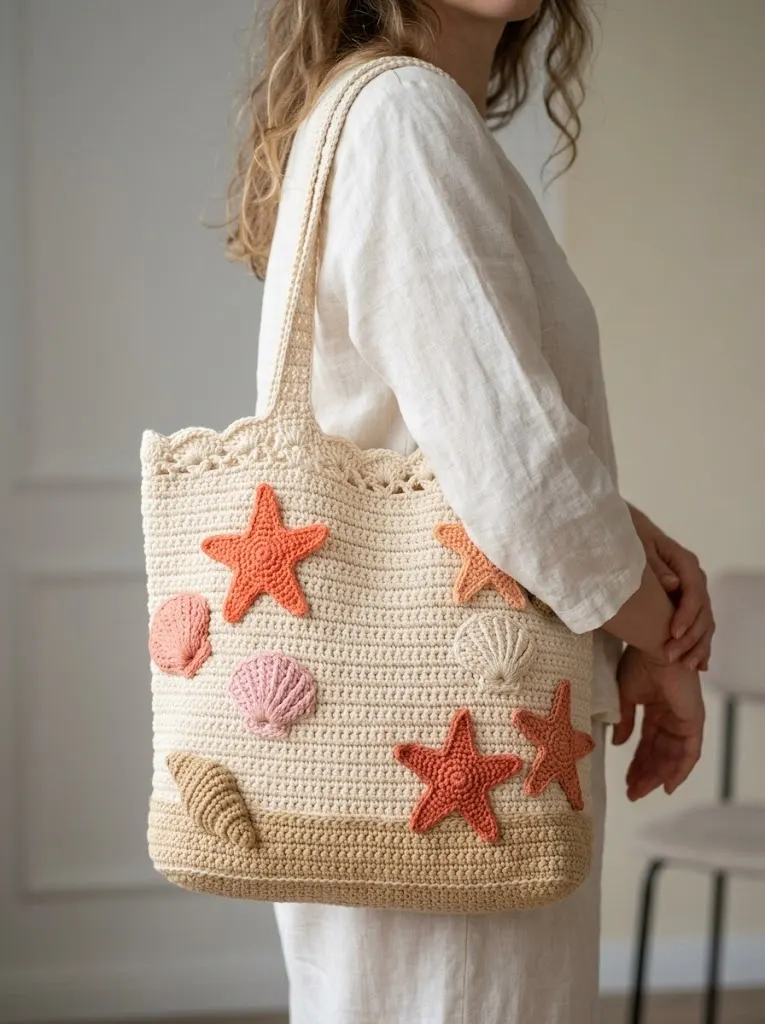
This is a crochet beach tote bag with adorable starfish and seashell appliqués. The main body uses basic single crochet stitches worked in joined rounds. The decorative scallop edge at the top adds a pretty finishing touch. Beginner friendly with simple appliqué techniques.
Why You’ll Love This Summer Tote Pattern
Picture yourself strolling along the boardwalk with this gorgeous beach bag slung over your shoulder. The neutral cream base gives those sweet coral, pink, and tan appliqués room to shine. I designed this tote to be roomy enough for all your beach essentials. Sunscreen, a good book, your phone, and a snack or two will fit perfectly inside.
The construction is straightforward even if you’ve never made a bag before. You’ll work the body in continuous rounds from the bottom up. Then you’ll create the appliqués separately and sew them on wherever you like. This means you have complete creative control over your design.
What makes this pattern special is the combination of textures. The dense single crochet body creates a sturdy base. The raised appliqués add dimension and visual interest. And that scalloped lace border at the top brings elegance to an otherwise casual accessory.
Skill Level
Intermediate beginner. If you can work single crochet in the round and follow a simple pattern, you can absolutely make this tote. The appliqués require a bit more shaping, but I’ll walk you through every step.
Finished Dimensions
Materials Needed
Yarn
You’ll want a sturdy worsted weight (weight 4) cotton or cotton blend yarn. Cotton holds its shape beautifully for bags and won’t stretch out over time like acrylic might.
Main color (MC): Cream or natural, approximately 350 yards
Color A: Coral orange, approximately 30 yards
Color B: Peach, approximately 25 yards
Color C: Dusty pink, approximately 25 yards
Color D: Tan or light brown, approximately 30 yards
Color E: Rust or terracotta, approximately 20 yards
I recommend brands like Lily Sugar’n Cream, Paintbox Cotton DK, or similar 100% cotton yarns. The slight texture of cotton yarn helps the stitches stay defined.
Tools
Gauge
16 single crochet stitches and 18 rows = 4 inches in single crochet
Gauge matters for this project! A tighter gauge creates a sturdier bag that won’t stretch or sag when loaded with your beach gear.
Abbreviations and Stitch Definitions
Let me break down every stitch you’ll need for this pattern.
Ch = Chain. Wrap yarn over hook, pull through loop on hook. This creates the foundation for your work.
Sl st = Slip stitch. Insert hook, yarn over, pull through both the stitch and the loop on your hook in one motion. Used for joining rounds.
Sc = Single crochet. Insert hook into stitch, yarn over and pull up a loop (2 loops on hook), yarn over and pull through both loops.
Hdc = Half double crochet. Yarn over, insert hook, yarn over and pull up a loop (3 loops on hook), yarn over and pull through all 3 loops.
Dc = Double crochet. Yarn over, insert hook, yarn over and pull up a loop (3 loops on hook), yarn over and pull through 2 loops, yarn over and pull through remaining 2 loops.
Sc2tog = Single crochet two together (decrease). Insert hook in first stitch, pull up a loop, insert hook in next stitch, pull up a loop (3 loops on hook), yarn over and pull through all 3 loops.
Inc = Increase. Work 2 stitches into the same stitch.
Magic ring = An adjustable starting loop that closes tightly. Also called magic circle or magic loop.
Pattern Notes
Crochet Summer Tote Pattern Instructions
Part 1: Tote Base
The base is worked in rows to create a rectangular bottom.
With MC and 5.0mm hook:
Row 1: Ch 41. Sc in 2nd ch from hook and in each ch across. (40 sts)
Rows 2 through 14: Ch 1, turn. Sc in each st across. (40 sts)
You should now have a rectangle approximately 10 inches by 3.5 inches. This forms the bottom of your tote.
Part 2: Tote Body
Now you’ll work around the entire perimeter of the base to build up the sides.
Round 1: Ch 1, do not turn. Work 3 sc in the corner stitch. Sc evenly along the short edge (approximately 14 sc). Work 3 sc in the corner. Sc across the foundation chain edge (40 sc). Work 3 sc in the corner. Sc along the other short edge (14 sc). Work 3 sc in the final corner. Sc across the top of Row 14 (40 sc). Sl st to first sc to join. (120 sts approximately)
Note: Your stitch count may vary slightly depending on your tension. The important thing is that your work lies flat without bunching or rippling.
Round 2: Ch 1. Sc in each st around. Sl st to join. (120 sts)
Rounds 3 through 40: Repeat Round 2.
Your tote body should measure approximately 10 to 11 inches tall at this point. If you’d like a taller bag, continue working additional rounds.
Part 3: Scallop Border
This decorative edge adds that lovely feminine touch you see at the top of the bag.
Round 1: Ch 1. Sc in each st around. Sl st to join. (120 sts)
Round 2: Ch 1. *Sc in next st, skip 2 sts, 5 dc in next st (shell made), skip 2 sts.* Repeat from * around. Sl st to join.
Round 3: Ch 3 (counts as dc). *2 dc in center dc of shell below, ch 2, 2 dc in same st, sc in sc between shells.* Repeat from * around. Sl st to top of ch-3 to join.
Fasten off and weave in ends.
Part 4: Handles (Make 2)
With MC and 5.0mm hook:
Row 1: Ch 81. Sc in 2nd ch from hook and in each ch across. (80 sts)
Rows 2 through 4: Ch 1, turn. Sc in each st across. (80 sts)
Fasten off, leaving a long tail for sewing.
Attaching handles: Position handles about 3 inches from each side edge. Pin in place. Using your yarn needle and the long tail, whip stitch securely along the inside of the bag. Reinforce by stitching through multiple times.
Appliqué Patterns
Here’s where the fun begins! These little ocean treasures bring your tote to life.
Starfish Appliqué (Make 4 to 5 in assorted colors)
With Color A, B, or E and 4.5mm hook:
Magic ring: Ch 2. Work 5 dc into ring. Sl st to join. Pull ring closed. (5 dc)
Arm 1: Ch 5. Sc in 2nd ch from hook, hdc in next ch, dc in next ch, hdc in next ch. Sl st into next dc of center ring.
Arms 2 through 5: Repeat Arm 1 instructions, slip stitching into each remaining dc of the center ring.
Fasten off and weave in ends. You should have a five-pointed starfish shape.
Tip: If your starfish looks floppy, try using a smaller hook or tighter tension. You want the arms to hold their shape.
Spiral Shell Appliqué (Make 2 to 3 in Colors C and D)
With chosen color and 4.5mm hook:
Magic ring: 6 sc into ring. Do not join. Work in continuous spiral. (6 sts)
Round 2: 2 sc in each st around. (12 sts)
Round 3: *Sc in next st, 2 sc in next st.* Repeat around. (18 sts)
Round 4: *Sc in next 2 sts, 2 sc in next st.* Repeat around. (24 sts)
Fasten off, leaving a tail. The natural curl of the work creates a spiral effect.
Fan Shell Appliqué (Make 2 to 3 in Colors C and D)
With chosen color and 4.5mm hook:
Row 1: Ch 4. 6 dc in 4th ch from hook. Turn. (7 sts including turning chain)
Row 2: Ch 3 (counts as dc). Dc in same st. 2 dc in each st across. Turn. (14 sts)
Row 3: Ch 1. Sc in each st across. (14 sts)
Fasten off, leaving a tail for sewing.
This creates a fan or scallop shell shape that’s perfect for adding variety to your design.
Ridged Cone Shell (Make 1 to 2 in Color D)
With Color D and 4.5mm hook:
Row 1: Ch 2. 3 sc in 2nd ch from hook. Turn. (3 sts)
Row 2: Ch 1. 2 sc in first st, sc in next st, 2 sc in last st. Turn. (5 sts)
Row 3: Ch 1. Sc in each st across. Turn. (5 sts)
Row 4: Ch 1. 2 sc in first st, sc in next 3 sts, 2 sc in last st. Turn. (7 sts)
Row 5: Ch 1. Sc in each st across. Turn. (7 sts)
Row 6: Ch 1. 2 sc in first st, sc in next 5 sts, 2 sc in last st. (9 sts)
Fasten off. Add texture by surface slip stitching horizontal lines across the shell if desired.
Assembly and Finishing
Placing Your Appliqués
Lay your tote flat on a table. Arrange your starfish and shells in a pleasing pattern. The photo shows them scattered organically across the front. Here are some tips:
Sewing Appliqués
Thread your yarn needle with matching yarn. Whip stitch around the edges of each appliqué, catching both the appliqué and the tote body. For starfish, stitch around each arm tip and the center. For shells, stitch around the entire perimeter.
Don’t pull too tightly or you’ll pucker the fabric. Just secure it firmly.
Weaving in Ends
Turn your tote inside out. Weave all yarn tails through several stitches, then back the opposite direction. Trim close to the fabric.
Blocking (Optional)
If your tote looks a bit rumpled, wet blocking can help. Soak in cool water, gently squeeze out excess, and lay flat to dry. Shape with your hands as needed.
Customization Ideas
This pattern is incredibly versatile. Here are some ways to make it your own:
Troubleshooting Tips
My bag is too floppy. Use a smaller hook size or stiffer yarn. You can also line the interior with fabric or craft interfacing.
My appliqués won’t lay flat. Block them individually before sewing. Pin to a foam board, mist with water, and let dry completely.
My handle keeps twisting. Make sure you’re not twisting the chain when you start. Lay it flat as you work each row.
I lost count of my rounds. Use a row counter app or make a tick mark on paper after each round. It happens to everyone!
Wrapping Up Your Crochet Summer Tote
You’ve just created a stunning beach accessory that’s practical, beautiful, and completely one of a kind. This crochet summer tote pattern combines simple stitches with creative appliqué work. The result is a bag that looks far more complicated than it actually is.
Every time you grab this tote for a beach day or farmers market trip, you’ll feel proud knowing you made it yourself. The starfish and shells add such sweet coastal charm. And the sturdy cotton construction means this bag will last for many summers to come.
Thank you so much for choosing this pattern for your next project. I genuinely hope you love making it as much as I loved designing it. If you’d like to share your finished tote, I’d absolutely love to see it! Tag me on Instagram or post a photo to my Facebook group. Seeing your creations brings me so much joy.
If you loved this crochet tutorial and want to make it later, go ahead and save this post to your Pinterest boards. That way you’ll have it ready whenever the mood strikes. And please drop a comment below if you make this tote. I’d love to hear how it turned out for you!
