
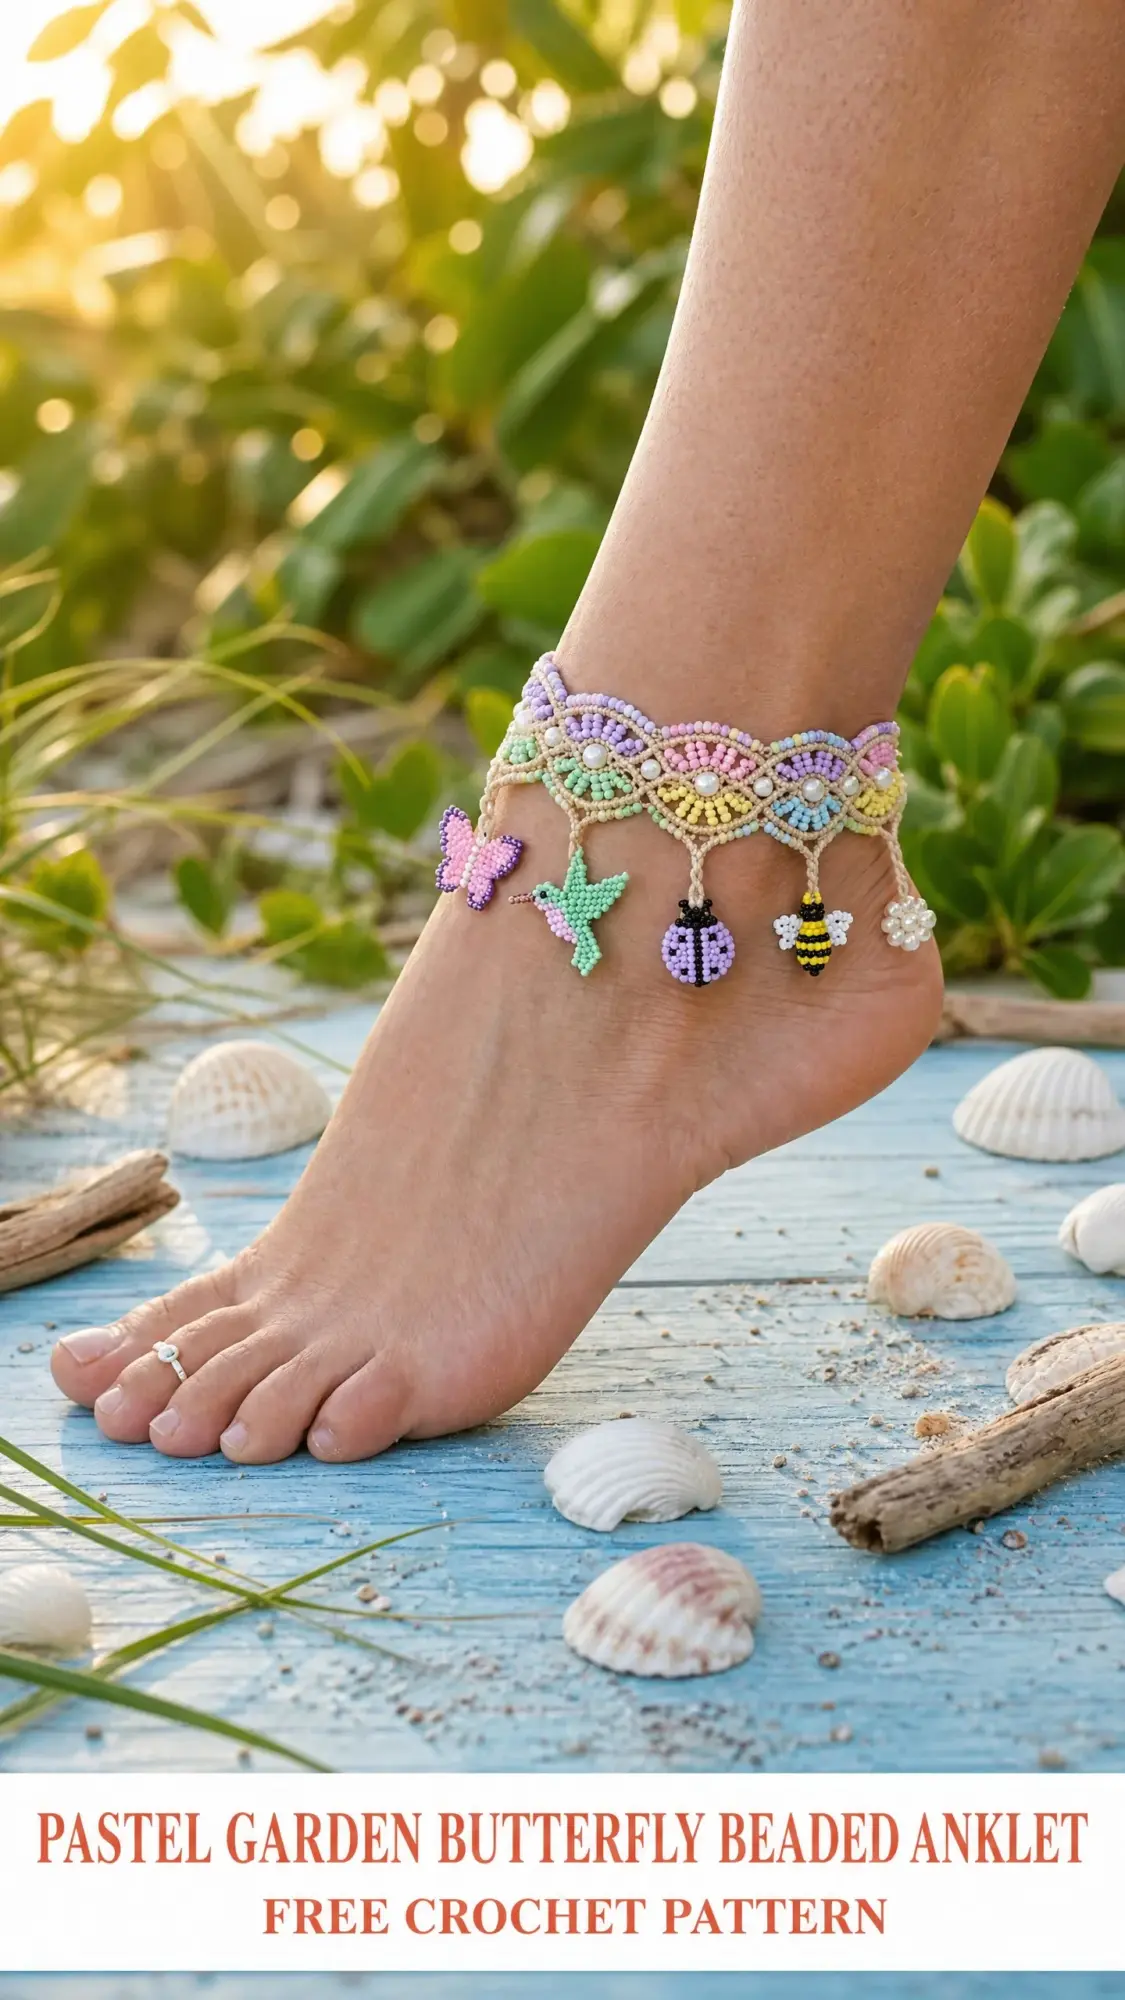
Looking for a statement piece that celebrates warm weather and adds whimsy to every step? This pastel garden butterfly beaded anklet delivers exactly that. The design features a macrame-inspired lattice band dotted with pearl centers and four adorable dangling charms: a butterfly, hummingbird, ladybug, and bumblebee.
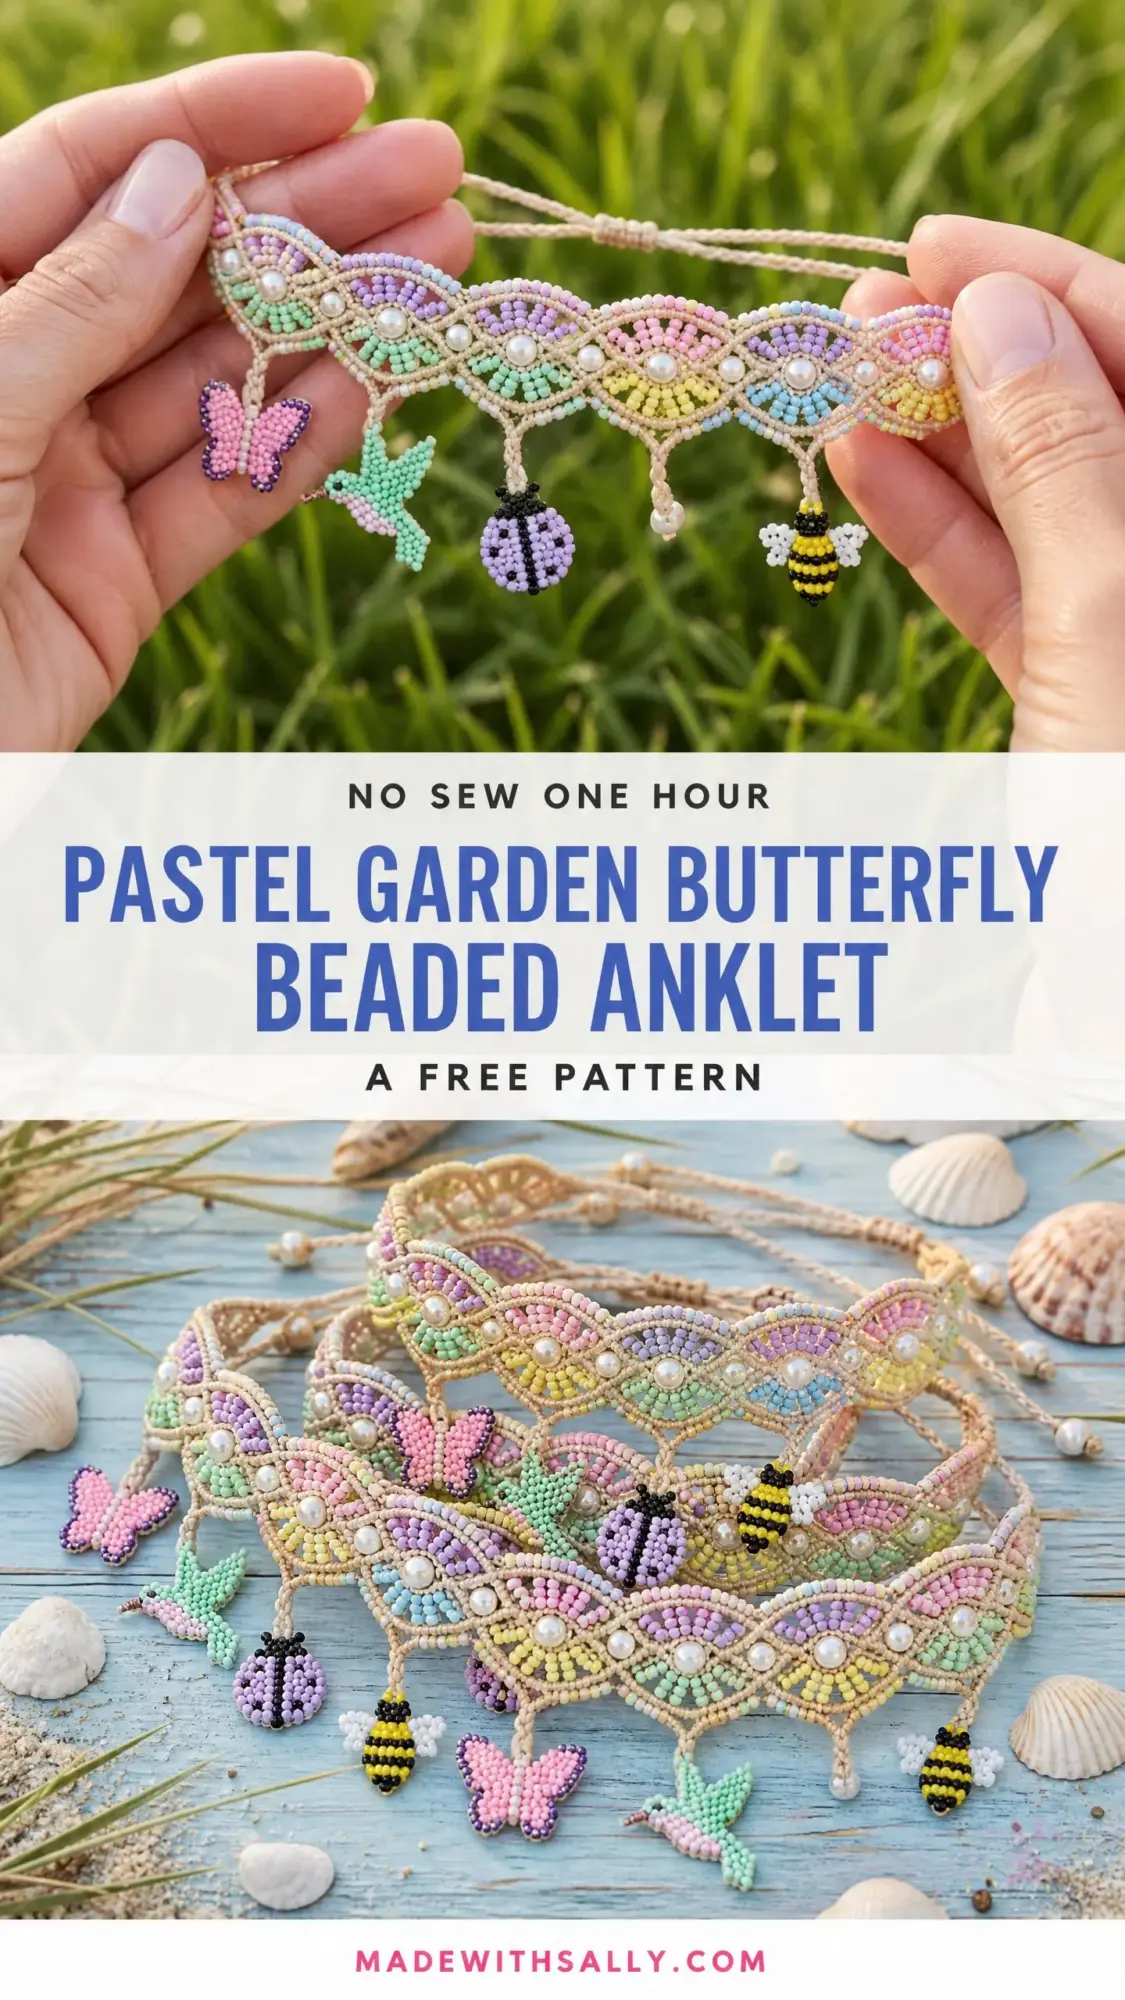
The construction uses basic chain and slip stitch techniques with pre-strung beads, making it accessible to anyone comfortable with bead management. The finished anklet fits ankle circumferences from 7 to 9 inches thanks to adjustable tie closures. It works up in 3 to 5 hours, which makes it perfect for a weekend project or a thoughtful handmade gift.
Whether you want to treat yourself or surprise a friend who loves boho beach style, this crochet tutorial walks you through every step. Let me break it all down for you.
Why You Will Love This Beaded Anklet Pattern
This project sits comfortably at the advanced beginner to intermediate skill level. If you have worked with pre-strung beads before, you will find the band construction straightforward. The charm pieces add moderate complexity because they require reading small bead diagrams translated into bead-loaded stitches, but I will walk you through each one row by row.
The rainbow of pastel seed beads creates a cheerful gradient across the band. Pink flows into lavender, then mint, soft yellow, and back again. Each eye-shaped lattice cell holds a tiny pearl at its center. The four garden-themed charms dangle from the lower edge, catching light and movement as you walk.
This beaded anklet crochet pattern produces a finished band length of approximately 8 inches from tie to tie, with the band width measuring about 0.75 inches at the center. Including the charm drops, the total anklet height reaches roughly 1.5 inches at the center front.
Materials You Will Need
Gather these supplies before you begin. Having everything ready makes the bead pre-stringing process much smoother.
Crochet Thread: Size 10 crochet cotton thread in natural or ecru, approximately 50 yards per anklet.
Seed Beads: Size 11/0 seed beads in these pastel colors:
Pearl Beads: 4mm faux pearl beads, approximately 10 beads per anklet. You will use 7 for band centers, 2 for tie ends, plus 1 spare.
Charm Beads: Size 11/0 seed beads for the four charms:
Crochet Hook: Size 7 steel crochet hook (1.65 mm) or size needed to obtain gauge.
Additional Tools: Fine beading needle or twisted wire needle for pre-stringing beads, scissors, and a tapestry needle for weaving ends.
Recommended Yarn
DMC Cebelia Crochet Cotton Size 10 in Ecru works beautifully for this project. The smooth twist allows beads to slide easily and produces clean, firm stitch definition.
Aunt Lydia’s Classic Crochet Thread Size 10 in Natural is another excellent choice. It handles beads well and creates a sturdy band.
Substitution note: Stick with 100-percent cotton thread in size 10 for best results. Avoid polyester blends because the bead holes may not slide smoothly and the finished band can feel stiff.
Gauge
20 slip stitches and 10 rows equals 1 inch worked in bead slip stitch on Size 7 steel hook with Size 10 crochet cotton.
Gauge is less critical here than for garments because the tie closure allows size adjustment. However, keeping gauge consistent ensures the lattice eyes appear uniform and the finished band width matches 0.75 inches.
Abbreviations and Stitch Definitions
Let me define every stitch before we begin. Understanding these terms will make the step by step instructions much easier to follow.
ch: Chain. The most basic crochet stitch that creates a foundation or adds height.
sl st: Slip stitch. Insert hook, yarn over, and draw through both the stitch and the loop on your hook in one motion.
sc: Single crochet (SC). Insert hook into stitch, yarn over and pull up a loop (two loops on hook), yarn over and draw through both loops.
bch: Bead chain. Work a standard chain stitch, but before completing it, slide one bead up snugly along the thread so it rests directly against the previous stitch. The bead sits on the front of the chain.
bsl st: Bead slip stitch. Insert hook into the designated stitch, slide one bead along the thread to sit against the right side of the work, then yarn over and draw through both the stitch and the loop on your hook. The bead locks on the right side of the fabric.
bsc: Bead single crochet. Insert hook into the designated stitch, slide one or more beads to rest against the right side of the work, yarn over and draw up a loop, yarn over and draw through both loops. The bead is now locked on the right side.
RS: Right side. The side of the work that faces outward when worn.
WS: Wrong side. The back side of the work.
rep: Repeat.
sp: Space.
st/sts: Stitch/stitches.
Special Techniques
Bead Chain (bch)
Pre-string all required beads onto your thread before beginning. Work a standard chain stitch, but before completing it, slide one bead up snugly so it rests directly against the previous stitch. Complete the chain normally. The bead now sits on the front of the chain.
Bead Slip Stitch (bsl st)
Insert your hook into the designated stitch or space. Slide one bead along the thread so it sits against the right side of the work. Yarn over and draw the thread through the stitch and through the loop on your hook in one motion. The bead is now locked on the right side of the fabric.
Pearl Center Stitch
When a pearl bead is called for, treat it exactly as a bead single crochet but slide a 4mm pearl bead (rather than a seed bead) to the right side of the work before completing the stitch.
Important Pattern Notes
Pre-stringing is essential. Before beginning the band, pre-string ALL seed beads for the band onto the thread in the exact sequence given. Load beads in REVERSE order because the last bead strung will be the first bead used.
Color sequence for the band reads across as follows from left tie to right tie: pink, lavender, mint, yellow, lavender, pink, mint, yellow, lavender, mint. Each eye unit uses one color family per row pass.
The band is constructed in two passes. Pass 1 creates the bottom scallop chain. Pass 2 builds the upper arch and pearl centers.
All bead faces should appear on the RS. When working Pass 1, the RS faces you throughout with no turning.
Tension matters. Work all bead stitches snugly but not so tightly that beads bunch or the thread distorts. The lattice should lie flat without curling.
Pre-Stringing the Band Beads
Pre-string onto one continuous length of ecru thread the following beads IN THIS ORDER (last strung equals first used):
Total band beads pre-strung: 7 pearls plus 39 seed beads equals 46 beads.
Set thread aside with beads bunched at the far end away from your working area. Slide beads down only as needed.
Pass 1: Foundation Scallop Chain
Leave a 6-inch tail. Thread tail pearl onto tail, knot to secure, set aside.
Row 1 (Foundation Chain with Beads):
Make a slip knot leaving a 6-inch tail.
Ch 4 (this forms the first tie end loop).
Work the following sequence:
[2 bch, ch 2, 5 bch, ch 2, 2 bch, ch 1] 7 times. (This is the scallop foundation.)
After the 7th repeat, ch 4 for the second tie end loop.
Leave a 6-inch tail, cut thread, and pull tail through last loop to fasten off. Thread tail pearl onto tail, knot to secure.
Total scallop units in Pass 1: 7 scallop units.
Checkpoint 1
Your Pass 1 foundation should measure approximately 7.5 inches from inner edge to inner edge of the two ch-4 tie loops. The scallops should dip downward in gentle arches.
Pass 2: Upper Arch and Pearl Centering
Join a new length of thread at the top of the leftmost ch-4 loop.
Row 2 (Upper Arch Pass):
Work across the TOP of the Pass 1 foundation, creating arching connections between the high points of each scallop unit.
Step 1: Join thread at left tie ch-4 loop with a sl st.
Step 2: For each of the 7 scallop units across, work: sl st into the top of the unit junction point, ch 3, work 1 bsl st (pink for units 1-2, lavender for units 3-4, mint for units 5-6, yellow for unit 7), ch 3, sl st into the next junction point. The arch formed above each scallop creates the upper half of each eye cell.
Step 3: For the PEARL CENTER of each eye unit: after completing the upper arch ch-3 on each unit, thread each pearl individually onto a 4-inch length of thread, pass both ends through the center of the corresponding upper arch from front to back, tie a square knot on the WS, and trim to 0.25 inch. This gives a clean, secure pearl placement.
Step 4: Fasten off Pass 2 thread and weave in ends.
(7 upper arches formed, 7 pearls placed)
Checkpoint 2
At this stage the band shows 7 eye-shaped cells each with a pearl center. Seed bead colors arc across the lower scallop portions. The band should measure approximately 7.5 inches in length and 0.6 inch in height at center.
Charm Attachment Cords
Before working charms, identify 4 evenly spaced scallop base points along the lower edge of the band. These are approximately at units 2, 3, 4, and 5 counting from the left.
At each point, thread a 10-inch length of ecru thread through the base of the scallop and fold it in half, creating a 5-inch doubled working cord. Each charm is worked from the doubled end of its cord.
Charm 1: Butterfly
Pre-string on charm cord (in reverse order):
Left wing: 3 pink, 2 purple, 3 pink (bottom left wing)
Right wing: 3 pink, 2 purple, 3 pink (bottom right wing)
Top left wing: 2 pink, 1 purple, 2 pink
Top right wing: 2 pink, 1 purple, 2 pink
Body: 3 purple
Row 1 (butterfly body base): Using doubled charm cord, make a slip knot leaving a 1-inch tail. Ch 3. (3 ch)
Row 2: Work 1 bsc with 1 purple bead in the 2nd ch from hook, 1 bsc with 1 purple bead in next ch. Turn. (2 bsc)
Row 3: Ch 1, 1 bsc with 1 purple bead in each st. Turn. (2 bsc)
Row 4 (body point): Ch 1, work 1 bsc with 1 purple bead, sl st in next st. Fasten off body. (1 bsc + 1 sl st)
Left lower wing (rejoin at base of body, left side):
Row 1: Join thread at left side of ch-3 foundation. Ch 1. Work 3 bsc (1 pink, 1 purple, 1 pink). Turn. (3 bsc)
Row 2: Ch 1. Work 4 bsc (1 pink, 1 purple, 1 purple, 1 pink). Turn. (4 bsc)
Row 3: Ch 1. Work 3 bsc decreasing to shape the outer tip (1 pink, 1 purple, sc2tog). (3 sts)
Fasten off. Weave tail.
Right lower wing: Work as Left lower wing but mirror the attachment point.
Upper wings (smaller, worked above body):
Left upper wing: Join at top left of body. Ch 1. Work 2 bsc (1 pink, 1 purple), turn, work 2 bsc (1 pink, 1 purple), sl st to close. Fasten off.
Right upper wing: Mirror of left upper wing.
Total bead count on butterfly charm: approximately 28 beads.
Charm 2: Hummingbird
Pre-string on charm cord (in reverse order):
Tail feathers: 2 mint, 1 mint
Body: 5 mint
Wing: 3 mint, 1 light green (or white if not available)
Head/beak: 2 mint, 1 dark mint or black (1 bead for eye)
Row 1 (beak and head): Make slip knot. Ch 3. Work 1 bsc (1 dark bead for eye) in 2nd ch from hook, 1 bsc (1 mint) in next ch. Turn. (2 bsc)
Row 2 (head/body join): Ch 1. Work 3 bsc (3 mint). Turn. (3 bsc)
Row 3 (wing row): Ch 1. Work 2 bsc (2 mint), ch 2, work 3 bsl sts along the ch-2 arch (3 mint) for wing, sl st back to body base stitch. This creates the extended wing silhouette. Turn at body edge. (2 bsc plus 3 bsl wing beads)
Row 4 (body taper): Ch 1. Work 3 bsc (3 mint). Turn. (3 bsc)
Row 5 (tail): Ch 1. Work 2 bsc (2 mint), ch 2, sl st at end of ch. Work 2 bsl sts back along ch for tail feather tips (2 mint). Join back to body end. Fasten off. (2 bsc plus tail detail)
Total bead count on hummingbird charm: approximately 18 beads.
Charm 3: Ladybug
Pre-string on charm cord (in reverse order):
Head: 3 black
Body: 4 lavender, 4 lavender, 3 lavender (3 rows of body)
Spots: 4 black (2 spots per side, 2 beads each spot)
Outline/dividing line: 3 black
Row 1 (head): Make slip knot. Ch 4. Work 3 bsc (3 black) across the chain. Turn. (3 bsc)
Row 2 (body top): Ch 1. Work 1 sc (no bead), 3 bsc (3 lavender), 1 sc (no bead). Turn. (5 sts)
Row 3 (spot row): Ch 1. Work 1 bsc (1 lavender), 1 bsc (1 black, right spot), 1 bsc (1 lavender, center dividing line black if pre-strung), 1 bsc (1 black, left spot), 1 bsc (1 lavender). Turn. (5 bsc)
Row 4 (body lower): Ch 1. Work 5 bsc (4 lavender around 1 black center dividing stitch for second spot pair). Turn. (5 bsc)
Row 5 (body taper): Ch 1. Sc2tog, 1 bsc (1 lavender), sc2tog. Turn. (3 sts)
Row 6 (base): Sl st across 3 sts. Fasten off.
Total bead count on ladybug charm: approximately 22 beads.
Charm 4: Bumblebee
Pre-string on charm cord (in reverse order):
Wings: 4 white (2 per wing)
Head: 2 black
Body stripes: 3 yellow, 2 black, 3 yellow, 2 black, 2 yellow
Stinger: 1 black
Row 1 (stinger/base): Make slip knot. Ch 2. Work 1 bsc (1 black) in 2nd ch from hook. Turn. (1 bsc)
Row 2 (lower body): Ch 1. Work 2 bsc (2 yellow). Turn. (2 bsc)
Row 3 (stripe): Ch 1. Work 3 bsc (1 black, 1 yellow, 1 black). Turn. (3 bsc)
Row 4 (middle body): Ch 1. Work 3 bsc (3 yellow). Turn. (3 bsc)
Row 5 (stripe): Ch 1. Work 3 bsc (1 black, 1 yellow, 1 black). Turn. (3 bsc)
Row 6 (shoulder): Ch 1. Sc2tog, 1 bsc (1 yellow). Turn. (2 sts)
Row 7 (head): Ch 1. Work 2 bsc (2 black). Turn. (2 bsc)
Row 8 (sl st close): Sl st across. Fasten off.
Wings (worked separately from head join):
Left wing: Join white thread at upper left of Row 6. Ch 3. Work 2 bsl sts (2 white) along arch. Sl st back to join. Fasten off.
Right wing: Mirror of left wing.
Total bead count on bumblebee charm: approximately 22 beads.
Checkpoint 3
All four charms should be complete and free-hanging before attachment. Each charm should measure approximately 0.5 to 0.75 inch at its widest point.
Attaching Charms to the Band
Step 1: Hold the completed charm. The tail threads from the charm top come up through the base of the charm.
Step 2: Thread both tail ends from the charm onto a tapestry needle and run them up through the looped attachment cord already in place on the band, pulling the charm flush to the cord end.
Step 3: Tie a square knot to secure the charm at a drop length of approximately 0.5 to 0.75 inch below the band.
Step 4: Trim tails to 0.125 inch and apply a small drop of fabric glue or clear nail polish to the knot. Allow to dry completely.
Placement order from left to right (as worn):
Size Customization Tips
To make the anklet smaller (for ankle circumference under 7 inches): Reduce from 7 eye units to 6 eye units. Remove one scallop repeat from Pass 1 and adjust bead pre-stringing proportionally. Finished band will be approximately 0.75 to 1 inch shorter.
To make the anklet larger (for ankle circumference over 9 inches): Add one or two eye units by extending the Pass 1 scallop chain. Each additional unit adds approximately 1 inch in length.
Tie length customization: The 6-inch tails are the minimum for comfortable tying. Extend to 8 inches if you prefer a bow tie versus a simple knot closure.
Finishing and Blocking
Step 1: Weave all remaining thread tails securely through the back of the band and charm bases using a tapestry needle, working each tail through at least 3 to 4 stitches before trimming.
Step 2: Thread one 4mm pearl onto each tie tail end, push it down to approximately 0.5 inch from the last band stitch, and secure with a tight overhand knot below the pearl. Trim tail to 0.25 inch beyond the knot.
Step 3: Lay the finished anklet flat on a clean towel. Mist lightly with water. Gently ease the band into a straight line and the eye units into even oval shapes. Pin if needed.
Step 4: Allow to air dry completely before wearing, approximately 1 to 2 hours.
Care Instructions
Hand wash only in cool water with a mild soap. Do not scrub or wring. Rinse gently and press between two clean towels to remove excess moisture. Lay flat to dry away from direct sunlight to prevent pastel bead colors from fading. Do not machine wash or tumble dry. Do not iron. Store flat or loosely coiled in a small pouch when not in use to prevent charm tangling.
Final Thoughts on This Beaded Anklet Crochet Pattern
This pastel garden butterfly beaded anklet brings together everything I love about summer accessories. The lattice band feels delicate but wears surprisingly sturdy, and those four little garden charms never fail to make me smile. It is the kind of piece that gets compliments at the beach, farmers markets, and backyard barbecues.
The beginner friendly foundation stitches combined with the bead techniques give you room to grow as a crafter. If this is your first beaded crochet project, take your time with the pre-stringing. That step makes everything else flow smoothly.
I hope you enjoy making this anklet as much as I enjoyed designing it. Thank you so much for choosing this pattern for your next project.
If you loved working on this beaded anklet, save this pattern to your Pinterest boards so you can find it again later or share it with fellow crafters. And please leave a comment below if you make one. I would absolutely love to see your finished pieces and hear which charm turned out to be your favorite.
