
Go ahead and dig into that stash. You know the one. That beautiful crochet thread you bought three years ago because the color was perfect, and it has been waiting patiently ever since. This lavender daisy table runner is exactly the kind of project that deserves your special yarn.
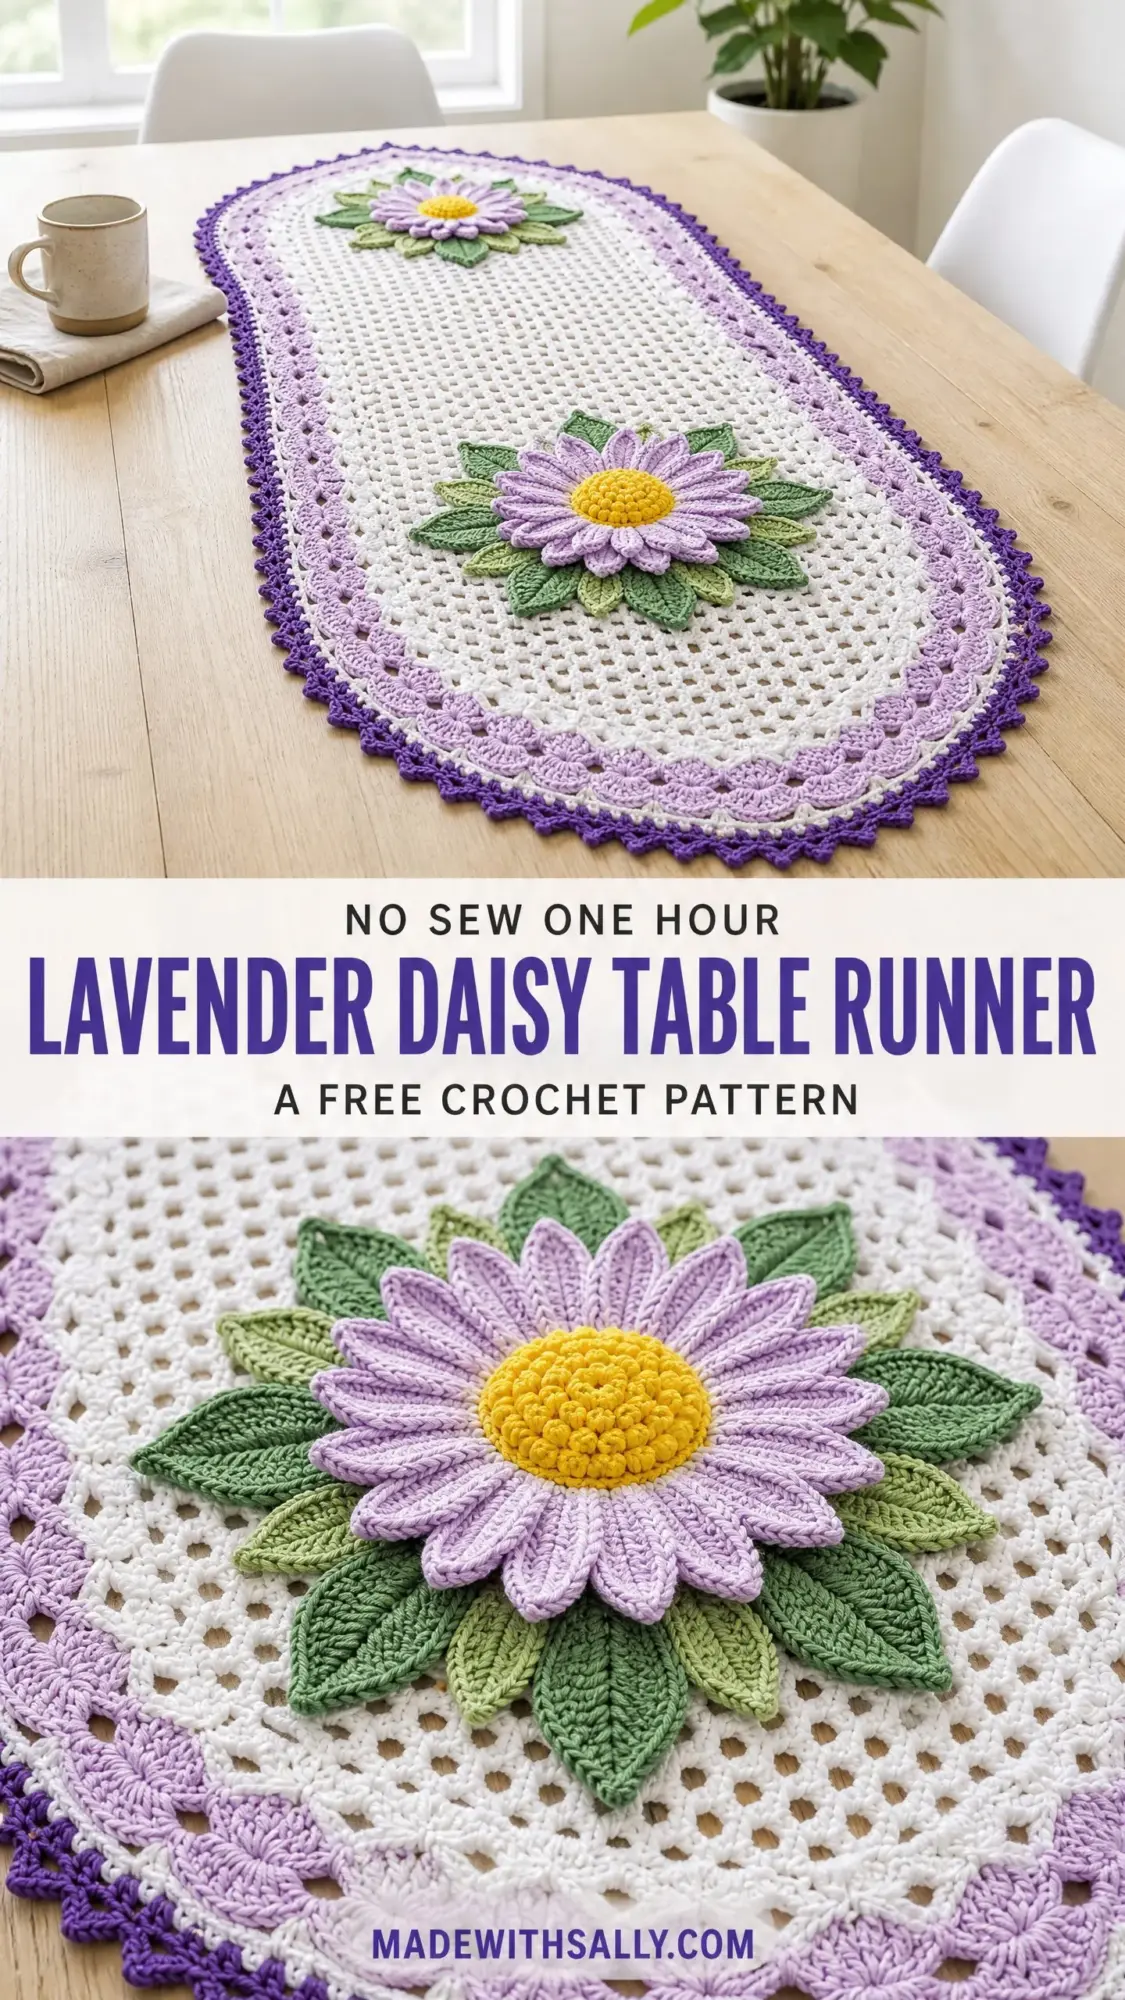
The construction here is genuinely interesting. You will work a filet mesh body from point to point, building a hexagonal shape with elegant increases and decreases. Then comes a three-layer border in graduating purples, followed by dimensional daisy appliques that you create separately and sew on at the end. The whole thing comes together like a beautiful puzzle.
I will be honest with you about the skill level. This is an advanced intermediate project. If you have never tried filet mesh or three-dimensional flowers before, practice those techniques first. But if you have a few lace projects under your belt and you are ready for something that will make your dining room table absolutely stunning, keep reading.
About This Heritage-Style Table Runner Pattern
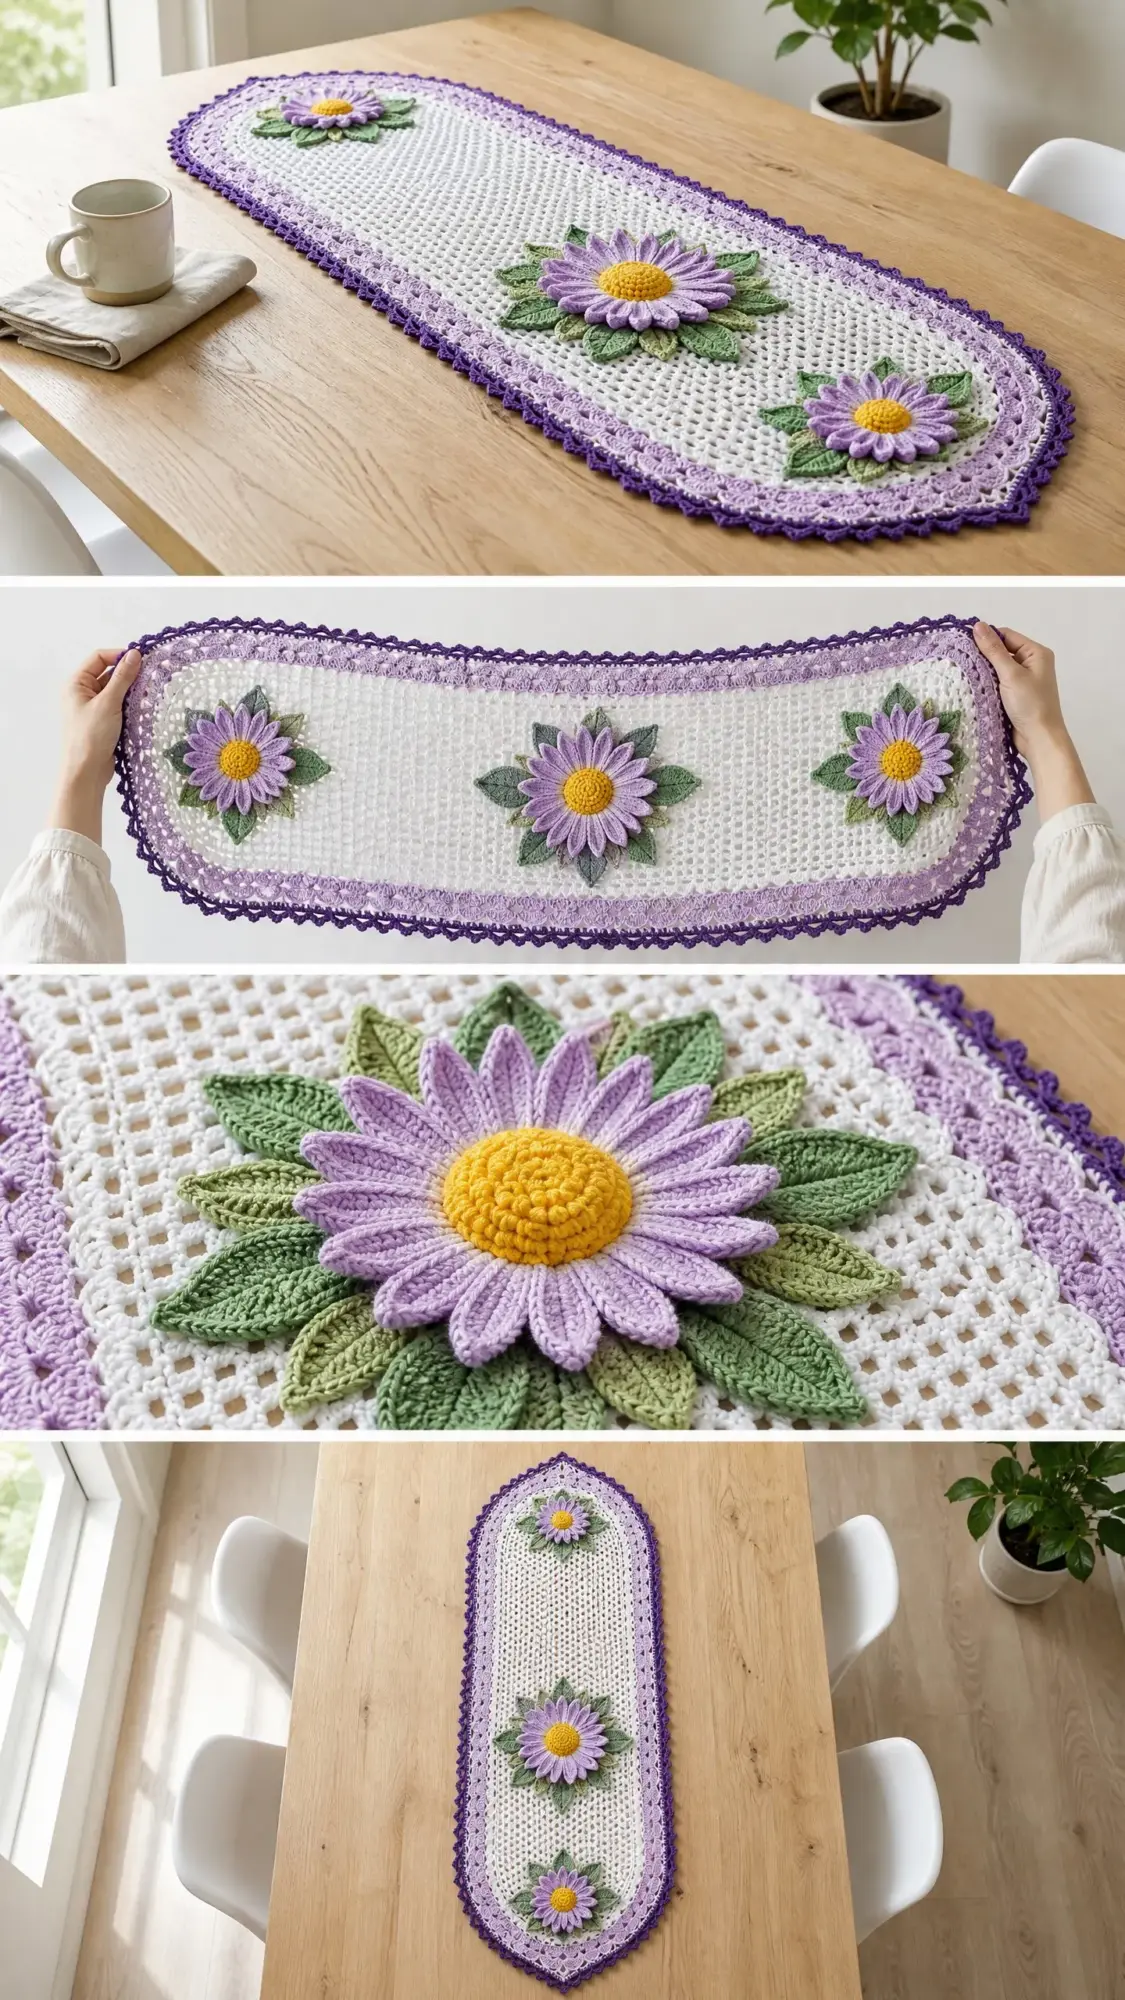
This crochet table runner combines classic filet mesh construction with modern dimensional appliques. The finished piece measures approximately 14 inches wide by 36 inches long after blocking. It features one large central daisy, two smaller accent daisies at each pointed end, and a gorgeous tri-layer border of lacework, shell stitches, and picot edging.
The runner works up in four distinct phases. First, you create the main body using filet mesh worked in rows. Second, you add the border directly onto the finished body in three separate rounds. Third, you crochet the daisy motifs and leaves as separate pieces. Finally, you block everything and sew the appliques into place.
This is not a reversible piece due to the dimensional flowers, but the back of the mesh body is neat and perfectly presentable. Plan for 20 to 30 hours of total work time if you are an experienced crocheter. The body and border take roughly 12 to 15 hours, the five daisy motifs and their leaves need another 6 to 8 hours, and finishing plus blocking adds about 2 more hours.
Materials You Will Need
Yarn: Size 10 crochet thread or fingering weight cotton yarn in five colors.
Hook: US Steel Hook Size 7 (1.65 mm) for thread, or US Size B-1 (2.25 mm) for fingering weight cotton. Adjust as needed to meet gauge.
Additional Materials:
Yarn Suggestions
Aunt Lydia’s Classic Crochet Thread Size 10 is the closest match to the original texture and drape. Use White, Soft Violet, Purple, and Sage. This is 100 percent mercerized cotton with 350 yards per ball.
Herrschners Lacewing Crochet Thread Size 10 works beautifully too. It is widely available and budget-friendly at 400 yards per ball.
If you prefer a softer hand and slightly thicker result, try Schachenmayr Catania fingering weight cotton. Your finished runner will measure slightly larger, approximately 15 by 38 inches.
Important: Use a smooth, tightly spun cotton thread or yarn. Avoid acrylic or blended fibers. The runner requires wet blocking to open the filet mesh, and the applique petals need to hold their dimensional shape without going limp.
Gauge
With Color A and recommended hook: 16 filet mesh squares by 16 filet mesh rows equals 4 inches by 4 inches after blocking.
Each filet mesh square is approximately 0.25 inches wide. Each filet mesh row is approximately 0.25 inches tall.
Gauge is critical for this project. A runner worked too loosely will drape off the table edges. A runner worked too tightly will not block open properly. Work a 4-inch swatch in filet mesh, block it, and adjust your hook size before beginning the actual pattern.
Abbreviations and Stitch Definitions
Special Stitches for This Table Runner Pattern
Filet Mesh Square (Open): Chain 1, skip 1 stitch or chain space, double crochet in next stitch. This forms one open square in the mesh.
Filet Mesh Square (Filled): Double crochet in the chain-1 space, double crochet in next double crochet. This forms a filled square.
Picot: Chain 3, slip stitch in the first chain made. Creates a small decorative loop at the edge.
Shell Stitch: Work 5 double crochets all into the same stitch or space. This creates a fan-shaped cluster.
V-Stitch: Double crochet, chain 2, double crochet all into the same stitch or space.
Puff Stitch (for daisy center): Yarn over, insert hook into stitch, pull up a loop to approximately 0.5 inch height, repeat yarn over and pull up loop 3 more times in the same stitch (9 loops on hook), yarn over and pull through all 9 loops, chain 1 to close. This creates a rounded bobble for the flower center.
Daisy Petal (Long, for large daisy): Chain 12. Starting in the second chain from hook, single crochet in next 2 chains, half double crochet in next 2 chains, double crochet in next 3 chains, half double crochet in next 2 chains, single crochet in last chain. Do not turn. Working into the opposite side of the foundation chain: single crochet in next chain, half double crochet in next 2 chains, double crochet in next 3 chains, half double crochet in next 2 chains, single crochet in next 2 chains, slip stitch to beginning. This forms one complete almond-shaped petal.
Daisy Petal (Short, for small daisy): Chain 8. Starting in the second chain from hook, single crochet in next 2 chains, half double crochet in next chain, double crochet in next chain, half double crochet in next chain, single crochet in last chain. Do not turn. Working into the opposite side of the foundation chain: single crochet in next chain, half double crochet in next chain, double crochet in next chain, half double crochet in next chain, single crochet in next 2 chains, slip stitch to beginning. This forms one small petal.
Leaf Motif: Chain 14. Starting in the second chain from hook, single crochet in 1, half double crochet in 2, double crochet in 6, half double crochet in 2, single crochet in 1, chain 2 for tip, then working down the opposite side of the foundation chain: single crochet in 1, half double crochet in 2, double crochet in 6, half double crochet in 2, single crochet in 1, slip stitch to starting stitch. Fasten off leaving a 10-inch tail for sewing.
Picot-Shell Border Stitch: Work 2 double crochets into indicated stitch, work Picot (ch 3, sl st to first ch), work 2 more double crochets into same stitch.
Pattern Notes Before You Begin
The body of the runner is worked flat in rows using Color A throughout. The shape is a hexagon with elongated sides. It begins at a point, widens over the first section of rows, works straight across the long center field, then mirrors the shaping to close at the opposite point.
Turning chains: At the beginning of each filet mesh row, chain 4. This counts as 1 double crochet plus 1 chain. The last stitch of every row is worked into the top of the turning chain from the previous row.
Corner increases: Six corner points are maintained by working V-stitches (dc, ch 2, dc) at corner positions. As the runner widens, these corners shift to align with the long side corners once full width is reached.
The three-dimensional daisy motifs are made separately and applied after blocking. Do not sew them on before wet blocking, as the moisture and tension can distort the appliques.
All border rounds are worked with the right side facing. Do not turn between border rounds unless instructed.
Body Instructions
The body begins at one pointed short end and is worked lengthwise. Begin with Color A.
Foundation: Chain 6.
Row 1 (RS): Double crochet in 6th chain from hook. Turn. (2 dc, counting t-ch as 1 dc)
Row 2: Chain 4 (counts as dc plus ch 1 throughout). In the ch-2 space of the V formed by the previous row’s setup, work (dc, ch 2, dc, ch 1, dc). Turn. (4 dc, 2 ch-sps)
Row 3: Chain 4. Dc in first ch-1 sp. Ch 1. In the ch-2 corner sp work (dc, ch 2, dc). Ch 1. Dc in next ch-1 sp. Ch 1. Dc in top of t-ch. Turn. (6 dc, 4 ch-1 sps, 1 ch-2 sp)
Rows 4 through 12: Continue the established increase pattern. Each row: Ch 4. (Dc, ch 1) in each ch-1 sp across to the ch-2 corner sp. In corner sp work (dc, ch 2, dc). (Ch 1, dc) in each ch-1 sp across to end. Ch 1. Dc in top of t-ch. Turn.
After Row 12, you should have 24 dc, 22 ch-1 sps, and 1 ch-2 sp. The pointed end section should measure approximately 3 inches long and 3 inches wide at the widest row.
Straight Body Section
Row 13 (begin straight body): Ch 4. (Dc, ch 1) in each ch-1 sp across, including working dc, ch 1, dc into the former ch-2 corner sp (treating it as a regular sp). Dc in top of t-ch. Turn. (24 dc, 22 ch-1 sps)
Rows 14 through 120: Repeat Row 13 structure. Ch 4. (Dc, ch 1) in each ch-1 sp across. Dc in top of t-ch. Turn. (24 dc, 22 ch-1 sps each row)
This creates 108 rows of straight filet mesh, measuring approximately 27 inches long.
Second Pointed End (Decreasing)
Row 121 (begin decreasing): Ch 4. Dc in first ch-1 sp. (Ch 1, dc) in each sp to the center position (11 sps worked). In the center sp, work (dc, ch 2, dc) to re-establish the corner marker. (Ch 1, dc) in each remaining sp to end. Dc in top of t-ch. Turn. (24 dc, 20 ch-1 sps, 1 ch-2 sp at center)
Rows 122 through 131: Continue decreasing. Each row: Ch 4. (Dc, ch 1) across to 1 sp before the ch-2 corner sp. Sk 1 sp. In the ch-2 sp work (dc, ch 2, dc). Sk 1 sp. (Ch 1, dc) in each remaining sp. Dc in top of t-ch. Turn.
Row 132 (final tip row): Ch 3. Dc in the ch-2 corner sp. Ch 1. Dc in same sp. Do not work remaining sts. Sl st to close the tip. Fasten off. Leave a 6-inch tail for weaving.
The body is complete. It should measure approximately 33 inches tip to tip and approximately 5.5 inches wide across the center.
Border Instructions
The border is worked in three rounds. Do not wet block before adding the border.
Border Round 1 (Color B, Light Lavender)
Join Color B with sl st to the upper right corner of the body’s long side at a dc post. Work with RS facing.
Along each long side: Work 2 dc into the end of each row (132 row ends per long side equals 264 dc per long side).
At each of the 2 long-side corner positions: Work (dc, ch 2, dc) to turn the corner.
Along each short angled side of the points: Work (dc, ch 1) into each ch-sp across (approximately 12 sps per angled side).
At each short pointed tip: Work 5 dc shell into the tip.
Join with sl st to top of beginning ch-3. Do not turn. (Approximately 586 sts and spaces around perimeter)
Border Round 2 (Color B, Light Lavender, Shell Lace Band)
Do not turn. Work with RS facing. Sl st into first ch-sp.
Work around the entire perimeter: (Shell of 5 dc into next sp or stitch, sk 2 sts, sc into next st, sk 2 sts) repeat around. At the tip points, work a double shell: shell of 5 dc, ch 2, shell of 5 dc into the tip center stitch.
Join with sl st to beginning stitch. Do not turn. (Approximately 98 shell groups around)
Border Round 3 (Color C, Deep Purple, Picot Edging)
Join Color C to the center dc of any shell from Round 2 with sl st.
Work as follows: (Sc in center dc of shell, picot, sc in same center dc, ch 3, sc in sc between shells, ch 3) repeat around. At tip points, work (sc, picot, sc, picot, sc) all into the center ch-2 space of the double shell.
Join with sl st to first sc. Fasten off Color C. (Approximately 196 sc and picot groupings around)
After all three border rounds, the runner should measure approximately 14 inches wide and 36 inches long.
Daisy Applique Motifs
Large Daisy (Make 1)
Large Daisy Petals (Color B): Make 14 individual long petals using the Daisy Petal (Long) special stitch. Fasten off each petal leaving a 6-inch tail.
Assemble petals: Thread the tail of each petal through a tapestry needle. Bring all 14 petal base tails together and stitch through a central point. Work 7 petals as the bottom layer arranged evenly around the center. Then arrange 7 more petals offset between the first layer.
Large Daisy Center Disk (Color E, Yellow):
Round 1: Magic ring, ch 1, work 8 sc into ring. Pull ring tight. Join with sl st. (8 sc)
Round 2: Ch 1. Work 2 sc in each st around. Join. (16 sc)
Round 3: Ch 1. (2 sc in next st, sc in next st) around. Join. (24 sc)
Round 4: Ch 1. Work 1 puff stitch into each st around. Join. Fasten off leaving a 10-inch tail. (24 puff stitches)
Sew the center disk to the center of the assembled petal ring.
Small Daisy (Make 2)
Small Daisy Petals (Color B and Color C): For each small daisy, make 10 short petals using the Daisy Petal (Short) special stitch. Make 5 petals in Color B and 5 petals in Color C, alternating colors when assembling.
Small Daisy Center Disk (Color E):
Round 1: Magic ring, ch 1, work 6 sc into ring. Pull ring tight. Join. (6 sc)
Round 2: Ch 1. Work 2 sc in each st around. Join. (12 sc)
Round 3: Ch 1. Work 1 puff stitch in each st around. Join. Fasten off. (12 puff stitches)
Sew small disk to center of each small daisy.
Leaves (Color D, Sage Green)
Make 8 large leaves using the Leaf Motif special stitch.
Make 6 small leaves: Work the Leaf Motif pattern but start with chain 10 instead of chain 14, reducing all interior stitch counts proportionally (sc 1, hdc 1, dc 4, hdc 1, sc 1, ch 2 tip, mirror back).
Finishing and Blocking
Wet blocking is required for this project.
Step 1: After completing the body and all three border rounds, wet the entire crocheted body by submerging in cool water with a small amount of wool wash or gentle liquid soap. Gently squeeze, never wring. Roll in a clean dry towel and press firmly to remove excess water.
Step 2: Lay the damp runner on a foam blocking board or flat surface covered with a clean cloth. Using rust-proof T-pins, pin the runner to its finished dimensions: 14 inches wide by 36 inches long. Pin the tips into sharp points. Pin along the shell border to open up the lacework. Allow to dry completely, which may take 24 to 48 hours depending on humidity.
Step 3: Once dry, remove pins. Position and sew all appliques as described in the placement section.
Applique Placement
Large daisy: Center the large daisy on the runner body at the exact halfway point along the 36-inch length. Arrange 4 large leaves radiating from beneath the petals in a compass arrangement. Tuck 2 to 4 additional leaves under the petal layer at diagonal positions.
Small daisies: Position each small daisy approximately 2.5 to 3 inches from the very tip of each pointed end, centered widthwise. Place 2 to 3 small leaves behind each small daisy, pointing outward toward the tip.
To sew appliques, thread the tail onto a tapestry needle. Take small stitches through the back of the petal or leaf base, catching 1 to 2 mesh bars of the body fabric. Take 6 to 8 stitches evenly around the base circumference of each motif. Weave tails through several mesh bars and trim.
Size Customization Tips
To make the runner longer: Add rows to the straight body section in multiples of 2 rows. Each 4 additional rows adds approximately 1 inch to the finished length.
To make the runner wider: Increase the starting foundation and add mesh squares across. Each additional open mesh square adds approximately 0.25 inch to the width.
To make a matching placemat: Work the pointed end section (Rows 1 through 12) once, then work 20 straight rows, then work the decrease section once. The result is a small oval mat approximately 5.5 by 10 inches before border. Add all three border rounds as written. Make 1 small daisy with leaves for the center.
Final Thoughts on This Crochet Table Runner Pattern
This lavender daisy table runner is the kind of project that becomes an heirloom. The filet mesh body creates beautiful texture that catches the light, and those dimensional daisies make everyone stop and look twice. It takes patience, but the result is absolutely worth every hour you put in.
Take your time with this one. Work on it in sections. The body can be your evening project for a week or two, and then the daisies become their own satisfying mini-projects. Before you know it, you will have a stunning centerpiece for your dining table.
Thank you so much for choosing this pattern. I genuinely hope you enjoy making it as much as I enjoyed designing it. If you finish your runner, I would love to see it. Tag me on Instagram or share a photo in our Facebook group. Seeing your finished projects is honestly the best part of this whole thing.
If this table runner is calling your name, go ahead and save this pattern to your Pinterest boards so you can find it when you are ready to start. And if you do make one, please drop a comment below. I love hearing which colors you choose and seeing how your finished runners turn out.
