I pulled out my grandmother’s crochet notebook last month and found a sketch she’d made decades ago. A fitted bodice, a flared skirt, delicate roses along the hem. She never finished writing the pattern, but I could see exactly what she’d envisioned. I spent weeks bringing her design to life, adjusting the construction for modern yarn weights and adding my own touches. This is the Dusty Rose Heirloom Baby Dress, and honestly, I think she would have loved it.
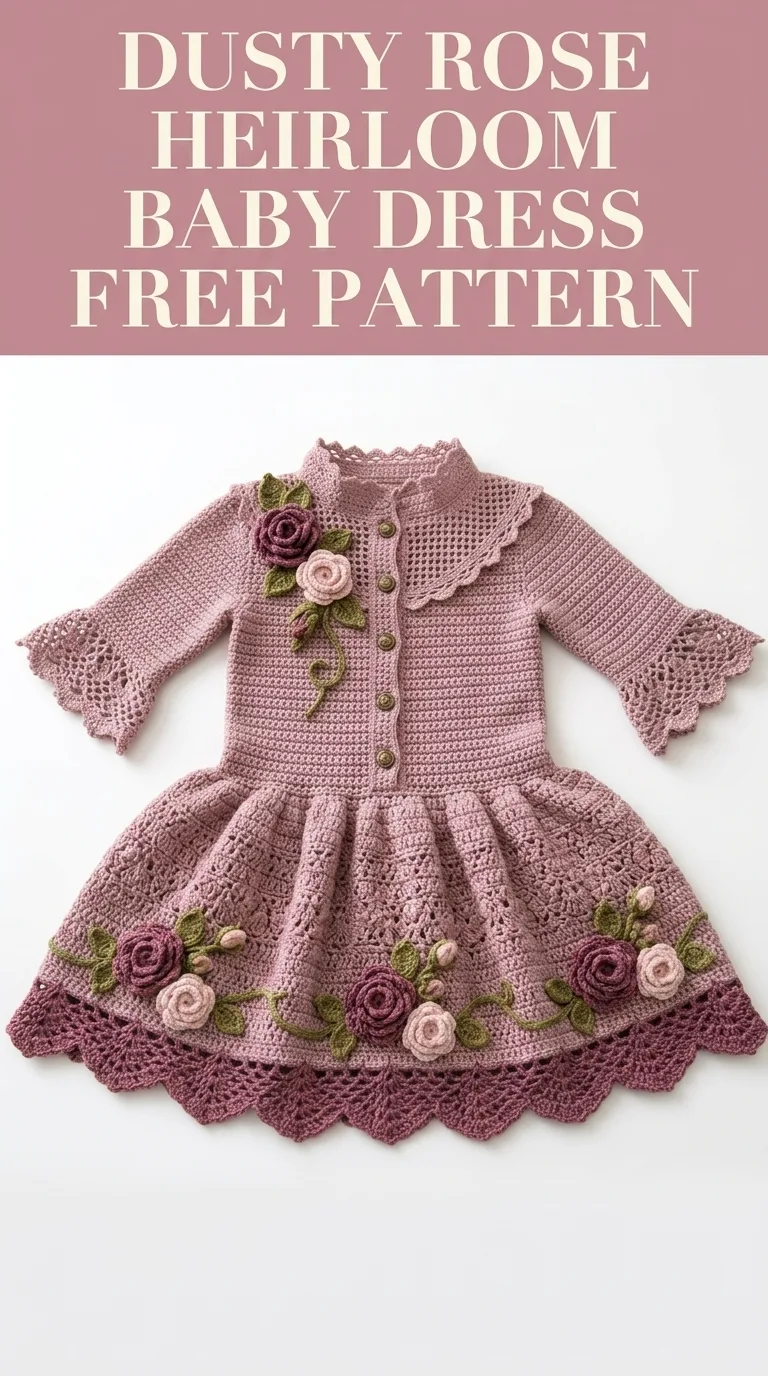
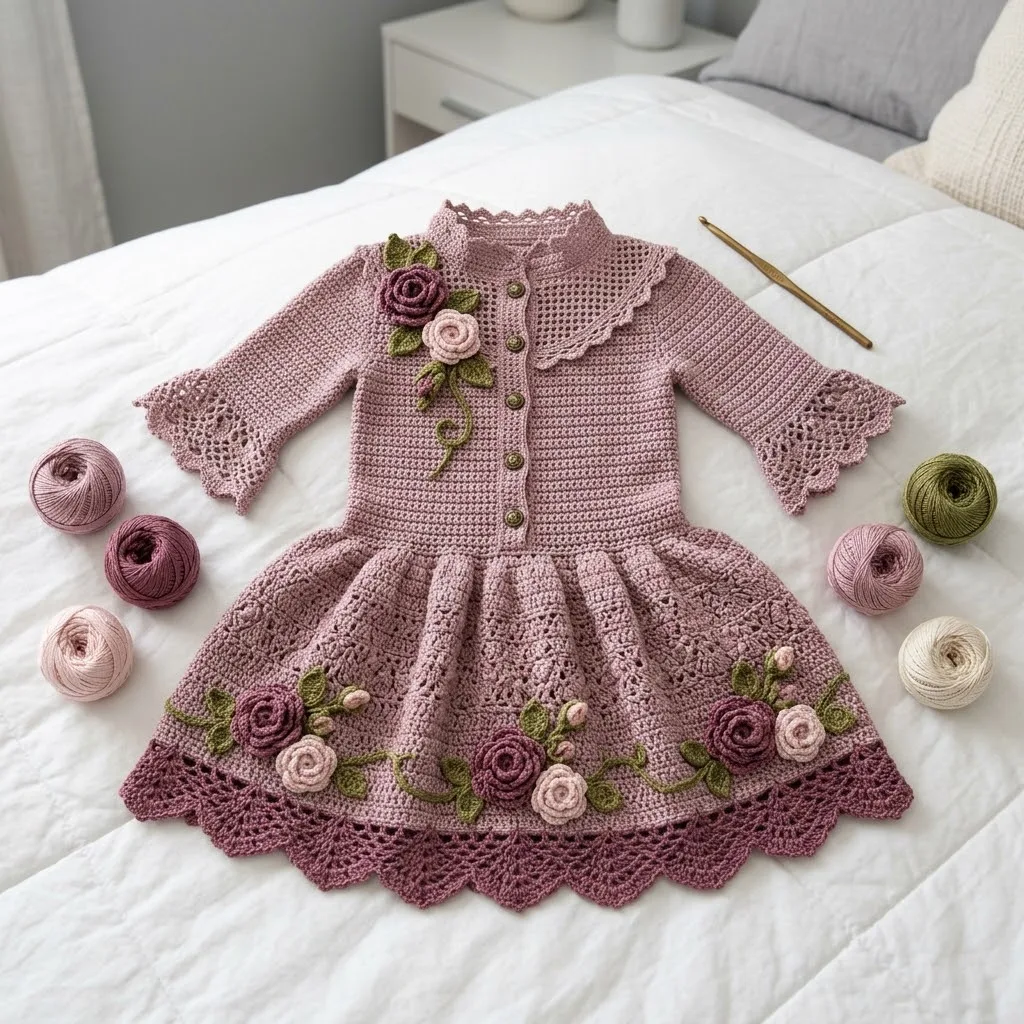
This crochet baby dress pattern combines classic vintage charm with detailed floral appliqués that transform a simple garment into something truly special. The fitted bodice features a button-front closure and a sweet scalloped collar, while the gathered skirt flows into an intricate lace border. Those dimensional roses along the skirt and bodice? They’re worked separately and sewn on, which means you can customize placement however you like.
I won’t pretend this is a weekend project. This dress requires patience, attention to detail, and comfort with several different techniques. But if you’ve been crocheting for a while and want to create something genuinely heirloom-worthy, this is the one. Every stitch matters here, and the finished result shows it.
About This Crochet Baby Dress Pattern
Skill Level: Intermediate to Advanced
Finished Size: 12-18 months (chest approximately 20 inches, length approximately 16 inches from shoulder to hem)
Gauge: 20 stitches and 22 rows = 4 inches in single crochet with recommended hook. Always check your gauge before starting.
This crochet tutorial walks you through every component of the dress, from the structured bodice to the flowing skirt to those gorgeous rolled roses. I’ve broken everything into manageable sections so you can work at your own pace without feeling overwhelmed.
Materials Needed
Yarn:
I recommend a cotton or cotton blend yarn for this project. The stitch definition stays crisp, the drape is beautiful, and it washes well for baby items. Look for something soft against delicate skin.
Hook:
Notions:
Abbreviations and Stitch Definitions
Let me walk you through every stitch abbreviation you’ll encounter. If any of these feel unfamiliar, practice them on a small swatch first.
ch = chain: Wrap yarn over hook, pull through loop on hook. This creates your foundation.
sl st = slip stitch: Insert hook into stitch, yarn over, pull through both the stitch and the loop on your hook in one motion. Used for joining and invisible movement.
sc = single crochet: Insert hook into stitch, yarn over, pull up a loop (2 loops on hook), yarn over, pull through both loops. Your most basic building block.
hdc = half double crochet: Yarn over, insert hook into stitch, yarn over, pull up a loop (3 loops on hook), yarn over, pull through all 3 loops at once.
dc = double crochet: Yarn over, insert hook into stitch, yarn over, pull up a loop (3 loops on hook), yarn over, pull through 2 loops, yarn over, pull through remaining 2 loops. Taller than single crochet.
tr = treble crochet: Yarn over twice, insert hook into stitch, yarn over, pull up a loop (4 loops on hook), [yarn over, pull through 2 loops] 3 times.
sk = skip: Pass over the indicated number of stitches without working into them.
sp = space: The gap created by chain stitches in previous rows.
inc = increase: Work 2 stitches into the same stitch.
dec = decrease: Work 2 stitches together as one.
BLO = back loop only: Insert your hook under just the back loop of the stitch instead of both loops.
Step by Step Instructions
Bodice Back Panel
With MC and larger hook, ch 43.
Row 1: Sc in 2nd ch from hook and in each ch across. Turn. (42 sts)
Row 2: Ch 1, sc in each st across. Turn. (42 sts)
Rows 3-6: Repeat Row 2. (42 sts)
Row 7 (Decrease Row): Ch 1, sc in first 5 sts, sc2tog, sc to last 7 sts, sc2tog, sc in last 5 sts. Turn. (40 sts)
Rows 8-10: Ch 1, sc in each st across. Turn. (40 sts)
Row 11: Ch 1, sc in first 5 sts, sc2tog, sc to last 7 sts, sc2tog, sc in last 5 sts. Turn. (38 sts)
Rows 12-20: Ch 1, sc in each st across. Turn. (38 sts)
This creates the slight waist shaping that gives the bodice its fitted look. Don’t skip those decrease rows.
Armhole Shaping:
Row 21: Ch 1, sl st in first 4 sts, ch 1, sc in next 30 sts, leave remaining 4 sts unworked. Turn. (30 sts)
Row 22: Ch 1, sc2tog, sc to last 2 sts, sc2tog. Turn. (28 sts)
Row 23: Repeat Row 22. (26 sts)
Rows 24-28: Ch 1, sc in each st across. Turn. (26 sts)
Fasten off, leaving a long tail for seaming.
Bodice Left Front Panel
With MC and larger hook, ch 23.
Row 1: Sc in 2nd ch from hook and in each ch across. Turn. (22 sts)
Row 2: Ch 1, sc in each st across. Turn. (22 sts)
Rows 3-6: Repeat Row 2. (22 sts)
Row 7: Ch 1, sc in first 5 sts, sc2tog, sc to end. Turn. (21 sts)
Rows 8-10: Ch 1, sc in each st across. Turn. (21 sts)
Row 11: Ch 1, sc in first 5 sts, sc2tog, sc to end. Turn. (20 sts)
Rows 12-20: Ch 1, sc in each st across. Turn. (20 sts)
Armhole Shaping:
Row 21: Ch 1, sl st in first 4 sts, ch 1, sc to end. Turn. (16 sts)
Row 22: Ch 1, sc to last 2 sts, sc2tog. Turn. (15 sts)
Row 23: Ch 1, sc2tog, sc to end. Turn. (14 sts)
Rows 24-28: Ch 1, sc in each st across. Turn. (14 sts)
Fasten off.
Bodice Right Front Panel
Work the same as Left Front Panel through Row 20, but mirror the decreases so they fall on the opposite side. Essentially, work your decreases at the end of rows instead of the beginning where indicated.
For the armhole, leave the first stitches unworked on the opposite end. This creates the matching front panel.
Buttonhole Band (Right Front only):
Along the center front edge, join MC and work a vertical band of sc. Every 4th row, work a buttonhole by chaining 2 and skipping 2 stitches. This creates 5 evenly spaced buttonholes.
Sleeves (Make 2)
With MC and larger hook, ch 33.
Row 1: Sc in 2nd ch from hook and in each ch across. Turn. (32 sts)
Rows 2-4: Ch 1, sc in each st across. Turn. (32 sts)
Row 5 (Increase Row): Ch 1, 2 sc in first st, sc to last st, 2 sc in last st. Turn. (34 sts)
Rows 6-8: Ch 1, sc in each st across. Turn. (34 sts)
Row 9: Repeat Row 5. (36 sts)
Rows 10-14: Ch 1, sc in each st across. Turn. (36 sts)
Sleeve Cap Shaping:
Row 15: Ch 1, sl st in first 3 sts, ch 1, sc to last 3 sts, leave remaining unworked. Turn. (30 sts)
Rows 16-18: Ch 1, sc2tog, sc to last 2 sts, sc2tog. Turn. (24 sts after Row 18)
Fasten off, leaving a long tail.
Lace Cuff Edging:
Join MC at sleeve opening edge.
Round 1: Ch 1, sc evenly around opening. Sl st to join. (32 sts approximately)
Round 2: Ch 3, dc in same st, sk 1, *2 dc in next st, sk 1*. Repeat around. Sl st to join.
Round 3: Ch 3, 2 dc in same sp, ch 1, *3 dc in next sp, ch 1*. Repeat around. Sl st to join.
Round 4: Ch 1, sc in each dc and ch sp around. Sl st to join.
Round 5: Ch 4, tr in same st, sk 2, *2 tr in next st, sk 2*. Repeat around. Sl st to join.
Fasten off.
Collar
With MC and larger hook, ch 61.
Row 1: Sc in 2nd ch from hook and in each ch across. Turn. (60 sts)
Row 2: Ch 1, sc in each st across. Turn. (60 sts)
Row 3: Ch 3 (counts as dc), dc in next st, *sk 1, 3 dc in next st*. Repeat to last 2 sts, dc in last 2 sts. Turn.
Row 4: Ch 1, sc in first dc, *ch 2, sc in center dc of 3-dc group*. Repeat across, ending with sc in top of turning chain.
Scalloped Edge:
Row 5: Ch 1, *5 dc in ch-2 sp, sl st in next sc*. Repeat across.
Fasten off. This creates the beautiful scalloped edge visible at the neckline.
Skirt
The skirt attaches to the bottom edge of the assembled bodice. This is where the dress really comes to life.
Join MC at the bottom edge of the assembled bodice (all three panels seamed at shoulders and sides).
Round 1: Ch 1, work sc evenly across the entire bottom edge. You want approximately 84 stitches total, so space them evenly. Sl st to join, but continue working in rows since this is a button-front dress.
Row 2: Ch 3 (counts as dc), dc in each st across. Turn. (84 sts)
Row 3: Ch 3, *2 dc in next st, dc in next st*. Repeat across. Turn. (126 sts)
This increase row creates the gathered fullness in the skirt.
Rows 4-8: Ch 3, dc in each st across. Turn. (126 sts)
Row 9: Ch 3, *2 dc in next st, dc in next 2 sts*. Repeat across. Turn. (168 sts)
Rows 10-16: Ch 3, dc in each st across. Turn. (168 sts)
Now we transition into the lace pattern for the lower portion of the skirt.
Lace Section:
Row 17: Ch 4, sk 1, dc in next st, *ch 1, sk 1, dc in next st*. Repeat across. Turn.
Row 18: Ch 4, dc in next dc, *ch 1, dc in next dc*. Repeat across. Turn.
Rows 19-22: Repeat Row 18.
Scalloped Border:
Row 23: Ch 1, sc in first dc, *sk next ch-1 sp, 7 dc in next dc (shell made), sk next ch-1 sp, sc in next dc*. Repeat across.
Row 24: Working along the bottom of the shells, ch 1, *sc in first dc of shell, hdc in next dc, dc in next 3 dc, hdc in next dc, sc in last dc of shell, sl st in sc between shells*. Repeat across.
Fasten off.
Roses (Make 5 or 6)
These rolled roses give the dress its romantic vintage character. Make them in varying colors for visual interest.
With Color A or Color B and smaller hook, ch 36.
Row 1: Dc in 4th ch from hook, *dc in next ch*. Repeat across. Turn. (34 dc)
Row 2: Ch 3, 4 dc in first dc, *5 dc in next dc*. Repeat across.
Fasten off, leaving a very long tail.
Starting from the beginning of the strip (the tighter end), roll the piece into a spiral, keeping the bottom edge aligned. The ruffled edge naturally forms petals as you roll. Use the long tail to stitch through the bottom of the rose, securing the roll in place. Don’t pull too tight, just enough to hold the shape.
Make roses in both burgundy and blush pink for variety.
Rosebuds (Make 4)
These smaller buds fill in the floral arrangements beautifully.
With Color A or B and smaller hook, ch 10.
Row 1: 3 dc in 4th ch from hook, 3 dc in each remaining ch across.
Roll tightly and secure with tail. These stay more closed than the full roses.
Leaves (Make 10-12)
With Color C and smaller hook, ch 8.
Row 1: Sc in 2nd ch from hook, hdc in next ch, dc in next 2 ch, hdc in next ch, sc in next ch, 3 sc in last ch.
Now work along the other side of the foundation chain.
Row 2: Sc in next ch, hdc in next ch, dc in next 2 ch, hdc in next ch, sc in last ch, sl st to first sc.
Fasten off, leaving a tail for sewing. This creates a pointed oval leaf shape.
Vines (Optional)
For the trailing vine detail visible on the bodice, simply create a chain of about 15-20 stitches with Color C. Use a slip stitch or surface crochet to attach it in a curving line before adding leaves.
Assembly and Finishing
Take your time with assembly. This is where your work transforms into a finished garment.
1. Seam shoulder seams using mattress stitch or whip stitch. Match the edges carefully.
2. Attach sleeves to armholes. Pin first, then sew. Ease in any fullness evenly.
3. Seam the sleeve and side seams in one continuous line from cuff to waist.
4. Attach collar to neckline. Center the collar along the back neck and front edges, leaving space at the button bands.
5. Join the skirt to the bodice bottom edge. Work the skirt rows.
6. Create a button band along the left front edge if not already worked. Work rows of sc to match the buttonhole band width.
7. Sew buttons in place opposite the buttonholes.
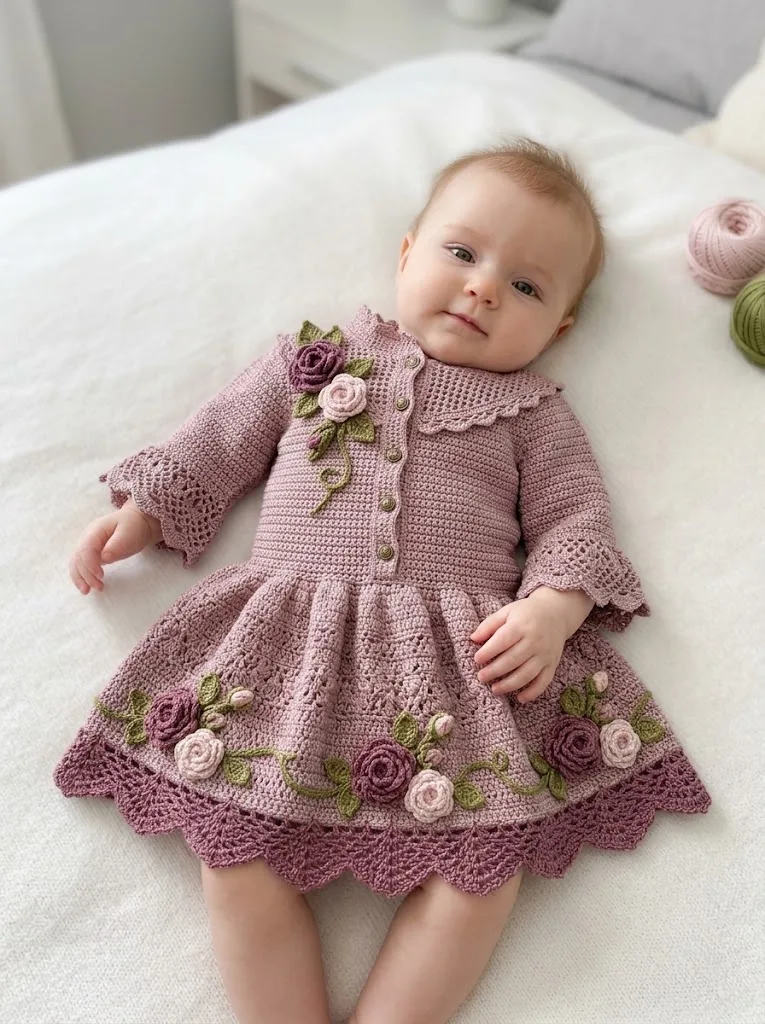
8. Arrange roses, buds, and leaves on the dress. Pin them first to find the most pleasing arrangement. I placed a cluster on the right bodice and a garland across the skirt hem.
9. Sew each appliqué securely with matching thread.
10. Weave in all remaining ends. Block lightly if needed, especially the lace sections.
Pattern Notes for Success
The bodice sizing runs slightly fitted. If baby is between sizes, consider going up.
You can adjust skirt length by adding or removing rows in the solid dc section before the lace portion.
The roses look intimidating but are genuinely simple once you roll your first one. Practice with scrap yarn first.
This crochet baby dress pattern works beautifully in other color combinations. Consider ivory with pale blue roses, or soft yellow with peach accents.
For a christening or baptism dress, work the entire piece in white or ivory. It becomes truly heirloom-worthy.
Care Instructions
Hand wash or machine wash on gentle cycle in cool water. Lay flat to dry. Steam block the lace sections if needed. Store folded with acid-free tissue paper to preserve shape.
I hope this pattern brings you as much joy to make as it brought me to design. Every time I look at the finished dress, I think of my grandmother and those sketches she left behind. Now her vision exists in the real world, ready to be worn by the next generation.
If you make this dusty rose baby dress, I would absolutely love to see your version. Tag me on Instagram or share in our Facebook group. Seeing your finished projects genuinely makes my day.
Save this crochet pattern to your Pinterest boards so you can find it whenever you’re ready to start. And please drop a comment below if you give it a try. I read every single one, and I’m always here to help if you get stuck on any step.
