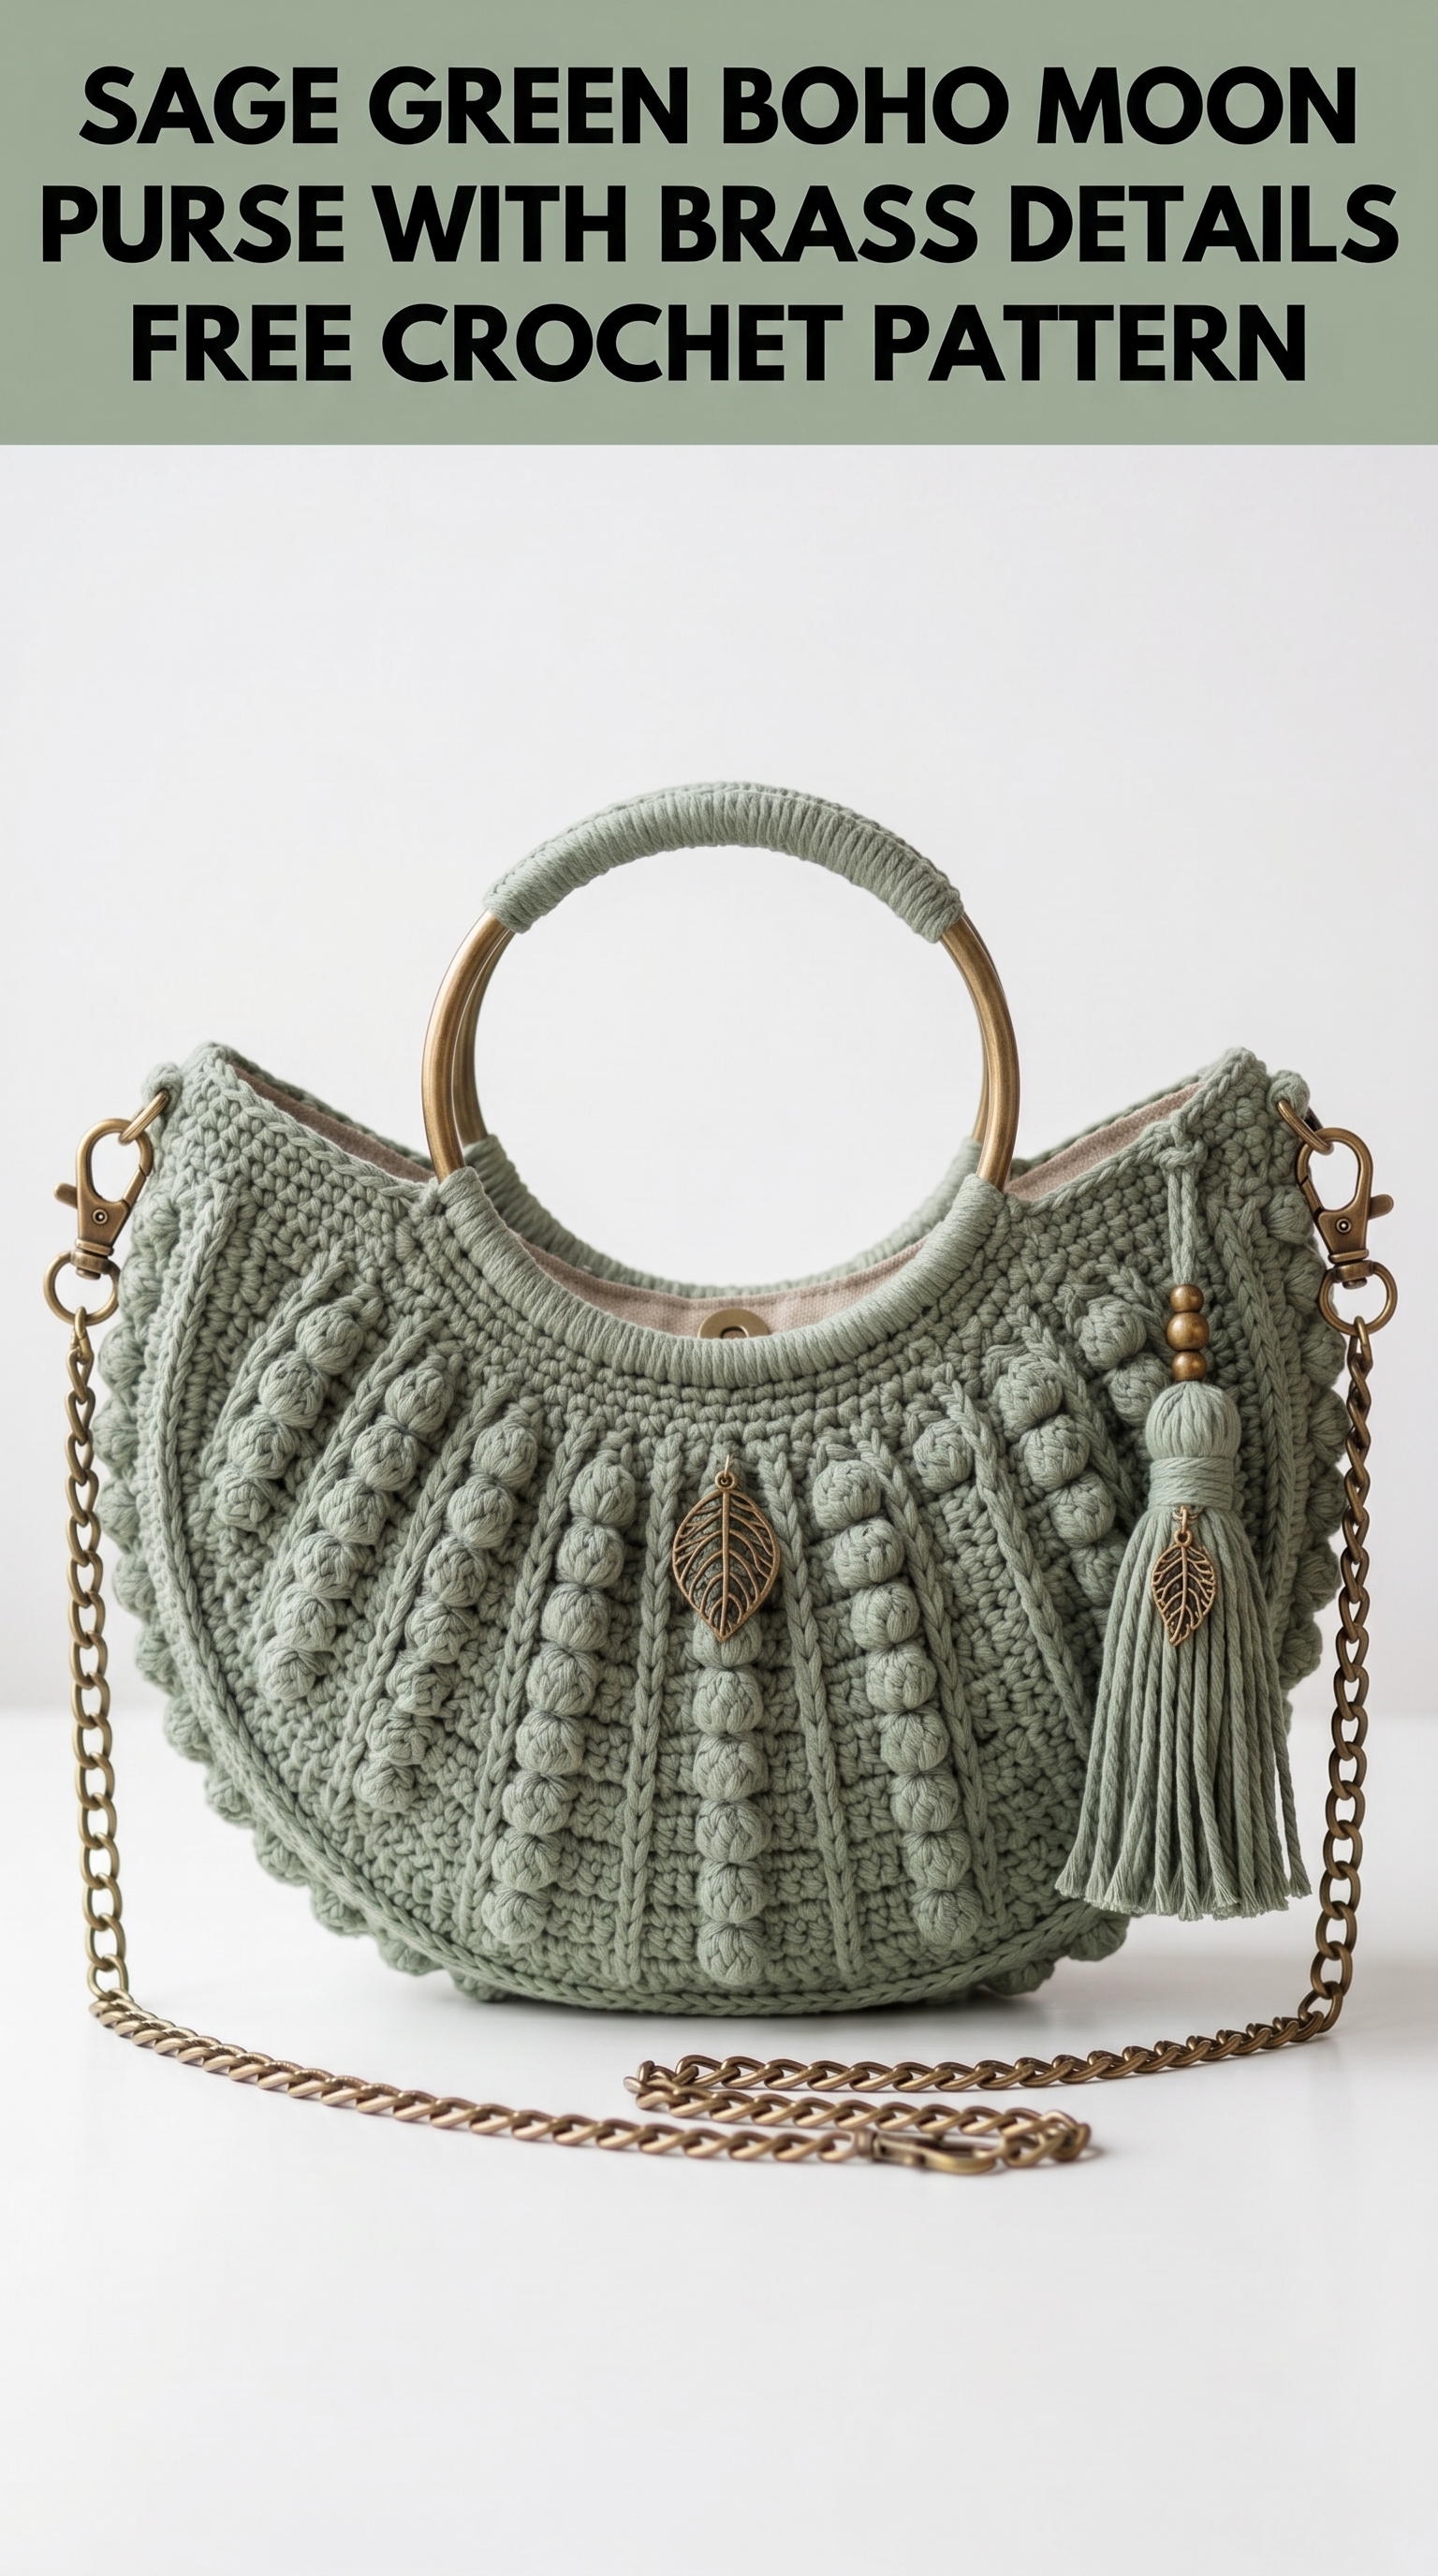
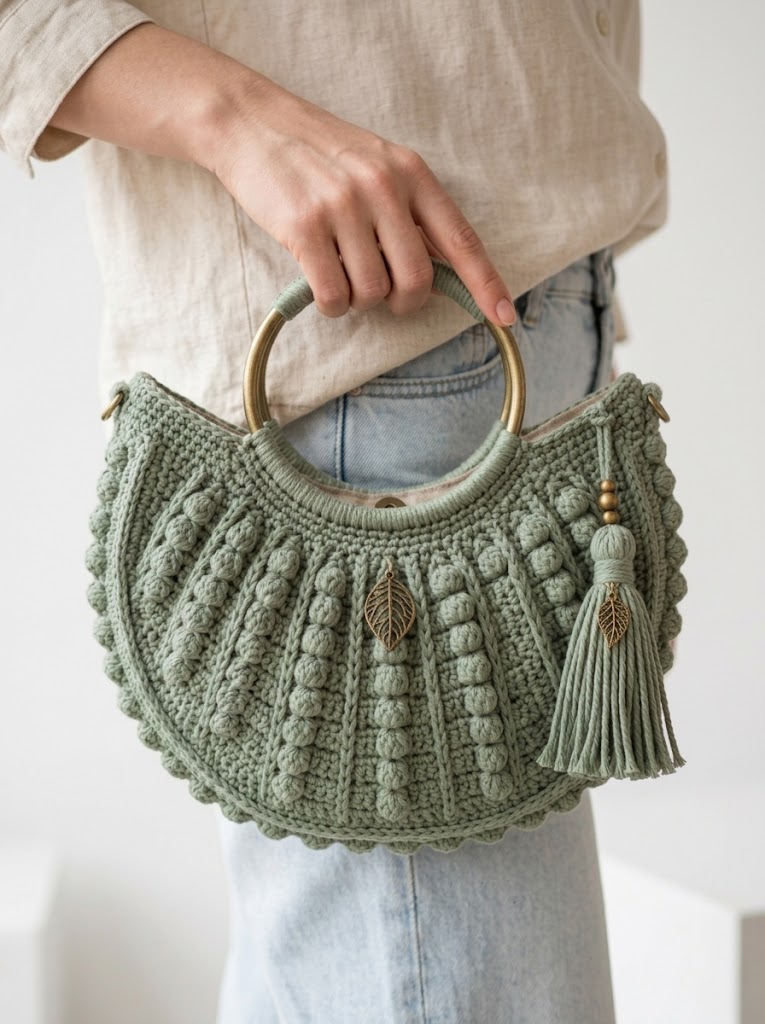
This stunning crescent-shaped purse is one of those projects that looks incredibly complex but breaks down into manageable pieces once you understand the construction. I absolutely love how the bobble stitch panels create vertical texture against the tighter base fabric. The sage green colorway paired with antiqued brass hardware gives it that perfect bohemian aesthetic that works for farmers markets and date nights alike.
If you can work basic stitches and have tried bobbles before, you can make this bag. If bobbles are new to you, this is a wonderful project to learn. I will walk you through every step of this crochet pattern, and by the end, you will have a gorgeous handmade purse that looks like it belongs in a boutique.
Why This Boho Moon Purse Pattern Works So Well
The crescent or moon shape is having a major moment in fashion right now. This crochet tutorial gives you a structured bag with real functionality. The brass ring handles provide stability at the top while the chain strap offers hands-free carrying options.
What makes this purse special is the combination of textures. You have got:
The vertical panels radiate outward from the bottom center, creating that signature fan or shell silhouette. Trust me when I say people will stop you to ask where you bought this bag.
Materials You Will Need
Yarn:
Hook:
Notions:
Skill Level and Gauge
Skill Level: Intermediate
You should be comfortable with:
Gauge:
16 stitches and 18 rows = 4 inches in single crochet with 4.0mm hook
Gauge matters here because the bag needs to hold its shape and fit the ring handles properly. Take time to check your gauge before starting.
Abbreviations and Stitch Definitions
Let me define every stitch before we begin so you can reference back easily.
ch = chain: yarn over, pull through loop on hook
sl st = slip stitch: insert hook, yarn over, pull through stitch and loop on hook in one motion
sc = single crochet: insert hook, yarn over, pull up a loop (2 loops on hook), yarn over, pull through both loops
hdc = half double crochet: yarn over, insert hook, yarn over, pull up a loop (3 loops on hook), yarn over, pull through all 3 loops
dc = double crochet: yarn over, insert hook, yarn over, pull up a loop (3 loops on hook), yarn over, pull through 2 loops, yarn over, pull through remaining 2 loops
bob = bobble stitch: work 5 double crochets into the same stitch but stop each dc before the final yarn over (leaving 2 loops on hook each time). You will have 6 loops total on your hook. Yarn over and pull through all 6 loops at once. This pushes the bobble to the front of your work.
FPdc = front post double crochet: yarn over, insert hook from front to back to front around the post of the stitch below (not into the top of the stitch), complete as a regular double crochet
BPdc = back post double crochet: yarn over, insert hook from back to front to back around the post of the stitch below, complete as a regular double crochet
inc = increase: work 2 stitches into the same stitch
dec = decrease: single crochet 2 together by inserting hook into first stitch, pulling up a loop, inserting hook into next stitch, pulling up a loop (3 loops on hook), yarn over, pull through all 3
Pattern Notes Before You Begin
This bag is worked in two identical panels that are seamed together along the curved bottom edge. Each panel is worked flat, starting from the bottom point and increasing outward to create the crescent shape.
The bobble sections are worked in vertical strips with post stitch columns between them. This creates the raised ribbed effect you see in the photos.
A tip about bobbles: Always push your bobbles to the right side of your work as you complete them. They naturally want to pop toward you, but on wrong side rows, you will need to push them through to the other side.
Step by Step Crochet Pattern Instructions

Front Panel
Foundation Row:
Ch 4.
Row 1 (RS): Sc in 2nd ch from hook and in each ch across. (3 sc)
Row 2: Ch 1, turn. 2 sc in first st, sc in next st, 2 sc in last st. (5 sc)
Row 3: Ch 1, turn. 2 sc in first st, sc across to last st, 2 sc in last st. (7 sc)
Rows 4 through 12: Repeat Row 3, increasing 2 stitches every row. (25 sc after Row 12)
You now have the bottom triangle established. This is where the textured sections begin.
Beginning the Bobble Panels
Row 13 (RS): Ch 1, turn. Sc in first 2 sts, *FPdc around next st, sc in next 3 sts, bob in next st, sc in next 3 sts, FPdc around next st*, sc in next st, repeat from * to * once more, sc in last 2 sts. (25 sts)
Row 14: Ch 1, turn. Sc in first 2 sts, *BPdc around post st, sc in next 7 sts (including the top of bobble), BPdc around post st*, sc in next st, repeat from * to * once more, sc in last 2 sts. (25 sts)
Row 15: Ch 1, turn. Inc in first st, sc in next st, *FPdc around post st, sc in next 2 sts, bob in next st, sc in next st, bob in next st, sc in next 2 sts, FPdc around post st*, sc in next st, repeat from * to * once more, sc in next st, inc in last st. (27 sts)
Continue this pattern, placing bobbles in a vertical line within each panel section. Increase 1 stitch at each edge every other row while maintaining the established pattern.
Middle Section (Rows 16 through 30)
Continue working the bobble pattern, adding one bobble per vertical column every 2 rows. The post stitches create the ribbed dividers between sections.
By Row 30, you should have approximately 45 stitches across and 3 to 4 bobbles stacked vertically in each panel section.
Important: Count your stitches at the end of each row. The post stitches count as stitches. The bobbles count as single stitches even though they are made from multiple yarn overs.
Top Shaping (Rows 31 through 38)
Row 31: Ch 1, turn. Dec over first 2 sts, work in pattern across to last 2 sts, dec over last 2 sts. (43 sts)
Row 32: Work even in pattern with no increases or decreases.
Rows 33 through 38: Alternate decrease rows and even rows. End with approximately 37 stitches.
Handle Opening
Row 39: Ch 1, turn. Work 12 sts in pattern, ch 13, skip next 13 sts, work remaining 12 sts in pattern. (24 sc + 13 ch)
Row 40: Ch 1, turn. Sc in each st and ch across. (37 sc)
Rows 41 through 44: Sc in each st across, decreasing 1 st at each edge every row. (29 sc after Row 44)
Fasten off and weave in ends.
Back Panel
Work identical to Front Panel.
Assembly Instructions
Seaming the Panels
Place both panels with wrong sides facing each other. The bobbles should face outward on both sides.
Using a tapestry needle and matching yarn, whipstitch or mattress stitch the curved bottom edges together. Start at one top corner, work down around the crescent, and up to the other top corner.
Leave the top straight edge open for the handle attachment.
Wrapping the Ring Handles
The brass handles need yarn wrapping to coordinate with your bag and provide a comfortable grip.
To wrap handles:
1. Tie yarn securely around the ring
2. Work closely spaced half hitches or buttonhole stitches around the entire ring
3. Cover approximately three quarters of each ring, leaving exposed brass visible at the bottom
4. Secure the end by weaving through the wrapping multiple times
Attaching Handles to Bag
Position the wrapped portion of each handle at the top center of your bag. The handle opening you created should fit around the handle.
Using matching yarn, whipstitch the top edge of each panel around the handle, encasing it securely.
Work approximately 20 single crochets around the top opening edge to neaten and reinforce.
Adding the Chain Strap
Attach D-rings to the upper corners of your bag where the side seams meet the top edge.
Thread the chain strap through the D-rings or clip lobster claws directly to the rings.
Making the Tassel
1. Wrap yarn around a 4-inch piece of cardboard 30 times
2. Thread a strand through the top and tie tightly
3. Cut the bottom loops
4. Wrap another strand around the tassel about half an inch from the top to create the head
5. Trim ends evenly
6. Add a leaf charm to the wrap strand before tying
7. Attach tassel to the ring handle with the remaining tail
Adding the Fabric Lining (Optional but Recommended)
Cut two pieces of fabric in the same crescent shape as your panels, adding half an inch seam allowance.
Sew fabric pieces together along the curved edge with right sides facing.
Turn right side out and press.
Slip the lining inside the bag with wrong sides together.
Hand stitch the lining to the inside top edge, tucking raw edges under.
The lining protects your belongings and gives the bag a professional finish.
Customization Ideas for Your Boho Purse
This pattern works beautifully in so many variations. Consider:
You can also swap the chain strap for a braided crochet strap or a leather cord if chains are not your style.
Troubleshooting Common Issues
My bobbles are not popping out enough.
Make sure you are using 5 double crochets for each bobble and pulling the final yarn over tight. Also check that you are pushing them to the right side consistently.
The crescent shape looks lopsided.
Count your stitches. Missed increases on one side will cause asymmetry. Block your pieces before seaming to even things out.
The handle wrapping looks uneven.
Undo and redo it. Consistent tension and spacing matter. Work slowly and push each wrap snugly against the last.
My bag is too floppy.
Try going down a hook size or adding interfacing behind your fabric lining. Cotton yarn also holds shape better than acrylic for bags.
Final Thoughts on This Crochet Pattern
This Sage Green Boho Moon Purse with Brass Details crochet pattern has become one of my absolute favorite projects to make and gift. There is something so satisfying about the combination of textures and the elegant finished shape.
Take your time with the bobble sections. They require a bit more yarn and attention than plain stitches, but the payoff is stunning. The vertical lines draw the eye and give this bag that high-end boutique quality.
Thank you so much for choosing this pattern for your next project. I genuinely hope you love making it as much as I do. When you finish your purse, please share photos with me on Instagram or in my Facebook group. Seeing your creations truly makes my day, and I love seeing the color combinations everyone chooses.
Happy crocheting, friend. You have got this.
