
Let me guess. You saw this gorgeous lace overlay top and immediately thought, "There’s no way I can make that." The delicate drape, the dramatic handkerchief hem, those intricate fan motifs cascading down the body. It looks like something that belongs in a boutique window with a triple-digit price tag, not on your crochet hook.

Here’s the truth. This Lavender Dream Lace Overlay Top is absolutely within your reach. Yes, even if you’ve never tackled lace before. The entire piece is built on just a handful of stitches repeated in a predictable rhythm. Once you understand the pattern of fans and clusters, you’ll find yourself flying through the rows.
This crochet pattern breaks down every single step, defines every stitch, and walks you through the construction from the very first chain to the final blocking pin. Whether you’re an adventurous intermediate crocheter ready to level up or an advanced maker looking for your next satisfying project, this tutorial has you covered.
About This Crochet Pattern
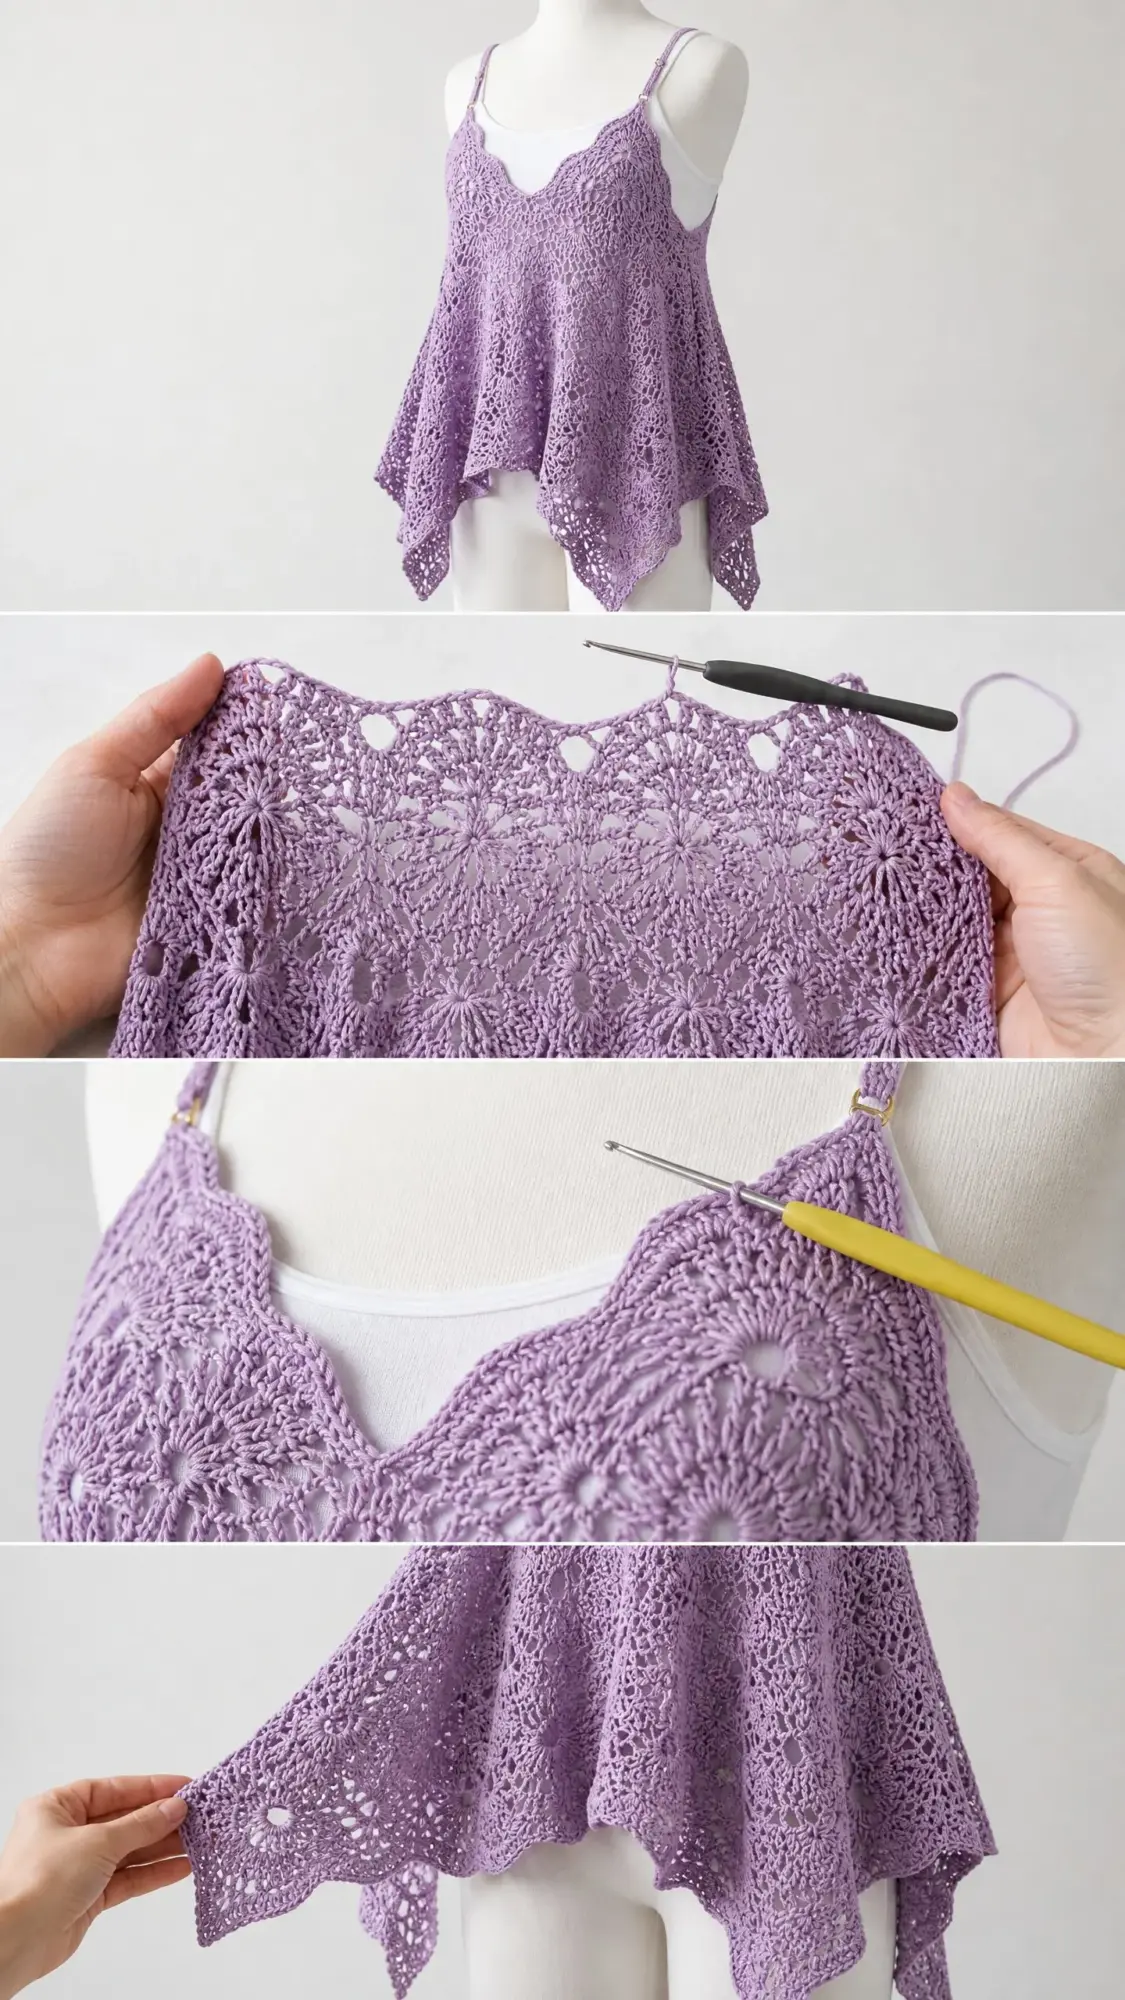
This flowing, boho-inspired crochet lace overlay top features repeating pineapple-adjacent fan motifs worked from the bust down in one continuous piece. The lacy openwork fabric drapes beautifully over a simple cami underlayer and falls to dramatic handkerchief-style pointed hem corners. Thin adjustable spaghetti straps complete the romantic look.
The construction is surprisingly straightforward. You’ll work two identical flat panels from the top down, starting with a foundation chain that spans the full bust. The bodice section uses a fitted fan-lace pattern, then the fabric flares outward dramatically through increases at each side. This creates the stunning A-line, handkerchief-hem silhouette that makes this piece so eye-catching.
The same lace motif continues throughout with no complicated seams. You’ll join the front and back panels with two short side seams, leaving the skirt portion open for that beautiful flowing movement. The four pronounced points at the hem happen naturally through the geometry of the fan motif columns. No tricky short rows required.
Skill Level
Intermediate to Advanced
This pattern requires consistent tension across long foundation chains, understanding of fan and shell stitch repeats with offset placement, shaping through strategic increases while maintaining repeat integrity, and finishing two matching panels that mirror each other. If you’re comfortable with basic stitches and ready for a challenge, you can absolutely do this.
Time Estimate
Approximately 18 to 26 hours for an average intermediate crocheter, depending on size. This is a perfect project to work on over a few weekends or during your evening Netflix sessions.
Finished Measurements
This pattern is written for a size Medium (US 8/10).
Size customization tips are included at the end of the pattern instructions.
Materials You’ll Need
Yarn: Approximately 600 yards / 549 meters of DK weight yarn (CYCA #3 Light), in lavender or soft lilac.
Yarn Suggestions:
1. Lion Brand Pound of Love in "Lavender" is 100% acrylic with excellent stitch definition for lace work. It washes well and is affordable.
2. Paintbox Yarns Simply DK in "Dusty Lilac" is 100% acrylic with a smooth texture that allows the fan stitches to open cleanly. It has consistent dye lots.
3. Cascade 220 Superwash Sport (used at DK tension) in "Soft Lilac" is 100% superwash merino wool. It gives beautiful drape with a slight halo and is the luxury option.
Substitution Note: Choose a yarn that is smooth and plied rather than fuzzy or bouclé. Hairy or textured yarns will obscure the openwork lace pattern. Cotton blends work well for warmer climates but have less drape than acrylic or wool blends. Avoid stiff fibers. Always work a gauge swatch.
Hook: US Size E-4 (3.5 mm) crochet hook
Notions:
Gauge
After blocking: 17 stitches and 10 rows = 4 in / 10 cm in the main fan lace pattern.
More specifically for this pattern: one full 12-stitch fan repeat measures approximately 2.8 in / 7 cm wide and 2 rows measures approximately 1.6 in / 4 cm tall.
Gauge is mandatory for this garment. Do not skip swatching. Even a half-stitch difference per 4 inches will result in a top that is multiple inches off in width. Make your swatch at least 6 in / 15 cm wide, block it, and measure before beginning.
Abbreviations
Before we dive into the step by step crochet tutorial, let’s cover all the abbreviations you’ll encounter:
Special Stitches Explained
These are the building blocks of this lace overlay top pattern. Take a moment to practice each one before you begin.
Fan Stitch (also called Shell)
Work 7 double crochet (dc) stitches all into the same stitch or space. This creates one fan unit and counts as 7 stitches when measuring, but occupies only one stitch or space of the row below. Think of it as a little burst of stitches radiating from a single point.
V-Stitch (V-st)
Work (dc, ch 2, dc) all into the same stitch or space. This creates a small open V shape and counts as 2 dc with one ch-2 sp in the middle.
Beginning Fan (Beg-Fan)
At the beginning of a row, ch 3 (this counts as your first dc), then work 6 more dc into the same stitch or space. This creates the first Fan of the row with a total of 7 dc.
Pineapple Shell Cluster (PSC)
This stitch creates the gathered crown effect at the top of each fan column. Here’s how to work it:
Step 1: Yarn over, insert hook into designated stitch, yarn over and pull up a loop, yarn over and draw through 2 loops. You now have the first leg of a dc begun.
Step 2: Repeat Step 1 three more times into the same stitch. You now have 5 loops on your hook.
Step 3: Yarn over and draw through all 5 loops. Chain 1 to close.
This forms a small gathered cluster. Don’t panic if it feels awkward at first. It becomes second nature after a few repetitions.
Transitional Chain Bridge (TCB)
Chain 3, then slip stitch into the top of the next fan stitch or PSC. This connects fan columns horizontally between motifs.
Pattern Notes Before You Begin
1. This pattern is worked in two identical flat panels (front and back). The panels are joined with a simple single crochet seam up each short side edge, leaving the top open for straps.
2. The top is not reversible. The right side (RS) faces you on every right-side row. Turn the work at the end of each row unless instructed otherwise.
3. The lace pattern has a 12-stitch repeat. The full foundation for the medium size uses a stitch count of 96 working stitches across, giving you exactly 8 full fan repeats per panel.
4. The bodice section (Rows 1 through 14) is worked with no increases, maintaining the 96-stitch count. This creates the fitted bust and ribcage section.
5. The skirt section (Rows 15 onward) introduces gradual width increases on each row to create the dramatic A-line flare.
6. The handkerchief hem forms naturally through the geometry of the fan motif columns. No special shaping required.
7. Chain 4 at the start of any row where a dc plus ch-1 is required. Chain 3 at the start of any row that begins with a plain dc (counts as dc throughout).
8. Block aggressively. This lace opens dramatically with wet blocking and the finished measurements assume a fully blocked piece.
9. Work both panels simultaneously if possible, alternating between them every few rows, to ensure consistent tension.
Crochet Pattern Instructions
Front Panel
Foundation Chain
Ch 116.
This creates a foundation of 116 chains. You will work into specific chains to produce 96 working stitches in the established pattern. The extra chains account for turning chains and skipped base chains in the fan setup.
Row 1 (RS, Setup Row)
Sc in 2nd ch from hook, sc in next ch. (2 sc made)
Sk 2 ch, work Fan in next ch (7 dc), sk 2 ch, sc in next ch, sk 2 ch, V-st in next ch (dc, ch 2, dc), sk 2 ch, sc in next ch.
Rep from to across, ending with sc in last ch.
Count check: You should have 8 fans, 8 V-sts, and 17 sc across the row. This equals 8 fan units established across the panel.
Row 2 (WS)
Ch 1, turn. Sc in first sc.
Ch 3, PSC over center 3 dc of Fan below (insert into 3rd, 4th, and 5th dc of the fan), ch 3, sc in next sc, sc in ch-2 sp of V-st, sc in next sc.
Rep from to across, end sc in last sc.
Stitch count: 8 PSC, 16 ch-3 arches (each side of PSC), 57 sc total including the 8 sc worked into V-st ch-2 sps.
Row 3 (RS)
Ch 3 (counts as dc), turn. 3 dc in first sc (this creates a half fan at the edge).
Sc in top of PSC, Fan in next sc (the sc that sits over the V-st ch-sp from 2 rows below), sc in top of next PSC.
Rep from to across, end 4 dc in last sc (half fan at edge).
Stitch count: 8 full fans in body, 2 half-fans at edges, 16 sc between fans.
Row 4 (WS)
Ch 1, turn. Sc in top of ch-3 edge dc.
Ch 3, PSC over center 3 dc of Fan, ch 3, sc in sc, sc in sc, sc in sc.
Rep from to across, end sc in top of t-ch.
Counts mirror Row 2.
Rows 5 through 14
Rep Rows 3 and 4 alternately (5 more RS rows and 5 more WS rows), keeping all pattern repeats exactly as set. Do not increase.
At the end of Row 14 you will have completed 7 full RS rows and 7 full WS rows in the bodice section.
CHECKPOINT 1: After Row 14, your panel should measure approximately 6 in / 15 cm tall from foundation chain to working edge and approximately 18 in / 45.7 cm wide. If your panel is significantly narrower or wider, check your fan stitch tension before proceeding.
Skirt Section (Rows 15 through 36)
In the skirt section, the fans at each outer edge expand outward by adding chain bridges and extra fans at the sides. One new fan repeat is added at each outer edge every 4 rows.
Row 15 (RS, First Expansion Row)
Ch 6, sl st into first sc of previous RS row to create an extension at the left edge. Now work across exactly as Row 3 but at the right edge, after the final fan, ch 3 and work Fan into the sc below the ch-3 bridge you just made.
You have added one fan unit at each edge.
Stitch count: 10 fans total (8 center, 1 new left, 1 new right), 18 sc between fans, 2 ch-3 bridges at extensions.
Row 16 (WS)
Work as Row 4 across all 10 fan units, including the new edge fans.
Stitch count: 10 PSC with corresponding sc and ch-3 arches.
Rows 17 and 18
Work as Rows 3 and 4 across all 10 fans with no new increases.
Row 19 (RS, Second Expansion Row)
Add one fan at each outer edge using the same ch-6 extension and bridge technique as Row 15.
Stitch count: 12 fans total.
Row 20 (WS)
Work as Row 4 across all 12 fans.
Rows 21 and 22
Work as Rows 3 and 4 across 12 fans with no new increases.
Row 23 (RS, Third Expansion Row)
Add one fan at each outer edge.
Stitch count: 14 fans total.
Row 24 (WS)
Work as Row 4 across 14 fans.
Rows 25 and 26
Work as Rows 3 and 4 across 14 fans.
Row 27 (RS, Fourth Expansion Row)
Add one fan at each outer edge.
Stitch count: 16 fans total.
Row 28 (WS)
Work as Row 4 across 16 fans.
Rows 29 and 30
Work as Rows 3 and 4 across 16 fans.
Row 31 (RS, Fifth Expansion Row)
Add one fan at each outer edge.
Stitch count: 18 fans total.
Row 32 (WS)
Work as Row 4 across 18 fans.
Rows 33 and 34
Work as Rows 3 and 4 across 18 fans.
Row 35 (RS, Sixth Expansion Row)
Add one fan at each outer edge.
Stitch count: 20 fans total.
Row 36 (WS)
Work as Row 4 across 20 fans.
CHECKPOINT 2: After Row 36, your panel should measure approximately 22 in / 56 cm tall at center and approximately 30 in / 76 cm wide at the widest fan span before the points drop below the main body. The outer two fan columns on each side will naturally hang lower than the center, forming the beginning of the handkerchief points.
Hem Finishing Rows (Rows 37 and 38)
Row 37 (RS)
Work as Row 3 across all 20 fans. At the end of this row, the outer fan columns are at their lowest natural position. Do not add more fans.
Row 38 (WS)
Work as Row 4 across all 20 fans. Fasten off, leaving a 6 in / 15 cm tail.
The hem is now complete. The four outer fan columns form the handkerchief points. The center of the hem is slightly shorter, creating that beautiful scalloped-to-point transition.
Back Panel
Work the Back Panel exactly as the Front Panel, following all rows from Foundation Chain through Row 38. The two panels are identical.
Joining the Panels
Hold the Front and Back panels with RS facing outward (WS together). Align the short side edges that run vertically along the sides of the body when worn.
Side Seams
Working with RS facing, attach yarn at the underarm point (the top corner of the side edge) with a sl st. Work sc seam along the side edge for approximately 12 in / 30.5 cm downward (approximately 14 rows of the bodice section). Fasten off.
Repeat on the opposite side edge.
Important: Seam only the bodice portion of the side edges (the first 14 rows). Leave the skirt section open. The skirt flares freely from the waist downward on both the front and back, with open side vents that allow the handkerchief hem to move beautifully.
Top Edge Finishing
With RS facing, attach yarn at the top corner of the front panel. Work one row of sc evenly across the top edge of the front panel (approximately 1 sc per row-end dc and 1 sc per sc row-end stitch). Work 3 sc into each corner.
Repeat across the back panel top edge. Fasten off.
Straps
Each shoulder has two parallel straps (4 straps total: 2 at front left shoulder, 2 at front right shoulder, mirrored on back).
Positioning: The straps attach approximately 2.5 in / 6.3 cm in from each outer top corner of the panels, with the two straps at each shoulder spaced approximately 1 in / 2.5 cm apart.
Crocheted Cord Strap (make 4)
Ch 90 (approximately 14 in / 35.5 cm unstretched, enough for adjustment).
Sl st in 2nd ch from hook and in each ch across.
Fasten off, leaving 8 in / 20 cm tails at each end for attaching.
Using the tail ends, thread each strap through the top edge sc stitches at the marked strap positions and knot securely on the WS, or attach to D-rings for adjustability.
If using purchased ribbon or cord straps, cut four lengths of approximately 16 in / 40.5 cm each and attach as above, knotting or sewing on the WS.
Size Customization Tips
To size down to a Small (bust 32 to 34 in / 81 to 86 cm):
Begin with Ch 104 (foundation for 7 fan repeats across, or 84 working stitches). All row instructions stay the same. The finished bust measurement will be approximately 32 in / 81 cm total when seamed.
To size up to a Large (bust 40 to 42 in / 101.5 to 106.5 cm):
Begin with Ch 128 (foundation for 9 fan repeats, or 108 working stitches). All row instructions stay the same. The finished bust measurement will be approximately 40 in / 101.5 cm total.
For each size above Large, add 12 chains to the foundation (one additional fan repeat) per size step, increasing the finished bust by approximately 2.75 in / 7 cm per repeat added.
For length adjustments: Each additional pair of rows (one RS, one WS) in the bodice section adds approximately 0.8 in / 2 cm to the bodice length. Each additional expansion cycle (4 rows) in the skirt section adds approximately 1.5 in / 3.8 cm to the center length and approximately 2.5 in / 6.3 cm to the point length.
Finishing and Blocking
Wet blocking is essential for this pattern. Lace will not open properly without it. Trust me on this one.
Step 1: Weave in all ends securely on WS before blocking.
Step 2: Fill a basin with cool water and a drop of gentle wool wash or baby shampoo. Submerge the completed top (both panels joined) and press gently to saturate. Do not wring.
Step 3: Remove the top from the water and press gently between two clean towels to remove excess water.
Step 4: Lay the piece flat on a blocking mat. Pin the top edge straight across. Pin each fan point of the hem to the blocking mat, stretching the points gently downward to accentuate the handkerchief effect. Use as many pins as needed to hold the scalloped hem edge open and even.
Step 5: Allow to dry completely flat (24 to 48 hours depending on yarn fiber content). Do not move until fully dry.
Step 6: Once dry, the fans will be open and the lace will be clearly defined. Remove pins and admire your work.
Care Instructions
For acrylic yarns: Machine wash on gentle cycle in cold water. Lay flat to dry. Do not tumble dry. Do not iron directly.
For wool or wool-blend yarns: Hand wash only in cool water with wool-safe detergent. Lay flat to dry. Do not wring, twist, or hang.
Store folded flat, not on a hanger, to prevent the lace fabric from stretching out of shape over time.
You Did It!
Thank you so much for choosing this Lavender Dream Lace Overlay Top crochet pattern for your next project. I truly hope you love making it as much as I loved designing it. There’s something incredibly satisfying about watching those fan motifs grow row after row, knowing you’re creating something that looks far more complicated than it actually is.
If you make this top, I would absolutely love to see it! Tag me on Instagram or share your finished piece in our Facebook group. Seeing your creations honestly makes my whole week.
Go ahead and save this pattern to your Pinterest boards so you can find it whenever you’re ready to start. And if you have any questions along the way, drop a comment below. I’m always happy to help a fellow crocheter work through a tricky spot. Happy hooking!
