I call these my "Sunset Terrace Sandals" because they remind me of warm summer evenings on a Spanish rooftop. This pattern actually started as a quick sketch in my project notebook about three years ago when I fell in love with a pair of designer platform slides I absolutely could not afford. I kept thinking about how the crochet detailing could be recreated at home with the right techniques and a sturdy sole base. After countless prototypes and one very patient husband who let me test fits on his feet too many times, I finally perfected this pattern. These sandals are now one of my most treasured makes, and I am thrilled to finally share the full tutorial with you.
Why You’ll Love This Crochet Platform Wedge Sandals Pattern
These aren’t your grandmother’s house slippers. These are statement pieces. Wearable art that you crafted with your own hands.
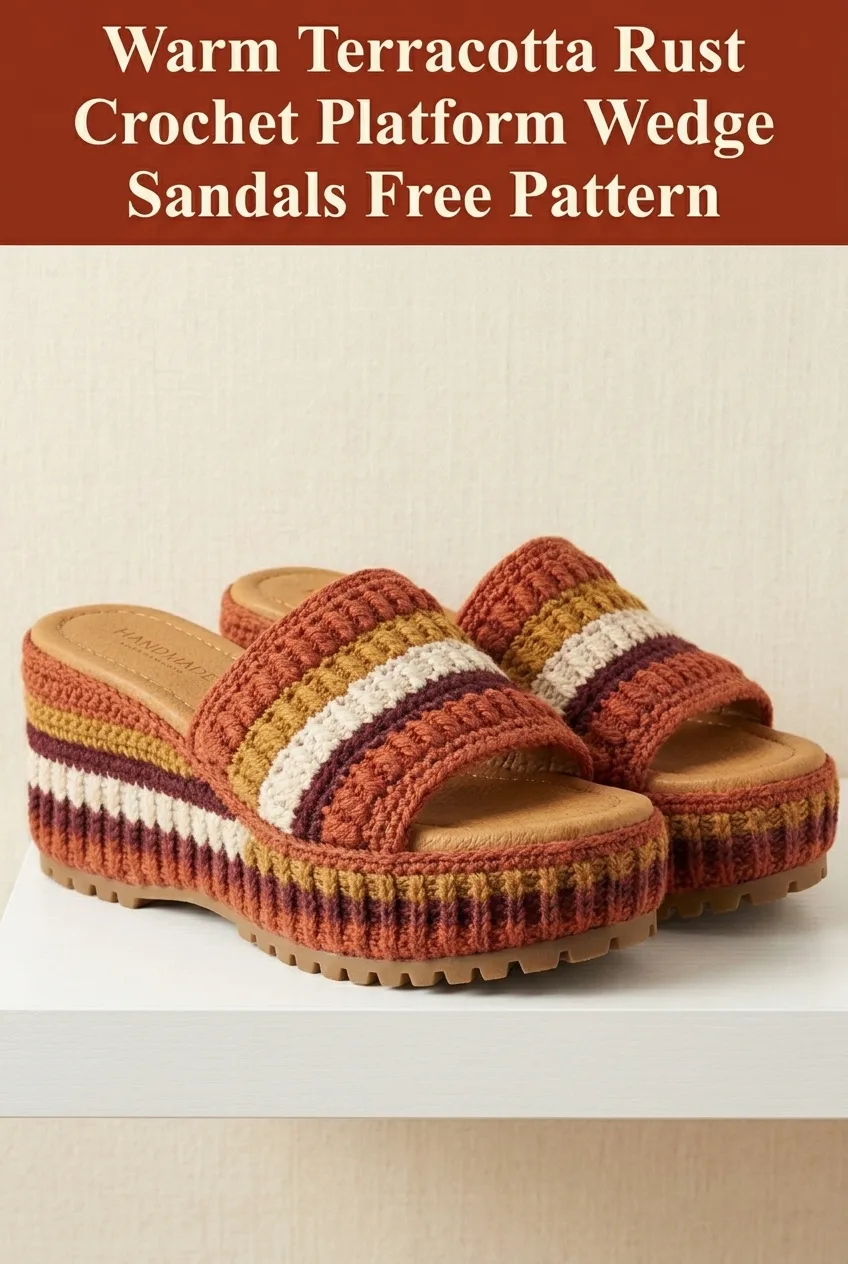
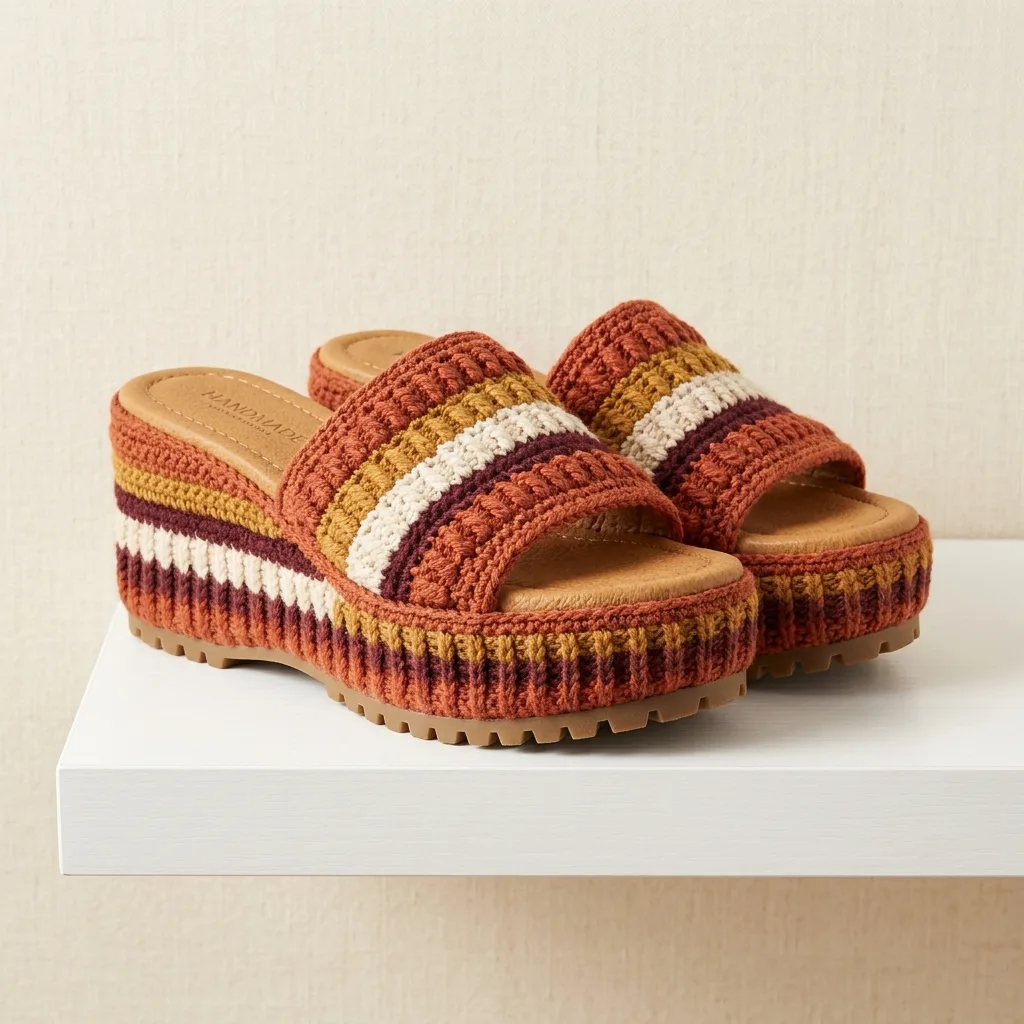
The retro striped colorway gives these platform sandals serious vintage appeal. Think 1970s bohemian vibes with a modern twist. The terracotta rust serves as the dominant color, accented by warm mustard gold, deep burgundy wine, and crisp cream stripes.
What makes this crochet pattern truly special is the construction. You’ll create crocheted covers that wrap around pre-made platform sandal bases. This means you get the comfort and durability of a real shoe sole with the handmade beauty of your crochet work.
Perfect for: beach vacations, summer festivals, casual brunch dates, or just feeling fabulous while running errands.
Skill Level
Intermediate. You should be comfortable with basic crochet stitches and working in rows. The construction requires some finishing work and assembly, but I’ll walk you through every step. If you’ve made a hat or a simple bag before, you can absolutely tackle this project.
Materials Needed
Yarn
You’ll need worsted weight cotton yarn (weight category 4) in four colors:
I recommend 100% cotton yarn for this project. Cotton holds its shape beautifully, wears well, and won’t stretch out over time like acrylic might. Look for a mercerized cotton if you want that slight sheen visible in the finished sandals.
Suggested brands: Lion Brand 24/7 Cotton, Lily Sugar’n Cream, or Paintbox Yarns Cotton DK held double.
Tools
Additional Supplies
Gauge
16 stitches and 18 rows = 4 inches (10 cm) in single crochet using 5.0 mm hook and worsted weight cotton.
Gauge matters here because your crocheted pieces need to fit snugly around your sandal bases. Too loose and they’ll sag. Too tight and they won’t stretch to cover the platform. Take time to check your gauge before diving in.
Finished Measurements
This pattern creates covers for a women’s size 7-8 US platform sandal with approximately:
I’ll include notes for sizing adjustments throughout the pattern.
Abbreviations and Stitch Definitions
Let me break down every stitch you’ll use. No surprises here.
ch = chain: Wrap yarn over hook, pull through loop on hook. This creates your foundation.
sl st = slip stitch: Insert hook, yarn over, pull through stitch AND loop on hook in one motion. Used for joining and creating a tight edge.
sc = single crochet: Insert hook into stitch, yarn over and pull up a loop (2 loops on hook), yarn over and pull through both loops. Your workhorse stitch for this project.
hdc = half double crochet: Yarn over, insert hook into stitch, yarn over and pull up a loop (3 loops on hook), yarn over and pull through all 3 loops. Slightly taller than single crochet.
dc = double crochet: Yarn over, insert hook into stitch, yarn over and pull up a loop (3 loops on hook), yarn over and pull through 2 loops, yarn over and pull through remaining 2 loops. Creates the textured ridges on the platform sides.
FPdc = front post double crochet: Yarn over, insert hook from front to back to front around the POST of the stitch below (not into the top of the stitch), complete as a regular double crochet. This creates the ribbed texture visible on the sandals.
BPdc = back post double crochet: Same as FPdc, but insert hook from back to front to back around the post. You’ll alternate these with FPdc for the ribbing effect.
sk = skip: Miss a stitch and work into the next one.
st(s) = stitch(es)
rep = repeat
Pattern Notes
Before we begin, a few things to keep in mind.
Working with platform bases: Choose sandals with a slightly textured edge. Smooth plastic makes it harder for the crochet to grip. Foam or fabric-covered platforms work wonderfully.
The stripe sequence appears on both the toe strap and the platform wrap. This creates that cohesive, designer look.
Make two of everything. Sounds obvious, but when you’re deep in a project, it’s easy to forget you need a matching pair!
Assembly happens at the end. You’ll crochet all pieces first, then attach them to your sandal bases.
The Pattern
Platform Side Wrap (Make 2)
This piece wraps around the entire outer edge of your platform sole.
Measure your platform circumference first. Mine measured 22 inches around. Adjust your starting chain if yours differs.
With Color A (Terracotta Rust), ch 89.
Row 1: Sc in 2nd ch from hook and in each ch across. (88 sts)
Row 2: Ch 1, turn. Sc in each st across. (88 sts)
Rows 3-4: Rep Row 2.
Row 5 (Color Change): Switch to Color B (Mustard Gold). Ch 1, turn. Sc in each st across. (88 sts)
Row 6: With Color B, ch 1, turn. Sc in each st across. (88 sts)
Row 7: Switch to Color C (Burgundy Wine). Ch 1, turn. Sc in each st across. (88 sts)
Row 8: Switch to Color D (Cream). Ch 1, turn. Sc in each st across. (88 sts)
Row 9: With Color D, ch 1, turn. Sc in each st across. (88 sts)
Rows 10-11: Switch to Color A. Ch 1, turn. Sc in each st across. (88 sts)
Fasten off, leaving a 12-inch tail for seaming.
Your platform wrap should measure approximately 22 inches long and 2.25 inches tall.
Ribbed Toe Strap (Make 2)
This creates that gorgeous textured band that goes across the top of your foot.
With Color A (Terracotta Rust), ch 14.
Row 1: Dc in 3rd ch from hook (skipped chs count as first dc), dc in each ch across. (13 sts including turning ch)
Row 2: Ch 2 (counts as first dc here and throughout), turn. *FPdc around next st, BPdc around next st.* Rep from * across, ending with dc in top of turning ch. (13 sts)
Row 3: Ch 2, turn. *BPdc around next st, FPdc around next st.* Rep from * across, ending with dc in top of turning ch. (13 sts)
Rows 4-6: Rep Rows 2 and 3, then Row 2 once more.
Row 7 (Color Change): Switch to Color B (Mustard Gold). Rep Row 3. (13 sts)
Rows 8-9: Continue ribbing pattern with Color B.
Row 10: Switch to Color D (Cream). Continue ribbing pattern. (13 sts)
Rows 11-12: Continue with Color D.
Row 13: Switch to Color C (Burgundy Wine). Continue ribbing pattern. (13 sts)
Rows 14-15: Continue with Color C.
Rows 16-20: Switch to Color A. Continue ribbing pattern for 5 rows.
Fasten off, leaving a 15-inch tail.
Your toe strap should measure approximately 3 inches wide and 8 inches long. Don’t worry if it seems slightly narrow. The ribbing stretches when worn.
Toe Strap Edging
This adds a finished look and helps the strap keep its shape.
With Color A and right side facing, join yarn to short edge of toe strap with a sl st.
Round 1: Ch 1, work 3 sc into corner, sc evenly along long edge (approximately 20 sc), 3 sc into corner, sc along short edge (approximately 13 sc), 3 sc into corner, sc along long edge, 3 sc into corner, sc along short edge. Join with sl st to first sc.
Round 2: Ch 1, sc in each st around, working 3 sc into each corner st. Join with sl st.
Fasten off and weave in ends.
Assembly Instructions
Here’s where everything comes together. Take your time with this step.
Step 1: Prepare Your Platform Bases
Wipe down the edges of your sandal platforms with a slightly damp cloth. Let dry completely. This removes any dust or oils that might prevent adhesive from bonding.
Step 2: Attach the Platform Wrap
Apply a thin line of strong craft glue along the outer edge of your platform sole.
Starting at the heel, press the bottom edge of your crocheted platform wrap firmly against the glued edge. Work your way around slowly, keeping the bottom edge aligned with the bottom of the platform.
The stripe pattern should be visible from the side, with terracotta at the top, then mustard, burgundy, cream, and terracotta again at the bottom.
Use clothespins or clips to hold the fabric in place while the glue sets. Let dry for at least 2 hours, preferably overnight.
Seam the short ends of the wrap together at the heel using a whip stitch and your tapestry needle.
Step 3: Secure the Top Edge
Once the bottom is fully set, fold the top edge of the wrap slightly over the top surface of the platform. Apply glue to secure. The crocheted edge should meet the leather footbed but not cover it.
Step 4: Attach the Toe Strap
Position your ribbed toe strap across the front third of the sandal. The strap should curve slightly over the toe area.
Apply glue to the underside of each strap end. Press firmly onto the platform sides, positioning the ends so they tuck just under the footbed edge.
Hold in place with clips until completely dry.
Step 5: Final Touches
Check all edges. Add a small amount of glue to any areas that seem loose. Let everything cure for 24 hours before wearing.
Sizing Adjustments
For smaller sizes (US 5-6): Reduce starting chain for platform wrap to 81 ch. Work toe strap for 18 rows instead of 20.
For larger sizes (US 9-10): Increase starting chain to 97 ch. Work toe strap for 22 rows.
Adjusting height: For a taller platform, add 2-4 more rows to the platform wrap, keeping the stripe sequence proportional.
Tips for Success
Tension consistency is key. Try to maintain even tension throughout. Tight stitches in one area and loose in another will create an uneven finish.
Color changes: Carry your yarn loosely along the edge or cut and rejoin for cleaner color blocks. I prefer cutting and weaving to avoid bulk.
Test your glue first. Apply a small amount to an inconspicuous area of your platform base to make sure it bonds well and doesn’t damage the material.
Blocking optional: You can wet block your pieces before assembly for extra crispness, but cotton holds its shape well without it.
Caring for Your Crochet Sandals
Spot clean only. Use a damp cloth with mild soap to clean dirty areas. Do not submerge in water.
Store flat or stuff with tissue paper to help them hold their shape.
Avoid prolonged sun exposure which can fade the beautiful colors over time.

Final Thoughts on This Crochet Platform Wedge Sandals Pattern
I genuinely believe that making your own footwear is one of the most rewarding crochet projects you can tackle. These Warm Terracotta Rust Crochet Platform Wedge Sandals combine vintage charm with practical wearability. Every time I slip mine on, I feel a little burst of pride knowing I made them myself.
This step by step crochet tutorial takes you from a simple chain all the way to a finished statement piece. Whether you’re an adventurous beginner ready to try something new or an experienced crocheter looking for your next unique project, these sandals deliver.
Thank you so much for choosing this pattern. I truly appreciate you being here, and I’d love nothing more than to see your finished sandals! Tag me on Instagram or share in my Facebook group. Your creations inspire me more than you know.
If you loved this crochet platform wedge sandals pattern, I’d be so grateful if you saved it to your Pinterest boards so you can find it easily when you’re ready to make your pair. And please drop a comment below if you give these sandals a try. I read every single one and would love to hear how yours turn out!
