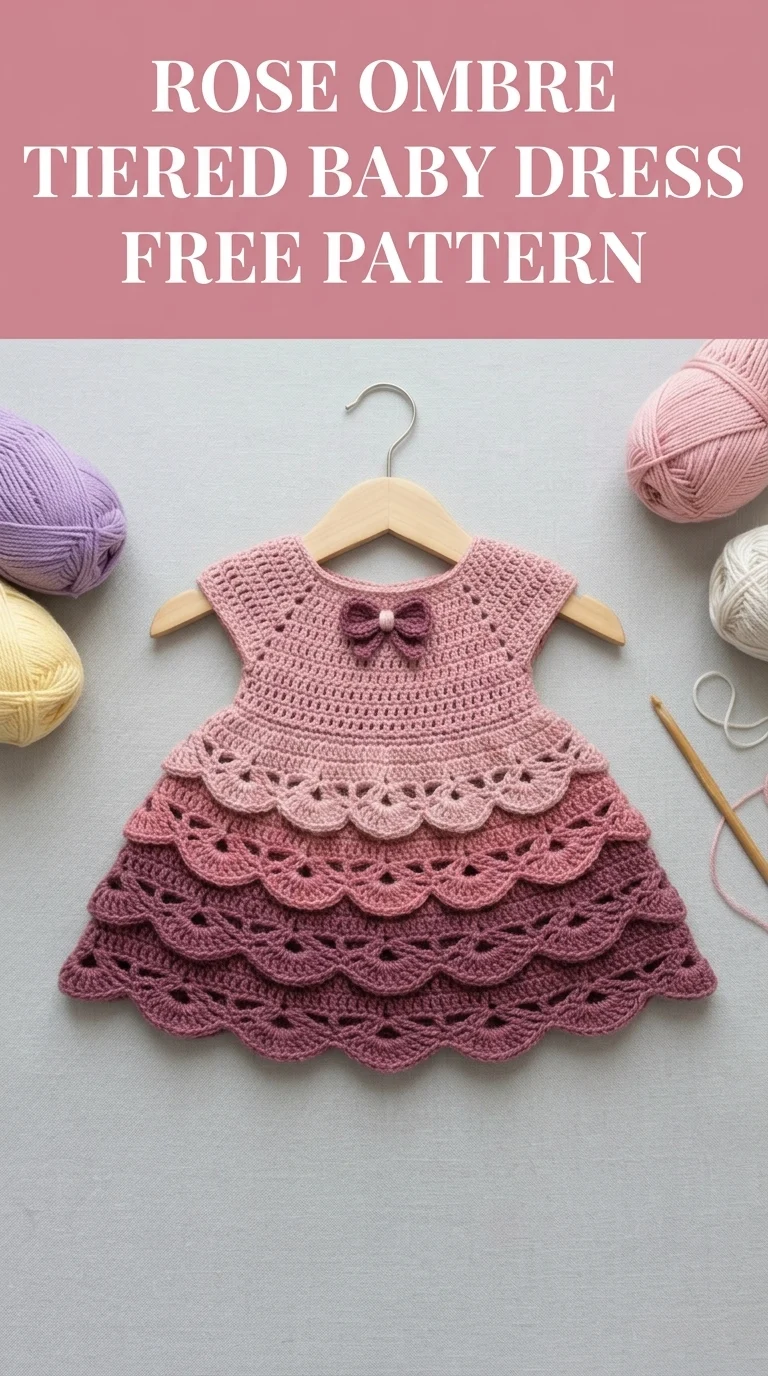
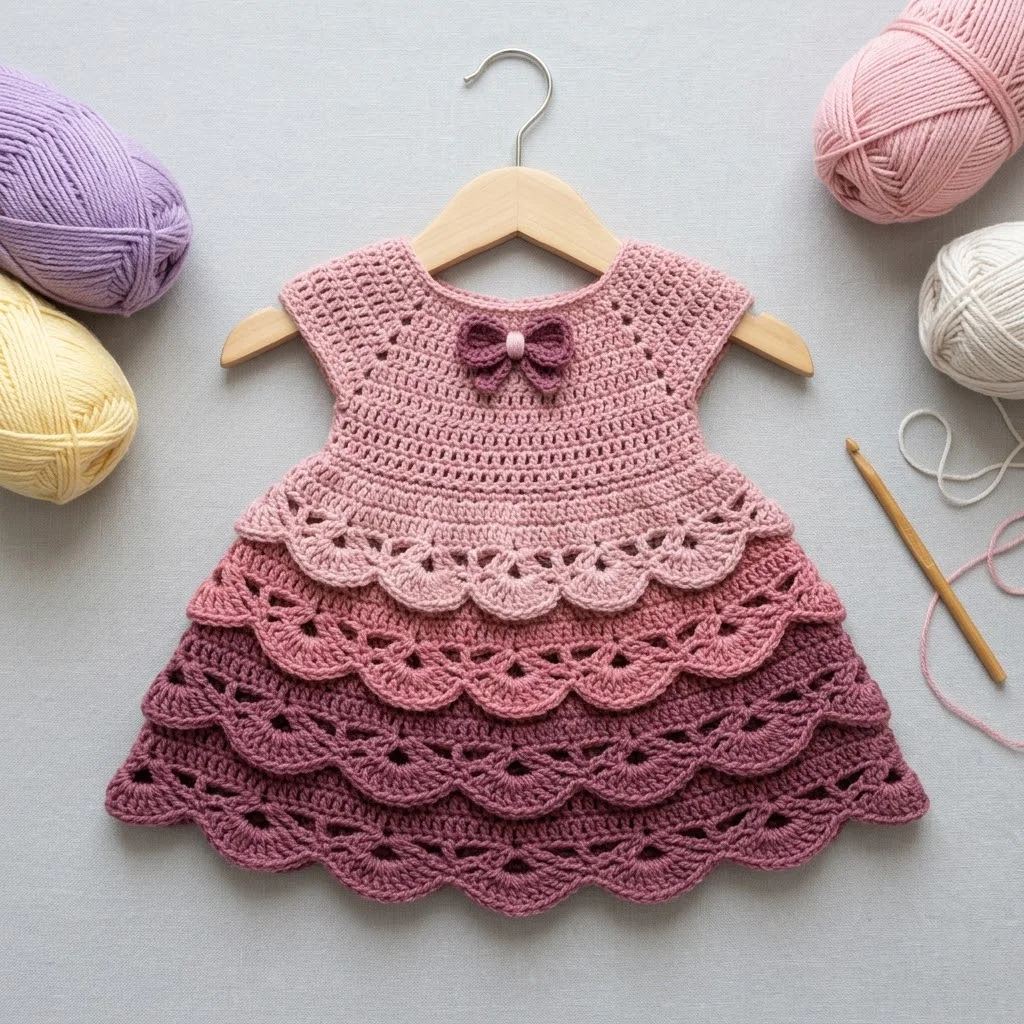
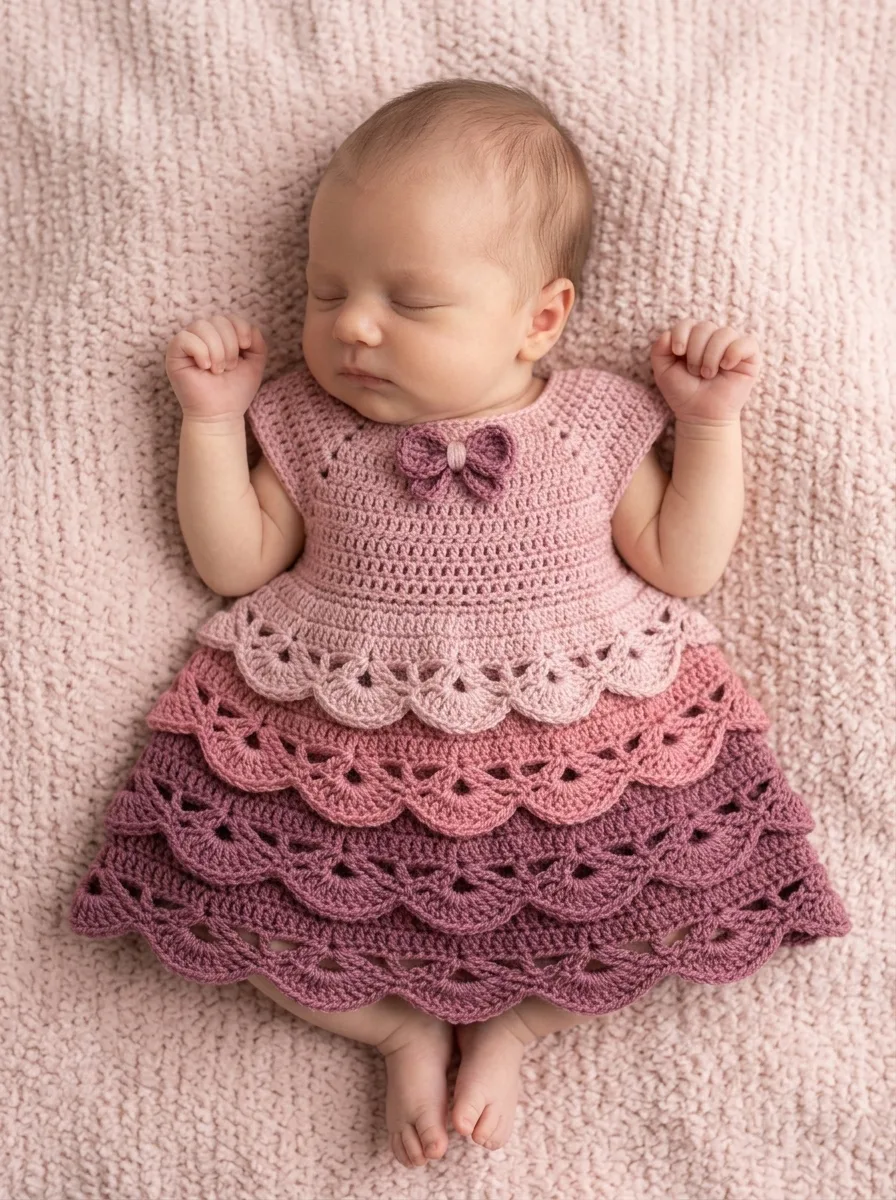
There is something absolutely magical about a little dress that looks like it belongs in a storybook. This Rose Ombre Tiered Baby Dress is exactly that kind of project. The soft gradient from dusty rose to deep mauve creates a vintage feel that photographs beautifully and makes an unforgettable baby shower gift. If you can work basic stitches in the round and follow a simple shell pattern, you can absolutely make this dress. I promise it looks far more complicated than it actually is.
This crochet pattern walks you through every single step to create this stunning tiered baby dress from start to finish. The fitted bodice uses straightforward stitches while the layered skirt features an easy shell stitch that creates all that gorgeous texture. Let me show you exactly how it all comes together.
Why This Baby Dress Pattern Works So Well
The genius of this design is in its construction. You start with the yoke and work your way down, which means minimal seaming at the end. The bodice portion uses simple rows of double crochet (dc) to create that clean, classic look around the chest and shoulders.
The real showstopper is the tiered skirt. Each layer uses a shell stitch pattern that naturally creates scalloped edges. By changing colors as you move down the tiers, you get that beautiful ombre effect without any complicated color work. Each tier is worked separately and attached, giving you those defined layers that make this dress so special.
That sweet little bow at the center front is a quick add-on that takes maybe ten minutes. It pulls the whole look together.
Skill Level
Confident beginner to intermediate. If you have made a basic baby blanket or simple garment before, you are ready for this. The yoke requires working in joined rounds, and the shell stitch takes a little practice to get consistent. But there is nothing here that should intimidate you.
Finished Measurements
Based on the proportions in the image, this pattern is sized for 0 to 6 months.
You can easily adjust sizing by adding or removing rows in the bodice and tiers.
Materials Needed
Yarn:
The yarn in the image appears to be a smooth acrylic or cotton blend with a slight sheen. Something like Paintbox Yarns Cotton DK or Lion Brand 24/7 Cotton would work beautifully and wash well for baby items.
Hook:
Adjust hook size if needed to match gauge.
Notions:
Gauge
18 stitches and 10 rows = 4 inches in double crochet using 4.0 mm hook.
Please check your gauge. A dress that is too tight will not fit over baby’s head, and one that is too loose will look sloppy. Take five minutes to make a swatch. Your future self will thank you.
Abbreviations and Stitch Definitions
Let me define every stitch before we begin so you can reference back as needed.
Special Techniques
Shell Stitch: This creates those beautiful scalloped fans you see on the skirt tiers. To make a shell, you simply work 5 double crochet stitches all into the same stitch. They fan out naturally and create that decorative wave.
Joining Rounds: At the end of each round, you will slip stitch to the top of the starting chain to close the round. This keeps your work connected in a tube rather than a spiral.
Working into Shell Centers: When stacking shells on top of each other in subsequent rounds, you work into the center stitch (the 3rd dc) of the shell below. This centers them nicely.
Step by Step Crochet Pattern
Yoke (Worked Top Down in Joined Rounds)
The yoke creates the neckline, shoulders, and upper bodice. We will start at the neck and increase outward.
Using Color A:
Foundation: Ch 72, being careful not to twist. Sl st to first ch to form a ring. (72 ch)
Round 1: Ch 3 (counts as dc here and throughout), dc in each ch around, sl st to top of ch-3 to join. (72 dc)
Round 2: Ch 3, dc in same st, 2 dc in next st, *dc in next 4 sts, 2 dc in next 2 sts*, repeat from * around, adjusting final stitches to end evenly, sl st to join. (96 dc)
Round 3: Ch 3, dc in each st around, sl st to join. (96 dc)
Round 4: Ch 3, dc in next 3 sts, 2 dc in next st, *dc in next 4 sts, 2 dc in next st*, repeat from * around, sl st to join. (115 dc approximately)
Rounds 5 through 7: Ch 3, dc in each st around, sl st to join. (115 dc)
Place stitch markers at the underarm points. You will be dividing for the bodice here.
Bodice (Worked in Joined Rounds)
Now we separate the sleeves from the body and work the torso portion.
Round 8: Ch 3, dc across front stitches (approximately 38 sts), ch 4, sk sleeve stitches (approximately 20 sts), dc across back stitches (approximately 38 sts), ch 4, sk remaining sleeve stitches, sl st to join.
Round 9: Ch 3, dc in each dc and each ch around, sl st to join. (approximately 84 dc)
Rounds 10 through 14: Ch 3, dc in each st around, sl st to join. (84 dc)
This creates the smooth fitted bodice section you see in the image. The texture is clean and simple, which contrasts beautifully with the fancy skirt.
Fasten off Color A. Weave in ends.
First Skirt Tier (Light Pink Shells)
This tier attaches directly to the bottom of the bodice and creates the first scalloped layer.
Using Color A:
Round 1: Join yarn to any st on bodice bottom edge. Ch 3, 2 dc in same st, sk 2 sts, sc in next st, *sk 2 sts, 5 dc (shell) in next st, sk 2 sts, sc in next st*, repeat from * around, ending with 2 dc in starting st, sl st to first dc to complete final shell. (14 shells approximately)
Rounds 2 through 4: Sl st to center of first shell, ch 3, 2 dc in same st, sc in next sc, *shell in center dc of next shell, sc in next sc*, repeat from * around, ending with 2 dc in starting st, sl st to join. (14 shells)
Fasten off. This tier should measure approximately 2 inches.
Second Skirt Tier (Medium Rose Shells)
This tier is worked slightly larger and attached behind the first tier for that layered effect.
Using Color B:
Attach yarn to the same bodice round where the first tier began, working into the back loops or into the round just above.
Round 1: Ch 3, 2 dc in same st, sk 2 sts, sc in next st, *shell in next st, sk 2 sts, sc in next st*, repeat from * around, sl st to join. (14 shells)
Rounds 2 through 6: Work shell rounds as established, working shell into center of shell below, sc between shells. (14 shells per round)
Fasten off. This tier should extend below the first tier by approximately 1.5 inches.
Third Skirt Tier (Deep Mauve Shells)
The final tier creates the longest layer and that gorgeous deep hem.
Using Color C:
Attach yarn to the round above where the second tier began.
Round 1: Work shell pattern as established. (14 shells)
Rounds 2 through 8: Continue shell pattern, maintaining 14 shells per round.
Final Round: Work one round of shells, then work a finishing edge: *sc in center of shell, ch 2, sc in same st, sc in sc*, repeat around for a delicate picot edge.
Fasten off and weave in all ends.
Crocheted Bow
This adorable accent finishes the dress perfectly.
Using Color C:
Ch 12.
Row 1: Dc in 4th ch from hook, dc in each ch across. (10 dc)
Rows 2 through 6: Ch 3, turn, dc in each st across. (10 dc)
Fasten off leaving a long tail.
Fold the rectangle in half lengthwise and pinch the center. Wrap yarn tightly around the center several times to create the bow shape. Secure with yarn needle.
Attach bow to center front of bodice at the yoke-to-bodice transition line.
Finishing
Weave in all ends carefully on the wrong side. For baby garments, I like to weave ends through several inches of stitches so nothing works loose during washing.
Block gently by laying flat on a towel and steaming lightly or spritzing with water. Do not stretch the shell tiers too much as they look best with natural drape.
Add a button closure at the back neck if desired. Crochet a small chain loop on one side of the back opening and sew a button opposite.
Tips for Success with This Baby Dress Pattern
Yarn choice matters. Cotton or cotton blends hold the shell stitch definition beautifully and wash well. Pure acrylic works but may pill over time. Avoid anything too fuzzy as it will obscure the stitch pattern.
Count your shells. If you suddenly have 15 shells when you should have 14, you missed a skip somewhere. Better to fix it immediately than discover it three rounds later.
The tiers look uneven at first. Do not panic. Once you attach all three and the dress hangs naturally, the layers settle beautifully. Trust the process.
Make a gauge swatch in shells too. Your double crochet gauge and your shell gauge can differ. A quick shell swatch helps you predict how the skirt will look.
Customization Ideas
Want to make this dress your own? Here are some easy variations:
Caring for the Finished Dress
Hand washing is safest, but machine washing on gentle with cold water works for most cotton and acrylic yarns. Lay flat to dry to prevent stretching. Steam lightly to refresh the shell stitches if they flatten.
You Did It
Making a garment this beautiful takes patience and attention, and you should be incredibly proud of yourself for completing it. This Rose Ombre Tiered Baby Dress is the kind of handmade treasure that families keep for generations. Thank you so much for trusting me to guide you through this project. I would absolutely love to see your finished dress, so please tag me on Instagram or share a photo on Facebook. Seeing your creations makes my whole day.
If this pattern made you smile or sparked some ideas, go ahead and pin it to your Pinterest boards so you can find it easily when the next baby shower invitation arrives. And if you make this sweet little dress, drop a comment below to let me know how it turned out. I read every single one and genuinely love hearing from you.
