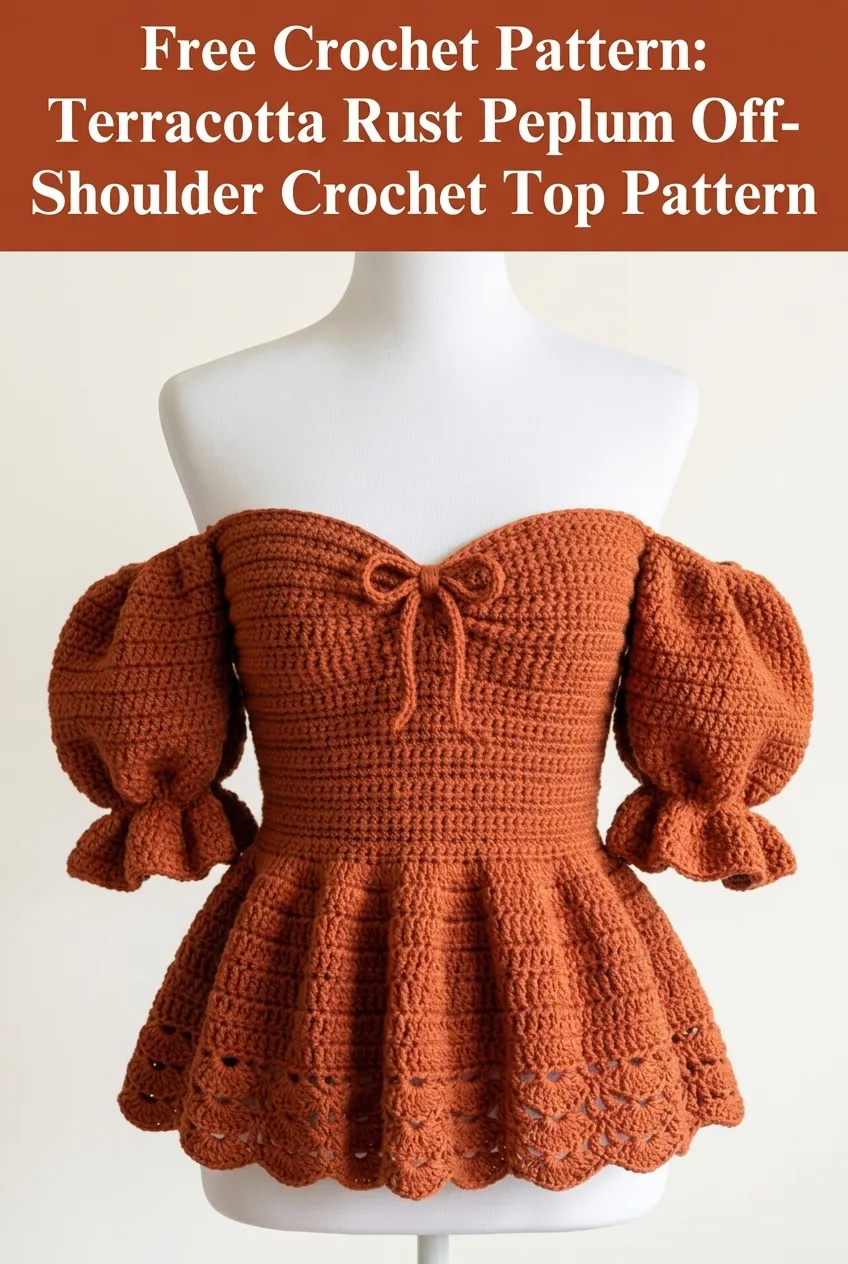
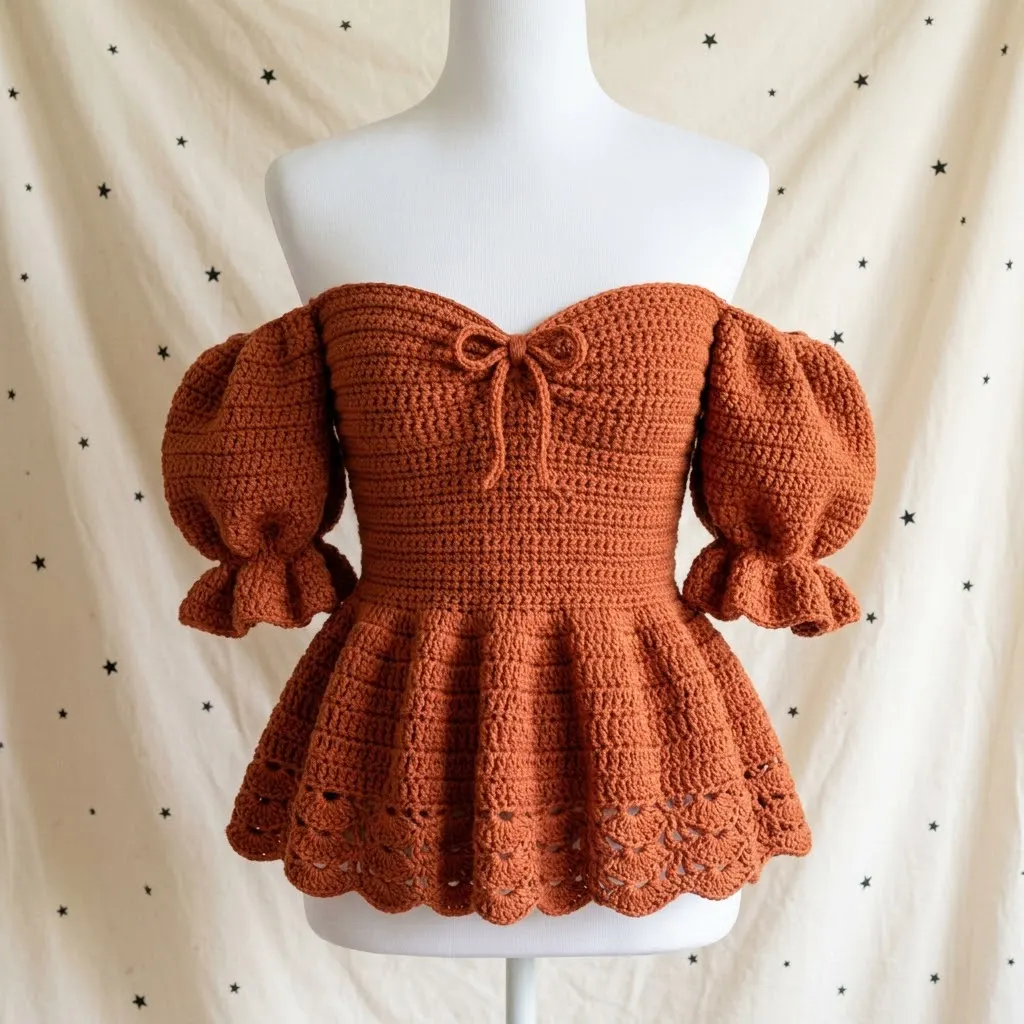
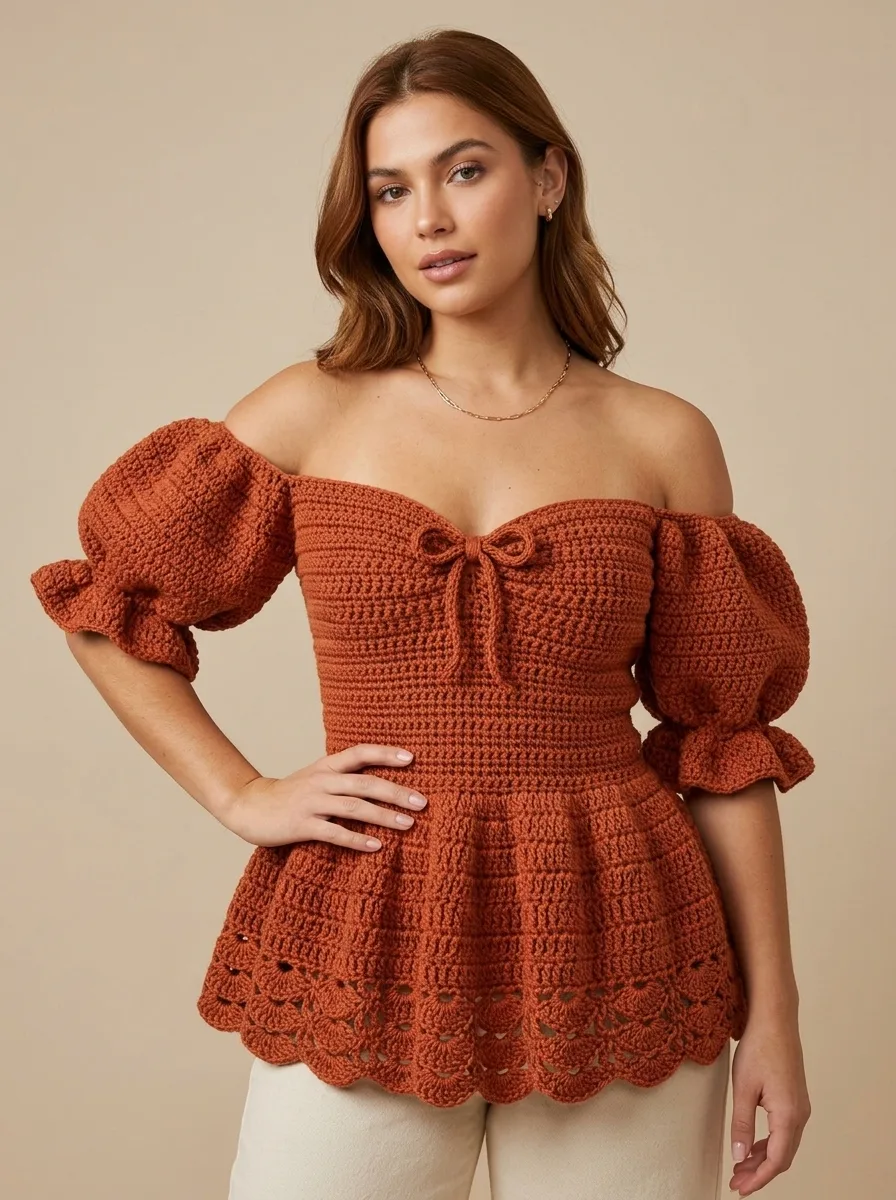
Let me guess. You took one look at this off-shoulder peplum top and thought, "That’s gorgeous, but there’s no way I can make that." I get it. The dramatic puff sleeves, the sweetheart neckline, the flirty peplum skirt with that delicate scalloped edge. It looks like something you’d find in a boutique, not something you’d crochet yourself at home.
But here’s the truth. This top is far more approachable than it appears. If you can work single crochet and double crochet, you already have the foundation you need. The magic isn’t in complicated stitches. It’s in how the pieces come together. I’m going to walk you through every single step, breaking down each section so you can tackle this confidently, whether you’ve been crocheting for years or you’re ready to push past basic scarves and blankets.
This terracotta rust peplum off-shoulder crochet top pattern is all about construction strategy. We’ll work the bodice, sleeves, and peplum as separate pieces, then join them seamlessly. By the end, you’ll have a stunning wearable that looks like it took professional skills but really just took patience and this tutorial.
Why This Crochet Top Pattern Works
This design hits the sweet spot between trendy and timeless. The off-shoulder silhouette is universally flattering, and that peplum detail adds movement and femininity without overwhelming your frame. The warm terracotta rust color works beautifully across seasons, pairing with high-waisted jeans in fall or a flowy maxi skirt in summer.
What I love most about this crochet tutorial is how modular it is. You’re not committing to one giant piece that could go wrong anywhere along the way. Instead, you’re building small, manageable components. That means if something doesn’t look right, you can fix just that section without frogging hours of work.
Materials Needed
Yarn:
Hook:
Notions:
Gauge:
Skill Level
Intermediate
This pattern requires comfort with basic stitches, working in rows and rounds, increasing and decreasing, and seaming pieces together. If you’ve made a basic garment before, you’re ready. If this is your first wearable, don’t worry. Just take it section by section.
Abbreviations and Stitch Definitions
Before we dive in, let’s get familiar with every stitch you’ll need. I’ll explain each one in plain English so nothing catches you off guard.
Ch = Chain. Wrap yarn over hook, pull through loop. This creates your foundation.
Sl st = Slip stitch. Insert hook, yarn over, pull through both loops at once. Used for joining and invisible movement.
Sc = Single crochet. Insert hook, yarn over, pull up a loop (2 loops on hook), yarn over, pull through both loops. This creates a short, dense stitch.
Hdc = Half double crochet. Yarn over, insert hook, yarn over, pull up a loop (3 loops on hook), yarn over, pull through all 3 loops. Slightly taller than single crochet.
Dc = Double crochet. Yarn over, insert hook, yarn over, pull up a loop, yarn over, pull through 2 loops, yarn over, pull through remaining 2 loops. A tall, versatile stitch.
Inc = Increase. Work 2 stitches into the same stitch.
Dec = Decrease. Work 2 stitches together as one. For sc, insert hook into first stitch, pull up loop, insert into next stitch, pull up loop (3 loops on hook), yarn over, pull through all 3.
BLO = Back loop only. Work into only the back loop of the stitch, creating a ribbed texture.
Sk = Skip. Miss the indicated stitch.
Size and Measurements
This pattern is written for a size Small with a finished bust measurement of approximately 32 to 34 inches. The bodice length is about 10 inches from underarm to waist. The peplum adds another 6 to 7 inches below the waist.
To adjust sizing:
The Bodice
The bodice is worked flat in rows, then seamed at the back. The sweetheart neckline is created through strategic decreases at the center front.
Foundation and Lower Bodice
Row 1: Ch 113 (or adjust to fit your waist measurement plus 1 inch for ease). Sc in 2nd ch from hook and in each ch across. Turn. (112 sc)
Rows 2 to 4: Ch 1, sc in BLO across. Turn. (112 sc)
This back loop only technique creates the subtle horizontal ribbing you see in the finished piece. It gives the fabric structure and a clean, modern look.
Rows 5 to 20: Ch 1, sc in each st across. Turn. (112 sc)
At this point, your bodice should measure approximately 5 inches tall.
Shaping the Sweetheart Neckline
Now we’ll split the work to create the curved sweetheart shape.
Row 21 (Right Front): Ch 1, sc in first 28 sts. Turn, leaving remaining sts unworked. (28 sc)
Row 22: Ch 1, sc2tog, sc to end. Turn. (27 sc)
Rows 23 to 28: Repeat Row 22, decreasing 1 st at neckline edge each row. (21 sc after Row 28)
Rows 29 to 32: Ch 1, sc across. Turn. (21 sc)
Fasten off.
Row 21 (Left Front): Skip center 56 sts. Join yarn in next st. Ch 1, sc in same st and in remaining 27 sts. Turn. (28 sc)
Row 22: Ch 1, sc to last 2 sts, sc2tog. Turn. (27 sc)
Rows 23 to 28: Repeat Row 22, decreasing at neckline edge. (21 sc after Row 28)
Rows 29 to 32: Ch 1, sc across. Turn. (21 sc)
Fasten off.
Center Bow Tie
Ch 80. Sl st in 2nd ch from hook and in each ch across. Fasten off, leaving a long tail.
This creates the simple tie that gathers the sweetheart neckline. Thread it through the center front and tie in a bow.
The Puff Sleeves
These dramatic balloon sleeves are what make this crochet top pattern truly special. They’re worked in the round from the shoulder down, with increases creating the puffed shape and decreases at the cuff for a gathered finish.
Sleeve Body (Make 2)
Round 1: Ch 48, sl st to first ch to form a ring, being careful not to twist. Ch 1, sc in each ch around. Sl st to first sc to join. (48 sc)
Rounds 2 to 4: Ch 1, sc in each st around. Sl st to join. (48 sc)
Round 5: Ch 1, *sc in next 5 sts, 2 sc in next st*, repeat around. Sl st to join. (56 sc)
Rounds 6 to 8: Ch 1, sc in each st around. Sl st to join. (56 sc)
Round 9: Ch 1, *sc in next 6 sts, 2 sc in next st*, repeat around. Sl st to join. (64 sc)
Rounds 10 to 14: Ch 1, sc in each st around. Sl st to join. (64 sc)
This is the widest point of your puff sleeve. Now we’ll decrease to create the gathered cuff.
Round 15: Ch 1, *sc in next 6 sts, sc2tog*, repeat around. Sl st to join. (56 sc)
Round 16: Ch 1, *sc in next 5 sts, sc2tog*, repeat around. Sl st to join. (48 sc)
Round 17: Ch 1, *sc in next 4 sts, sc2tog*, repeat around. Sl st to join. (40 sc)
Round 18: Ch 1, *sc in next 3 sts, sc2tog*, repeat around. Sl st to join. (32 sc)
Ruffle Cuff
Round 19: Ch 3 (counts as dc), dc in same st, 2 dc in each st around. Sl st to top of ch-3. (64 dc)
Round 20: Ch 3, dc in each st around. Sl st to join. (64 dc)
Round 21: Ch 1, sc in each st around. Sl st to join. (64 sc)
Fasten off, weave in ends.
The Peplum Skirt
The peplum features beautiful scalloped lace edging that adds romantic detail to the finished top. It’s worked from the waist down.
Waistband
Row 1: Ch 113 (or match your bodice foundation chain). Sc in 2nd ch from hook and each ch across. Turn. (112 sc)
Rows 2 to 4: Ch 1, sc in BLO across. Turn. (112 sc)
Peplum Body
Row 5: Ch 1, *sc in next 3 sts, 2 sc in next st*, repeat across. Turn. (140 sc)
Rows 6 to 8: Ch 1, sc in each st across. Turn. (140 sc)
Row 9: Ch 1, *sc in next 4 sts, 2 sc in next st*, repeat across. Turn. (168 sc)
Rows 10 to 14: Ch 1, sc in each st across. Turn. (168 sc)
Row 15: Ch 1, *sc in next 5 sts, 2 sc in next st*, repeat across. Turn. (196 sc)
Rows 16 to 20: Ch 1, sc in each st across. Turn. (196 sc)
Scalloped Lace Border
This decorative edge gives the peplum its feminine finish.
Row 21: Ch 1, sc in first st, *sk 2 sts, 5 dc in next st (shell made), sk 2 sts, sc in next st*, repeat across. Turn.
Row 22: Ch 3, 2 dc in first sc, *sc in center dc of shell, 5 dc in next sc*, repeat across, ending with 3 dc in last sc. Turn.
Row 23: Ch 1, sc in first dc, *5 dc in next sc, sc in center dc of shell*, repeat across.
Fasten off, weave in ends.
Assembly Instructions
Now comes the satisfying part. Putting all your pieces together.
1. Seam the bodice: With right sides together, use a tapestry needle and yarn to whip stitch or mattress stitch the back seam of the bodice closed.
2. Attach the peplum: Align the waistband of the peplum with the bottom edge of the bodice. Pin in place, matching side seams. Whip stitch together along the back loop only for a clean finish.
3. Attach the sleeves: Position each sleeve at the armhole opening of the bodice. The sleeve should sit just off the shoulder for the off-shoulder effect. Pin generously, then stitch in place using a mattress stitch for invisible seaming.
4. Thread the bow tie: Weave the chain tie through the center front of the sweetheart neckline, going in and out through the fabric. Tie in a bow at center front.
5. Block if desired: Lay flat on a blocking mat, pin to measurements, and mist with water. Allow to dry completely.
Styling Tips for Your Finished Top
This crochet peplum top pairs beautifully with high-waisted bottoms. Think vintage-inspired denim, a midi skirt, or wide-leg trousers. The off-shoulder neckline begs for statement earrings, so have fun with your accessories.
For layering in cooler weather, try a fitted turtleneck underneath. The sleeves still puff beautifully over a thin base layer, and you extend the wearability of your handmade piece into fall and early spring.
Troubleshooting Common Issues
Sleeves too tight at top? Add extra chains to your foundation round in increments of 4.
Peplum not flaring enough? Add an extra increase row between Rows 9 and 15.
Bodice riding up? Make sure your gauge matches. A tighter gauge will shrink the overall dimensions.
Scallops looking uneven? Block aggressively. Pinning each scallop point while wet makes a dramatic difference.
Final Thoughts on This Step by Step Crochet Pattern
You did it. Or you’re about to. Either way, I hope this terracotta rust peplum off-shoulder crochet top pattern has shown you that gorgeous, boutique-worthy garments are absolutely within your reach. The construction is logical, the stitches are familiar, and the result is something you’ll wear again and again.
This is the kind of project that reminds me why I fell in love with crochet in the first place. Taking simple yarn and a hook and creating something that makes you feel beautiful? That never gets old.
Thank you so much for choosing this pattern. I truly appreciate you trusting me to guide you through this project. If you make this top, I would absolutely love to see it. Tag me on Instagram or share it in my Facebook group. Seeing your creations is honestly the best part of my day.
If this pattern inspired you or you want to save it for your next project, go ahead and pin it to your favorite Pinterest board. And please, drop a comment below if you give it a try. I’d love to hear how it turned out and cheer you on!
