
THIS is the dress you have been waiting to make. I am not exaggerating when I say this Sunset Coral Tiered Lace Dress is one of the most stunning garment projects I have ever put together. Yes, it takes time. Yes, it requires focus. But the payoff? Absolutely incredible.
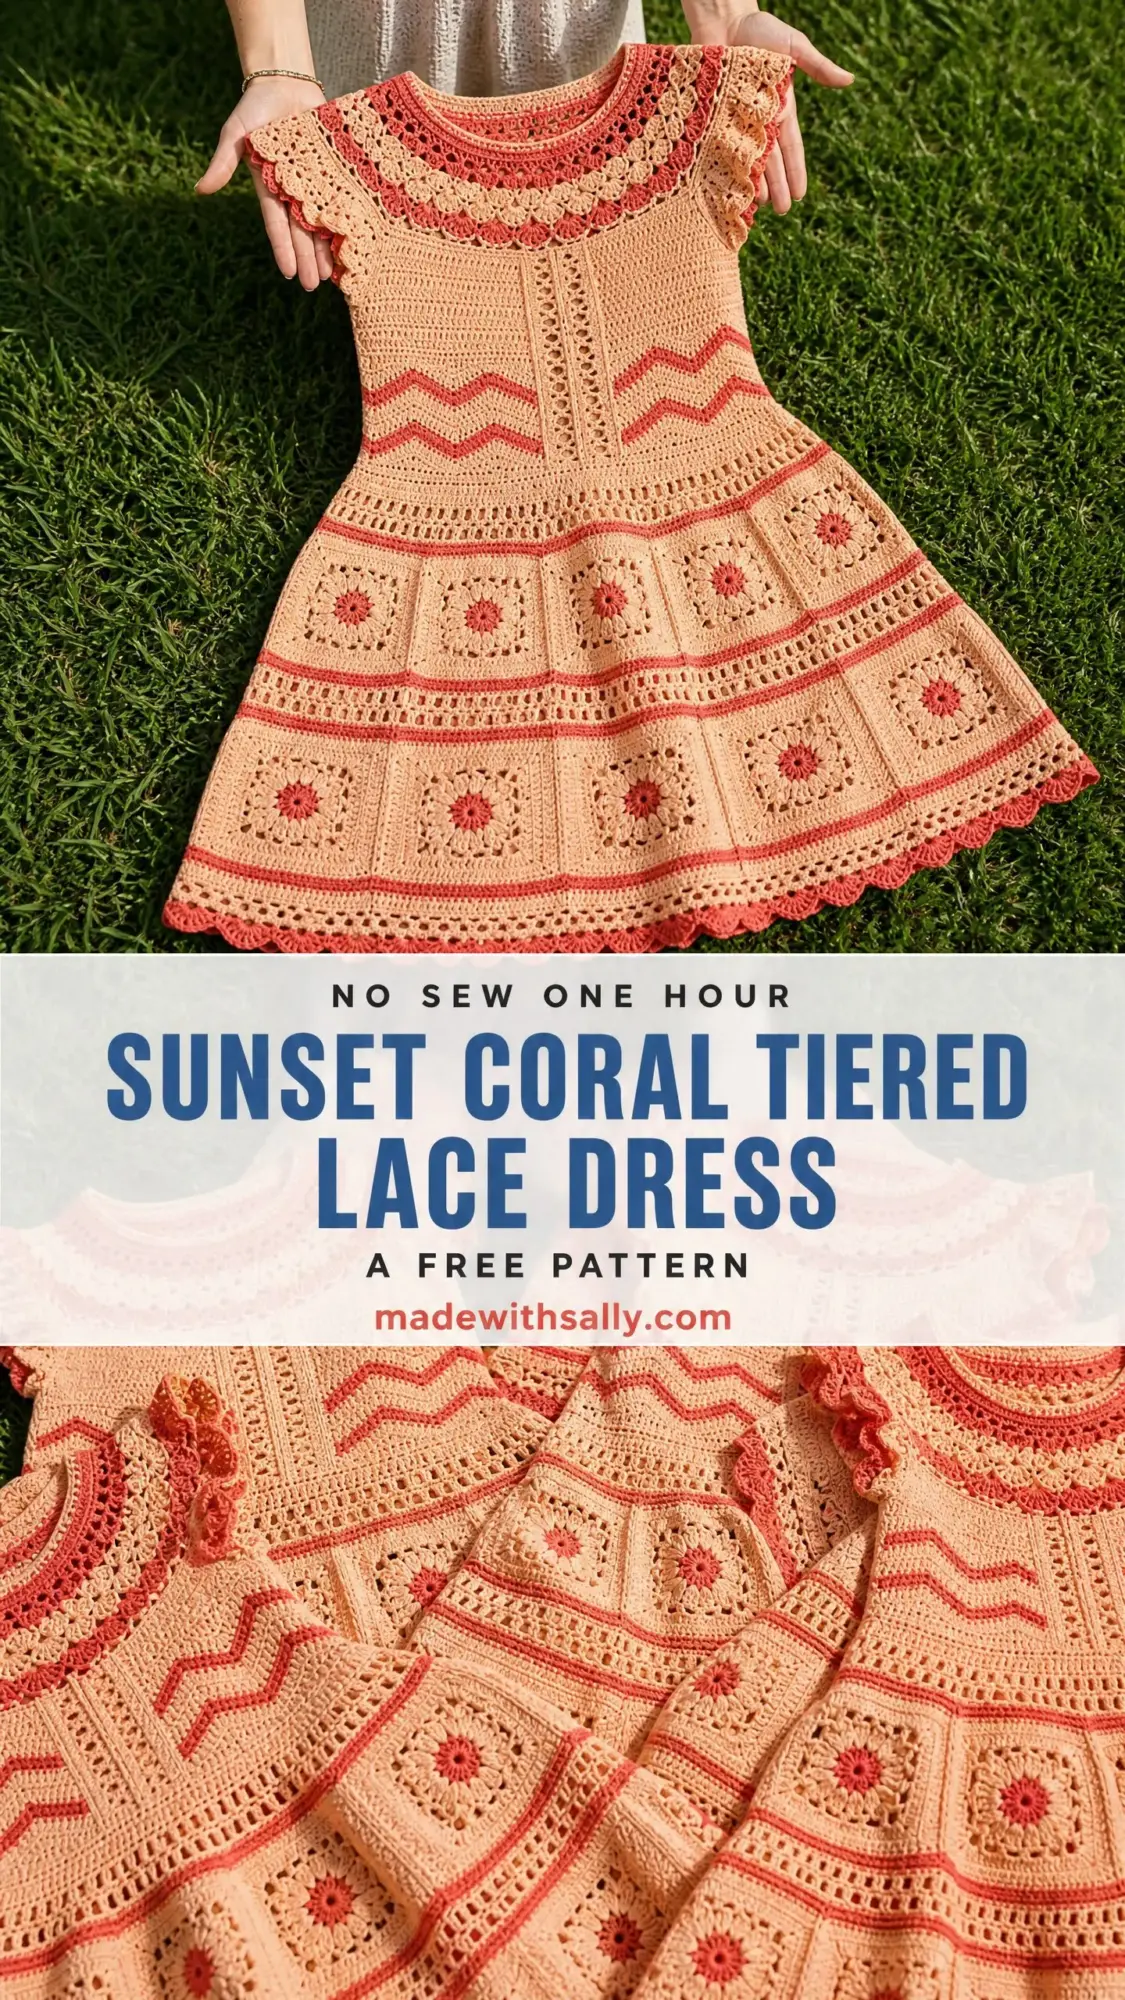
If you have been dreaming of crocheting a wearable showstopper that looks like it belongs in a boutique window, this is your moment. The combination of delicate lacework, cheerful granny squares, and that perfect fit-and-flare silhouette creates something truly special. You will get compliments every single time you wear it.
Whether you are making this for a summer wedding, a beach vacation, or just because you deserve something beautiful, this crochet pattern delivers. Let me walk you through everything you need to bring this gorgeous dress to life.
Why This Tiered Lace Dress Pattern Is Worth Your Time
I will be honest with you. This is not a weekend project. We are looking at approximately 80 to 110 hours of work depending on your size and experience level. But here is the thing. Every single stitch builds toward something breathtaking.
The construction is smart and satisfying. You work from the top down, starting at the neckline and flowing all the way to that gorgeous scalloped hem. No fussy seaming for the main body. The granny squares get made separately and joined, which means you can take them anywhere and work on them while watching your favorite show.
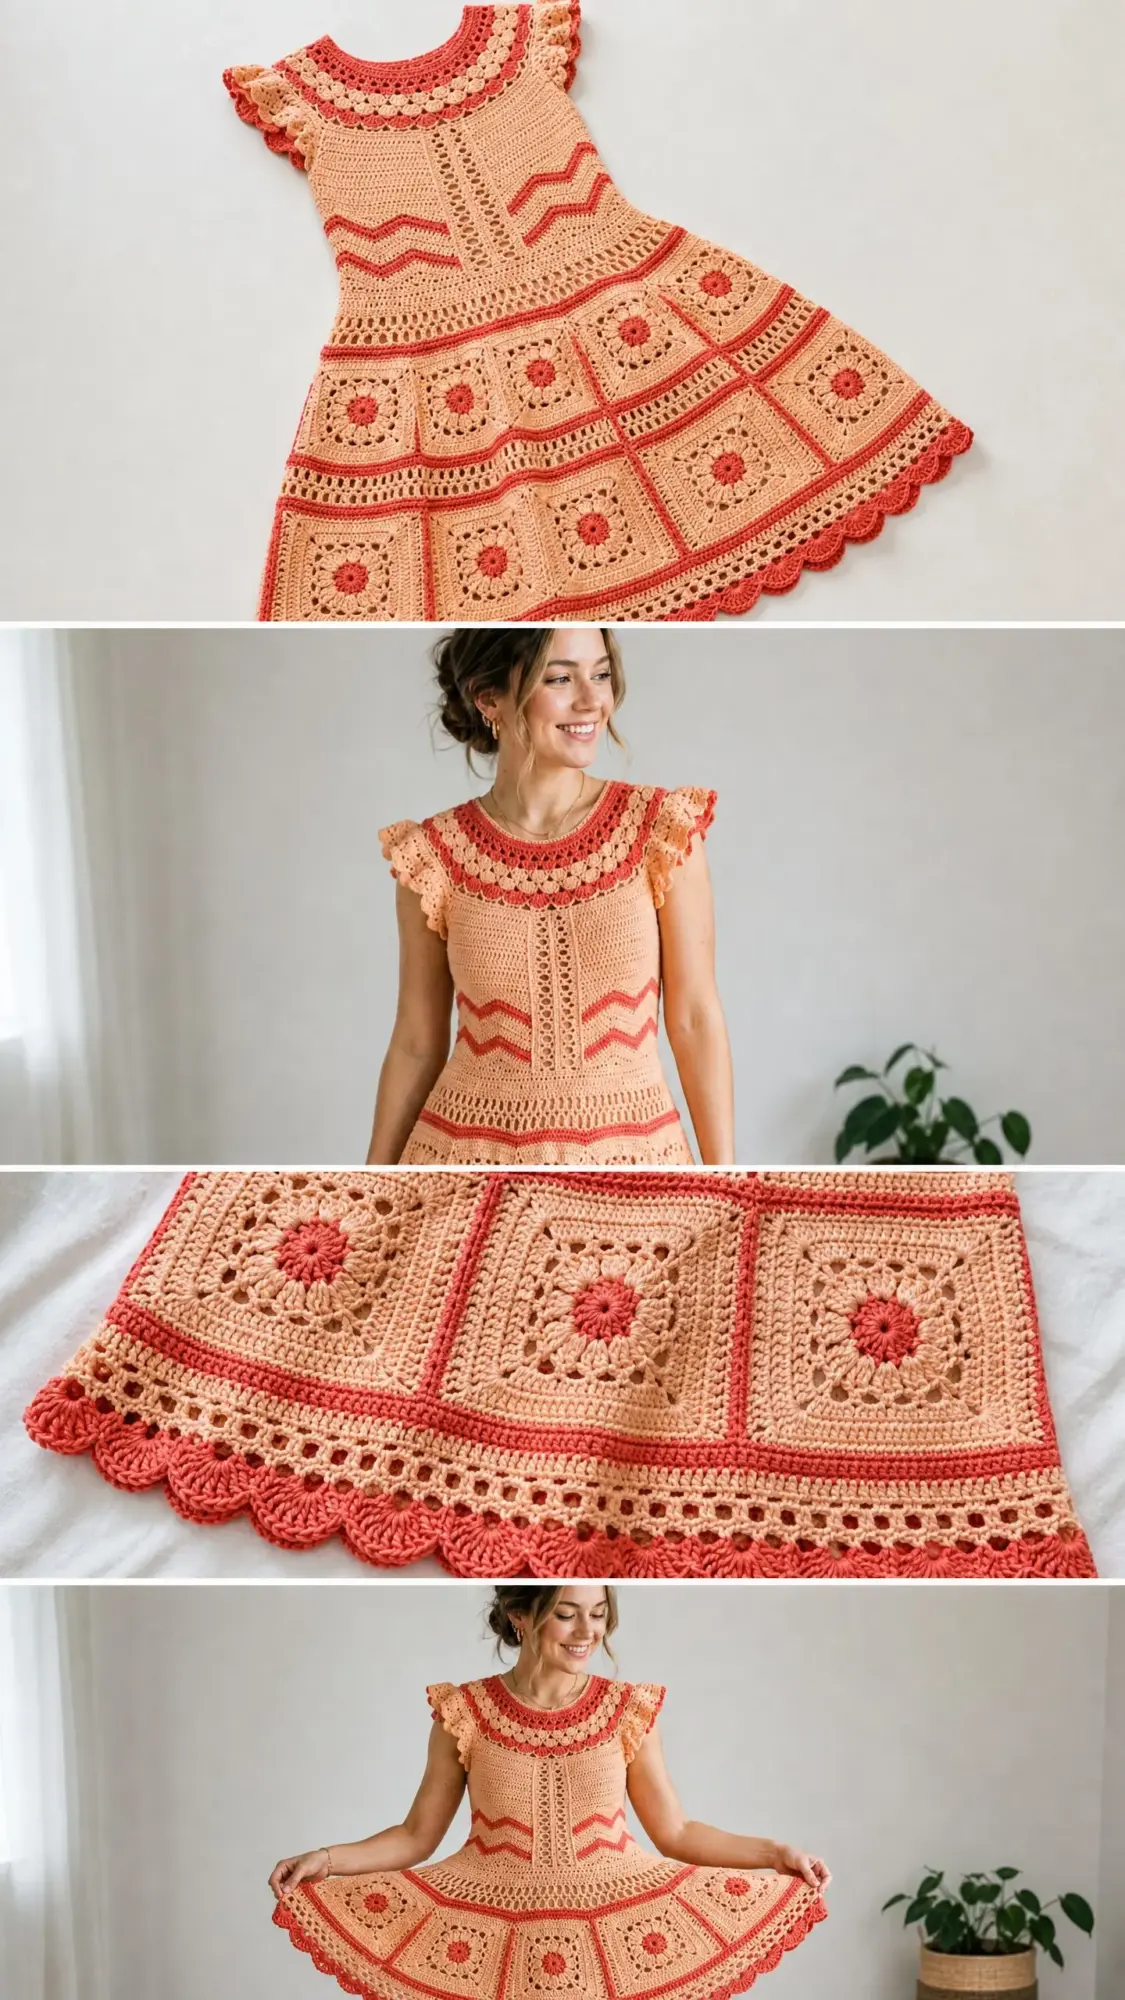
The color palette of peach and coral creates this warm, sunset glow that flatters so many skin tones. And that tiered skirt with its chevron stripes and granny square panels? Pure visual magic.
Skill Level and What You Need to Know
This pattern is rated Advanced Intermediate. Before you start, make sure you are comfortable with these techniques:
If you have made a few garments before and feel confident with lace patterns, you are ready for this challenge. If some of those techniques feel new, consider practicing them on a smaller project first. There is no rush.
Finished Measurements
The pattern includes three sizes. Throughout the instructions, sizes appear as Small (Medium, Large).
Bust: 34 (36, 38) inches or 86.5 (91.5, 96.5) cm
Waist: 27 (29, 31) inches or 68.5 (73.5, 78.5) cm
Hip at widest skirt point: 50 (54, 58) inches or 127 (137, 147) cm
Total length from shoulder to hem: approximately 36 (37, 38) inches or 91.5 (94, 96.5) cm
Yoke depth: 7 inches or 18 cm
Bodice length from underarm to waist: 6 inches or 15 cm
Skirt length from waist to hem: approximately 23 (24, 25) inches or 58.5 (61, 63.5) cm
Materials You Will Need
Yarn
You will need DK weight yarn (also called light weight or category 3) in cotton or a cotton blend. Here is your yardage breakdown:
Main Color (MC) in Peach: 1,200 (1,350, 1,500) yards or 1,097 (1,234, 1,372) meters
Contrast Color (CC) in Coral: 450 (500, 560) yards or 411 (457, 512) meters
Recommended Yarn Options
Option 1: Paintbox Yarns Simply DK in "Peach Orange" for MC and "Pillar Box Red" for CC. This 100 percent cotton yarn has excellent stitch definition and is machine washable. At 137 yards per 50g skein, purchase 9 (10, 11) skeins of MC and 4 (4, 5) skeins of CC.
Option 2: Lion Brand 24/7 Cotton in "Peach" for MC and "Tangerine" for CC. This mercerized cotton has a smooth hand and excellent drape. At 186 yards per 100g skein, purchase 7 (8, 9) skeins of MC and 3 (3, 4) skeins of CC.
Option 3: Drops Safran in color 07 (apricot) for MC and color 09 (orange) for CC. This fine cotton has a slight sheen perfect for delicate lace patterns. At 160 yards per 50g skein, purchase 8 (9, 10) skeins of MC and 3 (4, 4) skeins of CC.
When substituting yarn, avoid anything with too much stretch or fuzziness. Lace patterns need clean stitch definition to really shine.
Hooks
US Size E-4 / 3.5 mm for the yoke and bodice
US Size F-5 / 3.75 mm for the skirt sections
Using a slightly larger hook for the skirt allows gentle drape without distorting the motifs. This is intentional and important.
Notions
Gauge
Getting gauge right is critical for fit. Please swatch before starting.
Single crochet gauge with E-4 / 3.5 mm hook and MC:
22 stitches and 24 rows equals 4 inches / 10 cm, blocked
Lace pattern gauge with E-4 / 3.5 mm hook and MC:
One 6-stitch repeat (1 shell plus 2 chain spaces) equals approximately 1.25 inches / 3.2 cm wide
Granny square gauge with F-5 / 3.75 mm hook:
One finished granny square equals 4 inches by 4 inches / 10 cm by 10 cm, blocked
If your gauge is off, adjust your hook size. Too many stitches per inch means you need a larger hook. Too few stitches means you need a smaller hook.
Abbreviations Used in This Crochet Pattern
Let me define every abbreviation before we dive into the instructions. If you are newer to reading patterns, bookmark this section.
beg = beginning
BLO = back loop only (inserting your hook through just the back loop of a stitch instead of both loops)
CC = contrast color (coral in this pattern)
ch = chain (yarn over, pull through loop on hook)
ch-sp = chain space (the gap created by a chain in the previous row)
dc = double crochet (yarn over, insert hook, yarn over and pull up a loop, yarn over and pull through 2 loops, yarn over and pull through remaining 2 loops)
dc2tog = double crochet two together, a decrease that combines 2 stitches into 1
FLO = front loop only
hdc = half double crochet
inc = increase
MC = main color (peach in this pattern)
PM = place marker
rep = repeat
rnd = round
RS = right side (the outside of your finished piece)
sc = single crochet (insert hook, yarn over and pull up a loop, yarn over and pull through both loops)
sc2tog = single crochet two together, a decrease
sk = skip
sl st = slip stitch (insert hook, yarn over and pull through both the stitch and the loop on your hook)
sm = slip marker (move your marker from the old stitch to the new one)
sp = space
st(s) = stitch(es)
tr = treble crochet
WS = wrong side
yo = yarn over
Special Stitches and Techniques
Shell Stitch
Work 5 double crochet stitches all into the same stitch or chain space. This forms one decorative shell unit. Complete all 5 dc before moving to the next instruction.
Picot
Chain 3, then slip stitch into the first chain of that chain-3. This creates a small decorative loop used at the hem edging.
Granny Square (Worked in 3 Rounds)
Round 1 (CC): Make a magic ring. Chain 3 (this counts as your first dc). Work 2 dc into the ring. Chain 2. Work (3 dc into ring, ch 2) three more times. Slip stitch to the top of the beginning chain-3 to join. You now have four clusters of 3 dc and four chain-2 corner spaces.
Round 2 (MC): Slip stitch into the next 2 dc and into the chain-2 corner space. Chain 3 (counts as dc). Work 2 dc, ch 2, 3 dc all into the same corner space. Chain 1. Work (3 dc, ch 2, 3 dc into next corner sp, ch 1) three times. Slip stitch to the top of the beginning chain-3. You now have eight clusters of 3 dc, four chain-2 corners, and four chain-1 side spaces.
Round 3 (MC): Slip stitch into the next 2 dc and into the corner space. Chain 3. Work 2 dc, ch 2, 3 dc into the same corner space. Chain 1. Work 3 dc into the chain-1 side space. Chain 1. Work (3 dc, ch 2, 3 dc into next corner sp, ch 1, 3 dc into next side sp, ch 1) three times. Slip stitch to the top of the beginning chain-3. Fasten off and leave a 12-inch tail for joining. Your finished square has twelve clusters of 3 dc, four chain-2 corners, and eight chain-1 side spaces.
After blocking, each square measures 4 inches by 4 inches.
V-Stitch
Work (dc, ch 2, dc) all into the same stitch or space. This creates a V-shaped unit used in lace sections.
Chevron Unit
This creates the zigzag stripe pattern. One full chevron repeat uses 12 stitches. Work 5 dc for the peak, dc2tog twice for the valley dip, then 5 dc for the next peak. The valleys form where you decrease, and the peaks form where you work into the center stitch of the previous peak.
Scallop Edge
Work (sl st into next st, ch 3, 4 dc into same st, sl st into next st) repeated across. Each scallop uses 2 stitches from your foundation round.
Join-As-You-Go for Granny Squares
When working the last round of a new square, replace the ch 2 at each corner with: ch 1, sl st into the corresponding corner ch-2 sp of the adjacent finished square, ch 1. Replace the ch 1 at side spaces with a sl st into the corresponding side ch-1 sp of the adjacent square. This joins squares flat without needing a separate seaming step.
Pattern Notes Before You Begin
This dress is constructed top-down in the round. You start at the neckline, work through the yoke with raglan-style shaping, separate the sleeves, continue through the fitted bodice, shape the waist, then build the tiered skirt.
The back neckline has a small keyhole opening for easy on and off. You create this by working back and forth in rows for the first 4 rows at center back, then joining to work in the round.
When changing colors, carry the unused yarn loosely along the wrong side for no more than 4 stitches. For longer gaps, fasten off and rejoin.
All rounds are worked with the right side facing unless noted otherwise.
Place stitch markers at the four raglan increase points in the yoke. Move them up each round.
All chain-3 at the beginning of dc rounds counts as 1 dc throughout.
Do not turn at the end of rounds unless specifically instructed.
Step-by-Step Instructions
Neckline and Yoke Setup
With your E-4 / 3.5 mm hook and MC, leaving a 12-inch tail, chain 85 (97, 109). Being careful not to twist, slip stitch to the first chain to form a ring. Keep the join at center back. You now have 84 (96, 108) working stitches.
Creating the Keyhole Back Opening
Before working in the round, you will create a small split at center back for the button closure. Mark the center 18 (21, 24) back stitches with locking markers.
Flat Row 1 (RS): Join MC at the right edge of the marked back section. Chain 1, single crochet across the 18 (21, 24) back stitches. Turn. (18, 21, 24 sc)
Flat Row 2 (WS): Chain 1, sc across. Turn. (18, 21, 24 sc)
Flat Row 3 (RS): Chain 1, sc across. Turn. (18, 21, 24 sc)
Flat Row 4 (WS): Chain 1, sc across. Do not turn.
After Row 4, your keyhole gap is approximately 0.75 inches tall. Now slip stitch to the first stitch of the right sleeve section to begin working in the round. Place 4 stitch markers at the 4 raglan boundary points.
Yoke Shaping Rounds
Your starting stitch distribution is:
For all increase rounds: Work sc to 1 st before marker, 2 sc in next st (increase made), slip marker, 2 sc in next st (increase made). Repeat at each of the 4 markers. Sc to end of round, sl st to join.
For all plain rounds: Sc in each st around, sl st to join.
Work the following sequence for all sizes:
Yoke Round 1 (Inc): 92 (104, 116) sts
Yoke Round 2 (Plain): 92 (104, 116) sts
Yoke Round 3 (Inc): 100 (112, 124) sts
Yoke Round 4 (Plain): 100 (112, 124) sts
Yoke Round 5 (Inc): 108 (120, 132) sts
Yoke Round 6 (Plain): 108 (120, 132) sts
Yoke Round 7 (Inc): 116 (128, 140) sts
Yoke Round 8 (Plain): 116 (128, 140) sts
Yoke Round 9 (Inc): 124 (136, 148) sts
Yoke Round 10 (Plain): 124 (136, 148) sts
Yoke Round 11 (Inc): 132 (144, 156) sts
Yoke Round 12 (Plain): 132 (144, 156) sts
Yoke Round 13 (Inc): 140 (152, 164) sts
Yoke Round 14 (Plain): 140 (152, 164) sts
Yoke Round 15 (Inc): 148 (160, 172) sts
Yoke Round 16 (Plain): 148 (160, 172) sts
Yoke Round 17 (Inc): 156 (168, 180) sts
Yoke Round 18 (Plain): 156 (168, 180) sts
Yoke Round 19 (Inc): 164 (176, 188) sts
Yoke Round 20 (Plain): 164 (176, 188) sts
Yoke Round 21 (Inc): 172 (184, 196) sts
Yoke Round 22 (Plain): 172 (184, 196) sts
Yoke Round 23 (Inc): 180 (192, 204) sts
Yoke Round 24 (Plain): 180 (192, 204) sts
After Round 24, you have completed the yoke shaping.
Coral Collar Lace Band
Now switch to CC to create the beautiful decorative lace collar visible at the neckline and upper chest.
Collar Round 1 (CC): Chain 1. Sc in each st around. Sl st to join. (180, 192, 204 sc)
Collar Round 2 (CC): Chain 4 (counts as dc plus ch 1). Skip next st. Work (dc in next st, ch 1, sk 1 st) around. Sl st to 3rd ch of beginning ch-4. (90, 96, 102 dc and 90, 96, 102 ch-1 spaces)
Collar Round 3 (CC): Chain 3 (counts as dc). Work 2 dc into first ch-1 sp. Chain 1. Work (3 dc into next ch-1 sp, ch 1) around. Sl st to top of beginning ch-3. (90, 96, 102 clusters and 90, 96, 102 ch-1 spaces)
Continue working through the bodice, waist shaping, and tiered skirt sections following the established construction method. The skirt incorporates your prepared granny squares, chevron bands in alternating colors, and finishes with the scalloped shell border at the hem.
Flutter Cap Sleeves
After completing the body, return to the armhole openings. Join MC at the underarm and work short edging rounds to create the feminine flutter sleeves visible in the finished piece. The ruffled effect comes from working shells or increased stitches around the armhole edge.
Finishing
Weave in all ends securely. Block your dress to measurements, paying special attention to opening up the lace patterns and squaring up the granny squares. Attach your button at the back neckline opposite the button loop created during the keyhole rows.
Tips for Success with This Crochet Dress Pattern
Swatch everything. I cannot stress this enough. Make a gauge swatch for both hook sizes before starting. Make one test granny square and block it to confirm size.
Block as you go. Block your granny squares before joining them. This makes the joining process much smoother and ensures consistent sizing.
Use stitch markers generously. Beyond the four raglan markers, place additional markers at the beginning of rounds and at pattern repeat boundaries.
Take breaks. This is a marathon, not a sprint. Working in focused sessions will give you better results than rushing through.
Try it on. After completing the yoke and before separating for sleeves, try the piece on to check the fit across your shoulders and chest.
You Did It!
I am so proud of you for taking on this beautiful project. The Sunset Coral Tiered Lace Dress is the kind of handmade piece that becomes a treasured part of your wardrobe for years to come. Every hour you invest shows in the finished garment.
Thank you so much for choosing this crochet pattern. I genuinely hope you love the process and absolutely adore wearing your finished dress. If you make this, I would love to see it! Share your photos on Instagram or in our Facebook group and tag me so I can cheer you on.
If this pattern inspired you, go ahead and save it to your Pinterest boards so you can find it again easily. And please drop a comment below once you finish yours. I love hearing about your color choices, any modifications you made, and how the dress fits. Your feedback helps other makers feel confident to try it too. Happy crocheting!
