
I don’t know about you, but I have been dreaming of the perfect garden party dress for years. Something romantic, something feminine, something that makes you feel like you stepped out of a cottagecore fantasy.
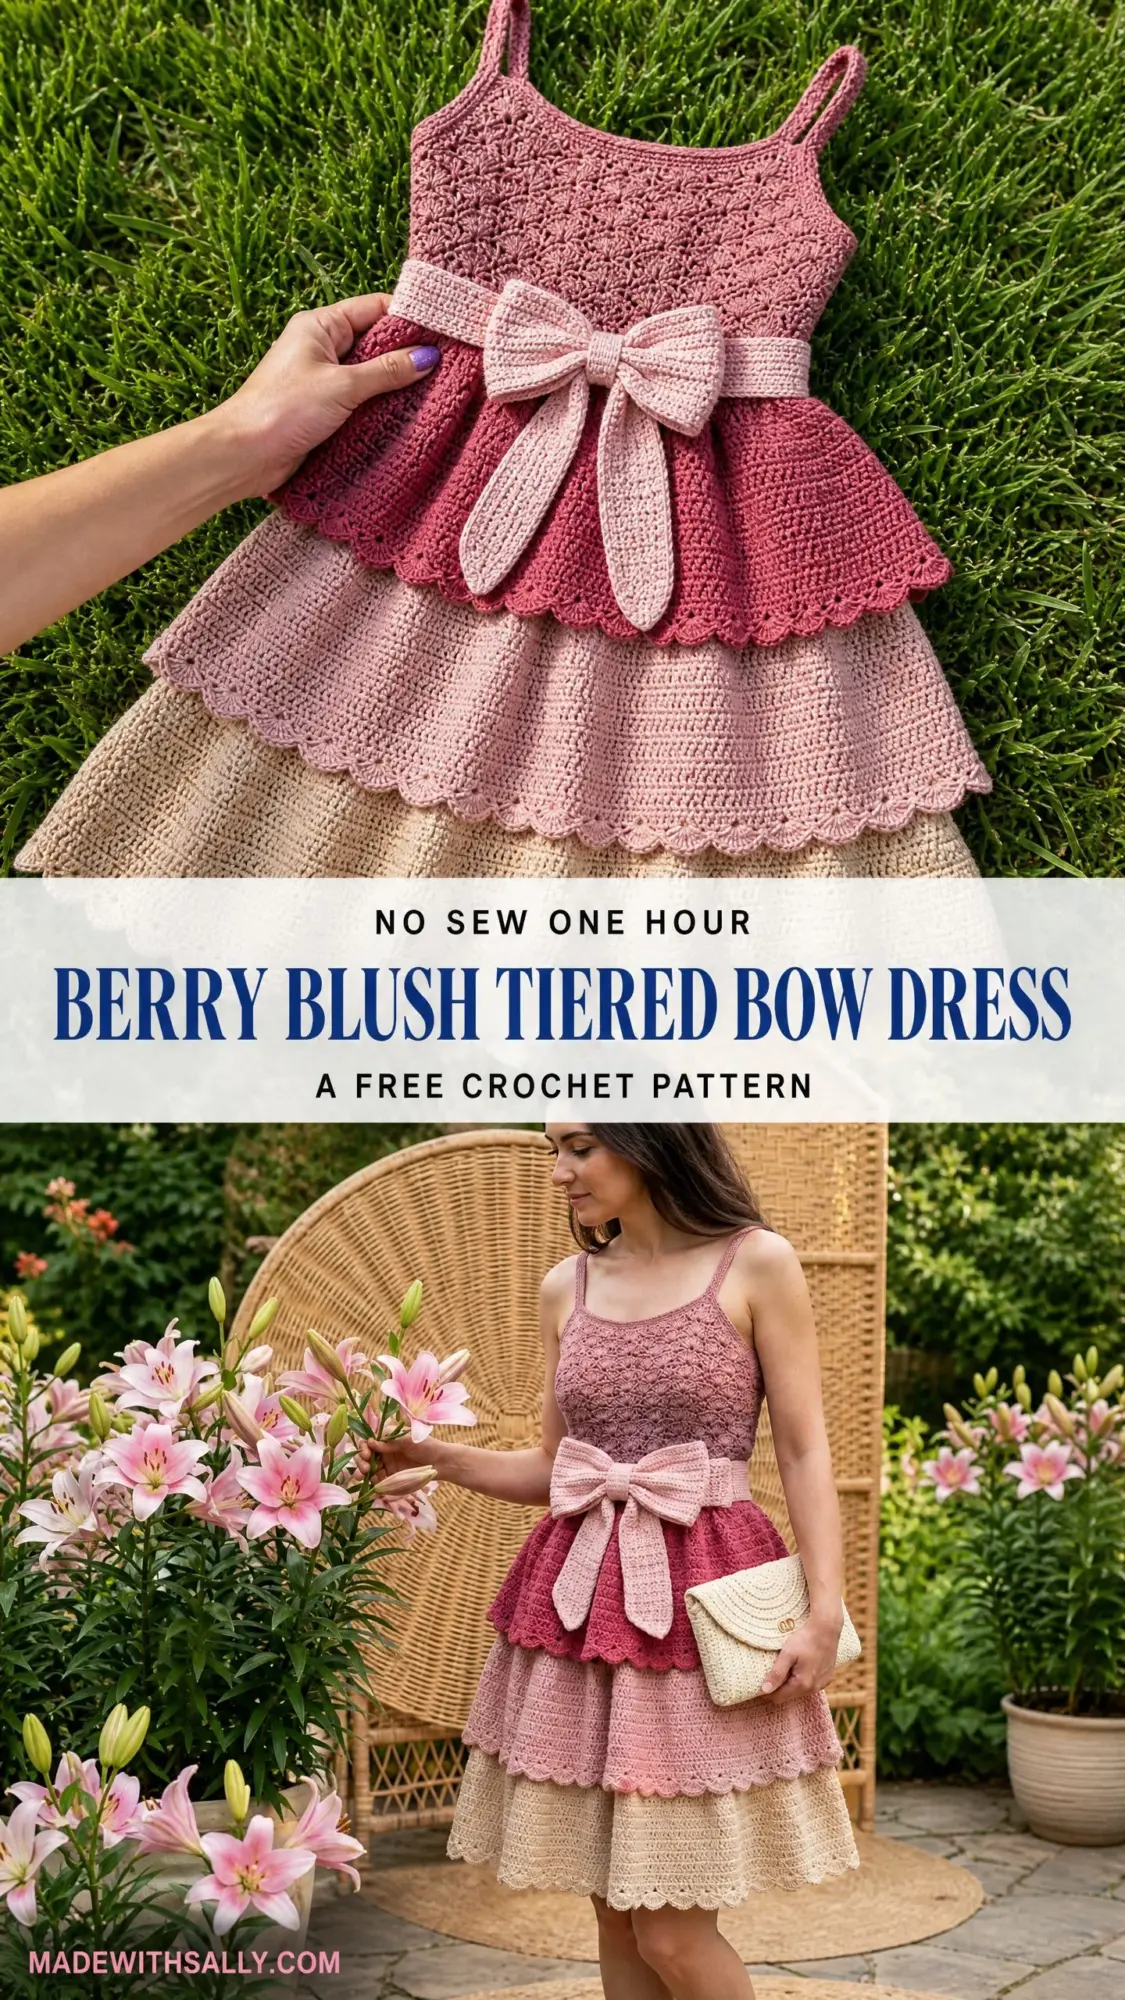
This tiered bow dress is exactly that vision brought to life. All the drama of layered ruffles and a statement bow with none of the impossible construction you might expect. The ombre color flow from dusty rose down to natural cream creates a stunning gradient effect that photographs beautifully and turns heads at any warm weather event.
If fitted garments have intimidated you before, this pattern breaks everything down into manageable pieces. The bodice panels are worked flat and seamed together. Each tier attaches one at a time. You can absolutely do this.
Why This Tiered Dress Pattern Works So Well
The construction method here is genuinely clever. Instead of trying to create complex shaping all at once, you build the dress in sections. The bodice uses a pretty floral lace stitch that looks intricate but follows a simple two row repeat. Each of the three skirt tiers gets worked in the round with strategic increases that create that gorgeous ruffled silhouette.
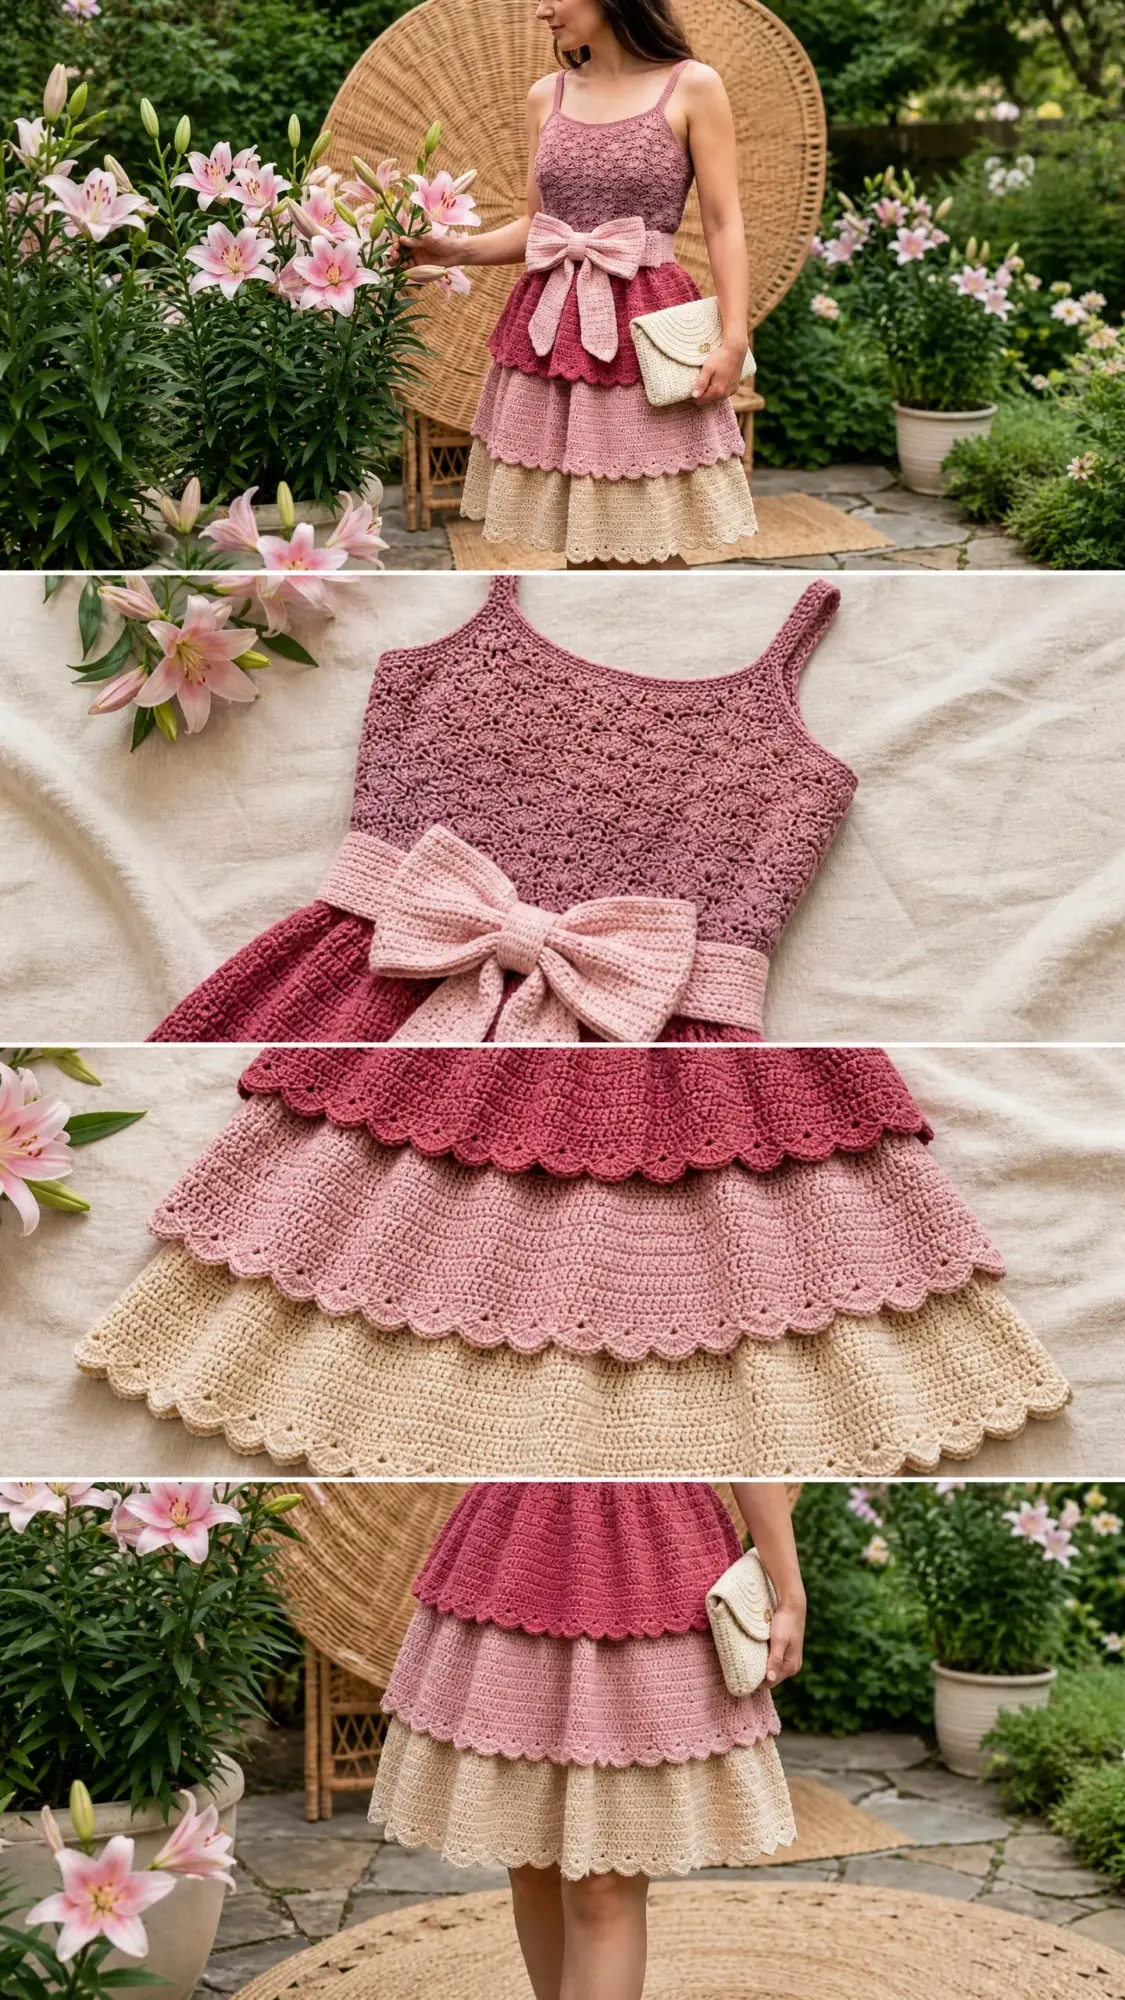
The ombre color progression moves from deep berry at the hip through soft blush in the middle and down to natural cream at the hem. This gradient effect elongates the body and creates visual interest without complicated colorwork. You simply change yarns between tiers.
That oversized bow at the empire waist? It is worked completely separately and attached at the end. So if bows are not your thing, you can skip it entirely or make it smaller. The dress stands beautifully on its own.
Skill Level
This pattern sits comfortably at advanced beginner to intermediate. The floral lace stitch in the bodice requires understanding of chain spaces and cluster stitches, but the repeat is regular and predictable once you get going. The tiered skirt rounds are straightforward single crochet worked in the round.
If you have completed a few basic garments and feel comfortable with counting stitches, reading patterns, and basic seaming, you are ready for this project.
Time Estimate
Plan for approximately 18 to 26 hours of work depending on your pace and familiarity with the yarn. This is not a weekend project, but it is absolutely achievable over a few weeks of evening crocheting.
Finished Measurements
This pattern is written for size Small/Medium, which fits US dress sizes 4 to 10.
Size customization notes appear at the end of the instructions.
Materials You Will Need
Yarn
You need worsted weight yarn (weight category 4) in a smooth cotton or cotton blend for proper drape and stitch definition. Gather these amounts in four colors:
Recommended Yarn Options
Lion Brand 24/7 Cotton in Rose, Magenta, Blush, and Ecru works beautifully. This 100% mercerized cotton gives excellent stitch definition for the lace bodice and has a clean sheen. At 186 yards per 3.5 oz skein, you need approximately 2 skeins of Color A, 2 skeins of Color B, 1 to 2 skeins of Color C, and 1 to 2 skeins of Color D.
Paintbox Yarns Simply DK in Dusty Rose, Raspberry Pink, Blush Pink, and Champagne White also works well when used at tension equivalent to a light worsted. Purchase 3 skeins each of A and B, 2 skeins each of C and D.
WeCrochet Comfy Worsted in Blush, Begonia, Cotton Candy, and Bare offers a cotton acrylic blend with softness and recovery that helps the fitted bodice hold its shape.
Choose a smooth, plied yarn with minimal halo or texture so the lace pattern reads clearly. Avoid single ply or fluffy yarns for this project.
Hooks
Notions
Gauge
Getting gauge right matters enormously for a fitted garment like this. Please make swatches before starting.
Bodice lace stitch (using G-6 hook):
One 8 stitch repeat of the floral lace pattern equals 2 inches (5 cm) wide. Eight rows in pattern equals 3 inches (7.6 cm) tall.
Skirt tiers (using H-8 hook):
16 single crochet equals 4 inches (10 cm). Twelve rows of single crochet equals 4 inches (10 cm).
Make a 6 inch (15 cm) swatch in both the lace pattern and single crochet. Adjust hook size as needed before beginning.
Abbreviations
Here are all the abbreviations used in this pattern with their full names and definitions:
Special Stitches
3dc-cl (3 Double Crochet Cluster)
Yarn over, insert hook into indicated stitch or space, yarn over and pull up a loop, yarn over and draw through 2 loops on hook. You now have 1 incomplete double crochet. Repeat this two more times in the same stitch or space. You now have 4 loops on your hook. Yarn over and draw through all 4 loops. Cluster complete.
5dc-cl (5 Double Crochet Cluster)
Work exactly as the 3dc-cl but repeat the incomplete double crochet step 5 times total before drawing through all 6 loops on hook.
Scallop Picot Edge
Slip stitch into first stitch of edging row. Chain 3. Work 2 double crochet into same stitch. Skip 2 stitches. Slip stitch into next stitch. Chain 3. Work 2 double crochet into same stitch as slip stitch. Skip 2 stitches. Continue this sequence across. Join with slip stitch to first slip stitch of round.
I-cord Strap
Chain 5. Row 1: Single crochet in second chain from hook and each chain across. (4 sc) Do not turn. Slide work to other end of hook. Pull yarn across back. Row 2: Single crochet in each stitch across without turning. (4 sc) Repeat Row 2 until strap measures desired length. This creates a firm rounded cord.
Alternatively, straps may be worked as a long chained length: chain 70, then slip stitch back along the chain to create a double strand strap.
Pattern Notes Before You Begin
1. The bodice is worked flat in two panels (front and back), then seamed at the sides. Both panels are identical.
2. The floral lace stitch works over a multiple of 8 stitches plus 4. The foundation chain for each panel is 44 stitches plus a turning chain.
3. All three skirt tiers are worked in the round without turning, using the H-8 hook.
4. Each tier attaches by slip stitching into the bottom loop of the finishing row of the section above, then working an increase round to create the tiered, ruffled silhouette.
5. Color sequence: Color A for bodice and waistband/bow. Color B for Tier 1 (first tier at hip). Color C for Tier 2 (middle). Color D for Tier 3 (lowest, at hem).
6. When joining rounds, always join with a slip stitch to the top of the beginning stitch or chain unless otherwise noted.
7. The dress has slight positive ease at the bust (approximately 1 inch) for comfortable wear.
8. Stitch counts appear in parentheses at the end of each row or round.
9. Because the bodice is worked flat, row 1 is a wrong side row after the foundation chain. Right side rows are even numbered.
Step by Step Instructions
Bodice (Make 2 Identical Panels)
Both front and back panels are worked the same way.
With Color A and G-6 hook, chain 48.
Foundation Row (WS): Sc in second ch from hook and each ch across. Ch 3, turn. (47 sc)
The chain 3 turning chain counts as the first dc in Row 1.
Row 1 (RS, Lace Row): Dc in second st from base of ch-3 (skip the st directly below the ch-3). Ch 2. Sk 2 sts. 5dc-cl in next st. Ch 2. Sk 2 sts. Dc in next 2 sts. Rep the sequence (ch 2, sk 2, 5dc-cl in next st, ch 2, sk 2, dc in next 2 sts) 3 more times. Ch 2. Sk 2. 5dc-cl in next st. Ch 2. Sk 2. Dc in last st. Ch 3, turn. (5 clusters, 12 dc, 10 ch-2 spaces)
Row 2 (WS, Lace Row): Dc in second st. Ch 2. 3dc-cl in top of first 5dc-cl. Ch 2. Dc2tog over next 2 dc. Rep (ch 2, 3dc-cl in next cluster top, ch 2, dc2tog over next 2 dc) 3 more times. Ch 2. 3dc-cl in next cluster top. Ch 2. Dc in top of tch. Ch 3, turn. (5 clusters, 12 dc equivalent stitches, 10 ch-2 spaces)
Rows 3 through 22: Repeat Rows 1 and 2 alternately. Work 10 full repeats of the 2 row lace pattern (20 rows total after the foundation row).
After Row 22, your bodice panel should measure approximately 8 inches (20 cm) tall. Check this measurement now.
Checkpoint: Each bodice panel should be 47 stitches wide at foundation and approximately 8 inches tall. The lace pattern should show 5 clearly defined flower like clusters per row with open chain spaces between them.
Do not fasten off. Make two identical bodice panels.
Bodice Side Seams
Hold front and back panel with wrong sides together. Using Color A and tapestry needle, whipstitch or mattress stitch the side seams along both selvedge edges. Leave the top 4 rows (approximately 1.5 inches) open at each top corner for the armhole. Leave the bottom edge open. Weave in all ends on side seams.
You now have a tube that is open at top and bottom. The bodice tube should measure approximately 17 inches (43 cm) around.
Bodice Top Edging
With Color A and G-6 hook, join yarn at top right of front panel.
Edging Rnd: Work 1 sc evenly in each stitch across the top of the front panel, then 1 sc in each row end along the right side armhole edge, 1 sc across the top of the back panel, and 1 sc in each row end down the left side armhole edge. Join with sl st. (approximately 110 sc total, adjusted to nearest even number)
Do not cut yarn.
Spaghetti Straps (Make 2)
Locate the 12th stitch from the right side seam on the front bodice top. Join Color A with sl st.
Chain 70. Try the chain over your shoulder and adjust length to reach the corresponding position 12 stitches from the right side seam on the back bodice top.
Slip stitch chain to the back bodice top at the corresponding 12th stitch from the back right seam. Ch 1. Work sc back along the entire chain toward the front. (approximately 68 sc along strap)
Fasten off and weave in ends. Repeat for the second strap on the left side.
Tier 1 (Color B, Deep Berry)
The first tier attaches directly to the bottom edge of the joined bodice panels.
With H-8 hook and Color B, join yarn with sl st to any stitch along the bottom edge of the bodice at the right side seam.
Setup Rnd: Ch 1. Work 1 sc in each stitch around the bottom edge of the bodice. Join with sl st to first sc. (94 sc)
Increase Rnd 1: Ch 1. (2 sc in next st, sc in next st) around. Join with sl st. (141 sc)
Rnd 2: Ch 1. Sc in each st around. Join. (141 sc)
Rnd 3: Ch 1. Sc in each st around. Join. (141 sc)
Increase Rnd 4: Ch 1. (Sc in next 2 sts, 2 sc in next st) around. Join. (188 sc)
Rnds 5 through 11: Ch 1. Sc in each st around. Join each round. (188 sc each round)
Corrected Rnd 12: Ch 1. Sc in next 46 sts. Sc2tog. Sc in next 93 sts. Sc2tog. Sc in next 45 sts. Join. (186 sc)
Scallop Rnd: Sl st in first st. Ch 3. Work 2 dc in same st as sl st. Sk 2 sts. (Sl st in next st. Ch 3. 2 dc in same st as sl st. Sk 2 sts) around. Join with sl st to first sl st. (62 scallops)
Fasten off Color B. Weave in ends.
Checkpoint: After Tier 1, your dress should measure approximately 16 inches from shoulder strap to the bottom of the scallop edging.
Tier 2 (Color C, Soft Blush)
With H-8 hook and Color C, join yarn with sl st to the back of the slip stitch joining row of Rnd 12 of Tier 1, working into the top of the sc stitches behind the scallop edging.
Setup Rnd: Ch 1. Work 1 sc in each of the 186 sts of Rnd 12, working behind the scallop edging into the top loop of each stitch. Join with sl st. (186 sc)
Increase Rnd 1: Ch 1. (Sc in next 2 sts, 2 sc in next st) around. Join. (248 sc)
Rnds 2 through 4: Ch 1. Sc in each st around. Join. (248 sc each round)
Increase Rnd 5: Ch 1. (Sc in next 3 sts, 2 sc in next st) around. Join. (310 sc)
Rnds 6 through 15: Ch 1. Sc in each st around. Join. (310 sc each round)
Corrected Rnd 16: Starting count 310. Work sc2tog once anywhere in this round. (309 sc)
Scallop Rnd: Sl st in first st. Ch 3. 2 dc in same st. Sk 2 sts. (Sl st in next st. Ch 3. 2 dc in same st. Sk 2 sts) around. Join. (103 scallops)
Fasten off Color C. Weave in ends.
Checkpoint: After Tier 2, your dress should measure approximately 23 inches from shoulder strap top to the bottom of the Tier 2 scallop edging.
Tier 3 (Color D, Natural Cream)
With H-8 hook and Color D, join yarn with sl st to the back of the slip stitch joining row behind Tier 2’s scallop edging.
Setup Rnd: Pick up 309 sts, work sc2tog 3 times evenly spaced. (306 sc)
Increase Rnd 1: Ch 1. (Sc in next 2 sts, 2 sc in next st) 102 times. Join. (408 sc)
Rnds 2 through 5: Ch 1. Sc in each st around. Join. (408 sc each round)
Increase Rnd 6: Ch 1. (Sc in next 5 sts, 2 sc in next st) 68 times. Join. (476 sc)
Rnds 7 through 19: Ch 1. Sc in each st around. Join. (476 sc each round)
Corrected Rnd 20: Sc around as usual, but work 2 sc in one stitch. (477 sc)
Scallop Rnd: Sl st in first st. Ch 3. 2 dc in same st. Sk 2 sts. (Sl st in next st. Ch 3. 2 dc in same st. Sk 2 sts) around. Join. (159 scallops)
Fasten off Color D. Weave in ends.
Final Checkpoint: The full dress from shoulder strap to hem should measure approximately 32 inches.
Waistband
The waistband covers the join between the bodice and Tier 1, wrapping the empire waist.
With Color A and G-6 hook, chain 100. The band should measure 30 inches when flat.
Row 1: Sc in second ch from hook and each ch across. Ch 1, turn. (99 sc)
Row 2: Sc in each st across. Ch 1, turn. (99 sc)
Row 3: Sc in each st across. Ch 1, turn. (99 sc)
Row 4: Sc in each st across. Do not turn. (99 sc)
Fasten off, leaving a 24 inch sewing tail.
The waistband strip should measure approximately 30 inches long and 1 inch wide.
Position the waistband around the dress at the empire waist join, centering it over the seam between the bodice and Tier 1. Sew the waistband to the dress using whipstitch along both long edges.
Bow Main Body (Make 2 Identical Pieces)
With Color A and G-6 hook, chain 29.
Row 1: Sc in second ch from hook and each ch across. Ch 1, turn. (28 sc)
Rows 2 through 20: Sc in each st across. Ch 1, turn. (28 sc)
Row 21: Sc in each st across. (28 sc)
Fasten off, leaving a 12 inch tail on one piece for seaming.
Place both rectangles together with wrong sides facing. Whipstitch around all 4 edges. This creates one firm, double layered bow rectangle.
Bow Center Knot Strip
With Color A and G-6 hook, chain 9.
Row 1: Sc in second ch from hook and each ch across. Ch 1, turn. (8 sc)
Rows 2 through 14: Sc in each st across. Ch 1, turn. (8 sc)
Row 15: Sc in each st across. (8 sc)
Fasten off, leaving a long sewing tail.
Bow Tie Tails (Make 2)
With Color C and G-6 hook, chain 9.
Row 1: Sc in second ch from hook and each ch across. Ch 1, turn. (8 sc)
Continue in sc for 50 rows or until the tail measures 15 inches.
Fasten off. Make 2 tails.
Bow Assembly
Pinch the bow rectangle at its center, gathering it to approximately 1.5 inches wide at the middle. Wrap the knot strip tightly around the gathered center and sew the short ends together at the back. Sew the two tails to the back of the bow center. Attach the completed bow to the center front of the waistband.
Size Customization Tips
To size up (Large/XL, US dress size 12 to 18): Increase the bodice foundation chain in increments of 8 for each size step. For size Large, use a foundation chain of 56. Adjust the waistband chain by 8 to 12 additional chains.
To size down (XS, US dress size 0 to 2): Decrease the bodice foundation chain by 8, using chain 40. Reduce waistband chain to 88.
To lengthen or shorten: Add or remove plain sc rounds from any tier before working the scallop edging. Adding 6 rounds to Tier 3 adds approximately 2 extra inches.
Blocking and Care
Wet blocking is strongly recommended for the lace bodice. Submerge the finished dress in lukewarm water, gently press without wringing, roll in a towel to remove excess water, then lay flat on a blocking mat. Pin out the scallop edging to even the points. Allow to dry completely.
Machine wash cold on gentle cycle if yarn label permits. Lay flat to dry. Do not tumble dry.
You Did It!
This Berry Blush Tiered Bow Dress crochet pattern takes some time and attention, but the result is absolutely worth every stitch. You now have a stunning statement piece perfect for garden parties, celebrations, summer weddings, or any occasion where you want to feel like the main character.
Thank you so much for choosing this pattern. I hope you love making it as much as I loved designing it.
If you make this dress, I would absolutely love to see it! Tag me on Instagram or share a photo in our Facebook group. Seeing your finished projects genuinely makes my day.
This is definitely a project worth bookmarking. Save this pattern to your Pinterest boards so you can find it when you are ready to start, and please drop a comment below if you give it a try. I love hearing how your projects turn out!
