Alright, yarn lovers. This is your sign to dig into that stash and pull out those gorgeous gray skeins you have been saving for "the right project." This structured clutch bag uses a stunning braided puff stitch pattern that creates a beautiful woven texture, and the ombré gray color scheme gives it a sophisticated, high-end look. I will be honest with you. This is an intermediate level project that requires attention to detail, but the construction is more straightforward than it appears. If you can work puff stitches and follow a color sequence, you can absolutely make this bag.
About This Textured Braided Clutch Pattern
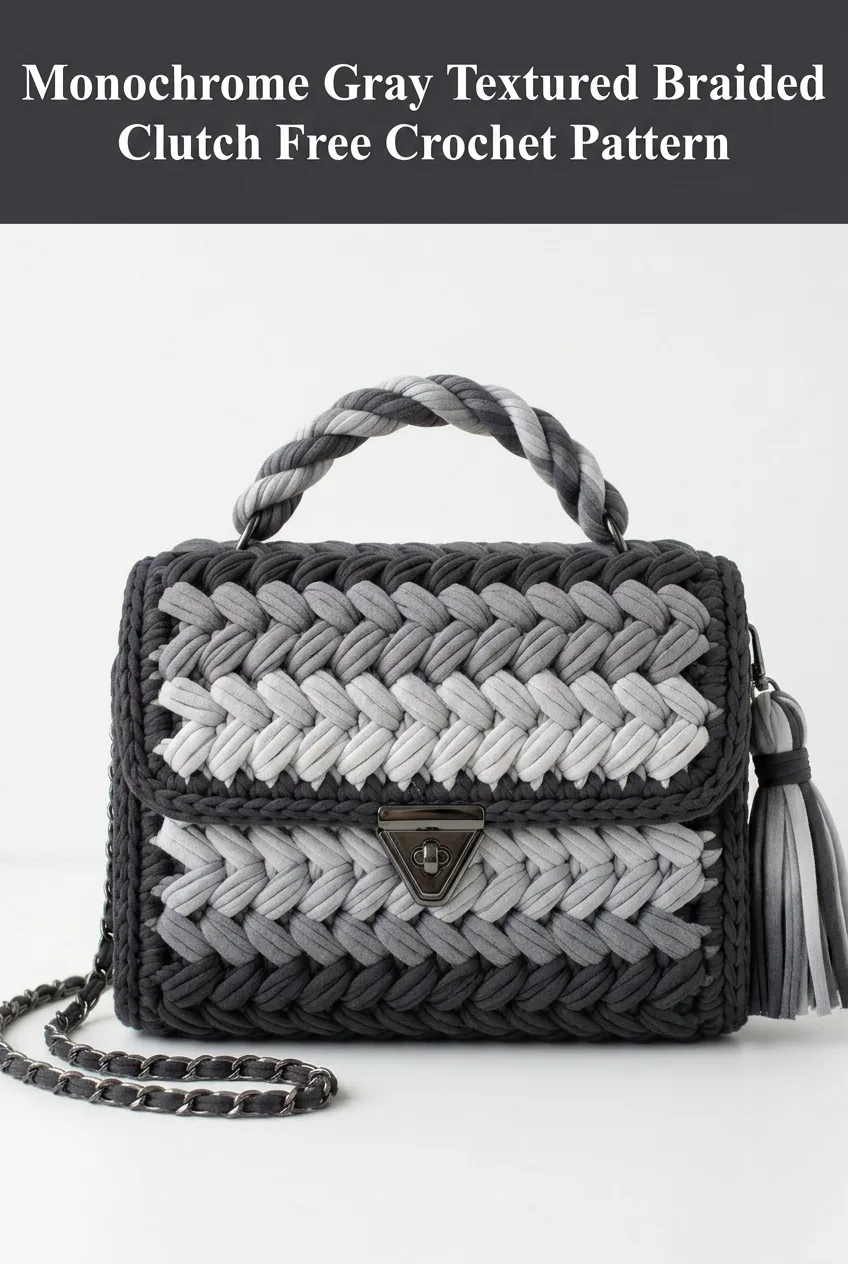
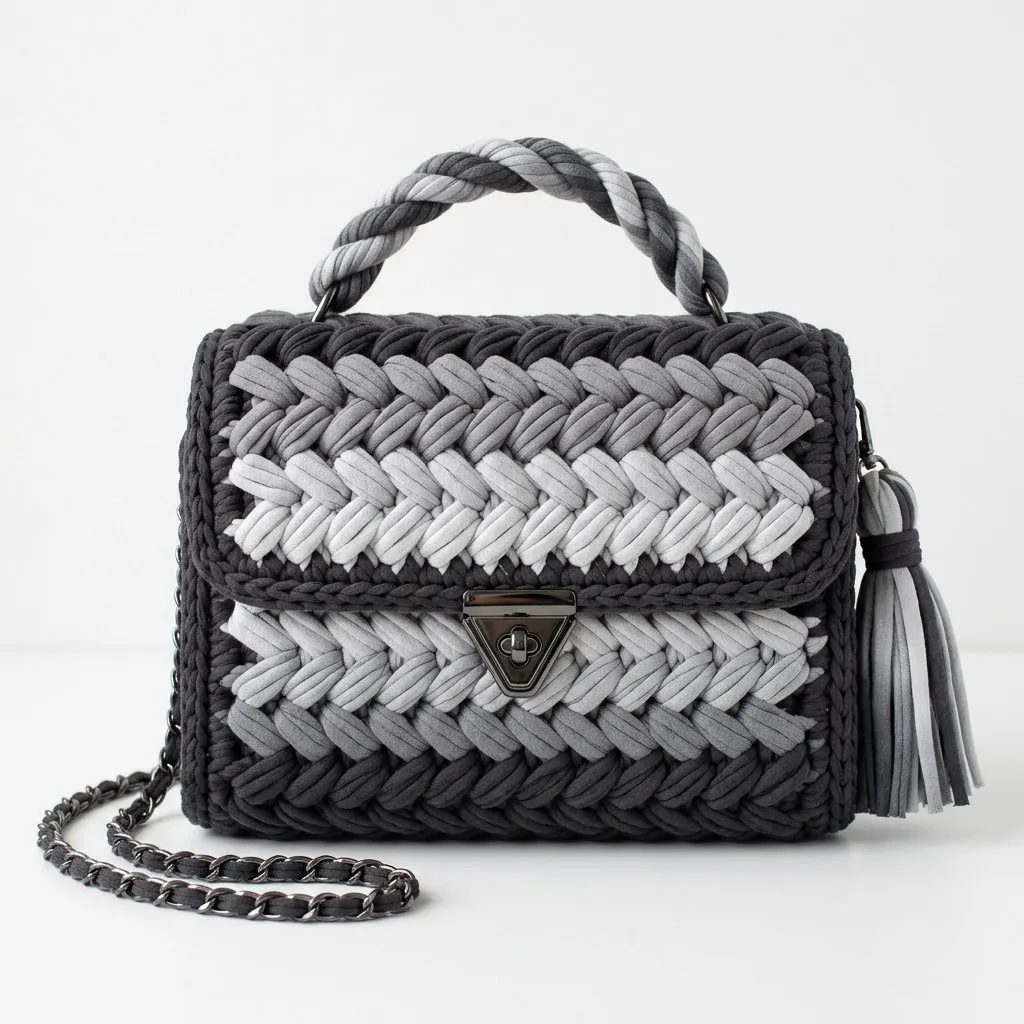
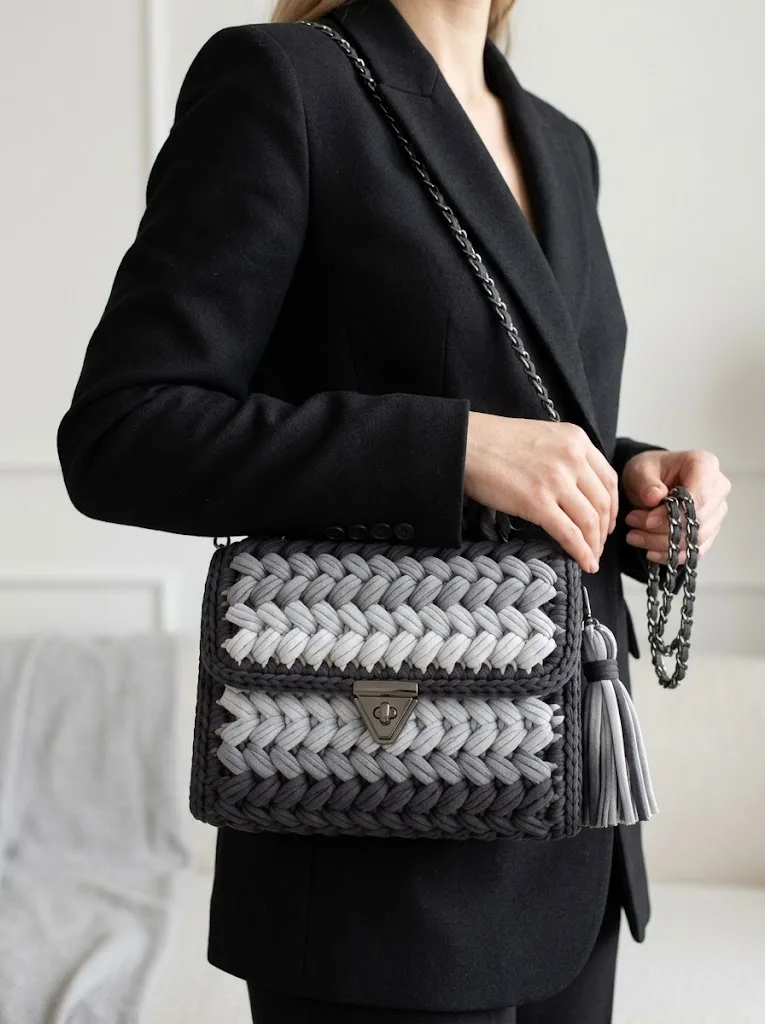
This gorgeous monochrome gray textured braided clutch features a distinctive herringbone-style braided puff stitch pattern that gives the bag incredible dimension and visual interest. The structured rectangular shape, metal turn-lock closure, twisted rope handle, and chain strap transform this handmade piece into something that looks like it came straight from a designer boutique.
The braided puff stitch creates those beautiful V-shaped chevron rows you see across the body and flap. Working in t-shirt yarn (also called trapillo or zpagetti yarn) gives the bag its substantial body and allows those puff stitches to really pop.
I love how the gray gradient moves from dark charcoal on the borders through medium gray to light silver in the center sections. This ombré effect is achieved simply by changing yarn colors at specific rows. No complicated colorwork techniques required.
Skill Level
Intermediate
This crochet pattern requires familiarity with puff stitches, working in rows and rounds, and maintaining even tension with bulky t-shirt yarn. The construction involves creating a structured base, building up the sides, and attaching hardware. If you have never worked with t-shirt yarn before, I recommend practicing a small swatch first to get comfortable with the weight and stretch.
Finished Dimensions
Materials Needed
Yarn
T-shirt yarn (super bulky weight, 100% cotton jersey)
You will need approximately:
Popular t-shirt yarn brands include Hoooked Zpagetti, Yarn Art Maccheroni, or Bobilon. You can also cut your own t-shirt yarn from old cotton t-shirts if you want to be extra sustainable.
Hook
Adjust hook size if needed to achieve a firm, structured fabric. You want the stitches tight enough that the bag holds its shape.
Notions
Stitches and Abbreviations
Let me walk you through each stitch before we begin. Understanding these will make the pattern much easier to follow.
Ch = Chain. Wrap yarn over hook and pull through the loop on your hook.
Sl st = Slip stitch. Insert hook into stitch, yarn over, pull through both the stitch and the loop on your hook in one motion.
Sc = Single crochet. Insert hook into stitch, yarn over and pull up a loop (2 loops on hook), yarn over and pull through both loops.
Hdc = Half double crochet. Yarn over, insert hook into stitch, yarn over and pull up a loop (3 loops on hook), yarn over and pull through all 3 loops.
Puff st = Puff stitch. This is the star of the show. Yarn over, insert hook into stitch, yarn over and pull up a loop. Repeat this 2 more times in the same stitch (7 loops on hook). Yarn over and pull through all 7 loops. Chain 1 to close the puff. This creates those beautiful rounded, textured bumps you see in the fabric.
BPsc = Back post single crochet. Insert hook from back to front to back around the post (vertical part) of the stitch from the previous row, complete as a regular single crochet.
FPsc = Front post single crochet. Insert hook from front to back to front around the post of the stitch, complete as a regular single crochet.
Gauge
8 puff stitches and 6 rows = 4 inches (10 cm) in braided puff stitch pattern with 10mm hook and t-shirt yarn.
Gauge matters for this project because you want your bag to match the finished dimensions and have a structured feel. Take time to check your gauge before starting.
Pattern Notes
Step by Step Crochet Pattern
Base
Using Dark Charcoal Gray and 10mm hook:
Row 1: Ch 19. Sc in 2nd ch from hook and in each ch across. (18 sc)
Rows 2-8: Ch 1, turn. Sc in each st across. (18 sc)
You should have a rectangular base approximately 9 inches by 3 inches. This forms the bottom of your clutch.
Building the Sides
Now we will work in continuous rounds to build up the walls of the bag.
Setup Round: Ch 1, do not turn. Working around all edges of the base, sc 18 across the long edge, sc 3 in corner, sc 8 along the short edge, sc 3 in corner, sc 18 along the opposite long edge, sc 3 in corner, sc 8 along the remaining short edge, sc 2 in corner, sl st to first sc to join. (56 sc)
Place a stitch marker in the first stitch to track your rounds.
Lower Body Section
Continue with Dark Charcoal Gray:
Round 1: Ch 1, sc in each st around, working in back loops only (BLO). This creates a sharp edge at the base. Sl st to join. (56 sc)
Round 2: Ch 2, puff st in first st, skip 1 st, *puff st in next st, skip 1 st.* Repeat from * around. Sl st to join. (28 puff sts)
Round 3: Ch 1, sc in top of each puff st and in each ch-1 space. Sl st to join. (56 sc)
Round 4: Change to Medium Gray. Ch 2, *puff st in next st, skip 1 st.* Repeat around, offsetting your puff stitches so they fall between the puff stitches from Round 2. Sl st to join. (28 puff sts)
Round 5: Ch 1, sc in top of each puff st and in each ch-1 space. Sl st to join. (56 sc)
Round 6: Change to Light Silver Gray. Ch 2, *puff st in next st, skip 1 st.* Repeat around. Sl st to join. (28 puff sts)
Round 7: Ch 1, sc in each st around. Sl st to join. (56 sc)
Round 8: Change to White. Ch 2, *puff st in next st, skip 1 st.* Repeat around, offsetting placement. Sl st to join. (28 puff sts)
Round 9: Ch 1, sc in each st around. Sl st to join. (56 sc)
Round 10: Change to Light Silver Gray. Ch 2, *puff st in next st, skip 1 st.* Repeat around. Sl st to join. (28 puff sts)
Round 11: Ch 1, sc in each st around. Sl st to join. (56 sc)
Round 12: Change to Medium Gray. Ch 2, *puff st in next st, skip 1 st.* Repeat around. Sl st to join. (28 puff sts)
Round 13: Ch 1, sc in each st around. Sl st to join. (56 sc)
Round 14: Change to Dark Charcoal Gray. Ch 1, sc in each st around. Sl st to join. (56 sc)
Round 15: Ch 1, working in BLO, sc in each st around. Sl st to join. Fasten off. (56 sc)
This creates that clean horizontal line where the flap will fold over.
Flap
The flap is worked flat in rows, then attached to the back of the bag.
Using Dark Charcoal Gray:
Row 1: Ch 19. Sc in 2nd ch from hook and in each ch across. (18 sc)
Row 2: Ch 1, turn. Sc in each st across. (18 sc)
Row 3: Change to Medium Gray. Ch 2, turn. Puff st in first st, skip 1 st, *puff st in next st, skip 1 st.* Repeat across. (9 puff sts)
Row 4: Ch 1, turn. Sc in top of each puff and in each ch-1 space. (18 sc)
Row 5: Change to Light Silver Gray. Ch 2, turn. *Puff st in next st, skip 1 st.* Repeat across, offsetting placement. (9 puff sts)
Row 6: Ch 1, turn. Sc in each st across. (18 sc)
Row 7: Change to White. Ch 2, turn. *Puff st in next st, skip 1 st.* Repeat across. (9 puff sts)
Row 8: Ch 1, turn. Sc in each st across. (18 sc)
Row 9: Change to Light Silver Gray. Ch 2, turn. *Puff st in next st, skip 1 st.* Repeat across. (9 puff sts)
Row 10: Ch 1, turn. Sc in each st across. (18 sc)
Row 11: Change to Medium Gray. Ch 2, turn. *Puff st in next st, skip 1 st.* Repeat across. (9 puff sts)
Row 12: Ch 1, turn. Sc in each st across. (18 sc)
Row 13: Change to Dark Charcoal Gray. Ch 1, turn. Sc in each st across. (18 sc)
Row 14: Ch 1, turn. Sc in each st across. (18 sc)
Do not fasten off.
Flap Border
Continue with Dark Charcoal Gray:
Border Round: Ch 1, sc evenly around all three open sides of the flap (not the top edge that will attach to the bag). Work 3 sc in each corner to keep the fabric flat. Sl st to join. Fasten off.
This creates the clean braided border you see framing the flap.
Twisted Rope Handle
This handle uses a simple twisted cord technique with t-shirt yarn.
Step 1: Cut 3 strands of t-shirt yarn, each approximately 36 inches long. Use one strand each of Dark Charcoal, Medium Gray, and Light Silver.
Step 2: Knot all three strands together at one end. Secure this end to a fixed point (doorknob, hook, or have a friend hold it).
Step 3: Twist all three strands tightly in one direction until the entire length is evenly twisted and begins to kink.
Step 4: Fold the twisted cord in half. Allow it to twist back on itself, creating a thick rope.
Step 5: Knot the loose ends together. Trim any excess.
Step 6: Attach each end of the rope handle to the top corners of the bag using slip stitches or by weaving through the stitches and knotting securely on the inside.
Tassel
Using Light Silver Gray:
Step 1: Wrap yarn around a 4-inch piece of cardboard approximately 15 times.
Step 2: Slide a separate strand through the top loops and tie tightly.
Step 3: Cut the bottom loops.
Step 4: Wrap another strand around the tassel about half an inch from the top to create the "head." Knot securely and tuck ends inside.
Step 5: Trim the bottom evenly.
Step 6: Attach the tassel to the corner of the bag using the top tie.
Assembly and Finishing
Attaching the Flap
Position the flap along the back edge of the bag opening. Using Dark Charcoal Gray and your tapestry needle, whip stitch the top edge of the flap to the inside back of the bag. Make your stitches firm but not so tight that the flap cannot fold naturally.
Installing the Turn-Lock Closure
On the flap: Mark the center point approximately 1 inch from the bottom edge of the flap. Use sharp scissors to carefully cut a small slit for the turn-lock prongs. Push the decorative front piece through from the right side, and secure the backing plate on the inside.
On the bag body: Close the flap and mark where the receiving plate should go on the front of the bag. Install following the hardware manufacturer’s instructions.
If you are nervous about cutting into your work (totally understandable), you can use a magnetic snap closure instead. These require smaller holes and are more forgiving.
Attaching the Chain Strap
Attach D-rings or O-rings to the upper side corners of the bag by crocheting small loops of slip stitches around the hardware and securing to the bag body. Clip or loop your chain strap onto these rings.
Optional Lining
For a truly professional finish, cut cotton fabric slightly smaller than the interior dimensions of your bag. Fold and press the edges, then hand stitch the lining to the inside of the bag using matching thread.
Helpful Tips for This Crochet Tutorial
Tension troubles? T-shirt yarn has natural stretch. If your bag feels too floppy, try going down a hook size or pulling your stitches tighter.
Color bleeding? Some t-shirt yarns can bleed when wet. Test wash a swatch before completing your bag.
Hardware hunting? Search for "purse hardware" or "bag making supplies" online. Etsy has wonderful options for unique turn-lock closures.
First time with puff stitches? Practice on scrap yarn until you can make them consistently. Each puff should look rounded and full, not flat or uneven.
Make It Your Own
This textured braided clutch crochet pattern works beautifully in any color scheme. Try warm neutrals like cream, tan, and chocolate. Go bold with jewel tones. Or make a statement with black and white. The braided puff stitch pattern looks stunning in any palette.
You could also adjust the size by adding or subtracting stitches from your foundation chain (keep your count even for the puff stitch pattern to work out correctly).
I really hope you enjoy making this gorgeous clutch as much as I enjoyed designing it. It makes such an impressive gift, and honestly, you might want to keep the first one for yourself. If you make this pattern, I would absolutely love to see your finished bag. Tag me on Instagram or share a photo in my Facebook group. Seeing your creations truly makes my day.
Go ahead and save this pattern to your Pinterest boards so you can find it when you are ready to start. And please drop a comment below if you give it a try. I love hearing which colors you chose and how your bag turned out.
