
Time to dig into that cotton stash you’ve been saving for something special. This cheerful little baby dress is exactly the kind of project that deserves your best yarn. With its sunflower appliqués, popcorn flower clusters, and scalloped edges, the construction keeps things interesting from start to finish.
I won’t sugarcoat it. This dress sits solidly in the intermediate category. You’ll be managing multiple colors, working applied motifs, and creating textured stitches throughout the skirt section. But if you’ve made a basic top-down garment before and you’re ready to level up, this project will stretch your skills in the best way.
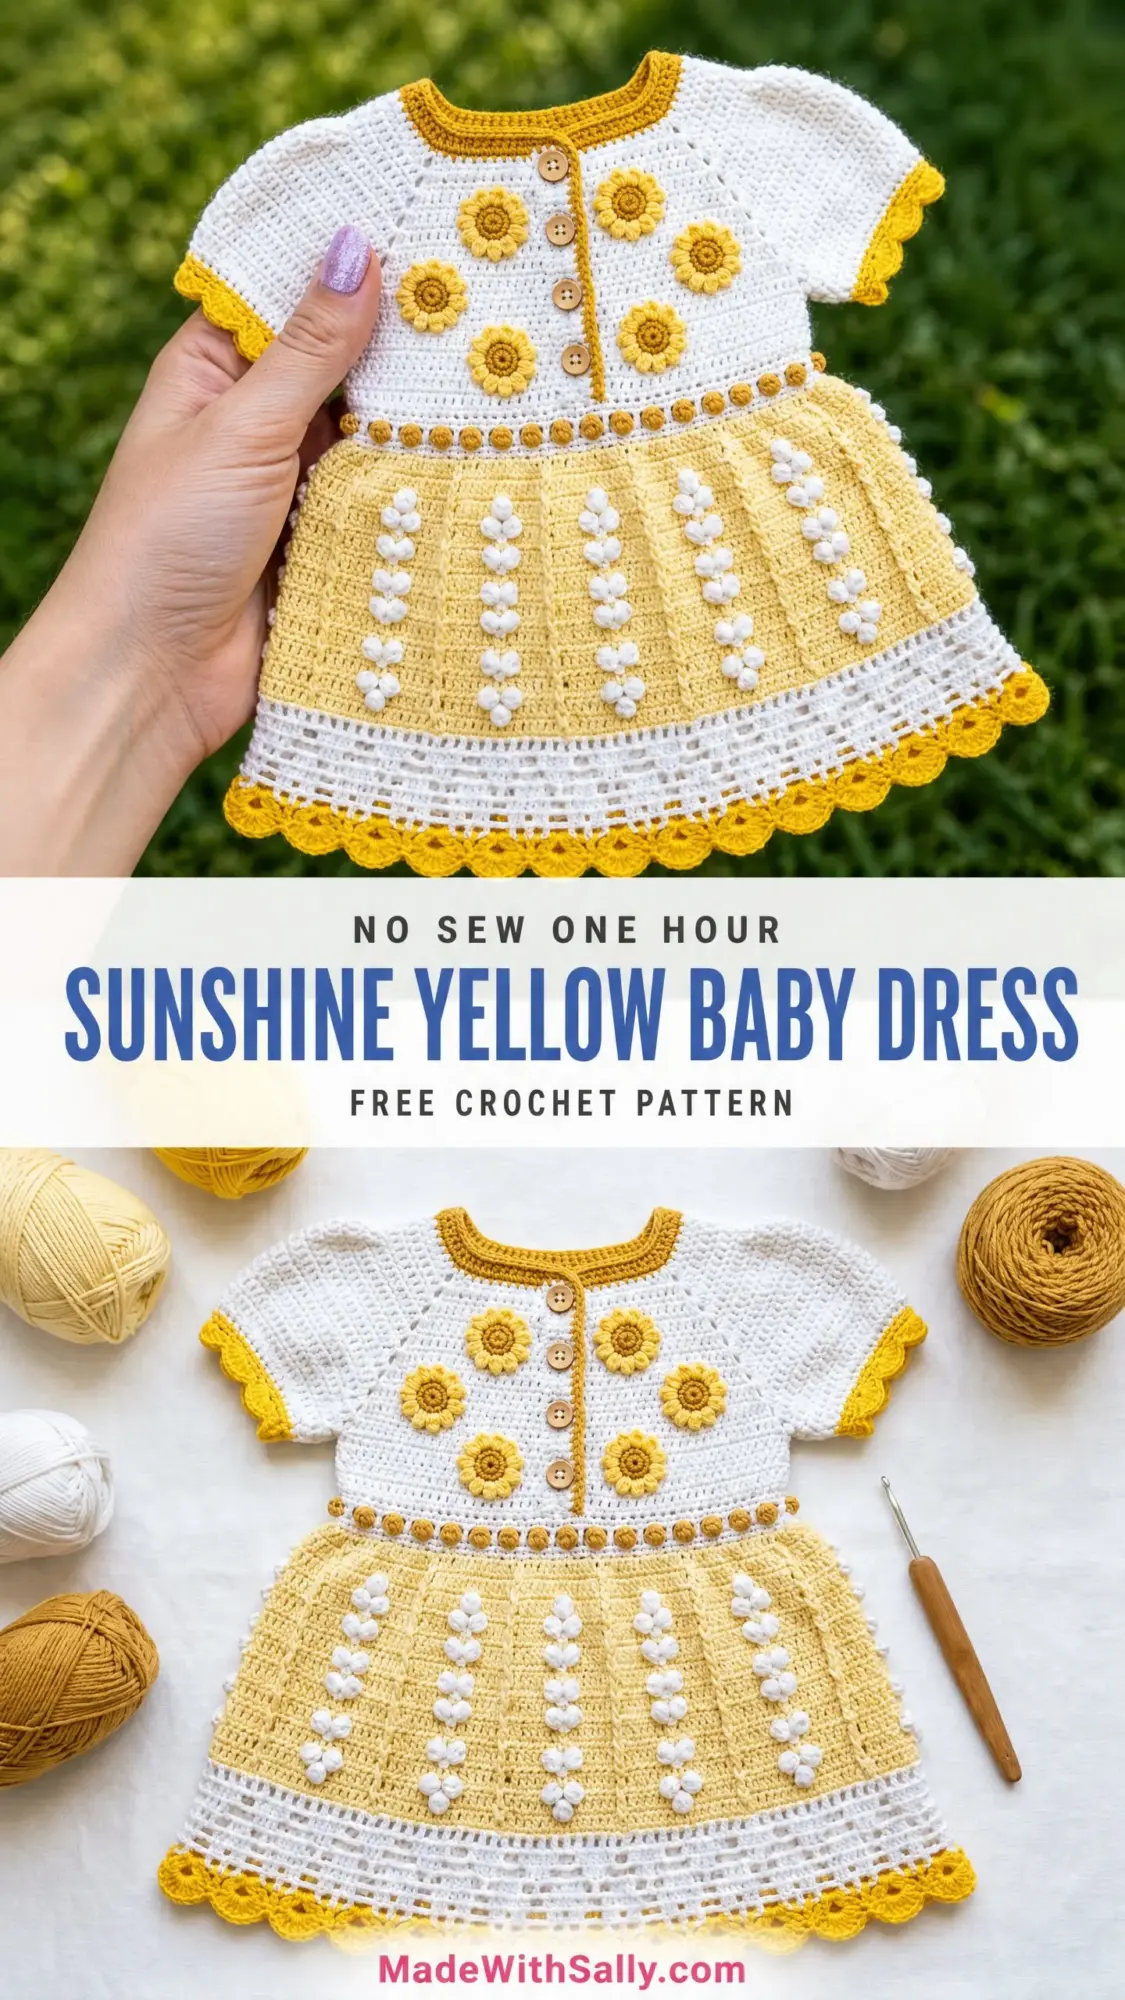
The finished piece looks absolutely stunning. A crisp white bodice with golden neckline ribbing, bright yellow sunflowers cascading down the front, and a pale yellow skirt covered in delicate white flower clusters. It’s the kind of handmade gift that makes people gasp when they open the box.
About This Baby Dress Crochet Pattern
This pattern creates a structured three-section baby dress worked in white and yellow cotton yarn. The design features a fitted yoke bodice worked from the top down, a textured waist transition band, and a flared A-line skirt with a grid pattern and raised flower details. Six sunflower motifs decorate the front bodice, arranged in two columns beside a center button band.
The dress works up in joined rounds after an initial flat section for the button band opening. Short cap sleeves with yellow scallop edging, mustard gold neckline ribbing, a bobble border at the waist, and a shell-stitch hem complete the design. Construction moves top-down, with the bodice and sleeves separated before the skirt begins.
Finished Measurements
This pattern fits size 6 to 12 months.
Chest circumference at underarm: approximately 19 inches (48 cm)
Total length from neckline to hem: approximately 14 inches (35.5 cm)
Bodice length from neckline to waist: approximately 6 inches (15 cm)
Skirt length from waist to hem: approximately 8 inches (20 cm)
Sleeve circumference: approximately 7 inches (18 cm)
Skill Level
Advanced Beginner to Intermediate. The pattern uses primarily single crochet (sc) and double crochet (dc) in a straightforward top-down yoke construction. The intermediate rating comes from multi-color yarn management, applied 3D sunflower motifs, popcorn clusters worked into the skirt, shell-stitch hem edging, and button band pickup.
If you’re comfortable with gauge swatching, color changes, and basic embellishments, you’ll complete this project successfully.
Time Estimate
Plan for approximately 18 to 25 hours if you’re an experienced crocheter working at a steady pace. First-time makers of similar garments should allow up to 30 hours.
Materials Needed
Yarn
Yarn A (MC, Main Color): White, 100% mercerized cotton, worsted weight (CYC 3 or light worsted), approximately 250 yards (229 meters)
Yarn B (CC1, Contrast Color 1): Bright yellow, 100% mercerized cotton, worsted weight (CYC 3 or light worsted), approximately 180 yards (165 meters)
Yarn C (CC2, Contrast Color 2): Mustard gold, 100% mercerized cotton, worsted weight (CYC 3 or light worsted), approximately 60 yards (55 meters)
Suggested Yarns
Option 1: Paintbox Yarns Simply DK (100% cotton, 137 yards per 50 g ball). Colors: Pure White (01), Banana Cream (123), Mustard Yellow (124). Purchase 2 balls White, 2 balls Banana Cream, 1 ball Mustard Yellow.
Option 2: Lion Brand 24/7 Cotton (100% mercerized cotton, 186 yards per 100 g ball). Colors: White, Yellow, Goldenrod. Purchase 2 balls White, 1 ball Yellow, 1 ball Goldenrod.
Option 3: Scheepjes Catona (100% mercerized cotton, 62 yards per 25 g ball). Colors: Bridal White (105), Lemon Chiffon (100), Saffron (249). Purchase 5 balls Bridal White, 3 balls Lemon Chiffon, 1 ball Saffron.
Any smooth 100% cotton or cotton-blend DK to light worsted weight yarn will substitute successfully. Avoid fuzzy or textured yarn as it will obscure the popcorn flower details and sunflower motifs.
Tools and Notions
Gauge
18 stitches and 20 rows = 4 inches (10 cm) in single crochet, blocked, using US E-4 (3.5 mm) hook.
14 double crochet stitches and 8 rows = 4 inches (10 cm) in double crochet, blocked.
Gauge is mandatory for a well-fitting garment. Please swatch in both single crochet and double crochet before beginning. If your gauge is tighter than stated, move up one hook size. If your gauge is looser, move down one hook size.
Abbreviations (US Terms)
Special Stitches
Bobble Stitch (bo)
Yarn over, insert hook into stitch, pull up a loop, yarn over, pull through 2 loops. You now have an incomplete double crochet on your hook. Repeat this sequence 4 more times into the same stitch for a total of 5 incomplete double crochets on hook. Yarn over and pull through all 6 loops on hook. One bobble complete.
The bobble pops to the side facing away from you. For this pattern, the bobbles at the waist band are worked on the right side.
Popcorn Stitch (pc)
Work 5 dc into the same stitch. Drop the working loop from hook. Insert hook from front to back into the top of the first dc of the group. Pick up the dropped loop and pull it through to the front. Chain 1 to secure. One popcorn complete.
Don’t worry if this feels awkward the first few times. The motion becomes natural quickly.
Scallop Shell Edging
Slip stitch into stitch, chain 1, work 5 dc into same stitch, skip 2 stitches, slip stitch into next stitch. That is one shell. Repeat along edge as directed.
Sunflower Motif (make 6)
These are worked separately and sewn onto the bodice after completion.
With CC2 (mustard gold): Make a magic ring, ch 1, work 8 sc into ring, sl st to first sc to join. (8 sc)
Round 2 (petals with CC1 yellow): Working into each sc of round 1: (sl st into sc, ch 3, work 3 dc into same sc, ch 3, sl st into same sc) repeat 8 times. (8 petals)
Fasten off, leaving a long tail for sewing. The center ring is mustard gold and the petals are yellow. Flatten with fingers and pin before sewing to bodice.
For larger motifs (top row, 3 larger flowers):
With CC2: Magic ring, ch 1, work 10 sc into ring, sl st to join. (10 sc)
Round 2 petals with CC1: (sl st, ch 3, 4 dc, ch 3, sl st) into each sc around. (10 petals)
Fasten off.
Pattern Notes Before You Begin
1. The dress is worked top-down in joined rounds. The front opening is created by working the bodice back and forth in rows for the button band section, then joining to work in the round after the button band is established.
2. The bodice is worked back and forth in rows to create the open front button band. The skirt is worked in joined rounds.
3. Color changes: when switching colors, complete the last yarn over of the stitch before the change with the new color. Carry the unused color loosely or cut and rejoin as needed.
4. Buttons are sewn to the left front band after all pieces are complete. The button loops form naturally from the chain spaces in the right front band.
5. Stitch counts in parentheses at the end of each row or round reflect total stitches unless otherwise noted.
6. All sunflower motifs are applied after the dress is complete and blocked.
7. Read through the entire pattern before beginning. I know that’s tedious advice, but it really helps with this one.
Step-by-Step Crochet Tutorial
Neckline and Yoke Setup
With CC2 (mustard gold) and US E-4 hook, ch 61.
Foundation Row (WS): Sc in 2nd ch from hook and in each ch across. Turn. (60 sc)
Row 1 (RS): Ch 1, sc in each st across. Turn. (60 sc)
Row 2 (WS): Ch 1, sc in each st across. Fasten off CC2. Join MC (white). Turn. (60 sc)
This 3-row gold band forms the neckline ribbing visible in the finished design. It’s a small detail that makes a big visual impact.
Bodice Yoke
The yoke is worked flat to accommodate the front button band opening.
Stitch placement for raglan increases: Place markers at positions 10, 20, 40, and 50 (counting from the right edge). These 4 markers divide the work into: Right Front (10 sts), Right Sleeve (10 sts), Back (20 sts), Left Sleeve (10 sts), Left Front (10 sts).
Row 3 (RS, increase row): With MC, ch 1. Sc in each st to 1 st before first marker, (sc, ch 1, sc) in next st, sm, sc to 1 st before second marker, (sc, ch 1, sc) in next st, sm, sc to 1 st before third marker, (sc, ch 1, sc) in next st, sm, sc to 1 st before fourth marker, (sc, ch 1, sc) in next st, sm, sc to end. Turn. (72 sts total counting ch sps as sts)
Row 4 (WS): Ch 1, sc in each st and each ch-sp across. Turn. (72 sc)
Row 5 (RS, increase row): Ch 1. Sc in each st to 1 st before first marker, (sc, ch 1, sc) in next st, sm, sc across to 1 st before second marker, (sc, ch 1, sc) in next st, sm, sc across to 1 st before third marker, (sc, ch 1, sc) in next st, sm, sc across to 1 st before fourth marker, (sc, ch 1, sc) in next st, sm, sc to end. Turn. (80 sts)
Row 6 (WS): Ch 1, sc in each st across. Turn. (80 sc)
Row 7 (RS, increase row): Repeat Row 5 pattern. (88 sts)
Row 8 (WS): Ch 1, sc in each st across. Turn. (88 sc)
Row 9 (RS, increase row): Repeat Row 5 pattern. (96 sts)
Row 10 (WS): Ch 1, sc in each st across. Turn. (96 sc)
Row 11 (RS, increase row): Repeat Row 5 pattern. (104 sts)
Row 12 (WS): Ch 1, sc in each st across. Turn. (104 sc)
Row 13 (RS, increase row): Repeat Row 5 pattern. (112 sts)
Row 14 (WS): Ch 1, sc in each st across. Turn. (112 sc)
Row 15 (RS, increase row): Repeat Row 5 pattern. (120 sts)
Row 16 (WS): Ch 1, sc in each st across. Turn. (120 sc)
Yoke marker positions after 7 increase rounds:
Checkpoint: After Row 16, the yoke piece should measure approximately 3.25 inches (8.3 cm) from the neckline chain, and 19 inches (48 cm) wide laid flat.
Sleeve Separation and Body Join
Row 17 (RS): Ch 1. Sc across 17 Right Front sts. Ch 4 (underarm bridge). Skip 24 Right Sleeve sts (place these on a holder or length of scrap yarn). Sc across 34 Back sts. Ch 4 (underarm bridge). Skip 24 Left Sleeve sts (place on holder). Sc across 17 Left Front sts. Turn.
Row 17 stitch count: 17 + 4 ch + 34 + 4 ch + 17 = 76 working sts.
Row 18 (WS): Ch 1, sc across all sts including ch sts of underarm bridges. Turn. (76 sc)
Bodice Body Rows
Continue flat (back and forth) for the lower bodice section. These rows build the bodice from the underarm to the waist.
Rows 19-26: Ch 1, sc in each st across. Turn. (76 sc)
Repeat this for 8 rows total.
Checkpoint: After Row 26, the bodice from underarm to current row should measure approximately 2.75 inches (7 cm). Total bodice length from neckline should be approximately 6 inches (15 cm).
Button Band Setup
The button band runs along the center front edges of the flat-worked bodice.
Right Front Button Loop Band:
With RS facing, join MC at lower right corner of right front edge. Ch 1. Work sc evenly up the right front edge, placing 6 button loops as follows: sc 2, (ch 3, skip 2 rows, sc 4) 5 times, ch 3, skip 2 rows, sc to top. Fasten off.
Left Front Button Band:
With RS facing, join MC at top left corner. Ch 1. Sc evenly down left front edge working approximately the same number of stitches as right band without any chain loops. Fasten off.
Sew buttons to left band aligned with button loops on right band.
Waist Bobble Transition Band
Join the bodice into a round before beginning the waist band.
With RS facing, join CC2 (mustard gold) at right front lower edge. Ch 1.
Rnd 1 (joining round): Sc across the 76 live bodice sts. Join the front edges closed by sl st the right and left front panels together at the center point. Sl st to first sc to join into a round. (76 sc in the round)
Rnd 2 (bobble round, CC2): Ch 2 (does not count as st). (Bo in next st, sc in next st) around, sl st to first bo to join. (38 bobbles, 38 sc = 76 sts)
Rnd 3 (CC2): Ch 1, sc in each st around. Sl st to join. Fasten off CC2. (76 sc)
Skirt Section
Rnd 4 (skirt setup, CC1): Join CC1 (bright yellow). Ch 3 (counts as first dc). Work (2 dc in next st, dc in next 2 sts) 24 times to increase evenly. (100 dc)
Rnd 5 (CC1): Ch 3, dc in each st around. Sl st to top of beg ch-3. (100 dc)
Rnd 6 (grid round, CC1): Ch 4 (counts as dc plus ch 1). (Sk 1 st, dc in next st, ch 1) 49 times, sk last st, sl st to 3rd ch of beg ch-4. (50 dc, 50 ch-1 sps)
Rnds 7-8 (CC1): Ch 4. (Dc in next dc, ch 1) 49 times, sl st to 3rd ch of beg ch-4. (50 dc, 50 ch-1 sps)
Rnd 9 (popcorn cluster round, MC white): Ch 1. Sc in each dc and each ch-sp around EXCEPT: replace ch-sp with pc at ch-sp positions 6, 19, 32, and 45. Sl st to first sc. (96 sc and 4 pc = 100 sts)
Rnd 10 (CC1): Ch 3. Dc in each st around. Sl st to top of beg ch-3. (100 dc)
Rnds 11-13 (CC1): Ch 4. (Sk 1, dc in next st, ch 1) 49 times, sk last, sl st to 3rd ch of beg ch-4. (50 dc, 50 ch-1 sps)
Rnd 14 (second popcorn round, MC white): Repeat Rnd 9 instruction, placing pc at the same column positions. (96 sc, 4 pc = 100 sts)
Rnd 15 (CC1): Ch 3, dc in each st around. Sl st to top of beg ch-3. (100 dc)
Rnd 16 (increase round, CC1): Ch 3, (2 dc in next st, dc in next 3 sts) 25 times, sl st to top of beg ch-3. (125 dc)
Rnd 17 (CC1): Ch 3, dc in each st around. Sl st to top of beg ch-3. (125 dc)
Rnd 18 (third popcorn round, MC white): Ch 1. Sc in each st around, placing pc at every 25th position to create 5 popcorn columns. (120 sc, 5 pc = 125 sts)
Rnds 19-20 (CC1): Ch 3, dc in each st around. Sl st to top of beg ch-3. On Rnd 20, work 2 dc in last st. (126 dc)
Checkpoint: The skirt portion should measure approximately 5.5 inches (14 cm) from the waist bobble band.
White Lace Band
Rnds 21-23 (MC white): Ch 5 (counts as dc, ch 2). (Sk 2, dc in next st, ch 2) 41 times, sl st to 3rd ch of beg ch-5. (42 dc, 42 ch-2 sps)
Yellow Shell Hem Edging
Rnd 24 (shell foundation, CC1): Join CC1. Ch 1. Sc in each dc and 2 sc in each ch-2 sp around. Sl st to first sc. (126 sc)
Rnd 25 (shell edging, CC1): Sl st in first st. (Sk 2 sts, 5 dc in next st, sk 2 sts, sl st in next st) repeat 21 times around. Fasten off CC1. (21 complete shells)
Sleeves (Make 2)
Transfer held sleeve stitches from holder to hook.
Join round setup: With RS facing, join CC1. Pick up and sc 4 sts across the underarm ch bridge, then work in the 24 sleeve sts. Sl st to first sc to join. (28 sc total)
Rnds 1-6 (MC white): Ch 1, sc in each st around. Sl st to join. (28 sc)
Sleeve scallop edging (CC1): Join CC1. Ch 1. (Sk 2, 5 dc into next st, sk 2, sl st in next st) 4 times, then sc in remaining 4 sts, sl st to join. Fasten off.
Repeat for second sleeve.
Finishing Your Baby Dress
Weave in all ends securely. Block the dress by soaking in lukewarm water with a drop of wool wash, gently squeezing out excess water, and laying flat to dry on a blocking mat. Shape the skirt into a nice A-line flare while damp.
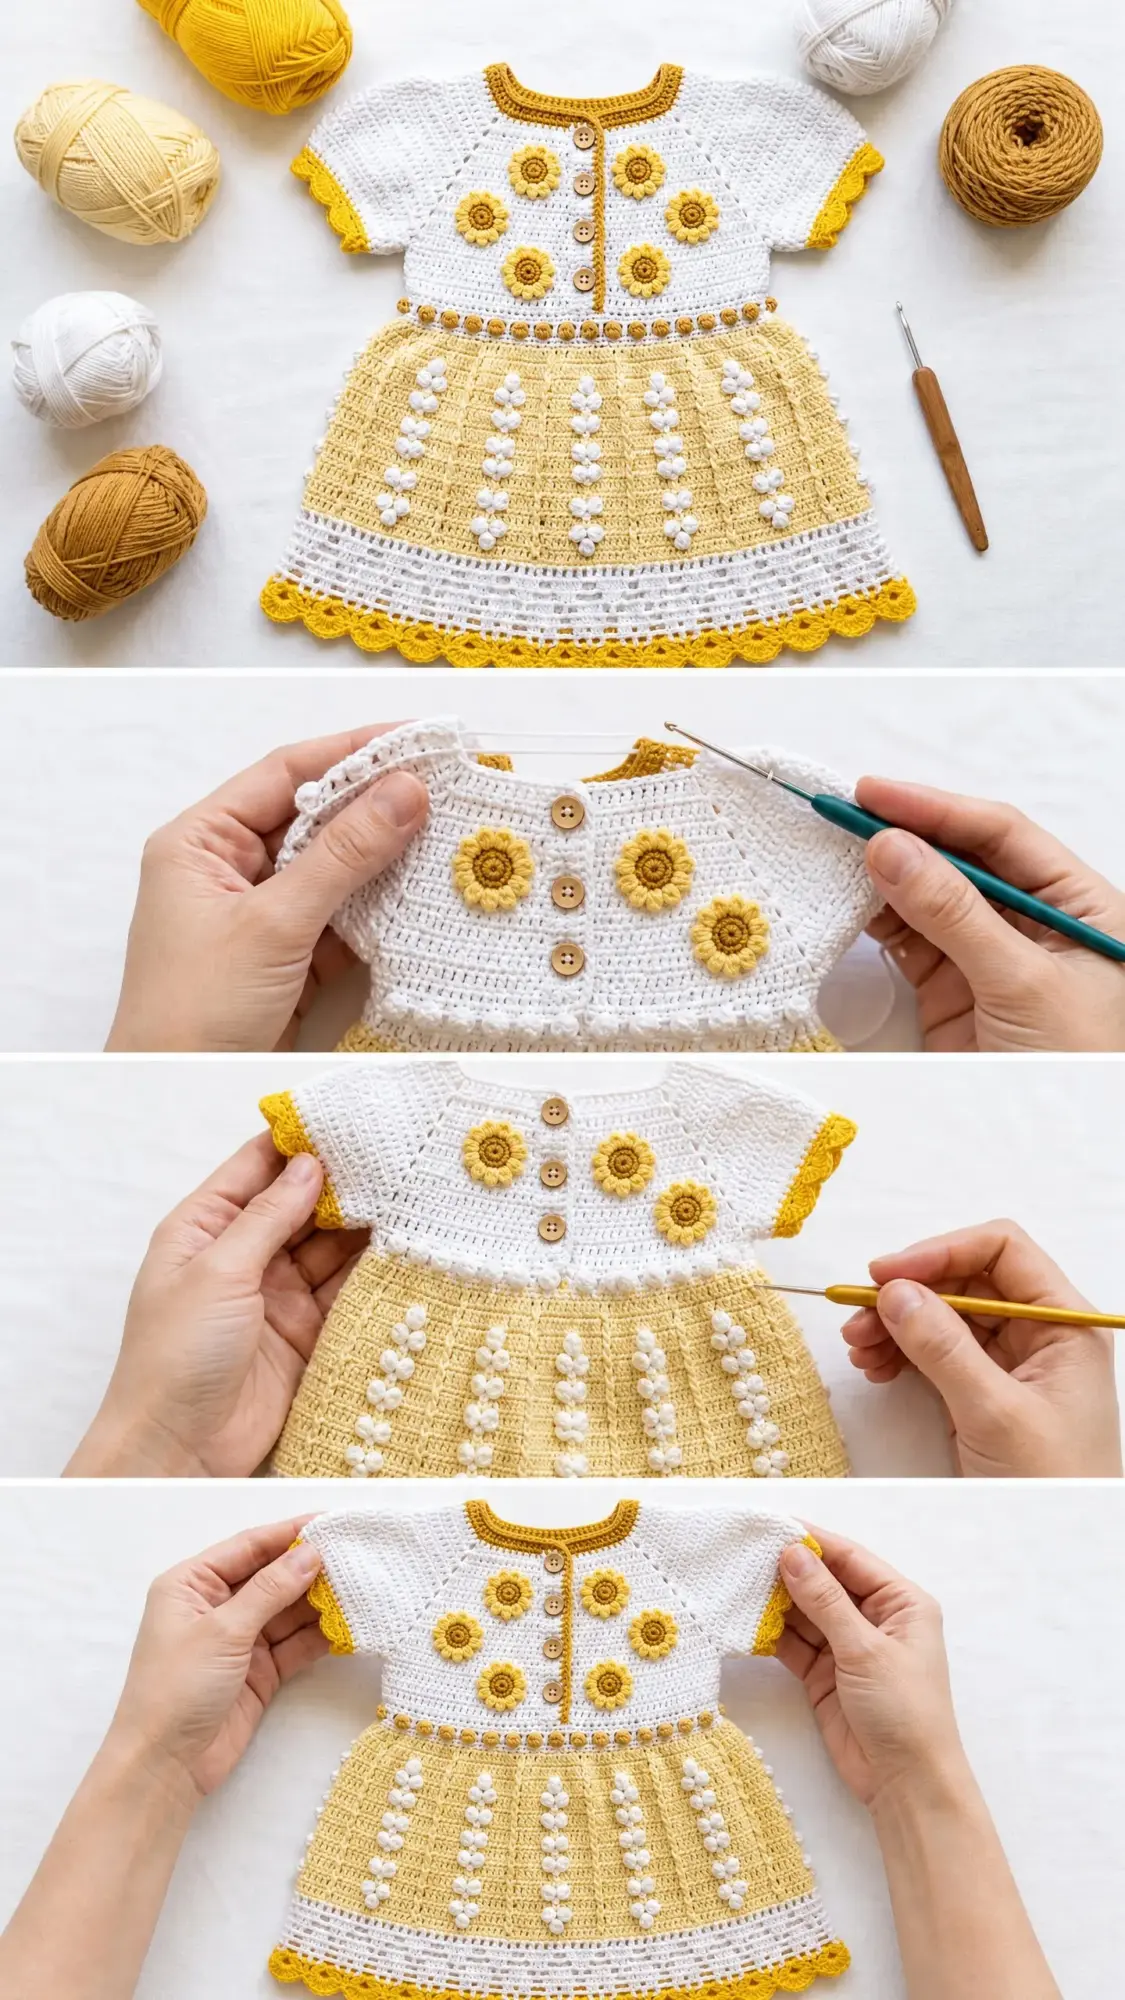
Once dry, sew all 6 sunflower motifs to the front bodice. Arrange them in two columns of 3 flowers each, flanking the center button band. Place the larger motifs at the top and the smaller ones below. Pin in place before sewing to ensure even placement.
Sew buttons securely to the left front band, aligned with the button loops on the right band.
Tips for Success
Managing multiple colors: Keep your yarn balls in separate bowls or bags to prevent tangling. Cut and rejoin colors rather than carrying long floats across the back of your work.
Popcorn stitch practice: If you’ve never made popcorns before, practice a few on a scrap piece first. The trick is inserting the hook cleanly into that first dc before pulling the loop through.
Sunflower placement: Take photos of different arrangements before committing to sewing. What looks balanced in your hand might look different when the dress is worn.
Button choice: Wood buttons add a lovely natural touch that complements the cotton yarn. Make sure they fit through your chain-3 button loops before sewing them on.
I hope this sunshine-filled baby dress brings joy to both your crafting time and the little one who wears it. The construction teaches valuable skills while creating something truly beautiful.
Save this pattern to your Pinterest boards so you can find it when you’re ready to start. And please leave a comment below if you make one. I would absolutely love to see your color choices and finished dresses!
