
Last summer, my niece came running up to me at a family picnic wearing a tulle princess dress that was already ripping at the seams. She looked at me with those big eyes and said, "Auntie, can you make me a real fairy dress?" I promised her I would. That night, I started sketching.
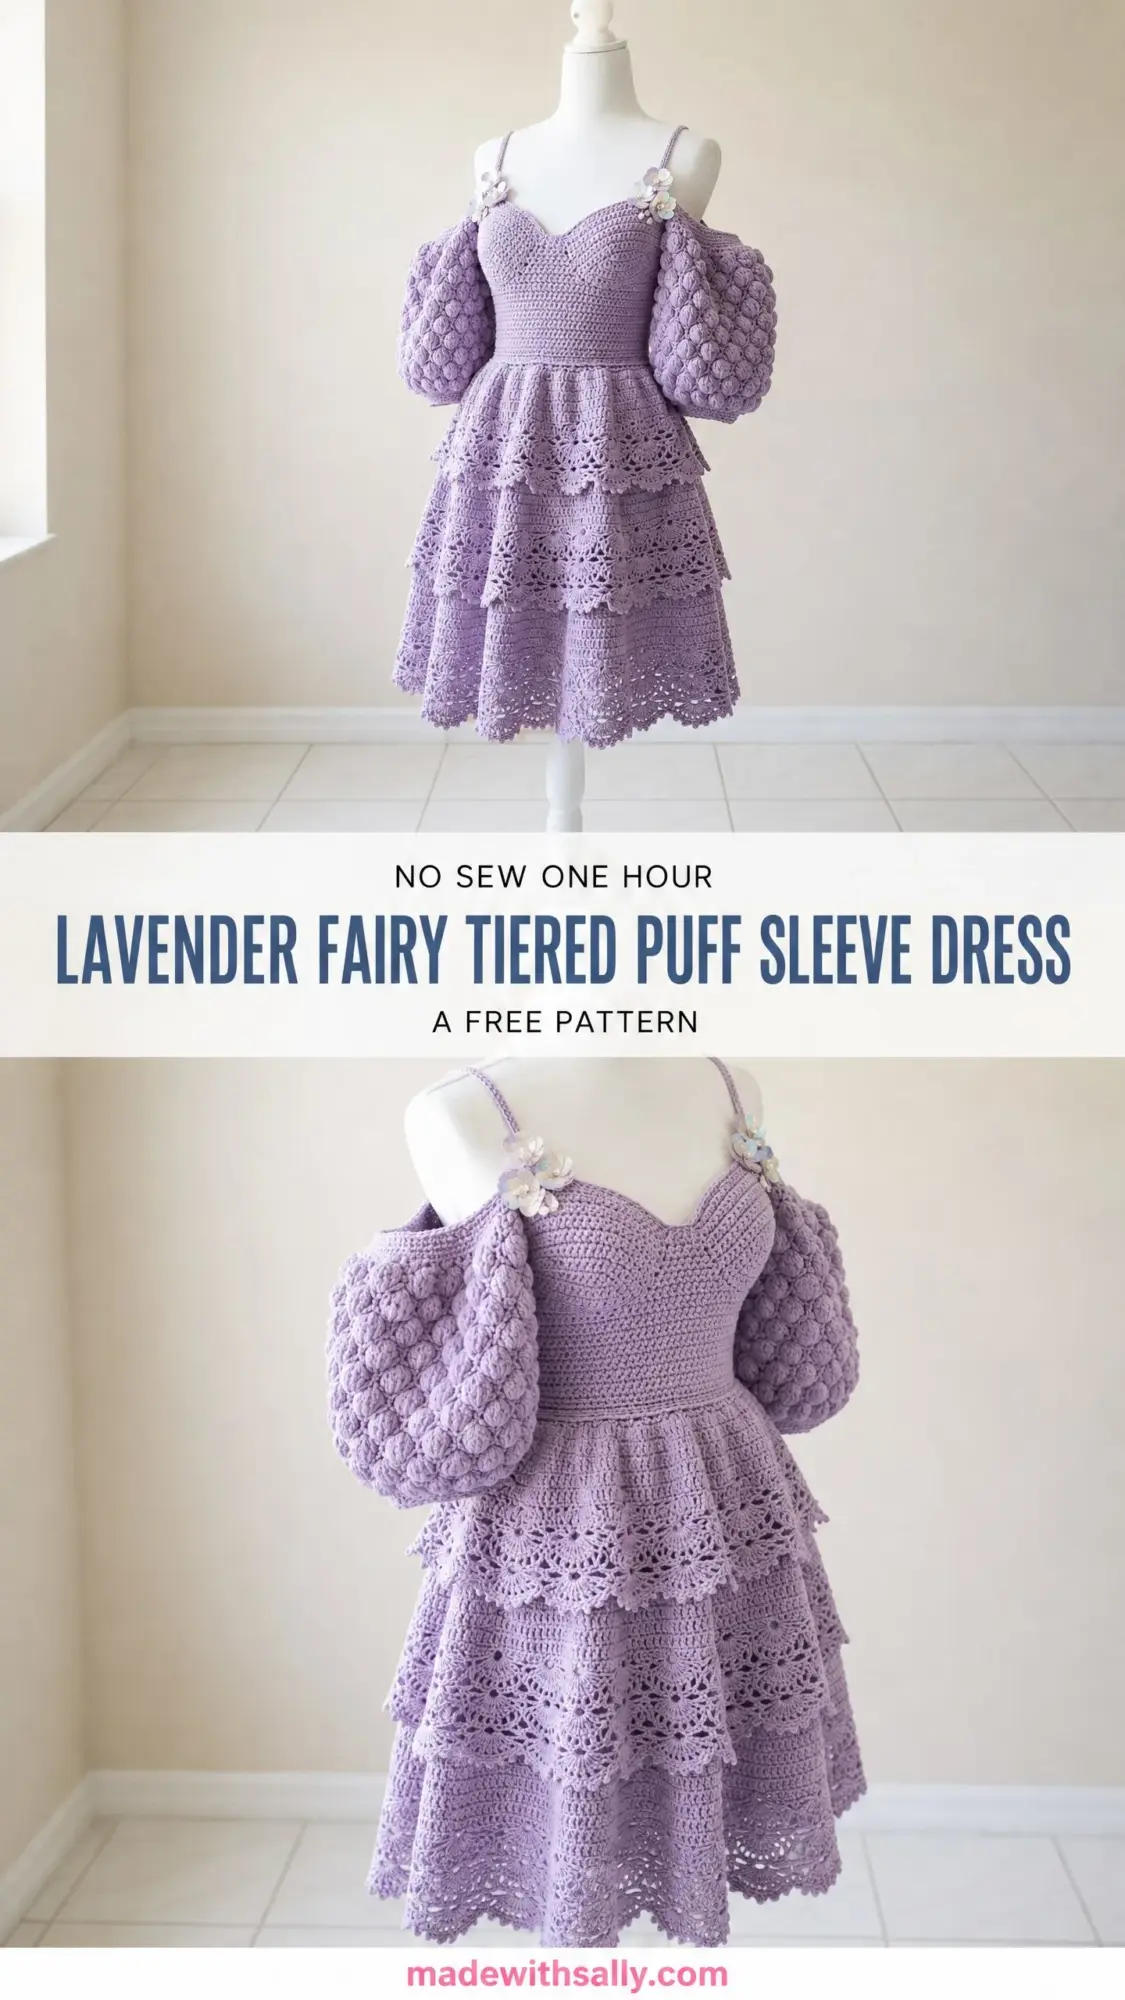
Six prototypes, countless hours of frogging, and one very patient mannequin later, this Lavender Fairy Tiered Puff Sleeve Dress was born. Every detail was designed with her twirling and dancing in mind. The dramatic puff sleeves that she could wave like wings. The cascading lace tiers that swish when she spins. The soft lavender color she picked out herself at the yarn store.
When I finally slipped it over her head and she saw herself in the mirror, she actually gasped. That moment made every single one of those 40-something hours worth it. Now I am sharing this crochet pattern with you so you can create that same magic for the little fairy in your life.
About This Crochet Pattern
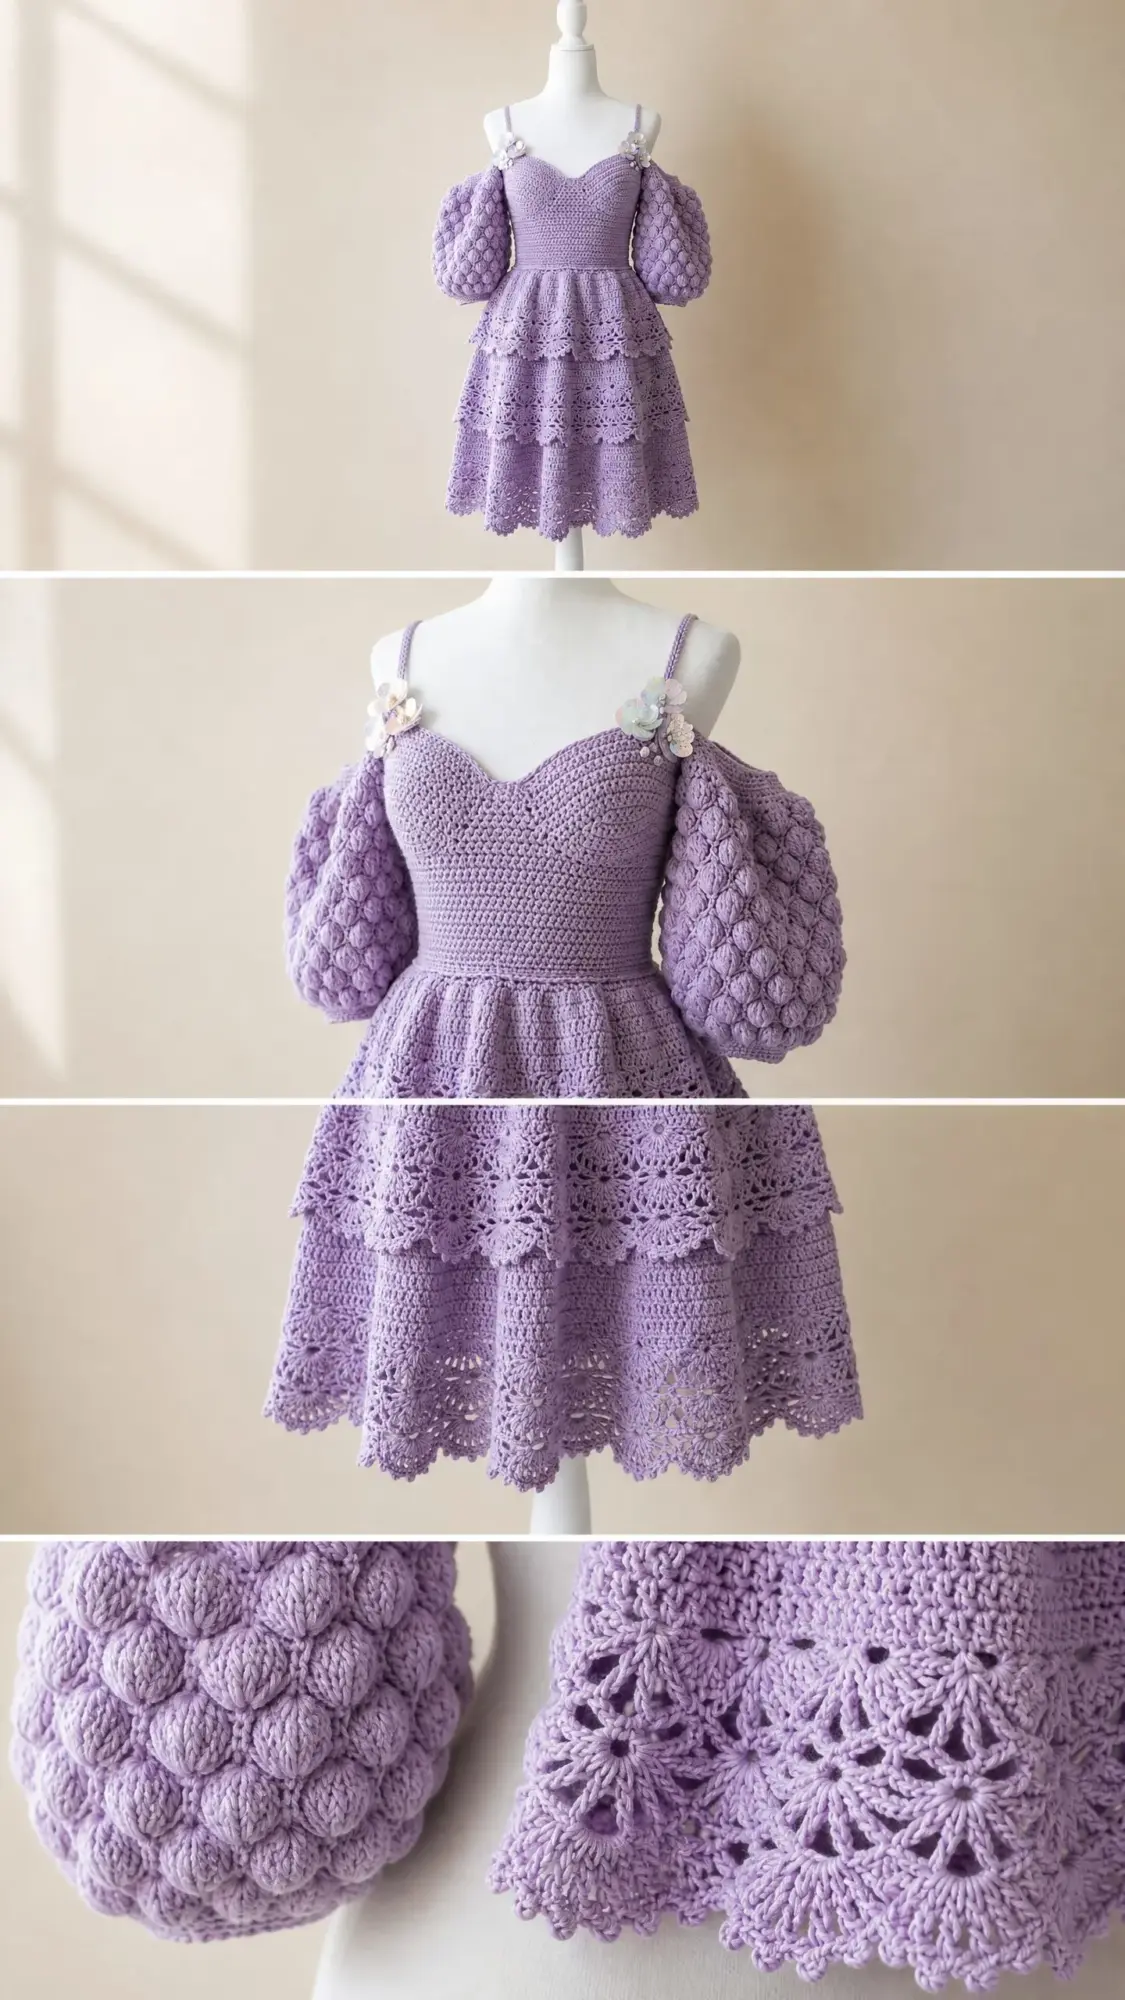
This is an advanced crochet project, and I want to be upfront about that. But please do not let the word "advanced" scare you away if you have intermediate skills and patience. The dress combines several techniques you may already know. You will work a fitted bodice in the round, create dramatic honeycomb bobble puff sleeves, and construct three cascading lace tiers with beautiful scalloped edges.
The construction is methodical and actually quite logical once you understand the order. You will make the straps first, then the bodice from the top down, followed by the waistband. Each of the three skirt tiers is worked separately as a flat panel, seamed, and then layered onto the one above it. The sleeves are their own little project, worked in the round and attached at the shoulders. Finally, you will add the iridescent floral embellishments.
Skill Level: Advanced. You should be comfortable with working in the round, reading lace pattern instructions, creating bobble stitches, and basic seaming.
Time Estimate: Plan for 35 to 50 hours of work. This is not a weekend project, but it is absolutely achievable if you break it into sections.
Finished Measurements
This pattern is written for a child’s size 5-6, fitting a chest measurement of 23 to 24 inches.
Materials Needed
Yarn:
Approximately 1,200 yards / 1,097 m of DK weight yarn (also called CYCA 3 or light worsted) in soft lavender
Recommended Yarn Options:
1. Paintbox Yarns Simply DK in shade Lilac (100% acrylic). This has excellent stitch definition and is machine washable, which is perfect for a child’s garment. You will need approximately 5 skeins.
2. Lion Brand Pound of Love in Lavender (100% acrylic). A budget-friendly choice with a softer drape. Purchase 2 skeins.
3. Paintbox Yarns Cotton DK in Misty Lilac (100% cotton). This gives a stiffer, more structured result with crisper lace definition. Great for warmer weather.
Hooks:
Additional Supplies:
Gauge
Getting gauge right is essential for this garment to fit properly. With your E-4 / 3.5 mm hook:
I recommend swatching in the round if possible. Your tension when working flat often differs from your tension in the round.
Abbreviations and Stitch Definitions
Let me walk you through every abbreviation and special stitch you will encounter. I am defining them all here so you can refer back as needed.
Basic Abbreviations:
Special Stitches
Bobble (bo):
This creates those wonderful puffy bumps on the sleeves. Yarn over, insert hook into stitch, yarn over and pull up a loop, yarn over and pull through 2 loops. You now have one incomplete half double crochet. Repeat this action 4 more times in the same stitch. You will have 6 loops on your hook. Yarn over and pull through all 6 loops at once. Chain 1 to close and lock the bobble. One bobble made.
Honeycomb Bobble Stitch (worked in the round):
The bobbles alternate position each time you work Round A, creating that gorgeous honeycomb offset effect.
Lace Fan Shell (multiple of 12 sts plus 6):
Repeat Rows 2-3 for the pattern.
Scallop Edge:
Sl st into first st, (sc in next st, hdc in next st, 3 dc in next st, hdc in next st, sc in next st, sl st in next st) rep across.
Pattern Instructions
Straps (Make 2)
Use D-3 / 3.25 mm hook.
Foundation: Ch 5.
Row 1: Sc in 2nd ch from hook and in each ch across. (4 sc)
Rows 2-60: Ch 1, turn. Sc in each st across. (4 sc)
After Row 60, your strap measures approximately 11 in / 28 cm. Fasten off, leaving a 12 in / 30 cm tail for sewing. Set both straps aside.
Tip: You can adjust the strap length. Measure from your child’s shoulder front, over the shoulder, and down to where you want it to attach at the back.
Bodice
Switch to E-4 / 3.5 mm hook.
The bodice is worked in joined rounds from the top down.
Foundation Chain: Ch 109. Being careful not to twist, sl st into first ch to form a ring.
Round 1: Ch 1, sc in same st as join, sc in each ch around. Sl st to first sc to join. (108 sc)
Place a marker at st 1 (center front left edge) and another at st 55 (center front right edge). This defines your front 54 stitches. The remaining 54 stitches form the back panel.
Round 2: Ch 1, sc in each st around, sl st to first sc to join. (108 sc)
Sweetheart Neckline Short Rows
These rows shape the beautiful dipped neckline and are worked only across the front 54 stitches.
Short Row Setup: With RS facing, join yarn at center front at st 28. Ch 1.
Short Row 1 (RS): Sc across 20 sts starting at st 28 (work sts 28-47). Turn. (20 sc)
Short Row 2 (WS): Ch 1, sc across 16 sts (work sts 30-45). Turn. (16 sc)
Short Row 3 (RS): Ch 1, sc across 12 sts (work sts 32-43). Turn. (12 sc)
Short Row 4 (WS): Ch 1, sc across 8 sts (work sts 34-41). Turn. (8 sc)
Short Row 5 (RS): Ch 1, sc across 4 sts (work sts 36-39). Turn. (4 sc)
Short Row 6 (WS): Ch 1, sc across 8 sts, picking up 2 sts from the held stitches on each side. Turn. (8 sc)
Short Row 7 (RS): Ch 1, sc across 12 sts, picking up 2 sts from each side. Turn. (12 sc)
Short Row 8 (WS): Ch 1, sc across 16 sts, picking up 2 sts from each side. Turn. (16 sc)
Short Row 9 (RS): Ch 1, sc across 20 sts, picking up 2 sts from each side. Turn. (20 sc)
Short Row 10 (WS): Ch 1, sc across all 20 sts. Do not turn. Join to resume working in the round.
Continue Bodice in Rounds
Round 3: Ch 1, sc in each st around, sl st to join. (108 sc)
Round 4 (Increase round): Ch 1, (sc in next 26 sts, 2 sc in next st) 4 times, sl st to join. (112 sc)
Round 5: Ch 1, sc in each st around, sl st to join. (112 sc)
Round 6 (Increase round): Ch 1, (sc in next 27 sts, 2 sc in next st) 4 times, sl st to join. (116 sc)
Round 7: Ch 1, sc in each st around, sl st to join. (116 sc)
Round 8 (Increase round): Ch 1, (sc in next 28 sts, 2 sc in next st) 4 times, sl st to join. (120 sc)
Checkpoint: Your bodice now measures 120 stitches around, which equals your 24 in chest measurement. The piece should be approximately 2.5 in from the neckline edge.
Rounds 9-12: Ch 1, sc in each st around, sl st to join. (120 sc each round)
Round 13 (Waist decrease): Ch 1, (sc in next 28 sts, sc2tog) 4 times, sl st to join. (116 sc)
Round 14: Ch 1, sc in each st around, sl st to join. (116 sc)
Round 15 (Waist decrease): Ch 1, (sc in next 27 sts, sc2tog) 4 times, sl st to join. (112 sc)
Round 16: Ch 1, sc in each st around, sl st to join. (112 sc)
Round 17 (Waist decrease): Ch 1, (sc in next 26 sts, sc2tog) 4 times, sl st to join. (108 sc)
Round 18: Ch 1, sc in each st around, sl st to join. (108 sc)
Checkpoint: Your bodice should measure approximately 6 in total length. The waist is now 108 stitches, or about 22 in.
Waistband
Still using E-4 / 3.5 mm hook.
Round 19: Ch 2 (counts as hdc), hdc BLO in each st around, sl st to top of ch-2. (108 hdc)
Rounds 20-26: Ch 2, hdc BLO in each st around, sl st to top of ch-2. (108 hdc each round)
The waistband measures approximately 1.5 in in height. Fasten off and weave in ends.
Skirt Tier 1
All tiers are worked flat in rows, then seamed and attached.
Circumference: 1.5 times waist = 162 sts
Foundation: Ch 163.
Row 1 (RS): Sc in 2nd ch from hook, sk 2 ch, 5 dc in next ch, (sk 2 ch, sc in next ch, sk 2 ch, 5 dc in next ch) 12 times, sk 2 ch, sc in last ch. (13 fan clusters, 14 sc)
Row 2 (WS): Ch 3, turn, 2 dc in first sc, (sc in 3rd dc of next fan, 5 dc in next sc) 12 times, sc in 3rd dc of last fan, 3 dc in last sc. (162 sts)
Row 3 (RS): Ch 1, turn, sc in first dc, (5 dc in next sc, sc in 3rd dc of next fan) 13 times, sc in top of ch-3. (162 sts)
Rows 4-10: Repeat Rows 2-3, ending on a Row 2.
Scallop Edge: Turn work so foundation chain edge is at top. Join yarn with sl st. Work scallop edge pattern across. Fasten off.
Seam: Fold panel with RS together, sl st short edges to create center back seam. Turn right side out.
Attachment: Sl st top edge of Tier 1 to bottom round of waistband, gathering evenly (162 sts into 108).
Skirt Tier 2
Circumference: 2 times waist = 216 sts
Foundation: Ch 217.
Row 1 (RS): Sc in 2nd ch from hook, sk 2 ch, 5 dc in next ch, (sk 2 ch, sc in next ch, sk 2 ch, 5 dc in next ch) 17 times, sk 2 ch, sc in last ch. (18 fan clusters, 19 sc)
Rows 2-12: Continue in lace fan shell pattern as established. (216 sts each row)
Work scallop edge, seam, and attach to Tier 1 at approximately Row 8, overlapping by 1.5 in.
Skirt Tier 3
Circumference: 2.5 times waist = 264 sts
Foundation: Ch 265.
Row 1 (RS): Sc in 2nd ch from hook, sk 2 ch, 5 dc in next ch, (sk 2 ch, sc in next ch, sk 2 ch, 5 dc in next ch) 21 times, sk 2 ch, sc in last ch. (22 fan clusters, 23 sc)
Rows 2-14: Continue in lace fan shell pattern. (264 sts each row)
Work scallop edge, seam, and attach to Tier 2 at approximately Row 9.
Sleeves (Make 2)
Use E-4 / 3.5 mm hook.
Foundation Ring: Ch 43, sl st to first ch to form a ring.
Round 1: Ch 2, hdc in each ch around, sl st to top of ch-2. (42 hdc)
Round 2 (Plain): Ch 2, hdc in each st around, sl st to join. (42 hdc)
Round 3 (Increase): Ch 2, (hdc in next 5 sts, 2 hdc in next st) 7 times, sl st to join. (49 hdc)
Continue working honeycomb bobble pattern with increases as established in the full pattern, building to maximum circumference, then decreasing toward the cuff.
Finishing
1. Attach straps: Position straps at front bodice, cross at back, and sew securely.
2. Attach sleeves: Gather top edge of each sleeve and tack to strap at shoulder point. The sleeves do NOT attach to the bodice armhole, creating that beautiful cold-shoulder effect.
3. Add embellishments: Sew iridescent floral appliques at the strap-to-bodice junction on each shoulder.
4. Block: Wet block the entire dress, pinning the lace tiers flat to open up the fan pattern.
5. Weave in all remaining ends.
Tips for Success
Work this dress in sections and take breaks. The bodice, each tier, and the sleeves can all be completed separately before assembly. This makes the project feel much more manageable.
If your lace tiers are curling, do not worry. Blocking will fix this completely. Pin each tier aggressively when wet blocking.
The honeycomb bobble stitch on the sleeves looks complex but becomes rhythmic once you get into it. Count your stitches after each round until you feel confident.
Thank you so much for choosing this pattern for your little one. I hope the making brings you as much joy as it brought me, and I hope the wearing brings your child pure fairy magic.
If you make this lavender fairy dress, I would absolutely love to see it. Tag me on Instagram or share a photo in my Facebook group. Seeing your creations is honestly the best part of sharing patterns.
Go ahead and save this pattern to your Pinterest boards so you can find it when you are ready to start. And please drop a comment below if you make one. I read every single one, and I would love to hear how it turns out for you.
