
I’ve been looking for the perfect statement dress pattern for ages. You know the kind. Something that makes people stop and ask, "Wait, you made that?" This sage green boho lace dress is exactly that project.
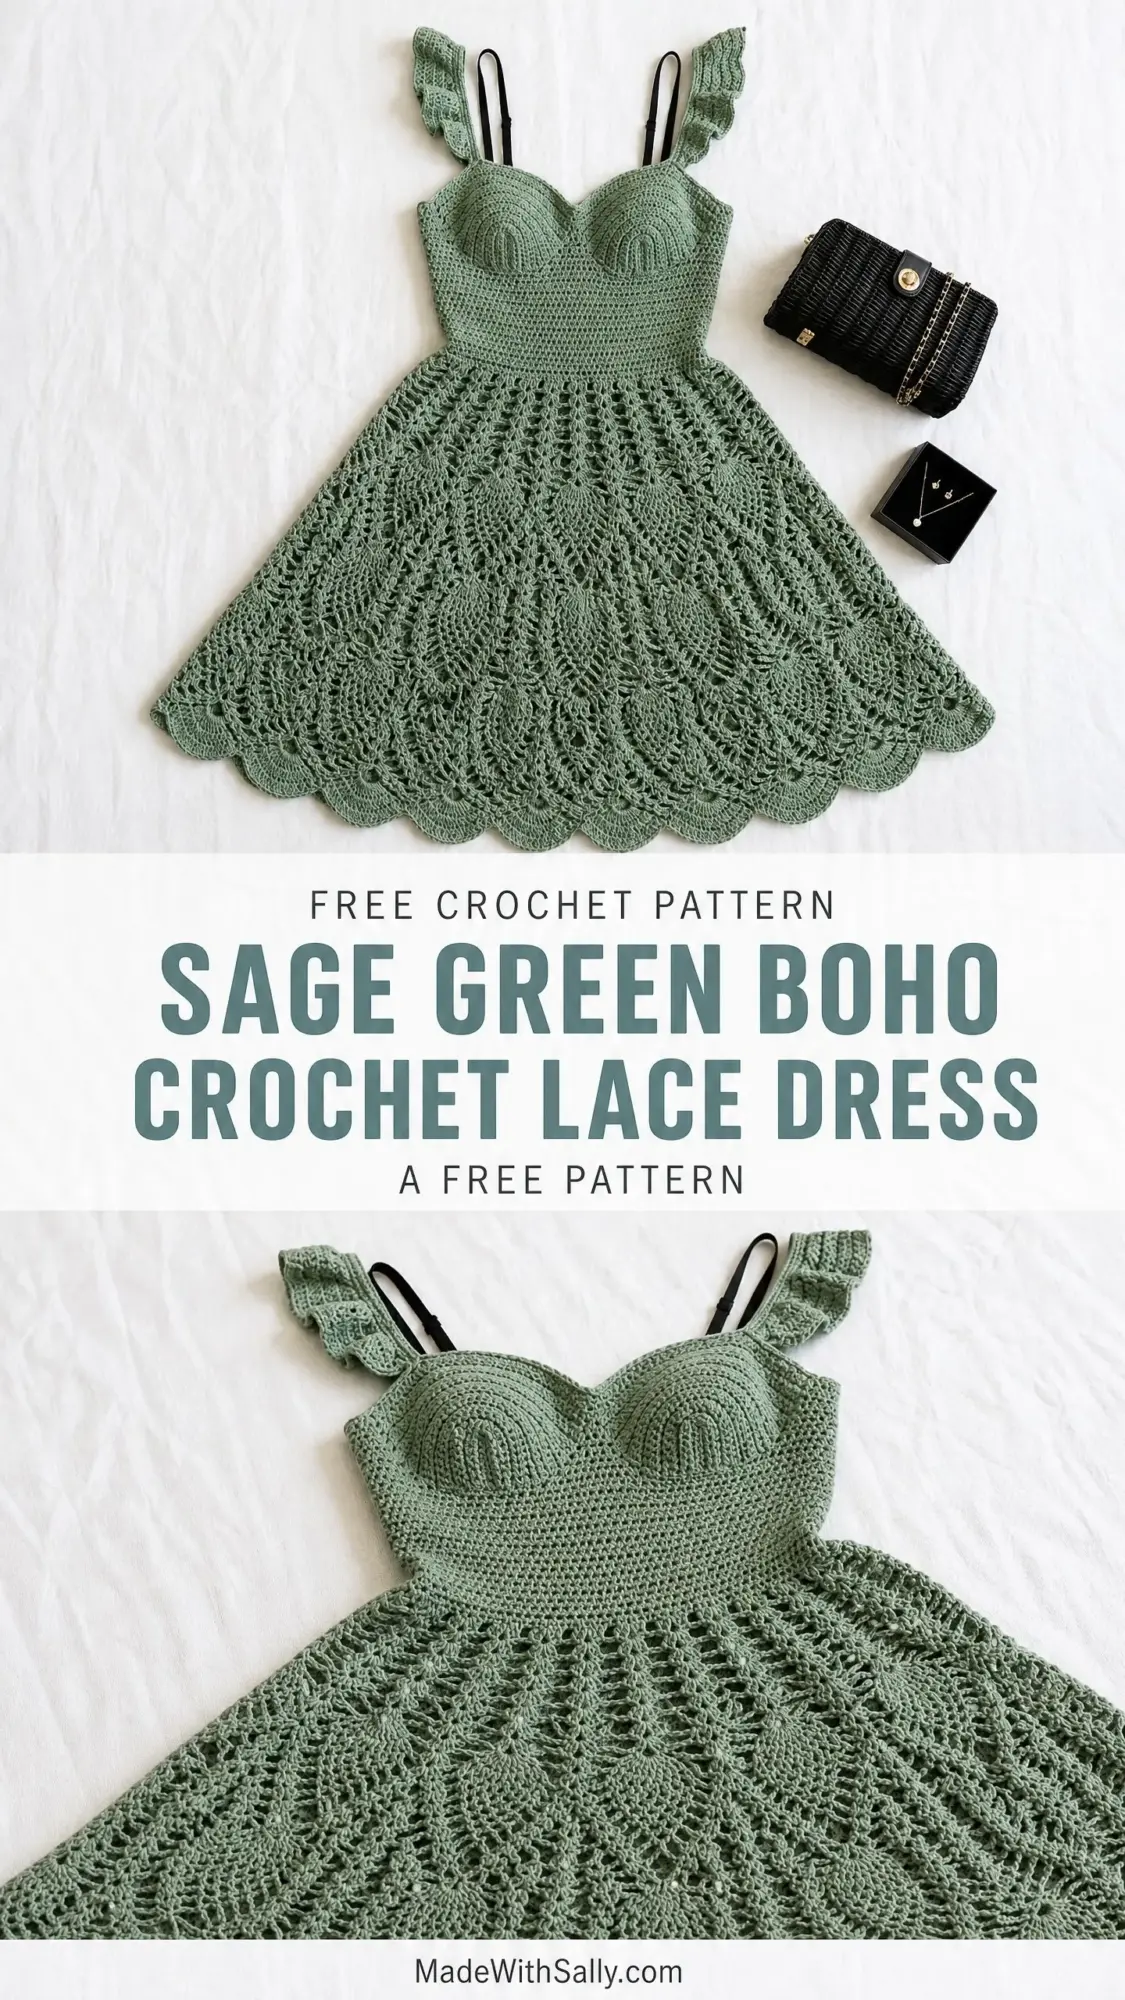
When I first saw this design, I knew I had to break it down for you. The combination of a structured sweetheart bustier bodice, those dreamy flutter sleeves, and a full pineapple lace skirt with scalloped edges hits every mark. It’s romantic. It’s bohemian. It’s the kind of handmade piece you’ll treasure forever.
Fair warning though. This is an advanced pattern that will challenge you in the best way. If you’ve tackled a couple of lace garments before, you’re ready. Let’s dive in.
Why This Crochet Lace Dress Pattern Stands Out
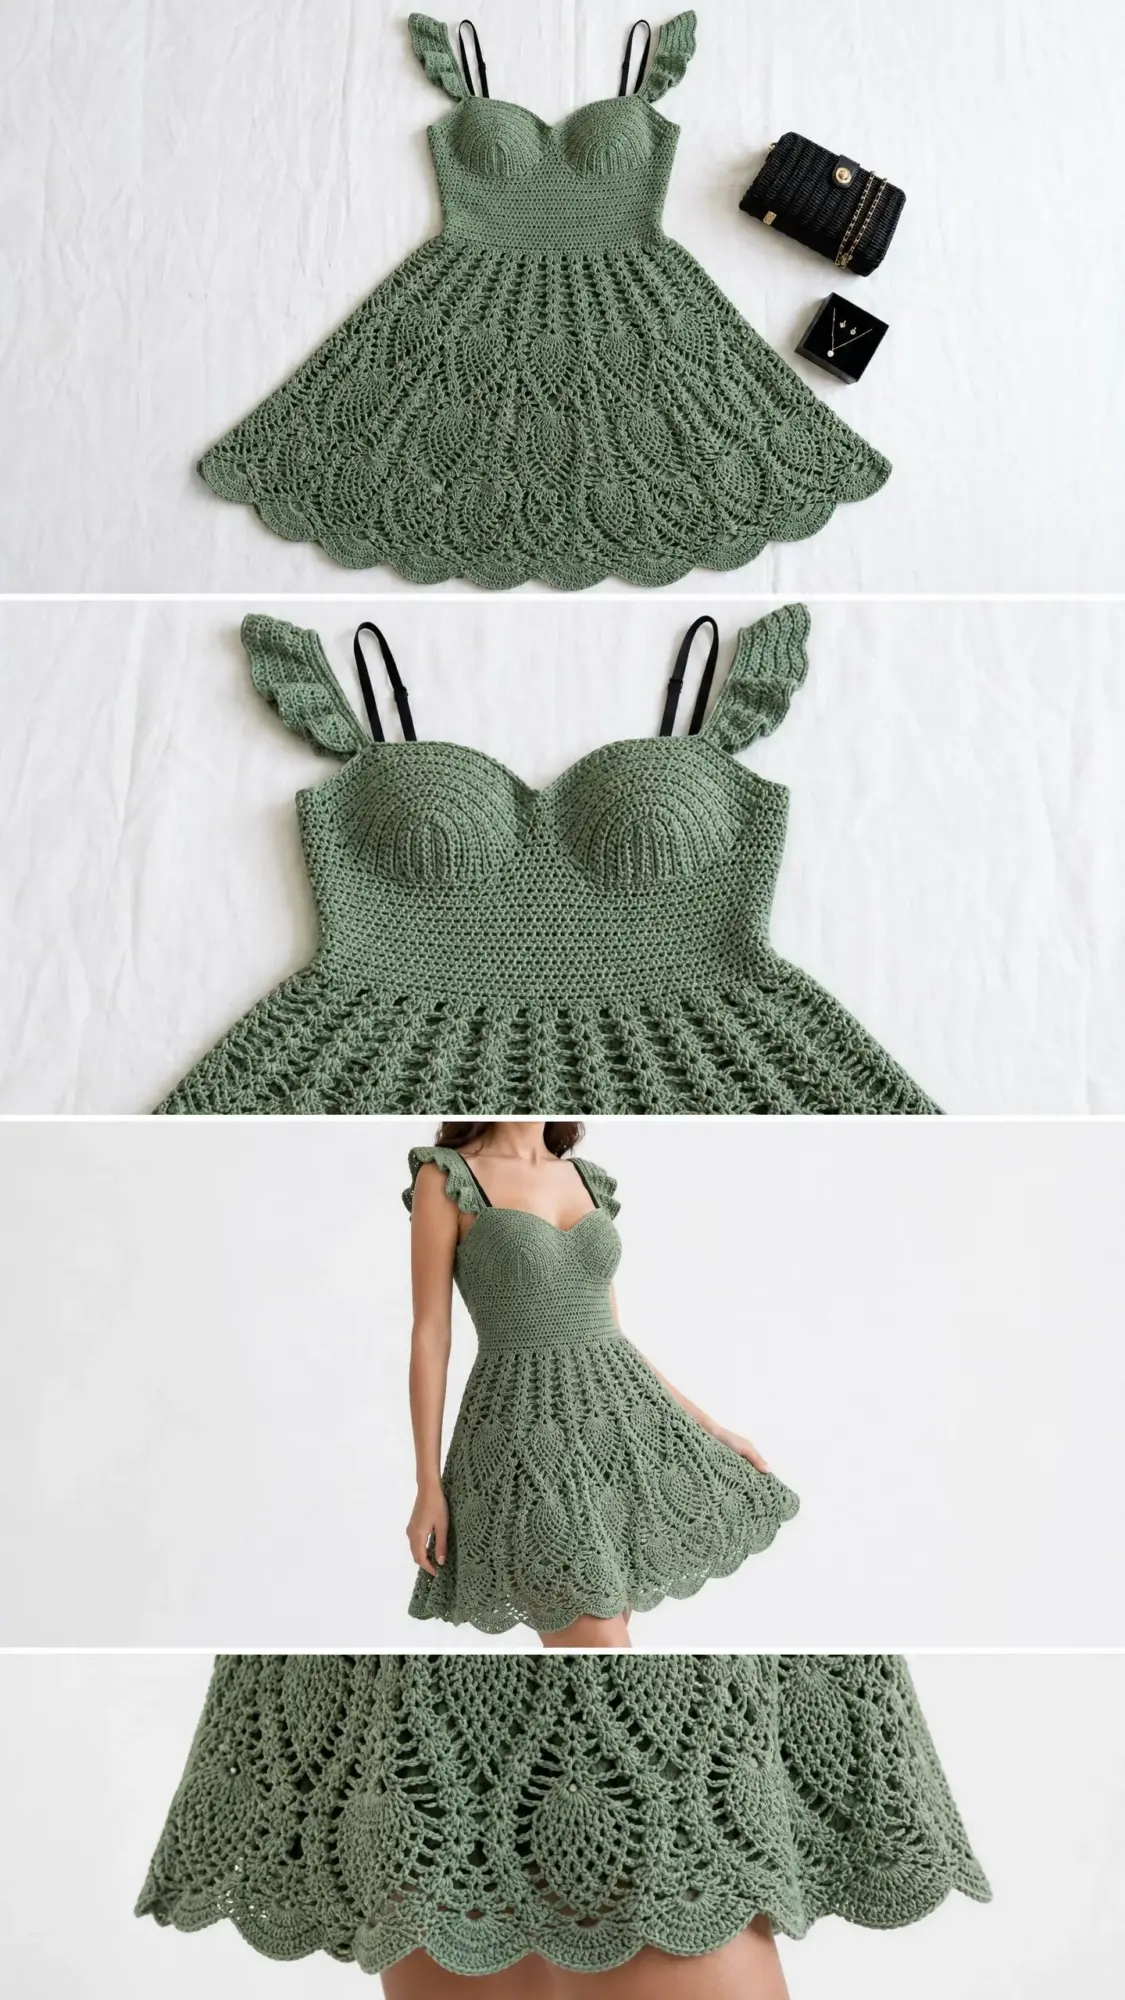
This isn’t your typical summer dress project. The construction combines multiple techniques that create a truly professional result. You’ll work shaped bustier cups that give real three-dimensional form. The fitted waistband cinches everything beautifully. And that skirt? Thirteen full pineapple lace repeats create movement and drama that photograph like a dream.
The clever use of purchased adjustable bra straps means you get lingerie-level support without having to engineer crocheted straps that stretch or slip. Smart design choices like this separate a wearable garment from a beautiful-but-impractical project.
Skill Level: Advanced
Time Estimate: Approximately 40 to 60 hours
The skirt accounts for most of that time due to the pineapple lace repeats. Plan for this to be a labor of love spread across several weeks or months.
Finished Measurements
This pattern is written for a size Small/Medium, which corresponds to US dress sizes 4 to 8.
Bust: 32 to 34 inches (81 to 86 cm) with 0 to 1 inch ease
Waist: 26 to 28 inches (66 to 71 cm)
Hip/Skirt hem circumference: approximately 68 to 72 inches (173 to 183 cm)
Total length (bodice plus skirt, excluding straps): approximately 22 to 24 inches (56 to 61 cm)
Bodice height: approximately 6 inches (15 cm)
Waistband height: approximately 2 inches (5 cm)
Skirt length: approximately 14 to 16 inches (35.5 to 40.5 cm)
Size customization tips are included at the end of the pattern.
Materials You’ll Need
Yarn: DK weight (weight category 3), smooth mercerized cotton or cotton-blend yarn
Yardage: approximately 1,400 to 1,600 yards (1,280 to 1,463 meters) in sage green
Hooks:
Notions:
Yarn Suggestions
Option 1: Lion Brand 24/7 Cotton in Sage (DK weight, 100 percent mercerized cotton, 186 yards per 100 g skein). This yarn has excellent stitch definition for lace work and holds its shape after blocking. You will need approximately 8 skeins.
Option 2: Paintbox Yarns Cotton DK in Grass Green or Pistachio (100 percent cotton, 273 yards per 100 g skein). Soft, affordable, and widely available. You will need approximately 6 skeins.
Option 3: Scheepjes Catona (sport/DK weight, 100 percent mercerized cotton, 125 meters per 50 g ball). Exceptional stitch definition and color range. Look for colorway 212 Sage Green or 391 Khaki. You will need approximately 13 balls.
Substitution note: Use a smooth, tightly spun cotton or cotton-blend yarn. Avoid fuzzy, hairy, or textured yarns as they obscure the pineapple lace pattern. The yarn must be machine washable since this garment will be worn against the skin.
Gauge
Getting gauge right is crucial for a fitted garment like this. Please don’t skip swatching.
With E-4 / 3.5 mm hook in single crochet:
20 stitches x 24 rows = 4 inches (10 cm)
With F-5 / 3.75 mm hook in pineapple lace pattern:
One pineapple repeat (16 stitches) = 3.2 inches (8 cm) wide
One full pineapple lace pattern repeat (12 rounds) = 3 inches (7.5 cm) tall
If your swatch is too small, go up a hook size. Too big? Go down. The bodice is fitted, so gauge directly determines whether the dress will fit as written.
Abbreviations (US Terms)
Before we start, let me define every abbreviation you’ll encounter:
Special Stitches for This Crochet Dress Tutorial
These special stitches create the beautiful texture and structure of this garment. Take time to practice each one before starting.
Pineapple Cluster (PC)
This stitch forms the individual leaf rows of the pineapple motif. Work as follows: yarn over, insert hook into indicated stitch or chain space, yarn over and pull up a loop (3 loops on hook), yarn over and draw through 2 loops (2 loops remain). Repeat this process inserting into the SAME space until you have 5 incomplete double crochets all sharing the same base (6 loops on hook). Yarn over and draw through all 6 loops at once. One Pineapple Cluster complete.
Shell Stitch
Work 5 dc all into the same stitch or chain space. This creates a fan or shell shape used at the base and between pineapples.
V-Stitch (V-st)
Work (1 dc, ch 2, 1 dc) all into the same stitch or chain space.
Scallop Edging
Work (sc, hdc, 3 dc, hdc, sc) all into one chain space. This creates one scallop unit for the hem border.
Ruffle Stitch
Working into the front loop only of the indicated stitch, work 3 dc into every stitch across or around. This creates a ruffled fullness for the flutter sleeve detail.
Sweetheart Curve Decrease
This is used at the center front of the bodice neckline to create the dip of the sweetheart shape. At the center 4 stitches: sc2tog over sts 1 and 2, sc into st 3, sc2tog over sts 3 and 4. This pulls the center inward creating the V-shape dip. Work symmetrically on each side of center.
Important Pattern Notes
Before you begin, read through these construction notes carefully:
1. The dress is worked in this order: two bustier cups (flat), then joined and the bodice worked flat from the cups down, then the waistband worked in the round, then the skirt worked in the round from the waist down, then ruffle sleeves added at armhole edges, then the hem scallop edging worked as the final round.
2. The back of the dress is straight across (no sweetheart dip) while the front has the sweetheart neckline. This is achieved during flat bodice construction.
3. Black adjustable bra straps are NOT crocheted. They are purchased lingerie straps that are threaded through reinforced crochet channel loops at the shoulders and sewn in place at the back with a sewing needle and thread.
4. The pineapple lace skirt is worked in the round. Each pineapple repeat is 16 stitches wide and 12 rounds tall. You will work 13 full pineapple repeats across the 208-stitch skirt foundation.
5. Use stitch markers generously during bodice construction to track the center front, side seams, and cup placement.
6. All rounds begin with a standing stitch or sl st join unless otherwise noted. Rounds are joined with sl st to the first stitch of the round.
7. Right side is the outside (public side) of the garment throughout.
Step by Step Instructions
Section 1: Bustier Cups (Make 2)
Each cup creates a rounded convex mound approximately 3.5 inches (9 cm) wide at the widest point and 2.5 inches (6.5 cm) tall.
Foundation: Ch 12.
Row 1 (RS): Sc in 2nd ch from hook and in each ch across. Turn. (11 sc)
Row 2 (WS): Ch 1, 2 sc in first st, sc across to last st, 2 sc in last st. Turn. (13 sc)
Row 3: Ch 1, 2 sc in first st, sc across to last st, 2 sc in last st. Turn. (15 sc)
Row 4: Ch 1, 2 sc in first st, sc across to last st, 2 sc in last st. Turn. (17 sc)
Row 5: Ch 1, 2 sc in first st, sc across to last st, 2 sc in last st. Turn. (19 sc)
Row 6: Ch 1, sc across. Turn. (19 sc)
Row 7: Ch 1, sc2tog, sc across to last 2 sts, sc2tog. Turn. (17 sc)
Row 8: Ch 1, sc2tog, sc across to last 2 sts, sc2tog. Turn. (15 sc)
Row 9: Ch 1, sc across. Turn. (15 sc)
Row 10: Ch 1, sc2tog, sc across to last 2 sts, sc2tog. Turn. (13 sc)
Row 11: Ch 1, sc2tog, sc across to last 2 sts, sc2tog. Turn. (11 sc)
Do not fasten off the first cup. Leave the second cup with a tail for joining.
To add dimension, work one round of sc around the entire perimeter of each cup through both loops, placing 3 sc in each corner. This creates the base ridge for seaming to the bodice.
Section 2: Bodice Construction
The bodice consists of:
Front Bodice Panel
Cup Joining Row (RS): With E-4 hook, attach yarn to the bottom left corner of the left cup. Work sc evenly across the bottom edge of left cup (11 sc), then without chaining, work sc evenly across the bottom edge of right cup (11 sc). Turn. (22 sc)
Row 1 (WS): Ch 1, sc across. Turn. (22 sc)
Row 2: Ch 1, 2 sc in first st, sc across to last st, 2 sc in last st. Turn. (24 sc)
Row 3: Ch 1, sc across. Turn. (24 sc)
Row 4: Ch 1, 2 sc in first st, sc across to last st, 2 sc in last st. Turn. (26 sc)
Row 5: Ch 1, sc across. Turn. (26 sc)
Row 6: Ch 1, 2 sc in first st, sc across to last st, 2 sc in last st. Turn. (28 sc)
Row 7: Ch 1, sc across. Turn. (28 sc)
Row 8: Ch 1, 2 sc in first st, sc across to last st, 2 sc in last st. Turn. (30 sc)
Row 9: Ch 1, sc across. Turn. (30 sc)
Row 10: Ch 1, 2 sc in first st, sc across to last st, 2 sc in last st. Turn. (32 sc)
Row 11: Ch 1, sc across. Turn. (32 sc)
Continue working downward toward the waist:
Row 12: Ch 1, sc across. Turn. (32 sc)
Row 13: Ch 1, 2 sc in first st, sc to last st, 2 sc in last st. Turn. (34 sc)
Row 14: Ch 1, sc across. Turn. (34 sc)
Row 15: Ch 1, 2 sc in first st, sc to last st, 2 sc in last st. Turn. (36 sc)
Row 16: Ch 1, sc across. Turn. (36 sc)
Row 17: Ch 1, 2 sc in first st, sc to last st, 2 sc in last st. Turn. (38 sc)
Row 18: Ch 1, sc across. Turn. (38 sc)
Row 19: Ch 1, 2 sc in first st, sc to last st, 2 sc in last st. Turn. (40 sc)
Row 20: Ch 1, sc across. Turn. (40 sc)
Fasten off front panel. The front panel should measure approximately 5.5 to 6 inches (14 to 15 cm) from the cup base.
Checkpoint: After the front bodice panel, your piece from cup top to the bottom of Row 20 should measure approximately 8.5 to 9 inches (21.5 to 23 cm) total height including the cup depth.
Back Bodice Panel
Foundation: Ch 41.
Row 1: Sc in 2nd ch from hook and each ch across. Turn. (40 sc)
Rows 2 through 20: Ch 1, sc across each row. Turn. (40 sc each row)
The back panel measures approximately 5.5 to 6 inches (14 to 15 cm) tall and 8 inches (20 cm) wide.
Fasten off, leaving a 24 inch (61 cm) tail for seaming.
Side Seams
Align the front and back panels with right sides together. The widths should match at 40 sc each. Using the yarn tail and a yarn needle, whip stitch or mattress stitch the side seams on each side, leaving the top 1.5 inches (4 cm) open at each side as the armhole opening.
Checkpoint: The joined bodice tube should measure approximately 32 to 34 inches (81 to 86 cm) around at the top and approximately 38 to 40 inches (96.5 to 101.5 cm) around at the bottom (waist) edge. Total height should be approximately 6 inches (15 cm).
Section 3: Waistband
Join yarn to the bottom edge of the bodice tube at a side seam with a sl st. The waistband is worked in the round in sc with the E-4 / 3.5 mm hook.
The bottom edge of the joined bodice tube has 80 stitches total (40 front plus 40 back).
Rnd 1: Sc evenly around the bottom edge of the bodice, placing 1 sc into each end stitch of each row and 1 sc into each st at the foundation chains, adjusting as needed to achieve exactly 80 sc. Join with sl st to first sc. (80 sc)
Rnds 2 through 12: Ch 1, sc in each st around. Join. (80 sc)
The waistband should measure approximately 2 inches (5 cm) tall after 12 rounds at gauge.
Checkpoint: After the waistband, the total garment height from the top of the cups to the bottom of the waistband should be approximately 8 inches (20 cm).
Note on waist fit: If you prefer less ease, work the waistband with the E-4 hook throughout. If you prefer the waistband to have slight give, substitute with an F-5 hook for rounds 6 through 12.
Section 4: Skirt Foundation
At the bottom of the waistband, you will increase dramatically to create the full A-line skirt silhouette. Switch to F-5 / 3.75 mm hook.
The skirt uses a pineapple lace pattern with a 16-stitch repeat. You need 13 repeats for the skirt circumference: 13 x 16 = 208 stitches.
Rnd 1 Skirt Foundation: Ch 1. Work (3 sc in next st, 2 sc in next st, 3 sc in next st, 2 sc in next st, 3 sc in next st) across each group of 5 waistband stitches. Repeat this group 16 times around. Join with sl st to first sc. (208 sc)
Checkpoint: After the skirt foundation round, count carefully to confirm 208 stitches. Place a stitch marker every 16 stitches (13 markers total) to mark each pineapple repeat beginning.
Section 5: Pineapple Lace Skirt
Switch to F-5 / 3.75 mm hook. The skirt is worked in the round throughout. The pineapple lace pattern is worked over 13 repeats of 16 stitches each.
Tier One Pineapple Setup (Rounds 2 through 13)
Round 2 (Pineapple Base): Ch 3 (counts as dc). Ch 1. Sk 2 sts. 5 dc in next st (shell). Ch 1. Sk 2 sts. Dc in next st. Ch 1. Sk 2 sts. 5 dc in next st (shell). Ch 1. Sk 2 sts. Rep from beginning around all 13 repeats. Join with sl st to top of beg ch-3. (13 shells of 5 dc, 13 single dc, 52 ch-1 sp)
Round 3: Sl st to first ch-1 sp. Ch 3. Dc in same sp. Ch 1. (Dc, ch 1, dc, ch 1, dc, ch 1, dc, ch 1, dc) in center dc of shell (that is, 9 dc with ch-1 between each, worked into the 3rd dc of each 5-dc shell = the pineapple fan base). Ch 1. 2 dc in ch-1 sp before single dc. Ch 1. 2 dc in ch-1 sp after single dc. Ch 1. Rep around. Join. (13 pineapple fans of 9 dc, 13 pairs of 2-dc groups)
Round 4 (Pineapple Row 1): Sl st across to first ch-1 sp within pineapple fan. Ch 1. Sc in same sp. (Ch 3, sc in next ch-1 sp) 7 times across the pineapple fan (8 sc with 7 ch-3 arches). Ch 3. V-st (dc, ch 2, dc) in center of 2-dc group. Ch 3. Rep around. Join. (13 pineapple arches of 8 sc, 13 V-sts)
Round 5 (Pineapple Row 2): Sl st to first ch-3 arch. Ch 1. Sc in same arch. (Ch 3, sc in next arch) 6 times (7 sc with 6 ch-3 arches per pineapple). Ch 3. Shell of 5 dc in ch-2 sp of V-st. Ch 3. Rep around. Join. (13 pineapples of 7 sc, 13 shells)
Continue working the pineapple tiers following the established pattern, decreasing one arch per round until each pineapple reaches its tip. Work two complete tiers of pineapples, then finish with the scallop border.
Final Scallop Edging
Work (sc, hdc, 3 dc, hdc, sc) into each chain space around the bottom edge of the final pineapple tier. This creates the beautiful scalloped hem visible in the finished dress.
Flutter Ruffle Sleeves
Return to the armhole openings. Join yarn at the underarm.
Working into the front loop only of each stitch around the armhole edge, work 3 dc into every stitch around. This creates the ruffled flutter sleeve effect.
Repeat for the second armhole.
Adding Bra Straps
Thread the adjustable black bra straps through the reinforced channel loops you created at the shoulder corners. Position the adjustable hardware at the back. Using a sewing needle and black thread, secure the straps in place with small, tight stitches.
Finishing Your Crochet Lace Dress
Weave in all ends securely. Block the entire garment on blocking mats using rust-proof pins. Pay special attention to opening up the pineapple lace motifs and ensuring the scalloped hem lies flat and even.
Allow to dry completely before wearing.
Size Customization Tips
To adjust width, add or subtract pineapple repeats (16 stitches each) at the skirt foundation and adjust the bodice panel widths proportionally.
For a longer skirt, work additional tiers of pineapples before the scallop edging.
For different cup sizes, add or remove increase/decrease rows in the bustier cup section.
I hope this crochet tutorial helps you create something truly special. This sage green boho lace dress is a showstopper that proves handmade garments can absolutely compete with high-end boutique pieces. Take your time, trust the process, and enjoy every stitch.
If this pattern inspires you, save it to your Pinterest boards so you can find it when you’re ready to start. And please leave a comment below if you make this dress. I would absolutely love to see your finished creation and hear about your experience bringing it to life!
