
Go dig through your yarn stash right now. I mean it. That cotton yarn you have been saving for something special? This is its moment. This coordinated bathroom set brings together five matching pieces, all built on a simple mesh grid pattern with gorgeous dimensional roses that look far more complicated than they actually are.
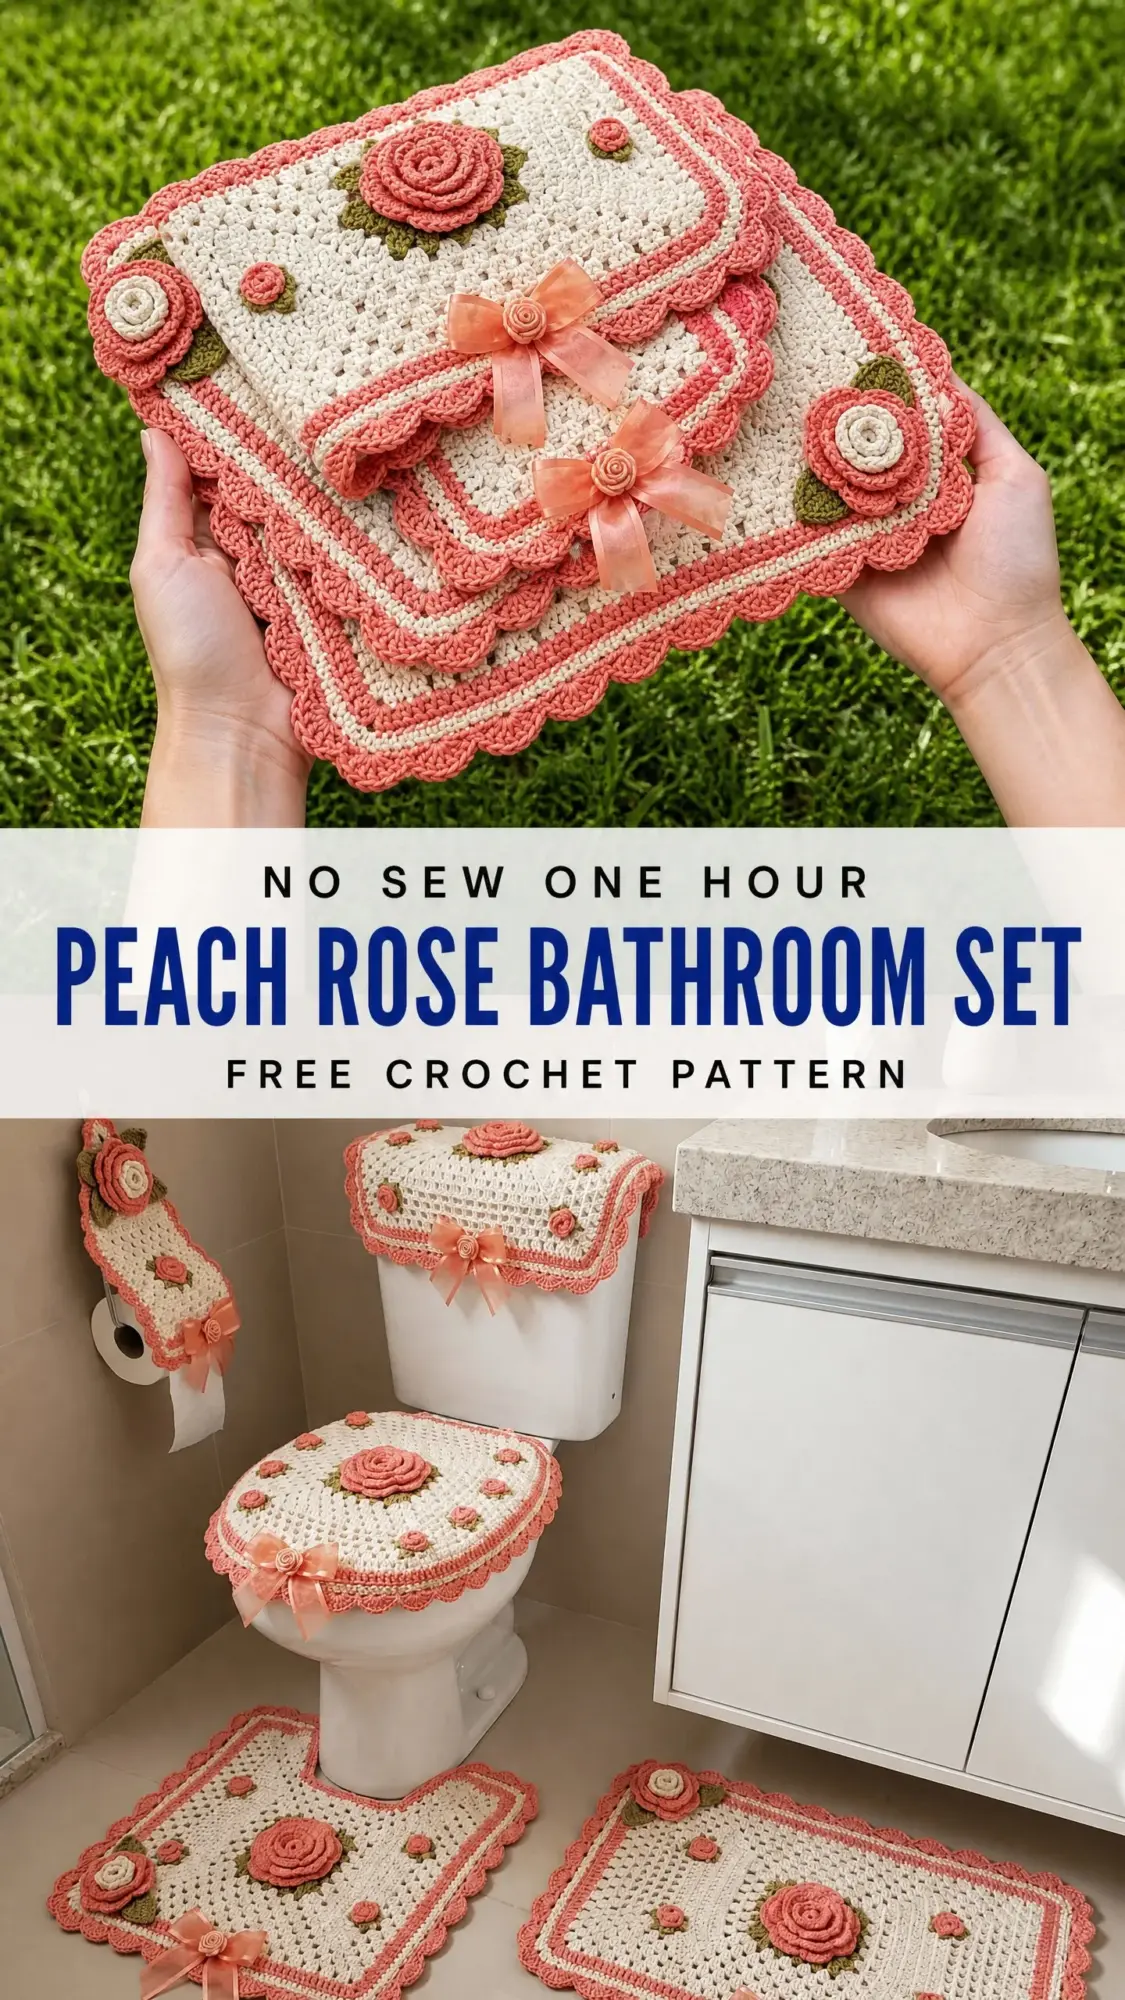
The construction is honestly fascinating once you understand it. Each piece uses the same basic technique: a granny-style open mesh in cream, bordered with coral-peach scalloped shells, then topped with separately crocheted 3D roses and leaves. You are essentially making the same project five times in different shapes and sizes. Master one piece and you have mastered them all.
I will be straight with you about the skill level. If you can chain, single crochet, and double crochet, you can make this set. The roses require working in the round and rolling the finished strip, which takes a bit of practice. I would call this advanced beginner to intermediate. Nothing here is truly difficult, but it does require patience and attention to stitch counts.
Why This Bathroom Set Works So Well
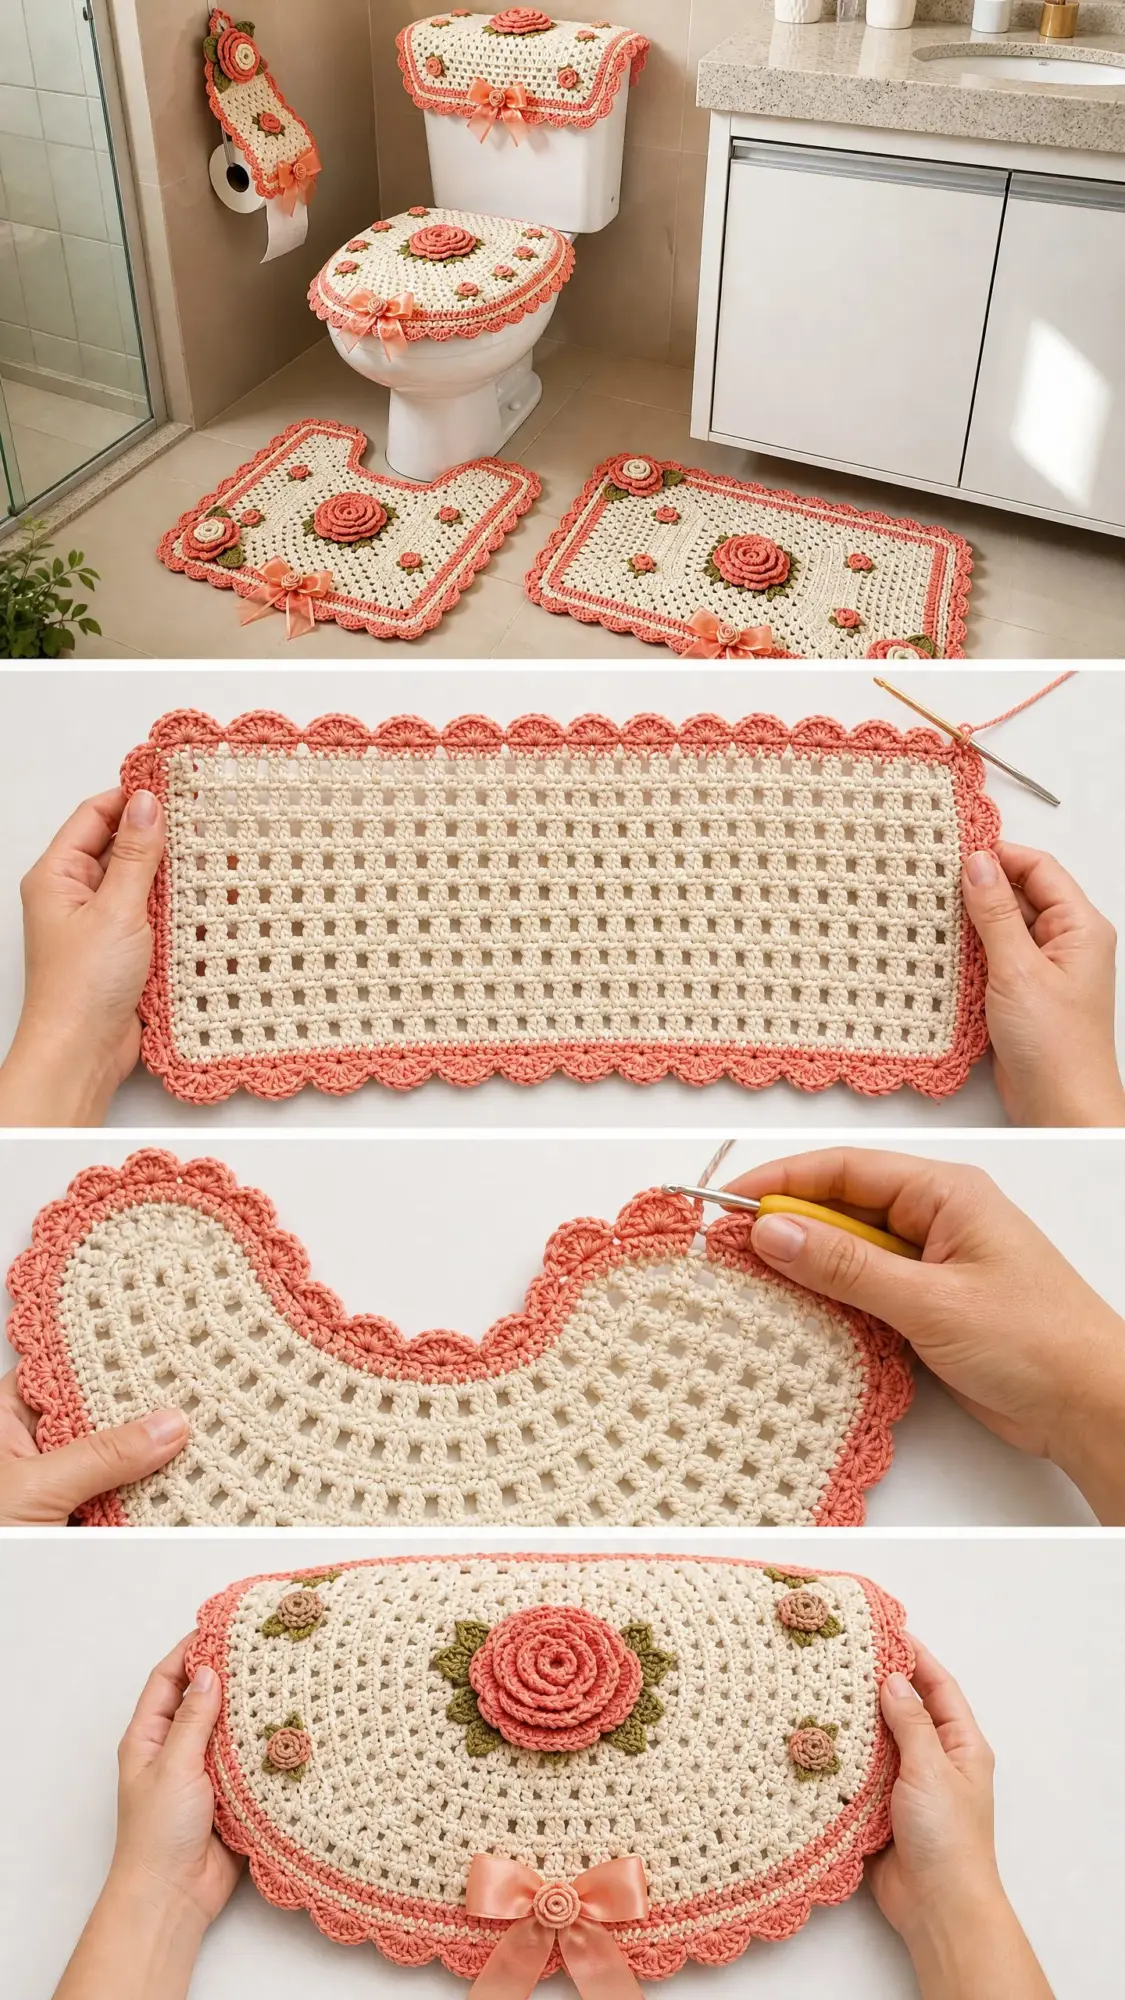
This peach rose bathroom set crochet pattern creates a cohesive look that transforms an ordinary bathroom into something that feels intentional and designed. The five pieces include a toilet tank cover, toilet seat cover, contour rug, floor rug, and toilet paper holder cover. Each one coordinates through matching colors, identical border treatment, and those beautiful rose embellishments.
The mesh pattern creates a lightweight fabric that drapes nicely over the tank and seat while providing enough structure for the rugs to lay flat on the floor. Cotton yarn is the right choice here because it absorbs moisture, washes easily, and holds its shape through repeated laundering.
Materials You Will Need
Before you start, gather everything so you can work without interruption.
Yarn:
Hooks:
Additional Materials:
Yarn Suggestions:
Lion Brand 24/7 Cotton in Ecru, Peach, and Sage works beautifully. Paintbox Yarns Cotton Aran or Drops Paris are also excellent choices. Avoid 100% acrylic for bathroom items since it does not absorb moisture well.
Gauge
Getting gauge right matters here because you want these pieces to fit standard bathroom fixtures.
With US G-6 (4.0 mm) hook and Color A:
Make a small swatch before starting. If your swatch is too big, go down a hook size. Too small? Go up a hook size.
Finished Sizes
Abbreviations and Stitch Definitions
Let me walk you through every stitch and term you will encounter. Understanding these before you begin makes the pattern so much easier to follow.
Special Stitches for This Pattern
Mesh Pattern
This is the foundation of every piece in the set. It creates an open grid that is both decorative and functional.
Each row consists of alternating double crochet and chain-1 spaces. The dc columns stack on top of each other while the ch-1 spaces create the open grid. To work: ch 3 (counts as dc), skip 1 st or sp, dc in next st, ch 1, skip 1 st or sp. Repeat dc, ch 1, skip 1 across, ending dc in top of t-ch.
Shell Stitch Border
Work 5 dc in the same stitch or space for the body of the shell. Each shell is separated by 1 sc in the stitch between shells. The scalloped appearance comes from the 5-dc shell fanning out against the flat sc anchor.
Picot
This creates tiny decorative bumps along the final border round.
Step 1: Work 1 sc in the indicated stitch.
Step 2: Ch 3.
Step 3: Sl st back into the first ch made (the ch closest to the hook).
Step 4: This creates a small knot. Continue to the next stitch.
How to Crochet the 3D Roses
These dimensional roses are what make this bathroom set truly special. They are worked flat as a strip, then rolled and stitched to form the flower shape.
Large Rose (make 5 total)
With CC1, ch 36.
Row 1: Sc in 2nd ch from hook and in each ch across. (35 sc)
Row 2: Ch 1, turn. Work 2 sc in each st across. (70 sc)
Row 3: Ch 1, turn. Working in front loops only, sc in first st, hdc in next, dc in next 3 sts, hdc in next, sc in next. Repeat this 7-stitch sequence across entire row to form petal shapes. (70 sts)
Fasten off leaving a 12 in tail. Begin rolling the strip from one end tightly, with Row 3 on the outside. Use the working yarn and a tapestry needle to tack the base of the roll together every few wraps to secure the coil. Fasten off and weave the end through the base.
Finished diameter: approximately 1.5 in (4 cm)
Small Rose (make 18 total)
With CC1, ch 24.
Row 1: Sc in 2nd ch from hook and in each ch across. (23 sc)
Row 2: Ch 1, turn. 2 sc in each st across. (46 sc)
Row 3: Ch 1, turn. Front loops only: sc, hdc, dc, dc, dc, hdc, sc. Repeat across. (46 sts)
Fasten off leaving a 12 in tail. Roll and sew base as for large rose.
Finished diameter: approximately 0.75 in (2 cm)
Leaf (make 28 total)
With CC2, ch 10.
Row 1: Sl st in 2nd ch from hook, sc in next, hdc in next, dc in next 3, hdc in next, sc in next, 3 sc in last ch. Rotating to work back along opposite side of foundation ch: sc in next, hdc in next, dc in next 3, hdc in next, sc in next, sl st in last. Join. Fasten off.
Finished length: approximately 1.25 in (3 cm)
Piece 1: Toilet Tank Cover Step by Step
The tank cover is a wide rectangular panel that drapes over the top of the tank and hangs down the front and back. This crochet tutorial will walk you through every row.
With Color A and G-6 hook, ch 74.
Foundation row: Dc in 4th ch from hook (first 3 ch count as dc), ch 1, skip 1 ch, dc in next ch. Rep ch 1, skip 1, dc in next ch across. (36 dc, 35 ch-1 sp)
Row 1 (WS): Ch 3, turn. Skip first dc and first ch-1 sp, dc in next dc, ch 1, skip ch-1 sp, dc in next dc. Rep ch 1, dc across, ending dc in top of t-ch. (36 dc, 35 ch-1 sp)
Rows 2 through 26: Repeat Row 1. Work until piece measures approximately 13 in (33 cm) from foundation. (36 dc, 35 ch-1 sp each row)
Do not fasten off. Proceed to border.
Tank Cover Border
Round 1 (Color B): Join CC1 at any corner, ch 1. Work sc evenly around the entire perimeter: sc in each dc and in each ch-1 sp across long sides, and sc evenly along row ends on short sides (approximately 1 sc per row end). At each corner, work 3 sc in the corner stitch. Join with sl st to first sc. (Approximately 210 sc: 72 sc across top, 27 sc along right side, 72 sc across bottom, 27 sc along left side, 3 sc in each of 4 corners)
Round 2 (Color B): Ch 1, do not turn. Working in the same direction, sc in first sc. Skip 2 sc, work 5 dc in next sc (shell made), skip 2 sc, sc in next sc. Rep skip 2, shell, skip 2, sc around entire perimeter, adjusting at corners so a shell falls on each corner sc. Join with sl st to first sc. Fasten off. (35 shells total approximately)
Round 3 (Color B): Join CC1 to the sc between any two shells. Ch 1, sc in same st. Ch 3, sl st in first ch of ch-3 (picot made), sc in next sc between shells. Rep picot, sc around. Join. Fasten off.
Weave in all ends.
Piece 2: Toilet Seat Cover Step by Step
The seat cover is an oval worked flat in mesh, shaped to fit an elongated toilet seat. This beginner friendly approach uses increases and decreases to create the oval shape.
With Color A and G-6 hook, ch 8.
Row 1: Dc in 4th ch from hook, (ch 1, skip 1, dc) twice. (3 dc, 2 ch-1 sp)
Row 2: Ch 3, turn. 2 dc in first ch-sp (inc), ch 1, dc in next dc, ch 1, dc in next ch-sp, ch 1, dc in last dc, ch 1, 2 dc in top of t-ch (inc). (6 dc, 5 ch-1 sp)
Row 3: Ch 3, turn. Dc in same st (inc), ch 1, skip 1, (dc in next dc, ch 1, skip ch-sp) across, dc in top of t-ch, ch 1, dc in same t-ch top (inc). (8 dc, 7 ch-1 sp)
Rows 4 through 8: Continue in mesh pattern, increasing 1 dc at each end every row (work 2 dc in first and last st). After Row 8: (20 dc, 19 ch-1 sp)
Rows 9 through 22: Work even in mesh pattern without increases. (20 dc, 19 ch-1 sp each row)
Rows 23 through 28: Decrease 1 dc at each end every row (skip the first dc without working it, stop 1 dc before the t-ch on the other end). After Row 28: (14 dc, 13 ch-1 sp)
Rows 29 through 32: Decrease 1 dc at each end every row. After Row 32: (6 dc, 5 ch-1 sp)
Fasten off.
Work border exactly as the Tank Cover Border (Rounds 1, 2, and 3) around the full oval perimeter. For Round 1, work approximately 186 sc evenly around, placing 3 sc in each of the two pointy oval ends.
Piece 3: Contour Rug Step by Step
The contour rug is a rectangle with a U-shaped cutout at the top center to wrap around the base of the toilet. Work the rectangle in two halves, then join.
Left Half
With Color A and G-6 hook, ch 26.
Foundation Row: Dc in 4th ch from hook, (ch 1, skip 1, dc in next ch) across. (13 dc, 12 ch-1 sp)
Rows 1 through 40: Work even in mesh pattern. (13 dc, 12 ch-1 sp each row)
Fasten off.
Right Half
Work same as Left Half.
Joining
Hold both halves with RS facing up. With Color A, sl st the two foundation-row edges together for 6 mesh units (12 sts) at the bottom, leaving the top 14 rows free on each side to form the U-shaped cutout opening.
Contour Rug Border
Round 1 (CC1): Beginning at the bottom joined edge, work sc evenly around the entire perimeter including around the inner curve of the U-cutout. Place 3 sc at each outer corner. Along the inner U-curve edges, work 1 sc per row end, and sc2tog at the two inner corners where the cutout meets the straight edge. Total approximately 230 sc around outer perimeter plus 30 sc around inner U-cutout.
Round 2 (CC1): Work shell border as for Tank Cover, skipping shell placement at the two inner U-corner sc2tog positions (work sc there instead).
Round 3 (CC1): Work picot border as for Tank Cover.
Fasten off. Weave in ends.
Piece 4: Floor Rug Step by Step
The floor rug is a simple rectangle in mesh pattern with the same border treatment.
With Color A and G-6 hook, ch 74.
Foundation Row: Dc in 4th ch from hook, (ch 1, skip 1, dc in next ch) across. (36 dc, 35 ch-1 sp)
Rows 1 through 40: Work even in mesh pattern. (36 dc, 35 ch-1 sp each row)
Floor Rug Border
Round 1 (CC1): Join at any corner, ch 1. Sc in each dc and ch-1 sp across each long side (71 sc per long side), sc evenly along row ends of short sides (approximately 40 sc per short side), 3 sc in each corner. Total: 234 sc.
Round 2 (CC1): Shell border as for Tank Cover. Work sc, skip 2, 5-dc shell, skip 2, sc around, ending with joined sl st.
Round 3 (CC1): Picot border as before. Fasten off.
Piece 5: Toilet Paper Holder Cover Step by Step
This narrow rectangular piece covers a standard wall-mounted toilet paper holder bracket.
With Color A and G-6 hook, ch 20.
Foundation Row: Dc in 4th ch from hook, (ch 1, skip 1, dc in next ch) across. (10 dc, 9 ch-1 sp)
Rows 1 through 30: Work even in mesh. (10 dc, 9 ch-1 sp each row)
Toilet Paper Holder Cover Border
Round 1 (CC1): Sc around all four sides: 18 sc across top, 18 sc across bottom, 30 sc along each long side, 3 sc at each corner. Total: 108 sc.
Round 2 (CC1): Shell border. (18 shells total)
Round 3 (CC1): Picot border. Fasten off.
At the top edge, sew a small button or attach a small crochet loop for hanging, or fold the top 1 in (2.5 cm) to the WS and sl st down to create a hanging sleeve.
Embellishment Placement Guide
Now comes the fun part. Attaching all those beautiful roses and leaves transforms your pieces from simple mesh rectangles into something truly special.
Tank Cover: 1 large rose center top, 2 small roses flanking it, 1 small rose on each far end near the border. Place 2 leaves behind large rose and 1 leaf behind each small rose. 1 ribbon bow front center.
Seat Cover: 1 large rose at center top third of oval, 2 small roses below it, 1 small rose at each side. 2 leaves behind large rose, 1 per small rose. 1 ribbon bow at front base.
Contour Rug: 1 large rose offset to left of center, 1 additional large rose to the right and slightly lower, 3 small roses scattered around them. 2 leaves behind each large rose. 1 ribbon bow at lower front center.
Floor Rug: Same placement as Contour Rug. 1 ribbon bow at lower front center.
TP Holder Cover: 1 large rose upper center, 1 small rose below it. 2 leaves behind large rose. 1 small ribbon bow at center.
To attach roses and leaves: Thread the long tail onto a tapestry needle. Position rose on piece RS. Insert needle through base of rose and through crochet fabric. Bring needle back up through fabric and base several times until secure. Repeat for leaves, tucking leaf stem under rose base.
Ribbon Bows
Cut one 18 in (46 cm) length of 1.5 in wide satin ribbon for each of the five bows. Tie into a standard bow. Trim tails at a 45-degree angle. Sew to the designated position on each piece through the knot center using a needle and matching thread.
Finishing and Blocking Your Bathroom Set
Weave in all ends securely on all pieces. For bathroom items, weave in at least 2 in (5 cm) and consider using a small dot of fabric glue on each woven end to prevent unraveling in the wash.
Wet block each piece by soaking in cool water for 10 minutes, gently squeezing out excess water (do not wring), then pinning to finished dimensions on a blocking mat. Allow to dry completely (12 to 24 hours) before removing pins. Blocking evens out the mesh pattern and opens the lace texture.
Attach roses, leaves, and bows only after blocking and drying.
Care Instructions
Machine wash on gentle cycle in cool water. Lay flat to dry or tumble dry on lowest heat setting. Do not iron roses or ribbon directly. Remove ribbon bows before washing if needed and reattach after drying. Avoid bleach.
Time Estimate for the Complete Set
Total estimated time for all five pieces: 18 to 24 hours depending on your experience level.
This is definitely a project to work on over several sessions. I recommend starting with the toilet paper holder cover since it is the smallest piece and lets you practice all the techniques before tackling the larger items.
Size Customization Tips
To make pieces wider: add 2 ch to the foundation chain (which adds 1 mesh unit) per 1.25 in (3 cm) of additional width desired.
To make pieces longer: add 1 row per 0.5 in (1.25 cm) of additional length.
For a smaller tank: reduce foundation chain to 62 ch (30 dc, 29 ch-1 sp, approximately 15 in / 38 cm wide) and work 22 rows.
For a round toilet seat: at Rows 9 through 22, work even for only 8 rows instead of 14, and begin decreases at Row 17.
For all adjustments, ensure your foundation chain remains an even number for mesh pattern to work correctly.
I hope you love making this peach rose bathroom set crochet pattern as much as I enjoyed putting it together for you. There is something so satisfying about completing a coordinated set, and watching those dimensional roses come together never gets old. Thank you for choosing this pattern for your next project.
If you make this set, I would absolutely love to see your finished pieces! Tag me on Instagram or share in my Facebook group so I can admire your work. Seeing your color choices and styling ideas is one of my favorite parts of sharing patterns.
Save this pattern to your Pinterest boards so you can find it when you are ready to start, and drop a comment below to let me know which piece you are planning to make first. Happy crocheting!
