
I have been dreaming about this dress for months. When I sat down to design it, I knew exactly what I wanted. A fitted halter bodice with delicate diamond mesh lace. A flirty A-line skirt that moves beautifully. And dozens upon dozens of three-dimensional roses covering every inch like a garden in full bloom.
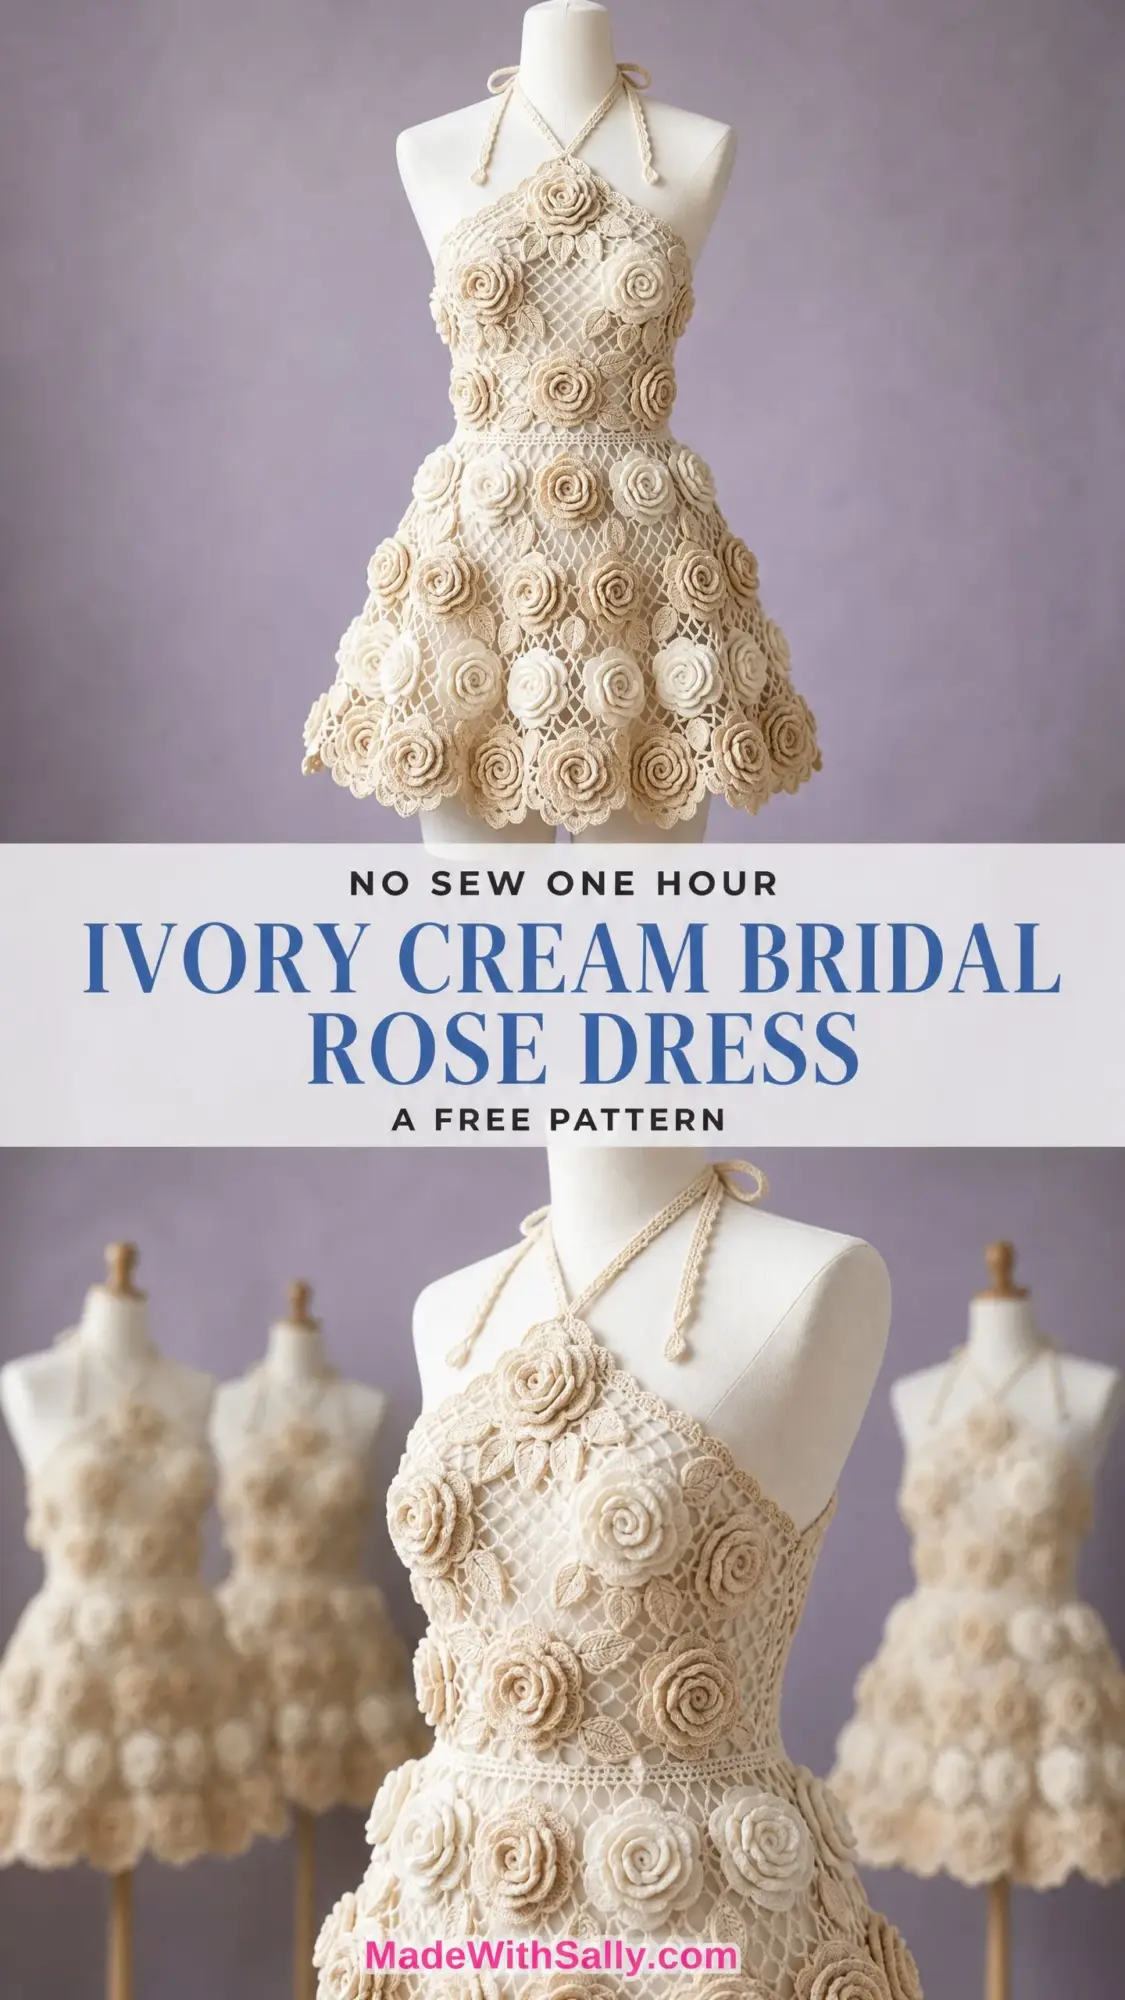
The construction needed to be logical even though the finished piece looks impossibly intricate. I wanted the bodice to flatter without being fussy. The skirt had to flare gracefully from waist to hem. And those roses? They needed to look lush and romantic in two slightly different ivory tones for depth and dimension.
I am SO pleased with how this turned out. Every single element came together exactly as I envisioned. If you have been searching for a show-stopping bridal crochet pattern or a statement piece for a special occasion, this is it. Let me walk you through every step.
About This Crochet Pattern
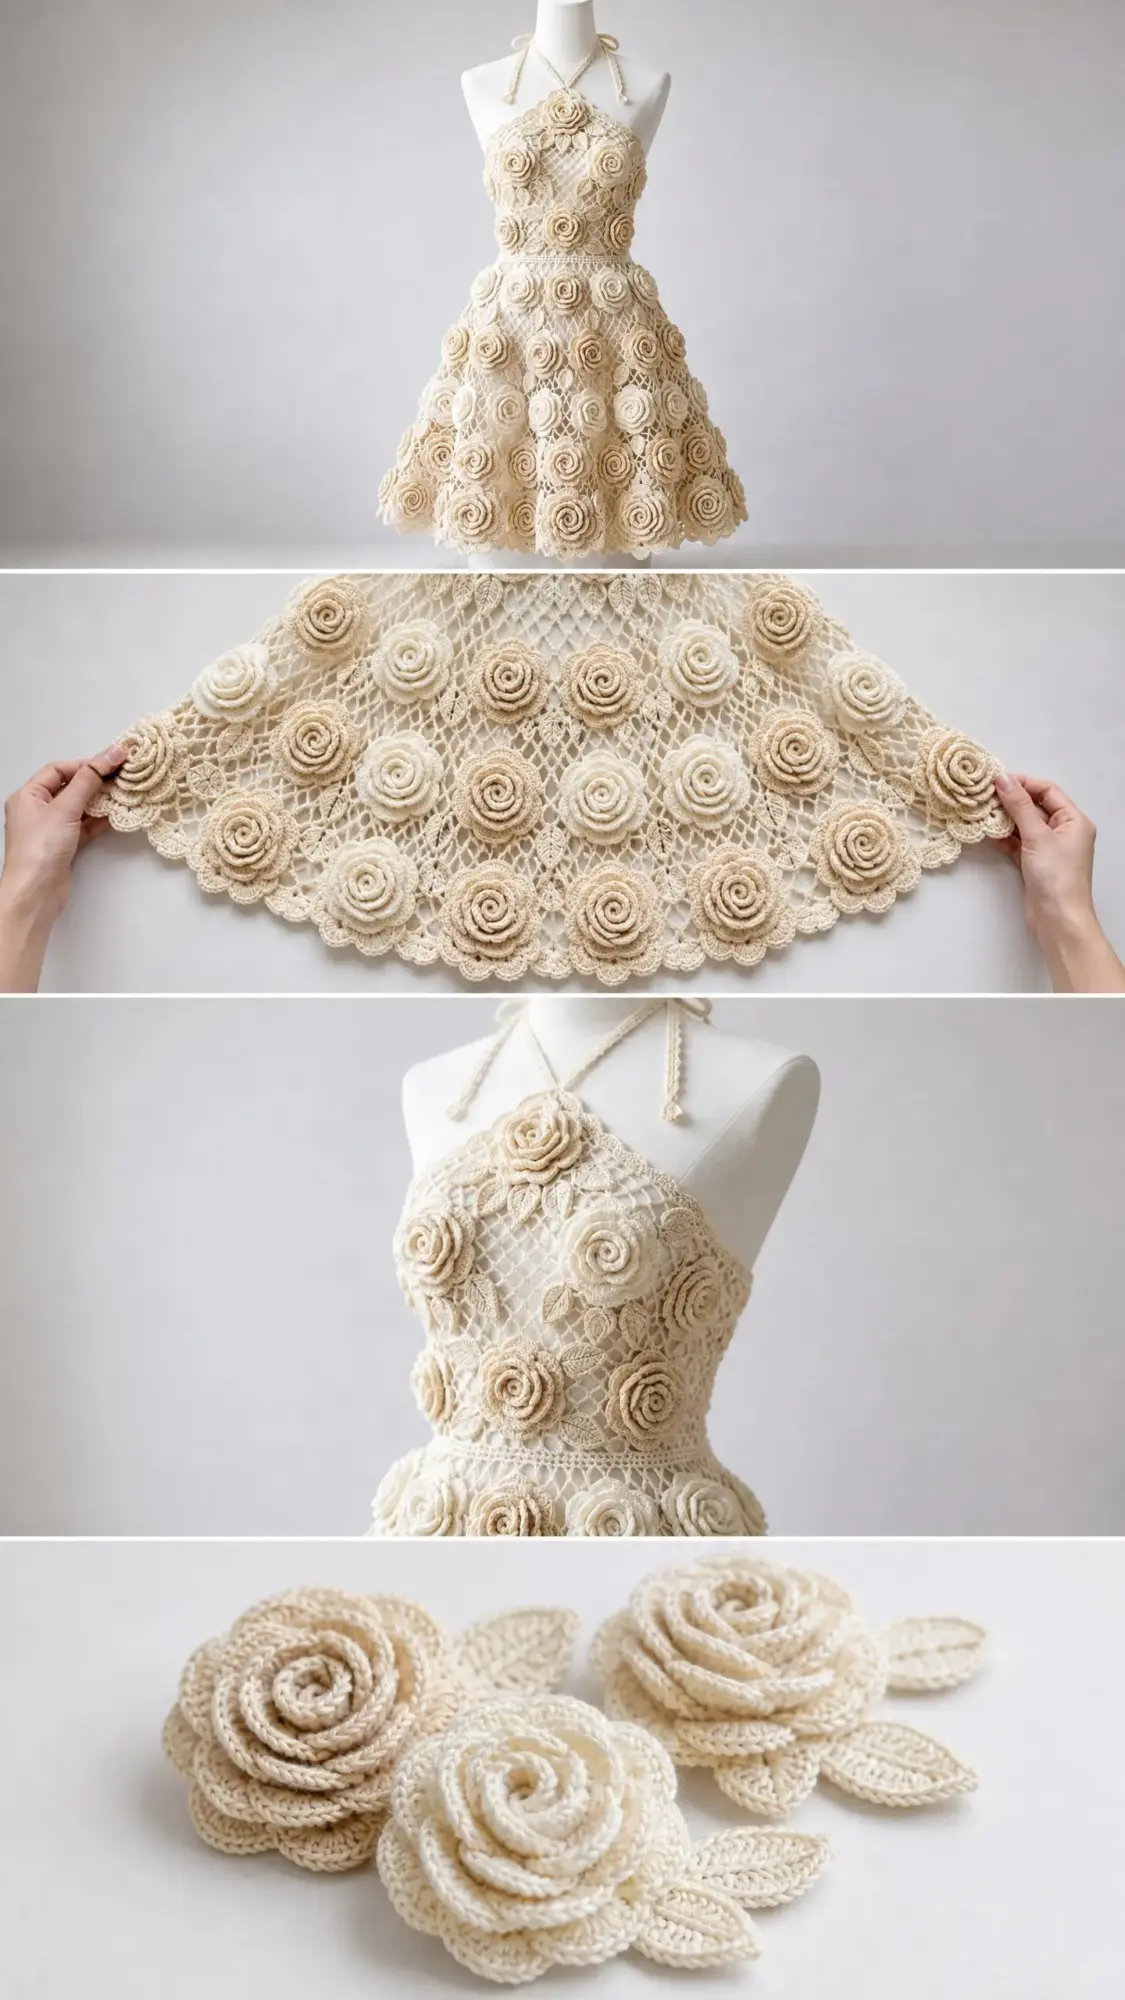
This Ivory Cream Bridal Rose Dress features a fitted halter bodice constructed with panels, a flared A-line skirt worked in the round, and over 100 handmade three-dimensional roses with coordinating leaves. The entire dress uses a diamond mesh lace background that creates an elegant, open texture. The roses are crocheted separately and then sewn onto the mesh surface in a dense, overlapping arrangement.
The halter neck ties with braided cords that cross at the back. The back remains open from neck to waist for easy dressing, with a simple hook-and-eye or button closure at the waist. The hem finishes with a gorgeous scalloped lace edging complete with picot details.
This is an advanced level pattern. You will need to be comfortable working flat and in the round, reading mesh lace repeats, creating three-dimensional appliqué motifs, and assembling a fitted garment. But do not let that intimidate you. I have broken everything down into clear sections, and if you take it step by step, you will absolutely get there.
Time estimate: Approximately 80 to 120 hours total. The roses alone account for 30 to 45 hours. I recommend working in stages over several weeks. This is a labor of love, but the finished result is worth every minute.
Finished Measurements
This pattern is written for size Small/Medium:
Size customization tips appear at the end of the pattern.
Materials Needed
Yarn:
Yarn Suggestions:
1. Lion Brand 24/7 Cotton in Ecru and Linen. 100% mercerized cotton, 186 yards per 3.5-oz skein. Crisp stitch definition ideal for lace mesh and roses. Machine washable.
2. Paintbox Yarns Cotton DK used at a slightly tighter gauge with the G hook. 100% cotton, 137 yards per 1.76-oz ball. Soft drape excellent for a bridal silhouette. Available in Champagne and Vanilla.
3. WeCrochet Comfy Worsted. 75% pima cotton, 25% acrylic. 218 yards per 3.5-oz skein. Slightly more stretch and drape than pure cotton, making it forgiving for fitted bodice sections.
Substitution note: Choose any worsted weight (size 4) yarn with a smooth ply and low halo. Fuzzy or bouclé yarns will obscure the lace mesh and rose details.
Hooks:
Notions:
Gauge
With G-6 (4.00 mm) hook and worsted cotton:
For mesh lace pattern:
Check gauge before beginning. Gauge is critical for a fitted bodice. One half-stitch off per inch creates a 2-inch error over a 34-inch bust.
Abbreviations (US Terms)
Let me define every abbreviation you will encounter:
Special Stitches and Techniques
Mesh Lace Repeat
This creates the beautiful diamond background for both bodice and skirt. Each repeat works as: dc in next dc, ch 2, skip 2 sts or ch-2 sp, dc in next dc, ch 2, skip 2 sts or ch-2 sp.
When working rows, ch 3 at the beginning of each row. This counts as dc. When working rounds, sl st to the third ch of the beginning ch-3 to close each round.
3D Crocheted Rose (Large, approximately 2.5 inches diameter)
Step 1 (Foundation): Ch 40. Turn.
Step 2 (Row 1, petals layer 1): Skip first 2 ch from hook. Work (sc, hdc, 3 dc, hdc, sc) in next 6 ch. This creates a 7-st petal. Repeat this petal group across, working each petal over 6 ch. You will have approximately 6 petals total. (6 petals)
Step 3 (Row 2, petals layer 2, larger): Do not turn. Working into the back of the foundation chain, skip first 2 ch. Work (sc, hdc, 5 dc, hdc, sc) in next 8 ch. This creates a 9-st petal. Repeat across. You will have approximately 4 to 5 larger petals. (5 petals)
Step 4 (Row 3, optional for extra fullness): Repeat Row 2 but work 7 dc in center of each petal space across remaining back loops. (4 petals)
Step 5 (Assembly): Beginning at one end, coil the strip tightly around itself, stitching the base together as you go with a tapestry needle and yarn tail. Flatten the base and secure all tails. The rose should be a multi-layered rosette approximately 2.5 inches across when complete.
3D Crocheted Rose (Small, approximately 1.5 inches diameter)
Follow Large Rose instructions but begin with ch 24 and omit Row 3. This creates approximately 4 to 5 petals total.
Crocheted Leaf (approximately 1.5 inches long)
Step 1: Ch 10.
Step 2 (Row 1): Starting in second ch from hook: sl st 1, sc 1, hdc 1, dc 3, hdc 1, sc 1, sl st 1. (9 sts)
Step 3: Do not turn. Rotate work and work into other side of foundation chain: sl st 1, sc 1, hdc 1, dc 3, hdc 1, sc 1, sl st 1. (9 sts)
Step 4: Sl st to join tip. Fasten off, leaving a 6-inch tail for sewing. Gently press flat with fingers or block.
Picot Stitch (used in hem edging)
Work as: sc in indicated st, ch 3, sl st in first ch of ch-3 made (picot formed), sc in same st.
Shell Stitch (used in hem edging)
Work 5 dc in the same stitch or space.
Scallop Edging
Working into existing stitch or space: (sc in first st, skip 2 sts, shell in next st, skip 2 sts) across, ending with sc. Adjust positioning as needed to complete an even number of scallops around full hem.
Pattern Notes Before You Begin
1. The bodice is worked flat in panels (front and two back panels separately), then seamed at the sides. The back remains open from shoulder to waist.
2. The skirt is picked up from the waist of the assembled bodice and worked in the round downward.
3. All roses and leaves are made separately, blocked, and sewn on after the dress base is complete.
4. Read all instructions fully before beginning. Pin your bodice to a dress form or measure frequently against your body.
5. The t-ch 3 counts as a dc throughout flat sections.
6. Block all pieces before final assembly. Cotton relaxes significantly after blocking.
7. Color A (ivory) is primary. Color B (warm cream) is used for approximately half the roses.
Step-by-Step Pattern Instructions
Section 1: Front Bodice Panel
The front bodice covers from the upper chest to the waist. It is worked flat.
Foundation: Ch 70. (This yields 68 working sts plus t-ch.)
Row 1 (RS): Dc in 4th ch from hook (t-ch counts as first dc), dc in each ch across. Turn. (68 dc)
Row 2: Ch 3 (counts as dc here and throughout), dc in next 2 dc, (ch 2, skip 2 dc, dc in next dc) across, end dc in top of t-ch. Turn. (22 dc, 22 ch-2 sp, 22 mesh repeats)
Row 3: Ch 3, dc in ch-2 sp, (ch 2, dc in next dc, ch 2, dc in ch-2 sp) across, end dc in top of t-ch. Turn. (68 working positions maintained as mesh)
Rows 4 through 12: Continue in established mesh lace pattern. Turn at end of each row.
Checkpoint: After Row 12, the front bodice panel should measure approximately 6 inches (15 cm) tall and 17 inches (43 cm) wide when slightly stretched.
Bodice Shaping Rows (bust to waist taper):
Row 13: Ch 3, dc2tog over first 2 mesh positions (decrease 1 repeat at each edge), work mesh across to last 2 positions, dc2tog. Turn. (66 working positions)
Row 14: Work even in mesh. Turn. (66 working positions)
Row 15: Ch 3, dc2tog at each edge. Turn. (64 working positions)
Row 16: Work even in mesh. Turn. (64 working positions)
Row 17: Ch 3, dc2tog at each edge. Turn. (62 working positions)
Row 18: Work even in mesh. Turn. (62 working positions)
This is the waist. The front bodice panel is complete. Do not fasten off. Place a stitch marker in the last st. The panel should now be approximately 9 inches (23 cm) tall total, measuring 15.5 inches (39 cm) wide at the waist edge.
Section 2: Back Bodice Panels (make 2, mirrored)
Each back panel is half the width of the front panel.
Right Back Panel:
Foundation: Ch 36. (Yields 34 working sts plus t-ch.)
Row 1 (RS): Dc in 4th ch from hook, dc in each ch across. Turn. (34 dc)
Row 2: Ch 3, dc in next 2 dc, (ch 2, skip 2, dc in next dc) across. Turn. (11 mesh repeats, 34 working positions)
Rows 3 through 12: Work even in mesh. Turn at end of each row. (34 working positions each row)
Back Bodice Shaping:
Row 13: Ch 3, dc2tog at side seam edge only (NOT at center back edge). Turn. (33 working positions)
Row 14: Work even. Turn. (33 working positions)
Row 15: Dc2tog at side seam edge. Turn. (32 working positions)
Row 16: Work even. Turn. (32 working positions)
Row 17: Dc2tog at side seam edge. Turn. (31 working positions)
Row 18: Work even. Turn. (31 working positions)
Fasten off. Weave in ends.
Make Left Back Panel as a mirror image (decrease at the opposite edge).
Section 3: Assemble Bodice
With RS facing, seam the front panel to each back panel at the side edges using a flat slip stitch seam or mattress stitch. The combined waist circumference should measure approximately 26 inches (66 cm).
Finish center back edges: With F-5 hook and Color A, work one column of sc evenly up each center back edge. Work 2 rows of sc across the top back edges to stabilize. Sew hook-and-eye or buttons at waist center back.
Section 4: Halter Straps (make 2)
With G-6 hook and Color A:
Ch 90. Sl st in each ch across to form a braid-like cord. (90 sl sts)
Repeat for a second cord.
Attach both cords to the top center front of the bodice at the upper chest, approximately 6 inches (15 cm) apart. Cords cross at the back of the neck and tie in a bow. Test length against wearer before attaching.
Additional strap detail: Work one row of sc along the top edge of the front bodice to create a clean border for the halter straps. With F-5 hook and Color A, sc evenly across the top front edge. (Approximately 68 sc)
Section 5: Skirt
The skirt is worked in the round, picked up from the combined waist edge.
Setup Round: With G-6 hook and Color A, RS facing, join yarn at center back waist. Work 1 sc in each dc and 2 sc in each ch-2 sp across the entire waist edge, joining to work in the round. (156 sc total around waist)
Rnd 1: Ch 3 (counts as dc), dc in next 2 sc, (ch 2, skip 2 sc, dc in next sc, ch 2, skip 2 sc, dc in next sc) around, sl st to top of ch-3 to join. (26 mesh repeats, 156 working positions)
Rnds 2 through 5: Ch 3, work even in mesh pattern around. Sl st to join each rnd. (156 working positions)
Increase Rnd 6: Ch 3, (work mesh across 6 repeats, 2 dc in next ch-2 sp) around, distributing increases evenly. Sl st to join. (182 working positions)
Rnd 7: Re-establish mesh evenly across new stitch count.
Rnds 8 through 12: Work even in mesh. (182 working positions)
Clean Increase Schedule:
Increase Round Instructions (apply at Rnds 6, 13, 20, 27, 34):
Ch 3, (work in established mesh across one repeat unit, 2 dc in one ch-2 sp of that unit) around. Sl st to join. This adds 26 sts. Then on the immediately following rnd, re-establish clean mesh over the new total.
Following each increase, work 7 even rounds before the next increase round.
Checkpoint: After Rnd 34, the skirt should measure approximately 17 inches (43 cm) from the waist pickup, and the hem should measure approximately 71 to 72 inches (180 to 183 cm) around.
Section 6: Hem Scallop Edging
Worked with F-5 hook and Color A.
Rnd 35 (transition): Ch 1, sc in each dc and 2 sc in each ch-2 sp around. Sl st to join. (Adjust to 288 sc, adding 2 sc evenly for divisibility.)
Rnd 36 (scallop): Ch 1, (sc in next sc, skip 2 sc, shell of 5 dc in next sc, skip 2 sc) around. Sl st to join. (48 scallops)
Rnd 37 (picot finish): Ch 1, (sc in first dc of shell, ch 3, sl st to first ch picot in same dc, sc in 2nd dc, picot in 2nd dc, sc in center 3rd dc, picot in 3rd dc, sc in 4th dc, picot in 4th dc, sc in 5th dc, picot in 5th dc, sc in sc between scallops) around. Sl st to join. Fasten off.
Section 7: Large Roses
Make 45 in Color A, make 25 in Color B
Follow the Large Rose special stitch instructions. Fasten off, leaving a 12-inch tail for sewing.
Total Large Roses: 70
Section 8: Small Roses
Make 20 in Color A, make 15 in Color B
Follow the Small Rose special stitch instructions. Fasten off, leaving an 8-inch tail.
Total Small Roses: 35
Section 9: Leaves
Make 60 in Color A, make 20 in Color B
Follow the Leaf special stitch instructions.
Total Leaves: 80
Section 10: Assembly of Appliqués
Block all roses and leaves first.
Begin placing roses on the bodice front, starting at the upper chest and working downward. Roses should be dense enough that very little mesh shows between them. Use large roses as primary placement and small roses to fill gaps.
Alternate Color A and Color B roses throughout. Cluster the lighter Color B roses near the hem and the warmer Color A roses more heavily on the bodice for depth.
Tuck leaves between roses at irregular angles to suggest natural foliage.
Pin all appliqués in position before sewing. Step back and assess placement visually before committing.
Sew each rose and leaf through its base to the mesh background using a tapestry needle and matching yarn. Take several anchoring stitches through the base of each rose to prevent rotation during wear.
Cover the bodice and skirt surface entirely. The back has sparser coverage. Avoid placing roses over the closure area.
Finishing and Blocking
Wet blocking method (recommended for cotton):
Submerge the completed dress base (before appliqués) in cool water with gentle soap. Gently squeeze out water without wringing. Roll in a clean towel to remove excess moisture. Lay flat on blocking mats. Pin the mesh to shape, opening up the diamond lace pattern. Allow to dry 24 to 48 hours.
Block all roses and leaves flat on mats. Pin leaves to shape.
Once dry, sew appliqués onto the blocked dress base.
Lightly steam the finished dress from the wrong side after appliqués are attached. Do not press directly onto roses.
Size Customization Tips
For a larger size: Add 12 sts to the front bodice foundation chain and 6 sts to each back panel for every additional inch of bust. Each 12-st addition equals approximately 3 inches of additional circumference.
For a longer skirt: Add 7 rows (one complete increase cycle) for every additional 2 inches of length.
For a shorter dress: Eliminate one or two increase cycles.
For cup shaping: Work short rows across the center 20 sts of the front bodice between Rows 6 and 10 to add approximately 1 inch of depth.
Care Instructions
Hand wash in cool water with gentle detergent or use the delicate cycle in a mesh laundry bag. Do not wring or twist. Lay flat to dry away from direct sunlight to prevent yellowing. Store folded or hung on a padded hanger. Steam from wrong side only if needed.
Final Thoughts on This Crochet Tutorial
This Ivory Cream Bridal Rose Dress crochet pattern is truly a masterpiece project. Yes, it takes time. Yes, you will be making roses for what feels like forever. But when you slip that finished dress onto a form and see all those petals cascading down the skirt, every hour is worth it.
Take your time with this one. Work on it during quiet evenings. Put on a podcast or audiobook and let the roses pile up beside you. Before you know it, you will have created something absolutely extraordinary with your own two hands.
Thank you so much for choosing this pattern for your next big project. I cannot wait to see your finished dresses. Please tag me on Instagram or share in our Facebook group when you complete yours. Seeing your creations is genuinely the best part of designing.
If this pattern caught your eye, go ahead and save it to your Pinterest boards so you can find it when you are ready to start. And if you make this dress, please leave a comment below. I would love to hear about your yarn choices, any modifications you made, and how your roses turned out!
