
I set out to design something that would completely transform a living room without requiring a single piece of new furniture. My goals were ambitious. I wanted coordinating pieces that would work together as a cohesive set, a stitch pattern with enough texture to feel luxurious, and that signature scalloped edge that makes handmade items look professionally finished.
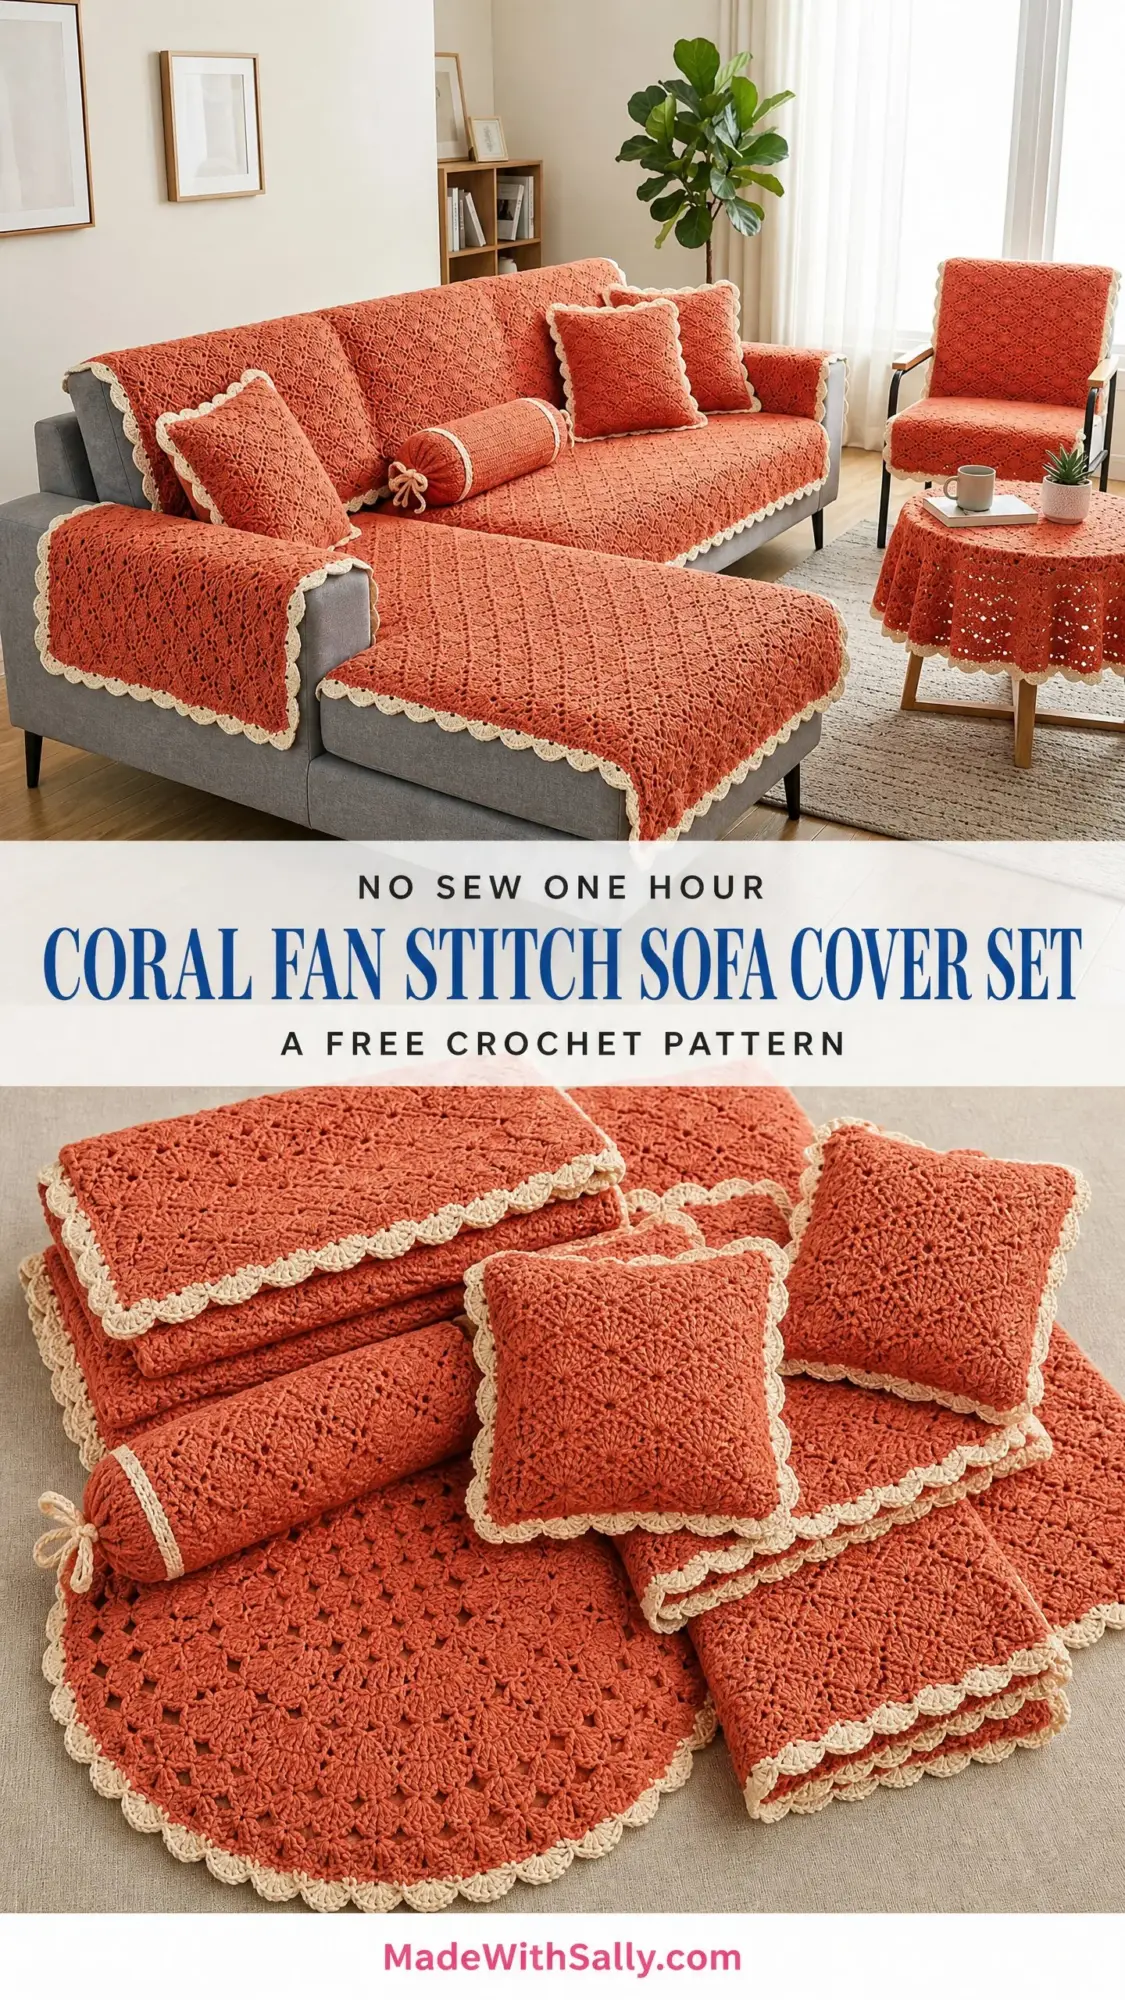
The result is this complete sofa cover set in a warm coral-orange that sits somewhere between salmon and terracotta. It includes covers for a full sectional sofa, an armchair, a round side table, throw pillows, and even a bolster pillow.
I am SO pleased with how it turned out. The diamond lattice texture has this beautiful raised quality that photographs beautifully and feels incredible under your hands. If you have been dreaming about giving your living space a complete crochet makeover, this is your project.
About This Crochet Sofa Cover Set Pattern
This set transforms a standard L-shaped sectional sofa into a coordinated textile display. You will make seven pieces total: one large sofa seat cover, one chaise or ottoman cover, one armchair cover, one round side table topper, two square throw pillowcases, and one bolster pillow cover.
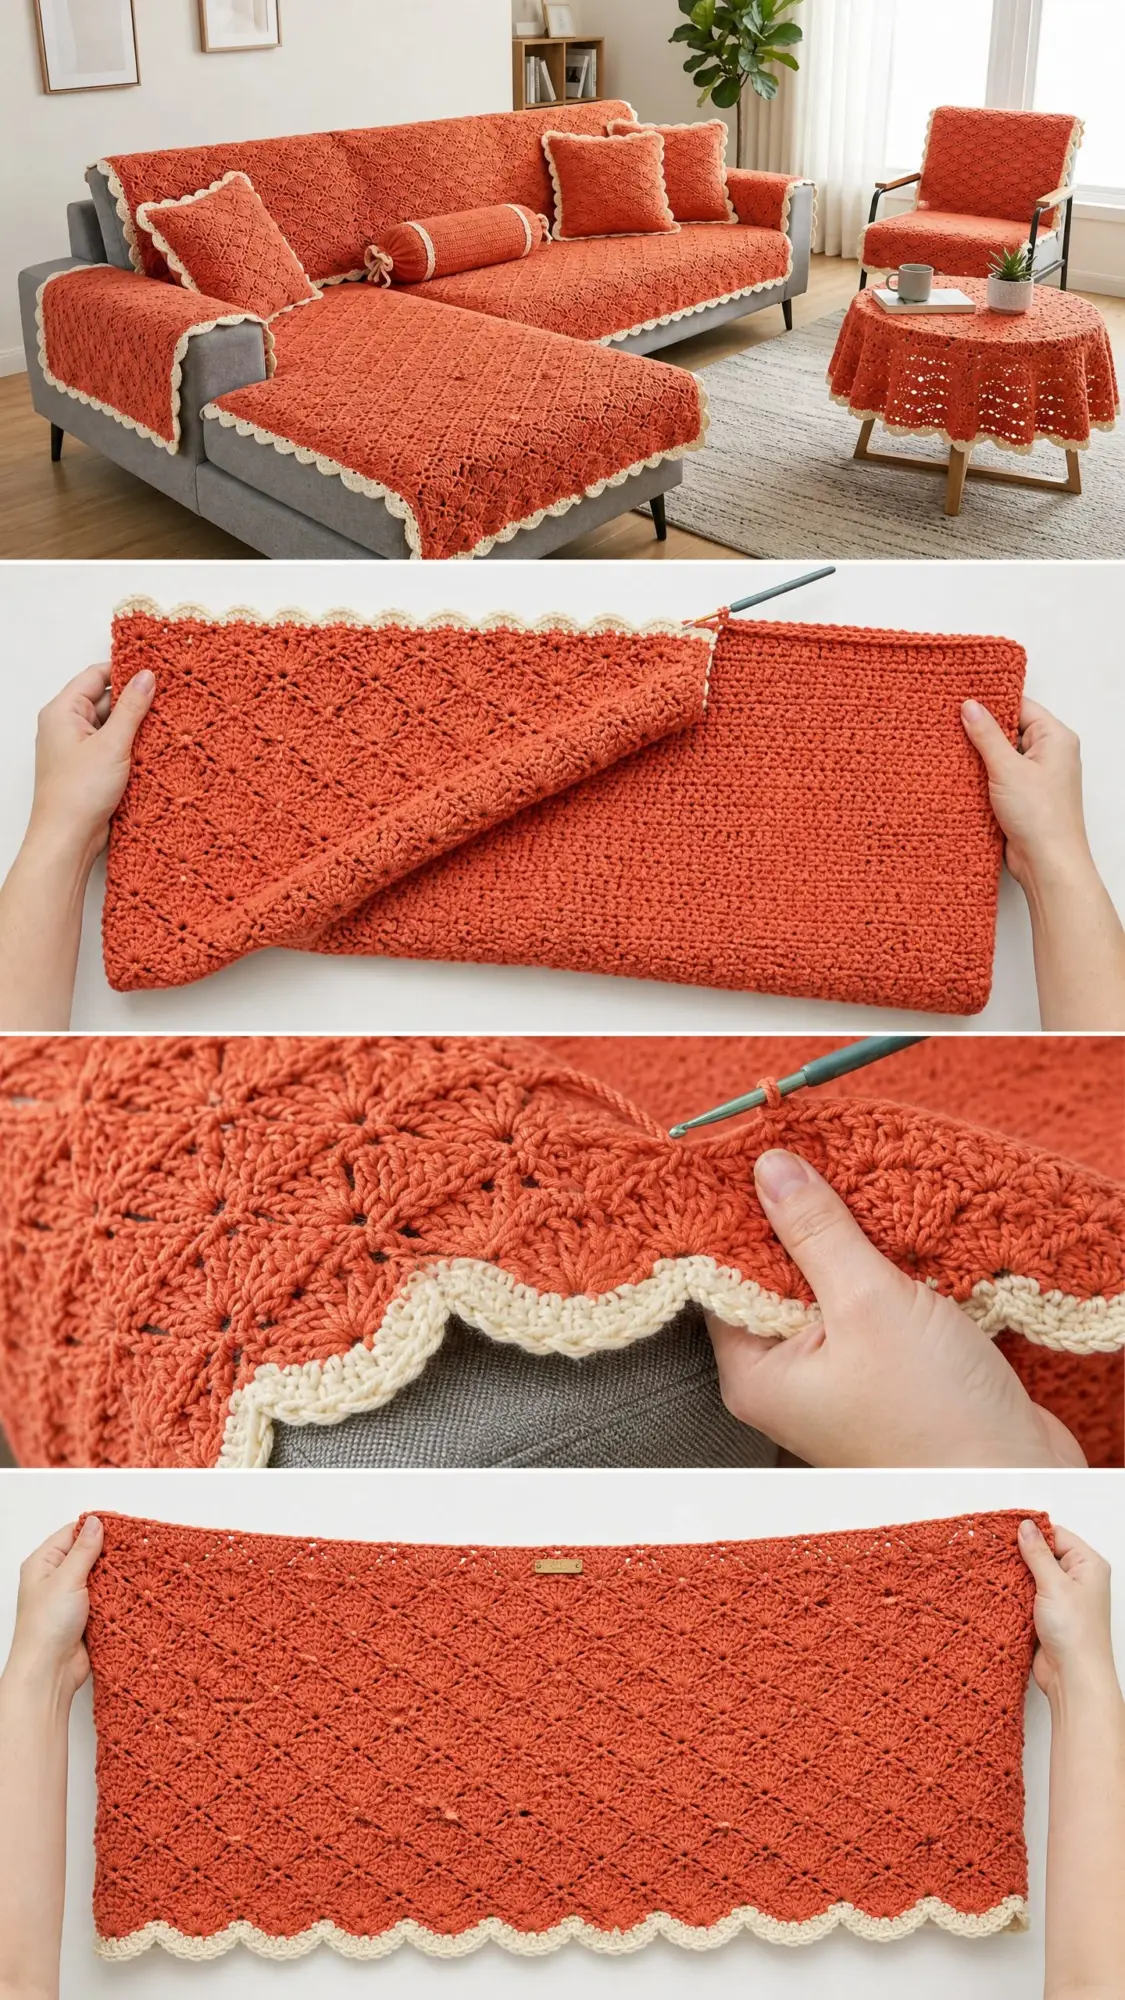
Every piece uses the same coral-orange yarn with cream edging. This creates a unified look across all surfaces in your room. The main fabric features a dense diamond lattice texture achieved by combining front post and back post double crochets in a repeating grid. The cream scalloped border is the defining decorative element, applied as a final edging round to every single piece.
All pieces are worked flat in rows, seamed or finished to shape, then edged. The table topper is the one exception, which is worked in the round from the center outward.
Skill Level
This pattern is rated intermediate. The stitch pattern itself is beginner-friendly once you establish the rhythm. However, the scale of each piece demands sustained row counting, consistent tension over hundreds of rows, and confidence working post stitches.
If you have never worked front post or back post stitches before, I recommend practicing on a small swatch first. Once you understand how to wrap your hook around the post of a stitch from the previous row, you will find the pattern becomes almost meditative.
Time Estimate
The full set will take an experienced crocheter approximately 60 to 80 hours. Here is how that breaks down:
I recommend working on the smaller pieces first to build confidence with the stitch pattern before tackling the larger covers.
Finished Sizes
Large Sofa Seat Cover (fits a 3-seat sofa approximately 84 in / 213 cm wide, covering seat and draping over front and back): 90 in wide x 60 in long / 229 cm x 152 cm
Chaise / Ottoman Cover: 60 in wide x 48 in long / 152 cm x 122 cm
Armchair Cover: 36 in wide x 48 in long / 91 cm x 122 cm
Round Table Topper: 24 in / 61 cm diameter
Square Pillow Cover (make 2): 18 in x 18 in / 46 cm x 46 cm each
Bolster Pillow Cover: 6 in diameter x 18 in long / 15 cm diameter x 46 cm long
All measurements include the scallop edging. You can adjust finished dimensions by adding or removing full repeats of 6 stitches.
Materials Needed
Yarn: Bulky weight (CYCA 5) chenille or velvet-feel yarn in coral-orange, approximately 3,500 yards / 3,200 meters total for the full set.
Break down the yardage as follows:
Cream or off-white bulky weight yarn for edging: approximately 400 yards / 366 meters total across all pieces.
Hook: US K-10.5 / 6.5 mm for main fabric. US J-10 / 6.0 mm for edging (slightly tighter to keep scallops crisp).
Notions: Tapestry needle, locking stitch markers (at least 10), scissors, blocking mats and pins, measuring tape, non-slip grip mat or fabric spray for the underside of finished covers (optional but recommended for keeping covers in place).
Yarn Suggestions
Option 1: Lion Brand Pound of Love in Pumpkin (Color 133) for the coral-orange sections and Fishermen’s Wool in Natural for the cream edging. This acrylic-blend yarn is machine washable and holds its shape through repeated laundering.
Option 2: Paintbox Yarns Simply Chunky in Candyfloss Pink or Coral paired with Simply Chunky in Cream. This yarn has excellent stitch definition that showcases the post-stitch diamond texture.
Option 3: Bernat Blanket yarn in Terracotta or Pumpkin Spice paired with Bernat Blanket in Vintage White. This option is widely available, forgiving on tension, and produces a thick, protective cover.
Avoid yarns with extreme halo such as mohair blends, which will obscure the post-stitch diamond texture. Chenille-style yarns produce the plush, dense fabric visible in the finished piece.
Gauge
In Diamond Lattice Pattern using US K-10.5 / 6.5 mm hook:
12 stitches = 4 in / 10 cm
8 rows = 4 in / 10 cm
Gauge swatch: Chain 26. Work Diamond Lattice Pattern for 16 rows. After blocking, the swatch should measure approximately 8 in / 20 cm wide by 8 in / 20 cm tall.
Gauge is critical for achieving correct cover dimensions. The post stitches pull the fabric slightly tighter than standard double crochets. Many crocheters will need to go up one hook size from their usual bulky weight hook. Always swatch before starting.
Abbreviations
Special Stitches for This Crochet Pattern
Front Post Double Crochet (FPdc)
Yarn over. Insert hook from front to back to front around the post (vertical bar) of the indicated stitch in the row below. Do not insert into the top loops. Yarn over and pull up a loop. Yarn over and pull through 2 loops. Yarn over and pull through remaining 2 loops. One FPdc complete.
This stitch creates a raised texture on the front of your work.
Back Post Double Crochet (BPdc)
Yarn over. Insert hook from back to front to back around the post of the indicated stitch in the row below. Yarn over and pull up a loop. Yarn over and pull through 2 loops. Yarn over and pull through remaining 2 loops. One BPdc complete.
This stitch creates a recessed texture and works together with FPdc to form the diamond lattice.
Diamond Lattice Stitch
This pattern is worked over a multiple of 6 stitches plus 2. The pattern alternates FPdc and BPdc in a shifting grid that creates a raised diamond impression across the fabric. Odd RS rows establish the post stitch columns. Even WS rows mirror them. The pattern shifts by 3 stitches on every right-side row, creating the diagonal lines that form diamonds every 6 rows.
Scallop Edging
Step 1: Join cream yarn with a sl st at any corner or starting position.
Step 2: Ch 1, sc evenly across the edge.
Step 3: Turn. Ch 1. Sl st in first sc. Work (ch 3, sk 2 sc, sl st in next sc) across, ending sl st in last sc. This creates the arch foundation.
Step 4: For each ch-3 arch: sl st into arch, ch 1, work 5 dc into the same arch, ch 1, sl st into same arch. This is one scallop shell.
Step 5: Continue across all arches. Fasten off and weave in ends.
Pattern Notes Before You Begin
Note 1: All pieces are worked flat in rows from bottom to top unless otherwise specified. The table topper is worked in the round.
Note 2: The turning chain 2 at the start of each row counts as the first dc. Always skip the first stitch at the base of the turning chain and work into the second stitch. At the end of each row, work the final stitch into the top of the turning chain from the previous row.
Note 3: On Row 1 (RS), you will work all dc into the chain as usual. Beginning on Row 2, you begin working FPdc and BPdc around the posts of the previous row’s stitches. The first and last stitches of every row are always plain dc to maintain clean selvage edges.
Note 4: For pieces that need to drape over sofa backs and arms, the extra length is included in the measurements given. The covers rest on the sofa and are held in place by the weight of the fabric and gravity.
Note 5: When joining new yarn or a new ball, always join at the end of a row, never mid-row.
Note 6: Place stitch markers at the beginning of every 20th row and at the midpoint of each row to help track repeat alignment.
Part One: Large Sofa Seat Cover Step by Step Tutorial
The sofa cover is worked as one continuous rectangle in the Diamond Lattice Pattern.
Foundation: Using coral-orange yarn and US K-10.5 hook, chain 272.
Row 1 (RS): Dc in 4th ch from hook (counts as 2 dc), dc in each ch across. Turn. (270 dc)
Row 2 (WS): Ch 2 (counts as dc here and throughout), sk first st, BPdc around next st, (FPdc around next st, BPdc around next st) across to last st, dc in top of t-ch. Turn. (270 sts)
Row 3 (RS): Ch 2, sk first st, FPdc around next st, (BPdc around next st, FPdc around next st) across to last st, dc in top of t-ch. Turn. (270 sts)
Row 4 (WS): Ch 2, sk first st, BPdc around next st, (FPdc around next st, BPdc around next st) across to last st, dc in top of t-ch. Turn. (270 sts)
Row 5 (RS): Ch 2, sk first st, dc in next st, (FPdc around next st, dc in next st, dc in next st, FPdc around next st, dc in next st) across to last st, dc in top of t-ch. Turn. (270 sts)
Row 6 (WS): Ch 2, sk first st, dc in next st, (BPdc around next st, dc in next st, dc in next st, BPdc around next st, dc in next st) across to last st, dc in top of t-ch. Turn. (270 sts)
Row 7 (RS): Repeat Row 3. (270 sts)
Row 8 (WS): Repeat Row 4. (270 sts)
Row 9 (RS): Ch 2, sk first st, dc in next 2 sts, (BPdc around next st, dc in next 3 sts, BPdc around next st) across, ending dc in last st, dc in top of t-ch. Turn. (270 sts)
Row 10 (WS): Ch 2, sk first st, dc in next 2 sts, (FPdc around next st, dc in next 3 sts, FPdc around next st) across, ending dc in last st, dc in top of t-ch. Turn. (270 sts)
Row 11 (RS): Repeat Row 3. (270 sts)
Row 12 (WS): Repeat Row 4. (270 sts)
Rows 1 through 12 form the Diamond Lattice Pattern repeat. Continue repeating Rows 1 through 12 (omitting the foundation chain) until the piece measures 60 in / 152 cm from the foundation chain edge, ending after a WS row.
The piece will require approximately 120 rows to reach 60 in at gauge.
Checkpoint: After 60 rows, the piece should measure approximately 30 in / 76 cm tall. Adjust hook size slightly if your piece is running short or long. Do not adjust by adding extra rows mid-repeat. Always finish a full 12-row repeat before measuring.
Fasten off coral-orange yarn.
Sofa Cover Edging
Switch to cream yarn and US J-10 / 6.0 mm hook.
Join cream yarn at any corner with a sl st.
Round 1: Ch 1. Work sc evenly around all four edges as follows. Along each long edge (270-stitch sides): work 1 sc into each dc post along the row ends, approximately 120 sc per long side. Along each short edge (top and bottom): work 1 sc into each of the 270 sts. At each corner, work 3 sc into the corner stitch. Join with sl st to first sc. (780 sc approximately, adjusted to nearest multiple of 3)
Round 2 (Arch round): Ch 1. Sl st in first sc. Work (ch 3, sk 2 sc, sl st in next sc) around, working (ch 3, sl st in corner sc, ch 3, sl st in next sc) at each corner to maintain shape. Join with sl st. (260 arches approximately)
Round 3 (Scallop round): Work (sl st into ch-3 arch, ch 1, 5 dc into same arch, ch 1, sl st into same arch) around. Join with sl st to first sl st. Fasten off. Weave in ends.
Part Two: Chaise / Ottoman Cover
Foundation: Using coral-orange yarn and US K-10.5 hook, chain 182.
Row 1 (RS): Dc in 4th ch from hook, dc in each ch across. Turn. (180 dc)
Work Diamond Lattice Pattern (Rows 2 through 12, then repeat) exactly as written for the Sofa Cover until piece measures 48 in / 122 cm from foundation, ending after a WS row. Approximately 96 rows total.
Checkpoint: After 48 rows the piece should measure approximately 24 in / 61 cm.
Fasten off coral-orange yarn.
Chaise Cover Edging
Join cream yarn at any corner with a sl st using US J-10 hook.
Round 1: Work sc evenly around all four edges: 180 sc along each short edge, approximately 96 sc along each long edge, with 3 sc at each corner. Total approximately 552 sc, adjusted to nearest multiple of 3.
Round 2: Work (ch 3, sk 2 sc, sl st in next sc) around with double arches at corners. (184 arches approximately)
Round 3: Work 5 dc scallop into each arch around. Fasten off. Weave in ends.
Part Three: Armchair Cover
The armchair cover is worked in two panels: a seat/back panel and a separate seat drape panel, then seamed along one long edge.
Main Panel
Foundation: Using coral-orange yarn and US K-10.5 hook, chain 110.
Row 1 (RS): Dc in 4th ch from hook, dc in each ch across. Turn. (108 dc)
Work Diamond Lattice Pattern until piece measures 48 in / 122 cm, ending after a WS row. Approximately 96 rows.
Fasten off.
Second Panel
Foundation: Chain 110.
Row 1 (RS): Dc in 4th ch from hook, dc in each ch across. Turn. (108 dc)
Work Diamond Lattice Pattern until piece measures 12 in / 30 cm, ending after a WS row. Approximately 24 rows.
Fasten off.
Seaming
Hold both panels RS facing up. Place the short panel (12 in / 30 cm) aligned to the bottom edge of the long panel (48 in / 122 cm). Using coral-orange yarn and tapestry needle, whipstitch the two panels together along their 108-stitch foundation chain edges.
Total assembled dimensions: 36 in wide x approximately 60 in effective drape length.
Armchair Cover Edging
Join cream yarn at any corner of the assembled cover.
Round 1: Work sc evenly around entire outer perimeter. Along the 108-stitch cast-on/cast-off edges: 108 sc each. Along each long row-end edge: approximately 120 sc. With 3 sc at each outer corner. Total approximately 456 sc adjusted to nearest multiple of 3.
Round 2: Work (ch 3, sk 2 sc, sl st in next sc) around with corner adjustments. (152 arches approximately)
Round 3: 5 dc scallop into each arch around. Fasten off. Weave in ends.
Part Four: Round Table Topper Crochet Pattern
The table topper is worked in the round from the center outward.
Foundation Ring: Using coral-orange yarn and US K-10.5 hook, chain 4. Join with sl st to form a ring.
Round 1 (RS): Ch 3 (counts as dc), work 11 dc into ring. Join with sl st to top of ch-3. (12 dc)
Round 2: Ch 3, dc in same st as join, 2 dc in each st around. Join with sl st to top of ch-3. (24 dc)
Round 3: Ch 3, dc in same st, dc in next st, (2 dc in next st, dc in next st) around. Join. (36 dc)
Round 4: Ch 3, dc in same st, dc in next 2 sts, (2 dc in next st, dc in next 2 sts) around. Join. (48 dc)
Round 5: Ch 2 (counts as dc), FPdc around next st, (BPdc around next st, FPdc around next st) around to last st before join, dc in last st. Join. (48 sts)
Round 6: Ch 3, dc in same st, FPdc around next st, (BPdc around next st, FPdc around next st) 2 times, 2 dc in next st, (2 dc in next st, FPdc around next st, (BPdc around next st, FPdc around next st) 2 times) around. Join. (60 dc)
Round 7: Ch 2, BPdc around next st, (FPdc around next st, BPdc around next st) around. Join. (60 sts)
Round 8: Ch 3, dc in same st as join, dc in next 4 sts, (2 dc in next st, dc in next 4 sts) around. Join. (72 dc)
Round 9: Ch 2, (FPdc around next st, BPdc around next st) around. Join. (72 sts)
Round 10: Ch 3, dc in same st, dc in next 5 sts, (2 dc in next st, dc in next 5 sts) around. Join. (84 dc)
Round 11: Ch 2, (BPdc around next st, FPdc around next st) around. Join. (84 sts)
Round 12: Ch 3, dc in same st, dc in next 6 sts, (2 dc in next st, dc in next 6 sts) around. Join. (96 dc)
Round 13: Ch 2, (FPdc around next st, BPdc around next st) around. Join. (96 sts)
Round 14: Ch 3, dc in same st, dc in next 7 sts, (2 dc in next st, dc in next 7 sts) around. Join. (108 dc)
Round 15: Ch 2, (BPdc around next st, FPdc around next st) around. Join. (108 sts)
Round 16: Ch 3, dc in same st, dc in next 8 sts, (2 dc in next st, dc in next 8 sts) around. Join. (120 dc)
Round 17: Ch 2, (FPdc around next st, BPdc around next st) around. Join. (120 sts)
Round 18: Ch 3, dc in same st, dc in next 9 sts, (2 dc in next st, dc in next 9 sts) around. Join. (132 dc)
Round 19: Ch 2, (BPdc around next st, FPdc around next st) around. Join. (132 sts)
Round 20: Ch 3, dc in same st, dc in next 10 sts, (2 dc in next st, dc in next 10 sts) around. Join. (144 dc)
Checkpoint: After Round 20, the piece should measure approximately 19 in / 48 cm in diameter. The circle should lie completely flat.
Round 21: Ch 2, (FPdc around next st, BPdc around next st) around. Join. (144 sts)
Round 22: Ch 3, dc in same st, dc in next 11 sts, (2 dc in next st, dc in next 11 sts) around. Join. (156 dc)
Round 23: Ch 2, (BPdc around next st, FPdc around next st) around. Join. (156 sts)
Round 24: Ch 3, dc in same st, dc in next 12 sts, (2 dc in next st, dc in next 12 sts) around. Join. (168 dc)
Fasten off coral-orange yarn. The piece should now measure approximately 22 in / 56 cm in diameter before edging.
Table Topper Edging
Join cream yarn with sl st to any st.
Round 1: Ch 1, sc in same st, sc in each st around. Join. (168 sc)
Round 2: Ch 1. Sl st in first sc. Work (ch 3, sk 2 sc, sl st in next sc) around. Join. (56 arches)
Round 3: Work (5 dc scallop into each arch) around. Join. Fasten off. Weave in ends.
After edging, total diameter is approximately 24 in / 61 cm.
Part Five: Square Pillow Covers (Make 2)
Each pillow cover is made of two identical square panels, seamed on three sides, stuffed with an 18-in pillow insert, then the fourth side is seamed closed.
Front Panel
Foundation: Using coral-orange yarn and US K-10.5 hook, chain 56.
Row 1 (RS): Dc in 4th ch from hook, dc in each ch across. Turn. (54 dc)
Work Diamond Lattice Pattern until piece measures 18 in / 46 cm, ending after a WS row. Approximately 36 rows.
Fasten off.
Make a second identical panel.
Assembly
Hold both panels with WS together. Using coral-orange yarn and tapestry needle, whipstitch three sides together. Insert 18-in pillow form. Whipstitch the fourth side closed.
Pillow Cover Edging
Join cream yarn at any corner with sl st using US J-10 hook.
Round 1: Ch 1, work sc evenly around entire perimeter: 54 sc along each cast-on/cast-off edge, approximately 36 sc along each row-end edge, with 3 sc at each corner. Total approximately 180 sc adjusted to nearest multiple of 3.
Round 2: Work (ch 3, sk 2 sc, sl st in next sc) around with corner arches. (60 arches approximately)
Round 3: 5 dc scallop into each arch around. Fasten off. Weave in ends.
Part Six: Bolster Pillow Cover
The bolster cover is worked as a tube (flat rectangle seamed into a cylinder) with two gathered circular end caps.
Main Body
Foundation: Using coral-orange yarn and US K-10.5 hook, chain 56.
Row 1 (RS): Dc in 4th ch from hook, dc in each ch across. Turn. (54 dc)
Work Diamond Lattice Pattern until piece measures 18 in / 46 cm in length, ending after a WS row. Approximately 36 rows.
Fasten off. The piece is now a rectangle approximately 18 in wide x 18 in long.
Seam into Tube: With WS together, whipstitch the two short (54-stitch) edges together using coral-orange yarn, forming a cylinder that is 18 in long with approximately 19 in circumference.
End Cap (Make 2)
Using coral-orange yarn and US K-10.5 hook, chain 4. Join with sl st to form ring.
Round 1: Ch 3, 11 dc into ring. Join. (12 dc)
Round 2: Ch 3, dc in same st, 2 dc in each st around. Join. (24 dc)
Round 3: Ch 3, dc in same st, dc in next st, (2 dc in next st, dc in next st) around. Join. (36 dc)
Round 4: Ch 3, dc in same st, dc in next 2 sts, (2 dc in next st, dc in next 2 sts) around. Join. (48 dc)
Round 5: Ch 3, dc in same st, dc in next 3 sts, (2 dc in next st, dc in next 3 sts) around. Join. (60 dc)
The end cap at Round 5 should measure approximately 7 in / 18 cm in diameter.
Attach end caps: Pin one end cap to each open end of the tube. With WS facing out, whipstitch the outer edge of the end cap to the edge of the tube, easing any fullness. Before closing the second end cap, stuff the bolster with polyfill to desired firmness. Seam the second end cap closed.
Bolster Edging: Join cream yarn to the seam line where the body tube and one end cap meet. Work 1 round of sc around the seam join. Then work (ch 3, sk 2 sc, sl st in next sc) around. Then work 5 dc scallop into each arch. Repeat for the opposite end. Fasten off and weave in ends.
Bolster Decorative Tie (Optional)
Using cream yarn, chain 30. Work sc in 2nd ch from hook and in each ch across. (29 sc) Fasten off. Use this strip as a tie at one or both ends of the bolster, threading it through the base of the scallop edging and tying in a bow.
Size Customization Tips
To make the sofa cover wider: Add stitches in multiples of 6 to the foundation chain. Each additional 6 stitches adds approximately 2 in / 5 cm to the width.
To make any cover longer: Add rows in groups of 12 (one full Diamond Lattice repeat). Each 12-row repeat adds approximately 6 in / 15 cm to the length.
To fit a smaller loveseat (approximately 60 in / 152 cm wide): Reduce the foundation chain for the sofa cover from 272 to 194 (192 dc working stitches).
For a heavier, thicker fabric: Work the Diamond Lattice Pattern holding two strands of worsted weight yarn together with a US K-10.5 hook.
Finishing and Blocking Your Sofa Cover Set
Step 1: Weave in all ends thoroughly on the WS, running each tail at least 2 in in multiple directions.
Step 2: Fill a bathtub or large basin with cool water and a small amount of no-rinse wool wash.
Step 3: Submerge each piece, press gently (do not wring), and allow to soak for 20 minutes.
Step 4: Roll the piece in a clean dry towel and press firmly to remove excess water.
Step 5: Lay the piece flat on blocking mats. Pin to the correct dimensions using rust-proof pins.
Step 6: For the round table topper, pin from the center outward in radiating lines.
Step 7: Allow to dry completely (24 to 48 hours) before unpinning.
Step 8: For acrylic yarns, you may steam-block carefully by holding a steam iron several inches above the surface without touching the fabric.
Step 9: Once all pieces are dry, lightly brush chenille fabric with a soft clothing brush to restore the pile.
Care Instructions
Machine wash on the gentle cycle in cool water inside a mesh laundry bag. Use a small amount of gentle liquid detergent. Avoid fabric softener on chenille yarns. Tumble dry on low heat or lay flat to dry. Do not bleach. Remove from the dryer promptly and smooth to shape while still slightly warm.
Final Thoughts on This Coral Sofa Cover Set
Thank you so much for choosing this pattern for your home makeover project. I truly hope you love creating these pieces as much as I loved designing them. The transformation when you drape these covers across your furniture is genuinely satisfying.
If you make this set, I would absolutely love to see your finished pieces. Tag me on Instagram or share in our Facebook group. There is nothing better than seeing these designs come to life in your homes with your color choices.
Go ahead and save this pattern to your Pinterest boards so you can find it when you are ready to start. And please drop a comment below if you make it. I read every single one and love hearing about your projects.
