
I don’t know about you, but I have a serious weakness for baby dresses with flutter sleeves. There’s just something about those little ruffles that makes my heart melt every single time.
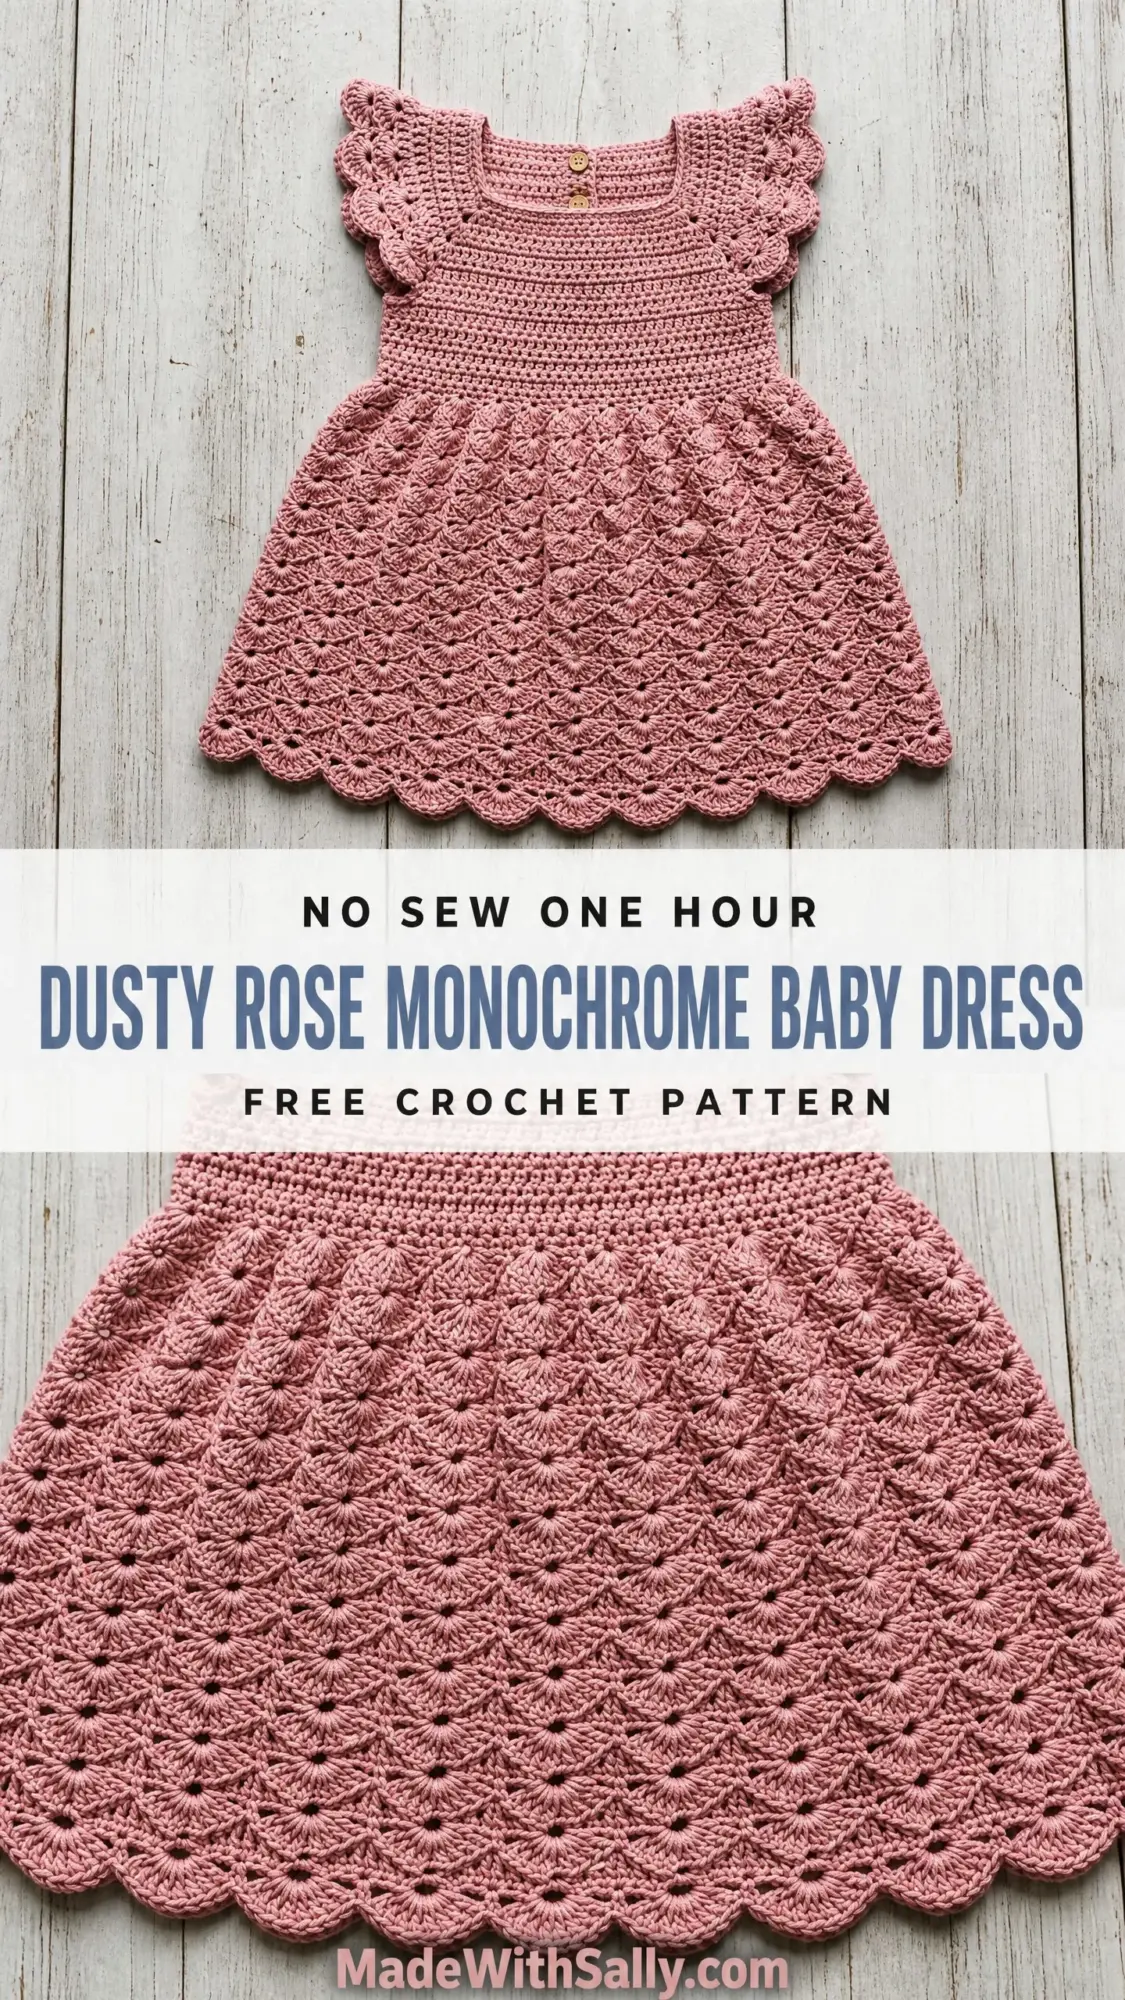
This dusty rose baby dress has been living in my head rent-free since I first sketched it out. The fitted bodice, the flared shell stitch skirt, those delicate scalloped edges. It’s feminine without being fussy, classic without being boring.
And here’s the best part: once you understand the shell stitch pattern, the whole skirt practically works itself. Let me walk you through every single step.
About This Crochet Baby Dress Pattern
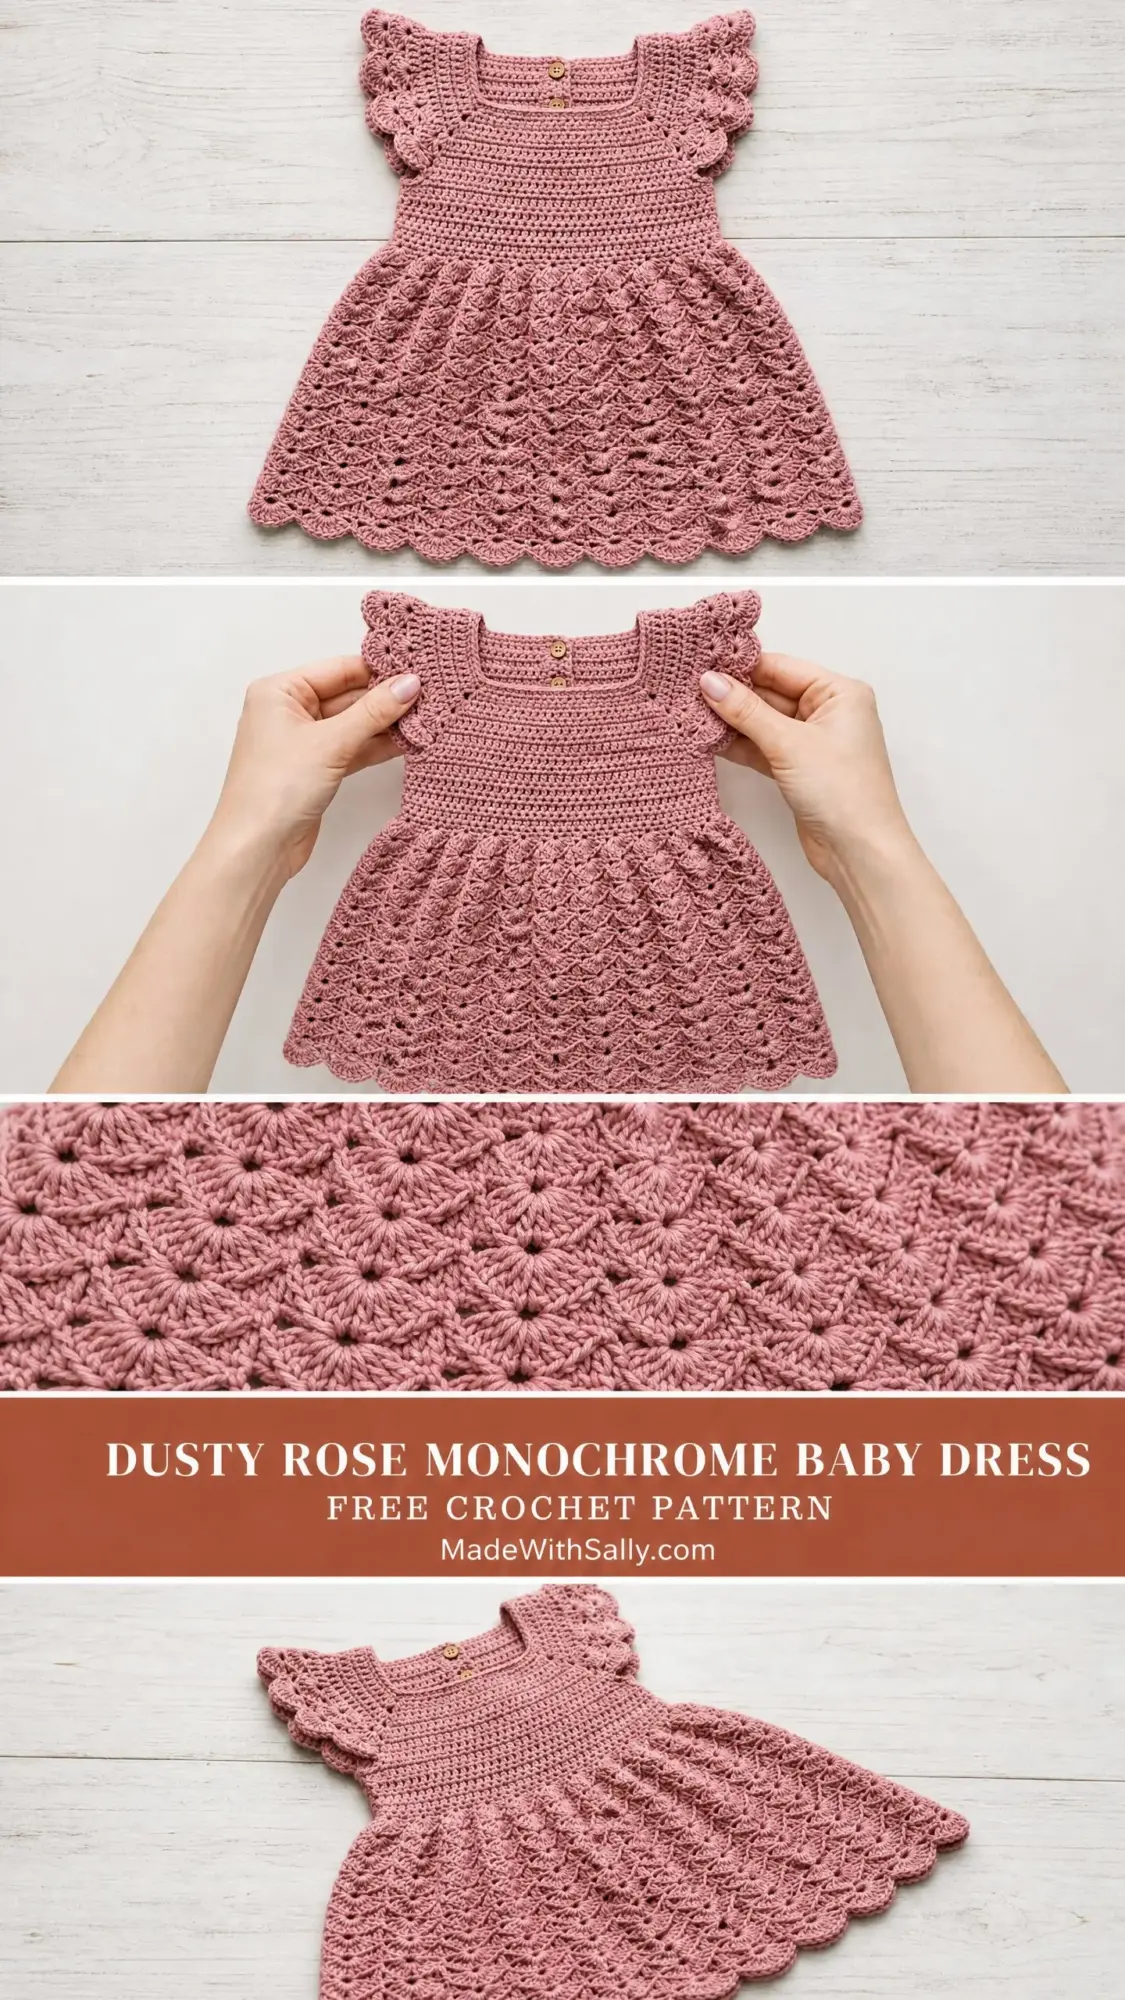
This baby dress features a square neckline bodice worked flat from the top down, flutter sleeves added after the body is joined, and a gorgeous fan shell stitch skirt that flares naturally into an A-line silhouette. Two small wooden buttons at the back neckline make dressing easy. The entire piece uses a single warm dusty rose color throughout for a clean, modern monochrome look.
The construction happens in three main stages. First, you work the bodice flat from the top down in two separate panels (front and back), then join them at the sides. Next, you transition to working in the round for the shell stitch skirt. Finally, you add the flutter sleeve ruffles and all the pretty scalloped edgings.
Skill Level: Intermediate
This crochet pattern requires comfort with working flat and in the round, reading shell and fan stitch repeats, working increases within a pattern, and picking up stitches along an edge. If you’re a confident beginner who has completed a few simple garments, you can absolutely tackle this project with patience.
Time Estimate: Approximately 8 to 14 hours across multiple sessions, depending on your experience level. The bodice works up quickly. The skirt shell pattern requires attention to repeat placement and accounts for most of the time investment.
Finished Measurements
This pattern is written for size 6 to 12 months.
Size customization tips are included at the end of the pattern.
Materials Needed for This Baby Dress Crochet Pattern
Yarn: Approximately 300 to 350 yards / 275 to 320 meters of DK weight yarn (CYCA weight 3), 100% cotton or cotton blend recommended for drape, breathability, and stitch definition. One color throughout.
Hooks:
Using a slightly larger hook for the skirt helps achieve the open, draping quality of the fan stitch without pulling.
Notions:
Yarn Suggestions
Option 1: Paintbox Yarns Simply DK (100% cotton, 137 yards / 125 meters per 50g skein). This yarn has excellent stitch definition for shell patterns and comes in a range of soft rose tones. Recommended colorway: Vintage Pink or Blush Pink. You will need 3 skeins.
Option 2: Lion Brand 24/7 Cotton DK (100% mercerized cotton, 186 yards / 170 meters per 100g skein). A widely available, affordable option with a smooth finish that makes shell stitches pop. Recommended colorway: Rose. You will need 2 skeins.
Option 3: Drops Safran (100% Egyptian cotton, 175 yards / 160 meters per 50g skein). A slightly thinner DK that produces a finer, more delicate fabric with excellent drape. Recommended colorway: Old Rose. You will need 2 skeins.
Substitution note: Choose any DK weight yarn (CYCA 3) that achieves gauge. Cotton or cotton-blend yarns are strongly recommended over acrylic for this garment, as cotton provides the drape, weight, and stitch definition needed for the fan skirt to lay properly. Avoid yarns with heavy texture or significant halo, which will obscure the shell pattern. Always check your gauge before beginning.
Gauge
With D/3 (3.25 mm) hook and single crochet (sc) stitch:
With E/4 (3.5 mm) hook and fan shell pattern (one full shell repeat = 6 stitches):
Gauge is essential for garment sizing. Adjust hook size as needed to match gauge. A swatch of at least 4 inches by 4 inches is required before beginning.
Abbreviations (US Terms)
Special Stitches Explained
Fan Shell Stitch
A fan shell consists of 5 dc worked into a single stitch or space, creating a fan shape. Each fan shell is separated by chain spaces and single crochets that form the base of the next row’s pattern.
To work one fan shell: work 5 dc all into the same stitch or chain space indicated.
Fan Shell Stitch Pattern (in the round)
Round A (setup): ch 3 (counts as dc), 2 dc in same st, sk 2 sts, sc in next st, sk 2 sts, [5 dc in next st, sk 2 sts, sc in next st, sk 2 sts] around, 2 dc in same st as beg ch-3, sl st to top of beg ch-3 to join.
Round B: ch 1, sc in first st (top of ch-3), [ch 2, 5 dc in sc from previous round, ch 2, sc in center dc of 5-dc fan from previous round] around, end with ch 2, sl st to beg sc to join.
Round C: ch 3 (counts as dc), 2 dc in same sc, [sc in center dc of fan, 5 dc in sc] around, end with sc in center dc of last fan, 2 dc in same as beg ch-3, sl st to top of beg ch-3.
Repeat Rounds B and C for fan shell pattern in the round.
Scallop Edging
Worked along any edge. Work sl st into first st, [sk 1 st, 5 dc into next st, sk 1 st, sl st into next st] across or around. Each scallop uses 4 stitches plus the sl st base.
Flutter Sleeve Ruffle
Pick up stitches evenly around the armhole opening. Work 2 dc into each stitch around, join with sl st. Work one row of scallop edging across the increased stitches.
Button Loop
Ch 5, sl st into same stitch to form loop, fasten off, sew securely at back neckline edge.
Pattern Notes Before You Begin
1. The bodice is worked flat from the top down in two separate flat pieces (front and back), then joined at the sides.
2. The back has a 2-stitch button band overlap at the top center. Two buttons fasten the back neckline opening to allow the dress to go over a baby’s head.
3. Stitch markers should be used at the beginning of every round and at the underarm join points.
4. The ch-3 at the beginning of any dc row or round counts as one dc throughout this pattern.
5. When picking up stitches for flutter sleeves, distribute stitches evenly and use the D/3 hook.
6. The skirt is worked in the round from the waist down using the larger E/4 hook.
7. The right side of the work is facing you for all skirt rounds.
8. Read all instructions for a section completely before beginning that section.
9. Turning chains: ch 1 at beg of sc rows does NOT count as a stitch. Ch 3 at beg of dc rows DOES count as one dc.
Baby Dress Crochet Pattern Instructions
Back Bodice Panel
With D/3 hook, ch 38.
Foundation Row (WS): Sc in 2nd ch from hook and in each ch across, turn. (37 sc)
Row 1 (RS): Ch 1, sc in each sc across, turn. (37 sc)
Row 2 (WS): Ch 1, sc in each sc across, turn. (37 sc)
Rows 3 through 6: Rep Row 1 for 4 more rows. (37 sc each row)
Note: Rows 1 through 6 form the neckline edge and button band. After Row 6 your piece should measure approximately 1 inch / 2.5 cm tall.
Now begin armhole and shoulder shaping by adding stitches at each end to build the shoulder width.
Row 7 (RS): Ch 1, 2 sc in first st, sc in each st to last st, 2 sc in last st, turn. (39 sc)
Row 8 (WS): Ch 1, 2 sc in first st, sc in each st to last st, 2 sc in last st, turn. (41 sc)
Row 9 (RS): Ch 1, 2 sc in first st, sc in each st to last st, 2 sc in last st, turn. (43 sc)
Row 10 (WS): Ch 1, sc in each st across, turn. (43 sc)
Row 11 (RS): Ch 1, sc in each st across, turn. (43 sc)
Rows 12 through 16: Rep Rows 10 and 11 for 5 more rows (ending on a RS row after Row 16). (43 sc each row)
Note: After Row 16, the back bodice panel should measure approximately 3 inches / 7.5 cm tall from foundation. Check your measurement here before continuing.
Rows 17 through 22: Ch 1, sc in each st across, turn. (43 sc each row)
Note: After Row 22, the back bodice panel should measure approximately 5 inches / 12.5 cm. This is the waistline. Fasten off and set aside.
Front Bodice Panel
Work exactly as Back Bodice Panel through Row 22. (43 sc)
Do not fasten off after Row 22. You will join front and back at the sides in the next step.
Joining Front and Back at Sides
Hold front and back panels with right sides facing out (RS facing you on both pieces).
With D/3 hook and working yarn attached at the end of the front panel Row 22, place front and back panels side by side with WS together along one side edge.
Side Join Row: Ch 1, working through both layers (front edge and back edge together), sc evenly along the side edge, working 1 sc per row end for 22 rows. (22 sc along side seam)
Repeat for the second side seam.
Note: If you prefer a seamless approach, after Row 10 of both panels, you may join them at the underarms with a sl st join and continue in the round. The flat seam method described here more closely replicates the clean side finish visible in the pictured garment.
After both side seams are joined, you will have a tube at the waist with the armhole openings at the top corners on both sides.
CHECKPOINT: After joining, the waist of the bodice measured in the round should be approximately 18 inches / 46 cm. The piece should measure approximately 5.5 inches / 14 cm from shoulder edge to waist.
Waist Transition Row
This row sets up the fan shell stitch in the skirt.
With E/4 hook, attach yarn at back left side seam at the bottom edge of the bodice (this is the waist edge). You will now work in the round.
The goal of this row is to increase the stitch count to 90 stitches, which is a multiple of 6 (90 divided by 6 equals 15 fan shell repeats) and provides the flare needed for the skirt.
Total stitches available at waist (front 43 plus back 43 minus any overlap at seams) = 86 working stitches around the waist edge.
Waist Transition Round: Ch 1, sc in each st around, working 4 evenly spaced increases (2 sc in same st) across the round, pm at beginning, sl st to first sc to join. (90 sc)
Placement of increases: Work 1 increase approximately every 21 sts (at approximately stitch positions 11, 32, 53, and 74).
Skirt (Worked in the Round with E/4 Hook)
All rounds are worked with RS facing.
SKIRT ROUND 1 (Fan Setup Round):
Ch 3 (counts as dc), 2 dc in same st, sk 2 sts, sc in next st, sk 2 sts, [5 dc in next st, sk 2 sts, sc in next st, sk 2 sts] 13 times, 2 dc in same st as beg ch-3, sl st to top of beg ch-3. (15 fan shells established)
Note: The round contains 15 fans of 5 dc each plus 15 sc stitches between them, totaling 90 active stitches.
SKIRT ROUND 2:
Ch 1, sc in top of beg ch-3 (center of the joined half fans), [ch 2, 5 dc in next sc, ch 2, sc in center dc (3rd dc) of next 5-dc fan] 14 times, ch 2, 5 dc in next sc, ch 2, sl st to first sc to join. (15 fans; 15 sc; 30 ch-2 spaces)
SKIRT ROUND 3:
Ch 3 (counts as dc), 2 dc in same sc, [sc in center dc of next fan, 5 dc in next sc] 14 times, sc in center dc of last fan, 2 dc in same sc as beg ch-3, sl st to top of beg ch-3. (15 fans)
SKIRT ROUNDS 4 through 9:
Rep Rounds 2 and 3 three more times (6 more rounds, ending on a Round 3 equivalent). (15 fans each round)
Note: After Skirt Round 9, the skirt should measure approximately 3.5 inches / 9 cm from the waist.
Skirt Increase Section
To add more width to the skirt, you will increase from 15 fans to 18 fans by adding a new fan between every 5th existing fan for 3 evenly spaced additions.
SKIRT ROUND 10 (Increase Setup Round):
Ch 1, sc in first joined st, [ch 2, 5 dc in next sc, ch 2, sc in center dc of next fan] 4 times, ch 2, 5 dc in next sc, ch 2, sc in center dc of next fan, ch 2, 5 dc in SAME sc just used (this creates a new fan insertion), ch 2, sc in center dc of next fan, [ch 2, 5 dc in next sc, ch 2, sc in center dc of next fan] 4 times, ch 2, 5 dc in next sc, ch 2, sc in center dc of next fan, ch 2, 5 dc in SAME sc just used, ch 2, sc in center dc of next fan, [ch 2, 5 dc in next sc, ch 2, sc in center dc of next fan] 4 times, ch 2, 5 dc in next sc, ch 2, sc in center dc of next fan, ch 2, 5 dc in SAME sc just used, ch 2, sl st to first sc to join. (18 fans)
Note: You have added 3 new fans at evenly spaced positions (after fans 5, 10, and 15). Stitch count: 18 fans of 5 dc each plus 18 sc equals 108 active stitches, with 36 ch-2 spaces.
SKIRT ROUNDS 11 through 20:
Work even in fan shell pattern (rep Skirt Rounds 2 and 3 equivalents, now working 18 fans each round) for 10 rounds. (18 fans each round)
Note: After Skirt Round 20, the skirt should measure approximately 7 inches / 18 cm from the waist.
SKIRT ROUNDS 21 and 22 (final two rounds before hem edging):
Work one more Round 2 equivalent and one more Round 3 equivalent. (18 fans each round)
CHECKPOINT: After Skirt Round 22, the total dress length from shoulder to bottom of last fan round should be approximately 13 to 13.5 inches / 33 to 34 cm.
Hem Scallop Edging
With D/3 hook, join yarn at any sc between fans at the bottom of the last skirt round.
Hem Edging Round: Ch 1, sl st in first sc, [sk ch-2 sp, 5 dc in center dc of next fan (the one directly below), sk ch-2 sp, sl st in next sc] 18 times, sl st to first sl st to join. Fasten off. (18 scallops)
Flutter Sleeves
Work both sleeves the same way.
With RS facing and D/3 hook, join yarn at the bottom center of one armhole opening.
Armhole Pickup Round: Ch 1, sc evenly around the entire armhole opening. Work 1 sc for every row end along the straight vertical edges, and 1 sc into each available stitch at the shoulder curve. You should end with approximately 36 sc around the armhole opening. If your count is slightly different due to row gauge variation, adjust to the nearest even number. Pm at beg, sl st to first sc to join. (36 sc)
Flutter Ruffle Round 1: Ch 3 (counts as dc), 2 dc in same st (increase made), [2 dc in next st] around, sl st to top of beg ch-3 to join. (72 dc)
Note: Working 2 dc in every stitch doubles the count, producing the ruffle flare visible as the flutter sleeve in the pictured item.
Flutter Ruffle Round 2 (Scallop): Ch 1, sl st in first dc, [sk 1 dc, 5 dc in next dc, sk 1 dc, sl st in next dc] 18 times, sl st to beg sl st to join. Fasten off. (18 scallops)
Note: 72 dc divided into groups of 4 (sk 1, work 1, sk 1, sl st 1) yields exactly 18 scallops.
Repeat for second armhole.
Neckline Edging
With D/3 hook, join yarn at back right neckline corner.
Neckline Pickup Row: Ch 1, sc evenly across the neckline edge. Work 1 sc per stitch across the foundation row of each panel (37 sc front, 37 sc back), and 1 sc per row end at each corner (approximately 2 to 3 sc at each inner corner).
Total neckline pickup stitches: approximately 78 to 80 sc. Do not join; work flat across.
Scallop Row: Ch 1, sl st in first sc, [sk 1 sc, 5 dc in next sc, sk 1 sc, sl st in next sc] across. Adjust start as needed to begin and end evenly. Fasten off.
Button Band and Button Loops
The back of the dress has a 2-stitch overlap at the top center back neckline for button placement.
The left back panel edge overlaps over the right back panel edge by approximately 0.5 inch / 1.5 cm.
Sew two buttons onto the right back panel band, spaced approximately 0.75 inch / 2 cm apart vertically, positioned approximately 0.25 inch / 0.5 cm from the center back edge.
On the left back panel, work two button loops as follows:
Attach yarn at the position corresponding to the first button. Ch 5, sl st into same stitch to form loop. Fasten off. Weave in ends. Repeat for second button loop.
Sew loops securely with yarn needle. Align buttons through loops to test fit before final tightening.
Size Customization Tips
To make the dress larger (12 to 18 months): Add 6 to the foundation chain (total 44 ch, 43 sc). Work 4 additional rows in the bodice before the waist transition. Increase to 96 stitches at the waist transition (16 fan repeats) and continue with skirt as written. Finished chest measurement will be approximately 19 to 20 inches / 48 to 51 cm.
To make the dress smaller (0 to 3 months): Subtract 4 from the foundation chain (total 34 ch, 33 sc). Reduce waist to 84 stitches (14 fan repeats). The proportions of the fan stitch remain the same.
To add length to the skirt: Each additional pair of fan rows (one Round 2 equivalent plus one Round 3 equivalent) adds approximately 0.75 inch / 2 cm to the skirt length.
To adjust width: All stitch counts must remain divisible by 6 for the fan repeat to work correctly. Any adjustment to the foundation chain must be in multiples of 2, and the waist transition count must be adjusted to the nearest multiple of 6.
Finishing and Blocking Your Baby Dress
Weave in all ends securely using a yarn needle, going in at least two directions to prevent unraveling.
Wet blocking is strongly recommended and will significantly improve the drape and stitch definition of the fan skirt.
To wet block: Soak the finished dress in cool water for 15 to 20 minutes. Gently squeeze out water without wringing. Roll in a clean towel and press to remove excess moisture. Lay flat on a blocking mat, pin the skirt scallops open to their full width, and allow to dry completely (usually 12 to 24 hours). Cotton yarns will relax and the fans will open beautifully.
Sew on buttons after blocking is complete.
Care Instructions
Hand wash in cool water with gentle soap. Do not wring. Lay flat to dry away from direct sunlight. Do not tumble dry. If yarn is 100% cotton, light ironing on a low-heat cotton setting is acceptable once fully dry. Store folded, not hung, to prevent stretching.
Final Thoughts on This Baby Dress Crochet Pattern
This dusty rose baby dress is one of those projects that looks so much more complicated than it actually is. Once you get into the rhythm of the shell stitch, you’ll find yourself flying through those skirt rounds. And when you hold up that finished dress with its fluttery sleeves and scalloped edges? Pure satisfaction.
I hope you love making this baby dress as much as I loved designing it. Thank you so much for choosing this pattern for your next project.
If you’re not quite ready to start today, save this pattern to your Pinterest boards so you can find it later. And if you do make this dress, I would absolutely love to see it! Drop a comment below or tag me on Instagram or Facebook with your finished photos. Seeing your creations is honestly the best part of sharing these patterns.
