
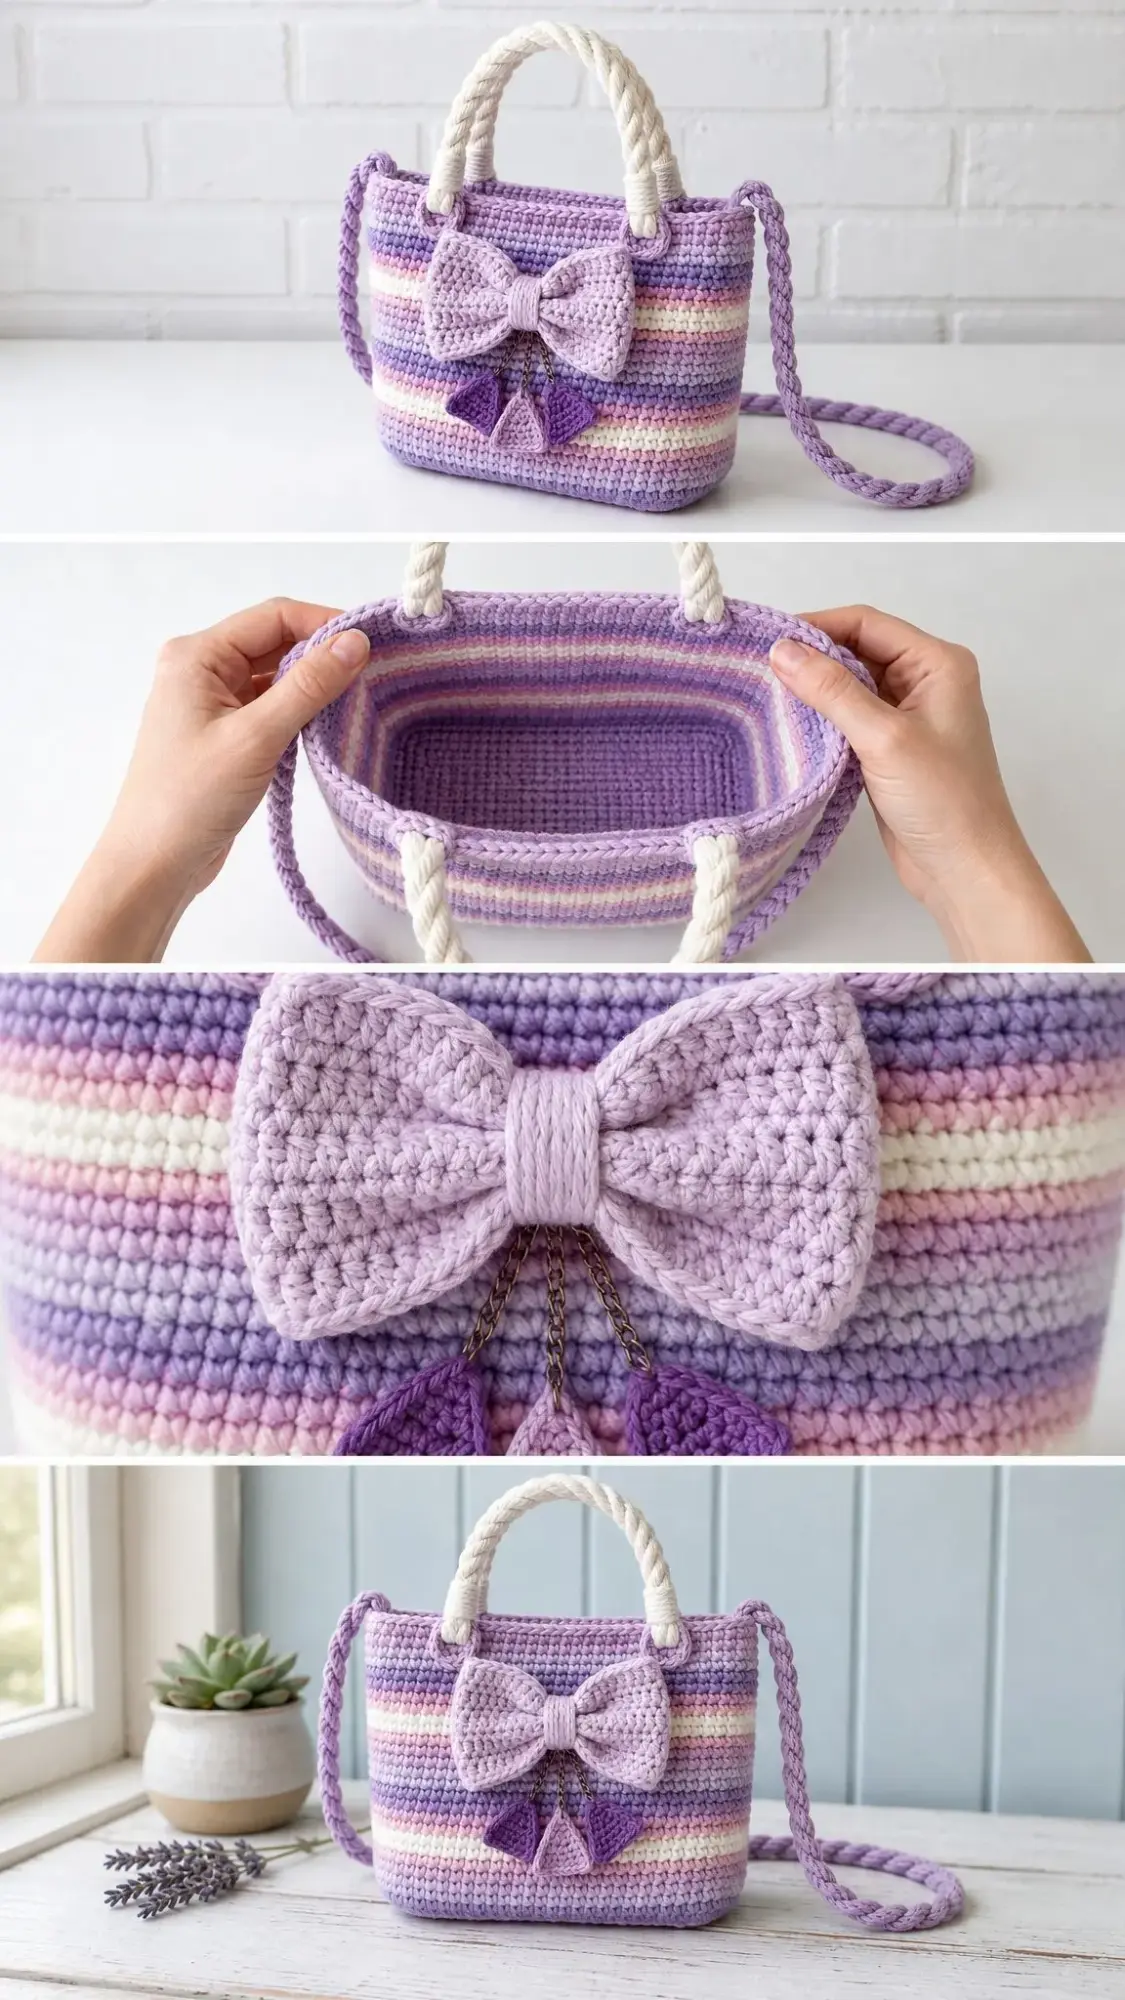
This purse is SUPER IMPRESSIVE and honestly one of my favorite designs I’ve ever put together. Those soft lavender stripes, the plush statement bow, braided handles, and playful triangle tassels all come together in about 6 to 9 relaxed hours. Yes, really!
Get the Ad-Free PDF Pattern
You can find the free pattern below, or you can purchase the ad-free printable PDF from my shop.
Get the Printable PDF →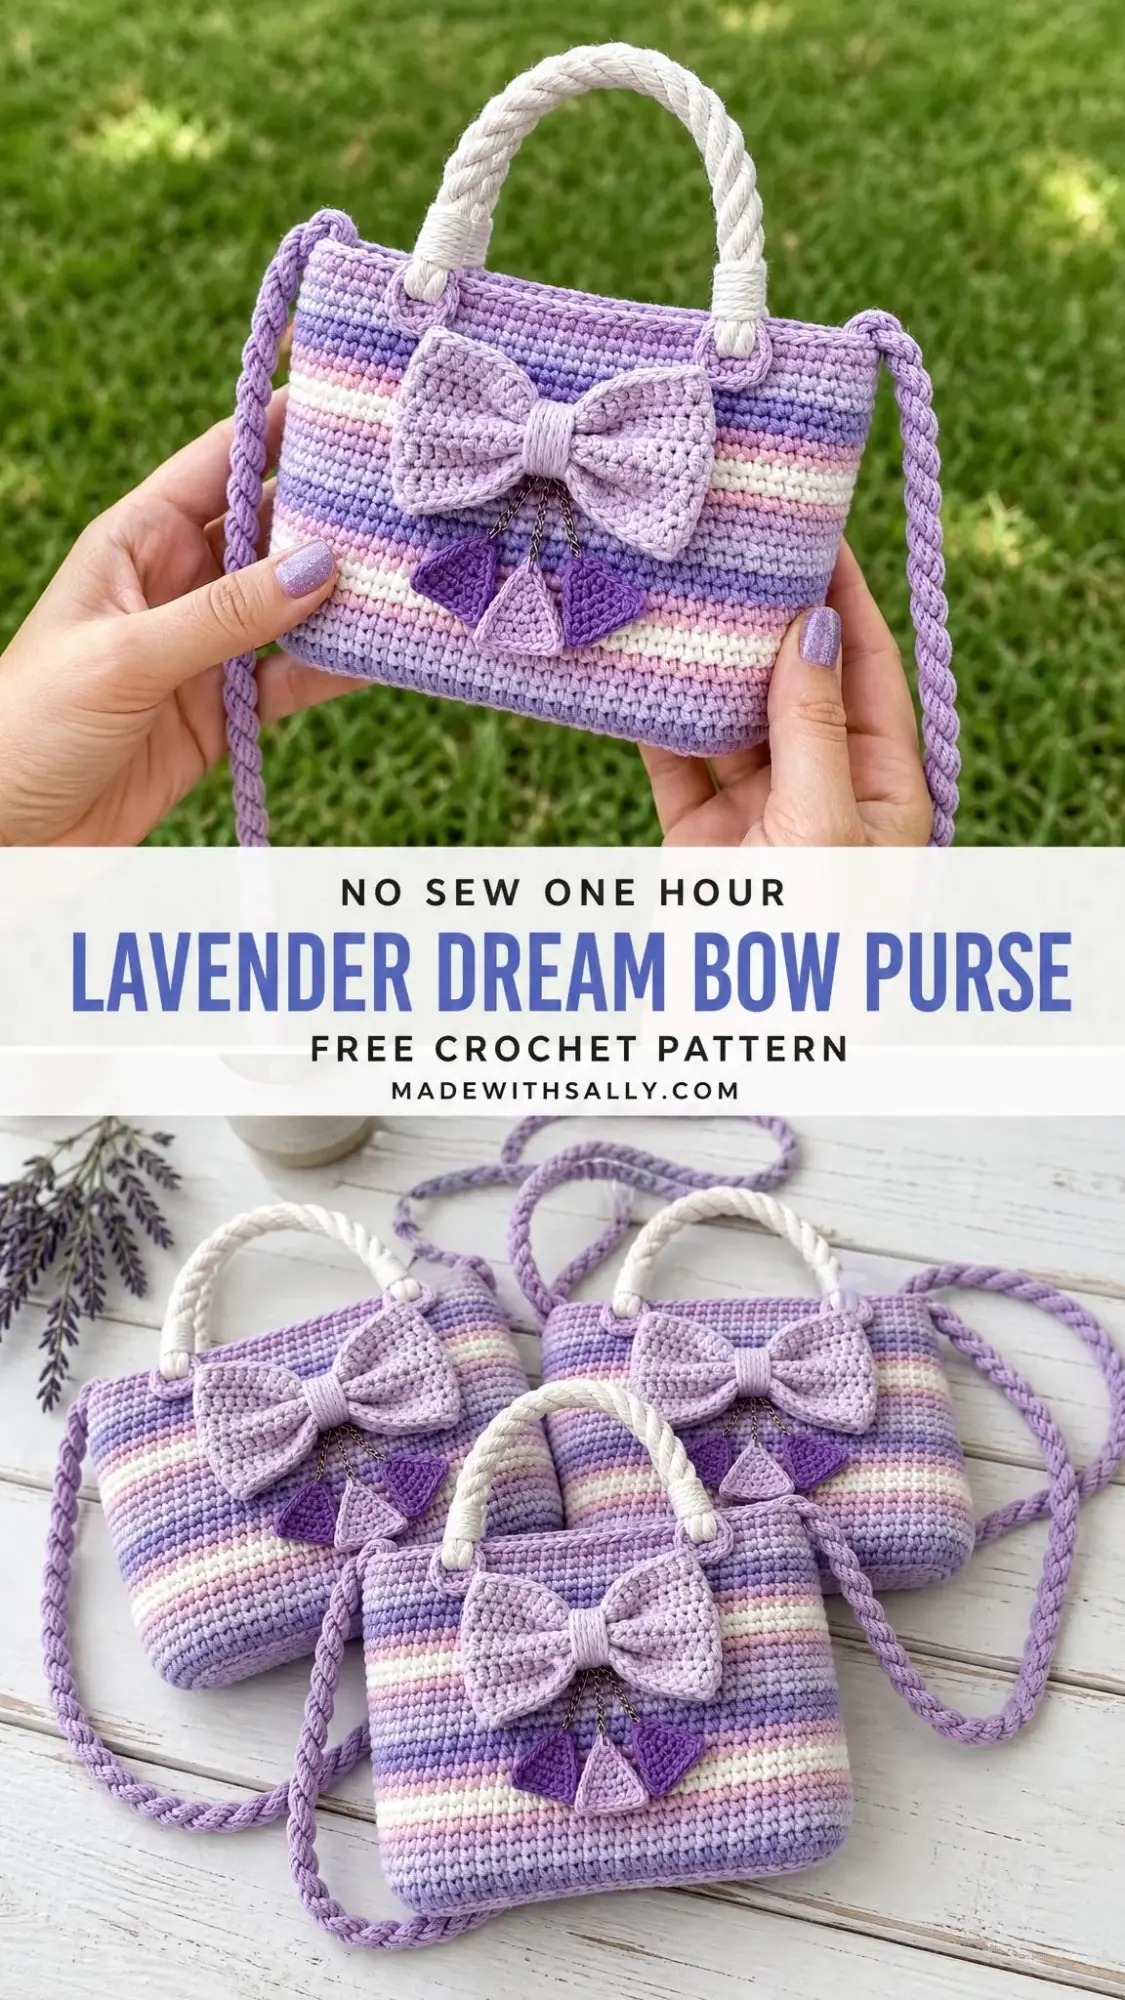
If you’ve been wanting to make something that looks like it belongs in a boutique gift shop, this is your project. The construction is straightforward single crochet worked in the round, so even confident beginners can tackle this one.
Whether you’re making it for yourself, selling at markets, or gifting to someone special, this purse delivers serious wow factor without serious stress. Let me walk you through every single step.
Why You’ll Love This Crochet Purse Pattern
This Lavender Dream Bow Purse hits that sweet spot between "looks complicated" and "actually doable." The body is worked entirely in single crochet, which means you’re not learning any fancy new stitches. You’re just building on skills you probably already have.
The magic comes from the color changes and the finishing touches. Those stripes create visual interest without requiring colorwork expertise. And the bow? It’s just a rectangle pinched in the middle. The triangle tassels are simple increase triangles. Nothing scary here.
What makes this pattern special:
Skill Level
This pattern is rated confident beginner to intermediate. You should be comfortable with basic single crochet, changing colors, working in joined rounds, and sewing pieces together. If you’ve made a simple amigurumi or a basic bag before, you’re ready for this.
The most challenging parts are the color changes (which I’ll explain), shaping the rectangular base, and attaching the dimensional embellishments like the bow and tassels. None of these are difficult, they just require patience and attention to detail.
Finished Measurements
Your completed purse will measure approximately 7.5 inches wide by 5.5 inches tall by 2 inches deep (19 x 14 x 5 cm). This measurement does not include the handles or shoulder strap.
The body rounds should measure about 19 inches (48 cm) around and 5.5 inches (14 cm) tall before you add the handles.
Materials You’ll Need
Yarn: Worsted weight cotton or cotton-acrylic blend, approximately 240 to 300 yards (220 to 275 m) total.
Color breakdown:
Hook: US G/6 (4.0 mm) crochet hook for firm purse fabric. Adjust your hook size to match gauge if needed.
Notions:
Optional extras:
Yarn Suggestions
Lily Sugar’n Cream is 100% cotton with sturdy construction and crisp stitch definition. This is my top pick for bags.
Paintbox Yarns Cotton Aran offers smooth cotton with tons of pastel shade options, perfect for matching this color palette.
Knit Picks Dishie provides firm cotton with excellent wear for bags that need to hold their shape.
Substitution Note
You can substitute any worsted weight yarn that creates a firm, non-floppy fabric. Cotton is strongly recommended because it holds the purse shape best. Make sure you match gauge before starting, especially if you plan to add lining or hardware.
Gauge
14 single crochet stitches by 20 rows equals 4 inches (10 cm) in single crochet, worked flat before blocking.
Take the time to check your gauge. If your fabric is too loose, your purse will be floppy. If it’s too tight, you’ll struggle to work the stitches. Adjust your hook size as needed.
Abbreviations and Stitch Guide
Let me define every abbreviation you’ll encounter in this pattern:
Special Techniques
Single Crochet (sc): Insert your hook into the stitch, yarn over and pull up a loop so you have two loops on your hook, yarn over again and pull through both loops. That’s one single crochet complete.
Invisible Color Change: Work your last single crochet of the old color until you have 2 loops remaining on your hook. Yarn over with your new color, pull through both loops, then continue working with the new color. This creates a much cleaner color transition.
Surface Chain: With yarn held on the wrong side, insert your hook from front to back, pull a loop to the front, then slip stitch across the surface line to create a neat decorative ridge.
Braided Cord: Make three equal crochet chains, knot or stitch one end together, braid evenly without twisting, then secure the opposite end.
Important Pattern Notes
Work the purse body in joined rounds. The chain 1 at the start of each round does NOT count as a stitch. Join each round with a slip stitch to the first single crochet. Move your beginning marker upward as you work.
Follow the stripe chart exactly for a balanced front and back appearance. Place your round joins at the side edge so they’re hidden.
Please note: Individual results may vary depending on your yarn, tension, hook size, and finishing technique. You may need to make small adjustments to achieve the closest possible result to the finished project shown.
Left-Handed Crocheters: You can follow the same stitch counts. Your rounds will travel in the opposite direction. Keep the join at a side edge and place embellishments by measurement rather than by direction.
Purse Base Instructions
The base is worked flat in lavender, then edged to create the foundation for your body rounds.
Step 1: Chain 26.
Row 1: Single crochet in the 2nd chain from your hook and in each chain across. Chain 1, turn. (25 sc)
Rows 2 through 8: Single crochet in each stitch across. Chain 1 and turn after Rows 2 through 7. Do not turn after Row 8. (25 sc each row)
Edging Round: Work 25 single crochet across the last row, 8 single crochet evenly down the first short side, 25 single crochet across the foundation chain edge, and 8 single crochet evenly up the second short side. Join with a slip stitch. (66 sc total)
Checkpoint: Your base should measure approximately 7.25 x 1.75 inches (18.5 x 4.5 cm).
Purse Body Instructions
Now you’ll work the body in joined rounds, following this stripe sequence exactly.
| Rounds | Color | Instructions |
|---|---|---|
| 1-3 | Lavender | Sc in each st around. (66 sc each rnd) |
| 4-6 | Blush pink | Sc in each st around. (66 sc each rnd) |
| 7-8 | Cream | Sc in each st around. (66 sc each rnd) |
| 9-11 | Lavender | Sc in each st around. (66 sc each rnd) |
| 12-14 | Purple | Sc in each st around. (66 sc each rnd) |
| 15-17 | Blush pink | Sc in each st around. (66 sc each rnd) |
| 18-19 | Cream | Sc in each st around. (66 sc each rnd) |
| 20-22 | Lavender | Sc in each st around. (66 sc each rnd) |
| 23-27 | Purple | Sc in each st around. (66 sc each rnd) |
| 28 | Purple | BLO sc in each st around for a tidy rim. (66 sc) |
Checkpoint: After Round 28, your purse should measure approximately 7.5 inches (19 cm) across the front, 5.5 inches (14 cm) tall, and 19 inches (48 cm) around the top edge.
Handle Tabs
Make 4 tabs in lavender.
Chain 9.
Row 1: Single crochet in the 2nd chain from hook and in each chain across. Chain 1, turn. (8 sc)
Rows 2 through 4: Single crochet in each stitch across. (8 sc)
Fasten off, leaving a long tail for sewing. Fold each tab over the base of a handle and sew the short edges to the purse top.
Twisted White Handles
Make 2 handles.
Cut six 26-inch (66 cm) lengths of white yarn for each handle. Divide them into two groups of three strands each. Twist each group tightly in the same direction, then twist the two groups together in the opposite direction.
Your finished handle should measure approximately 12 inches (30.5 cm) long before attaching. The arch height will be approximately 4.5 inches (11.5 cm).
Placement: Pin your tab centers 1.35 inches (3.5 cm) in from each front and back top corner. Sew through the tab, purse fabric, and tab again several times for strength.
Braided Shoulder Strap
Make 3 chains in lavender or purple, each chain 145 stitches. Fasten off each chain, leaving 8-inch (20 cm) tails.
Knot the three chains together at one end, braid evenly without twisting, and secure the opposite end. Your finished strap should measure approximately 36 to 38 inches (91.5 to 96.5 cm).
Sew or tie the ends to the upper side corners just below the rim.
Durability Tip: For a sturdier market-ready finish, stitch the strap ends around small D-rings first, then sew the D-rings to the inside side seams with matching yarn.
Statement Bow
This bow is the showpiece of your purse. It’s easier than it looks!
Bow Rectangle (light lavender):
Chain 19.
Row 1: Single crochet in the 2nd chain from hook and in each chain across. Chain 1, turn. (18 sc)
Rows 2 through 10: Single crochet in each stitch across. Chain 1 and turn after Rows 2 through 9. (18 sc)
Fasten off. Weave in your ends. Pinch the rectangle at the center to form two bow loops.
Center Band:
Chain 8.
Row 1: Single crochet in the 2nd chain from hook and in each chain across. (7 sc)
Rows 2 through 5: Single crochet across. (7 sc)
Wrap this band around your pinched bow center and sew it closed at the back.
Optional detail: Surface chain a curved line from each bow corner toward the center pinch for extra definition.
Triangle Tassels
Make 3 triangles total: two in purple and one in light lavender.
Chain 2.
Row 1: 2 single crochet in the 2nd chain from hook. (2 sc)
Row 2: Increase in each stitch. (4 sc)
Row 3: Increase, single crochet 2, increase. (6 sc)
Row 4: Increase, single crochet 4, increase. (8 sc)
Row 5: Increase, single crochet 6, increase. (10 sc)
Row 6: Single crochet in each stitch. (10 sc)
Fasten off. Attach each triangle with short chains of 10, 12, and 14 stitches so the center tassel hangs slightly lower than the outer two.
Assembly
Step 1: Center the bow on the front of your purse, approximately 1.25 inches (3 cm) below the rim. Sew only through the back layer of the bow so your stitches do not show on the front.
Step 2: Attach the tassel chains under the bow center band. Arrange the two purple triangles on the outside and the lavender triangle in the center.
Step 3: Sew the handle tabs in place, then attach your strap ends. If you’re adding a magnetic snap or fabric lining, do this before closing any inside seams.
Finishing and Blocking
Weave in all your ends securely. Steam block lightly from the wrong side, shaping the purse into a soft rectangle.
Do not flatten the bow! Cup each loop gently with your fingers while the fibers cool to maintain that dimensional shape.
For extra structure, insert a removable cardboard or plastic canvas base cut to approximately 7 x 1.5 inches (18 x 4 cm).
Care Instructions
Hand wash gently in cool water and reshape flat. Air dry completely before storing.
If you’ve added a snap, D-ring, or fabric lining, follow the care requirements for the most delicate component.
Size Customization Options
For a wider purse: Add chains to the base in multiples of 2. Each 2 extra chains adds approximately 0.57 inches (1.45 cm) to the front width and 4 stitches to the body circumference.
For a taller purse: Add body rounds before Round 28. At this gauge, 5 additional rounds add approximately 1 inch (2.5 cm).
For a longer strap: Add 4 chains to each strap cord for every extra inch (2.5 cm) you want.
Troubleshooting Common Issues
Body leans at the join: Keep the join at the side edge and gently tug the first stitch of each round snug.
Stripes show jogs: Use the invisible color change technique and place your join beneath a side strap where it’s less visible.
Bag feels floppy: Go down one hook size, add a fabric lining, or use cotton yarn with less drape.
Bow droops: Sew the top corners of the bow invisibly to the purse front, then steam block lightly.
You Did It!
I’m so excited for you to make this Lavender Dream Bow Purse. It’s the kind of project that makes people stop and ask, "Did you really MAKE that?" And you get to say yes!
Thank you so much for choosing this pattern. I genuinely appreciate you being here and trusting me to guide you through this project. If you make this purse, I would absolutely love to see it! Share your photos on Instagram or Facebook and tag me so I can admire your work.
If this pattern brought you joy, save it to your Pinterest boards so you can find it easily later or share it with a crochet-loving friend. And please drop a comment below if you make one. I read every single comment and love hearing about your color choices and customizations. Happy crocheting!
Want a Quick & Easy Printable Version?
Get a clean, beautifully formatted PDF of this pattern — easy to follow step by step, ready to print or save on any device. No scrolling, no distractions, just the pattern.
Get the Printable PDF →