
I pulled this pattern from my "someday" folder last spring, and I’m so glad I finally did. I originally sketched the Ocean Blue Hydrangea Crochet Dress after visiting a friend’s garden where the hydrangeas were blooming in every shade of blue and teal you could imagine. I wanted to capture that cascading, cloud-like feeling of a hydrangea bush in full bloom. The dress sat in my notebook for over a year before I finally found the right combination of soft tulle and DK cotton to bring it to life. Now that it’s finished, I can honestly say this is one of the most romantic, show-stopping projects I’ve ever designed.
Get the Ad-Free PDF Pattern
You can find the free pattern below, or you can purchase the ad-free printable PDF from my shop.
Get the Printable PDF →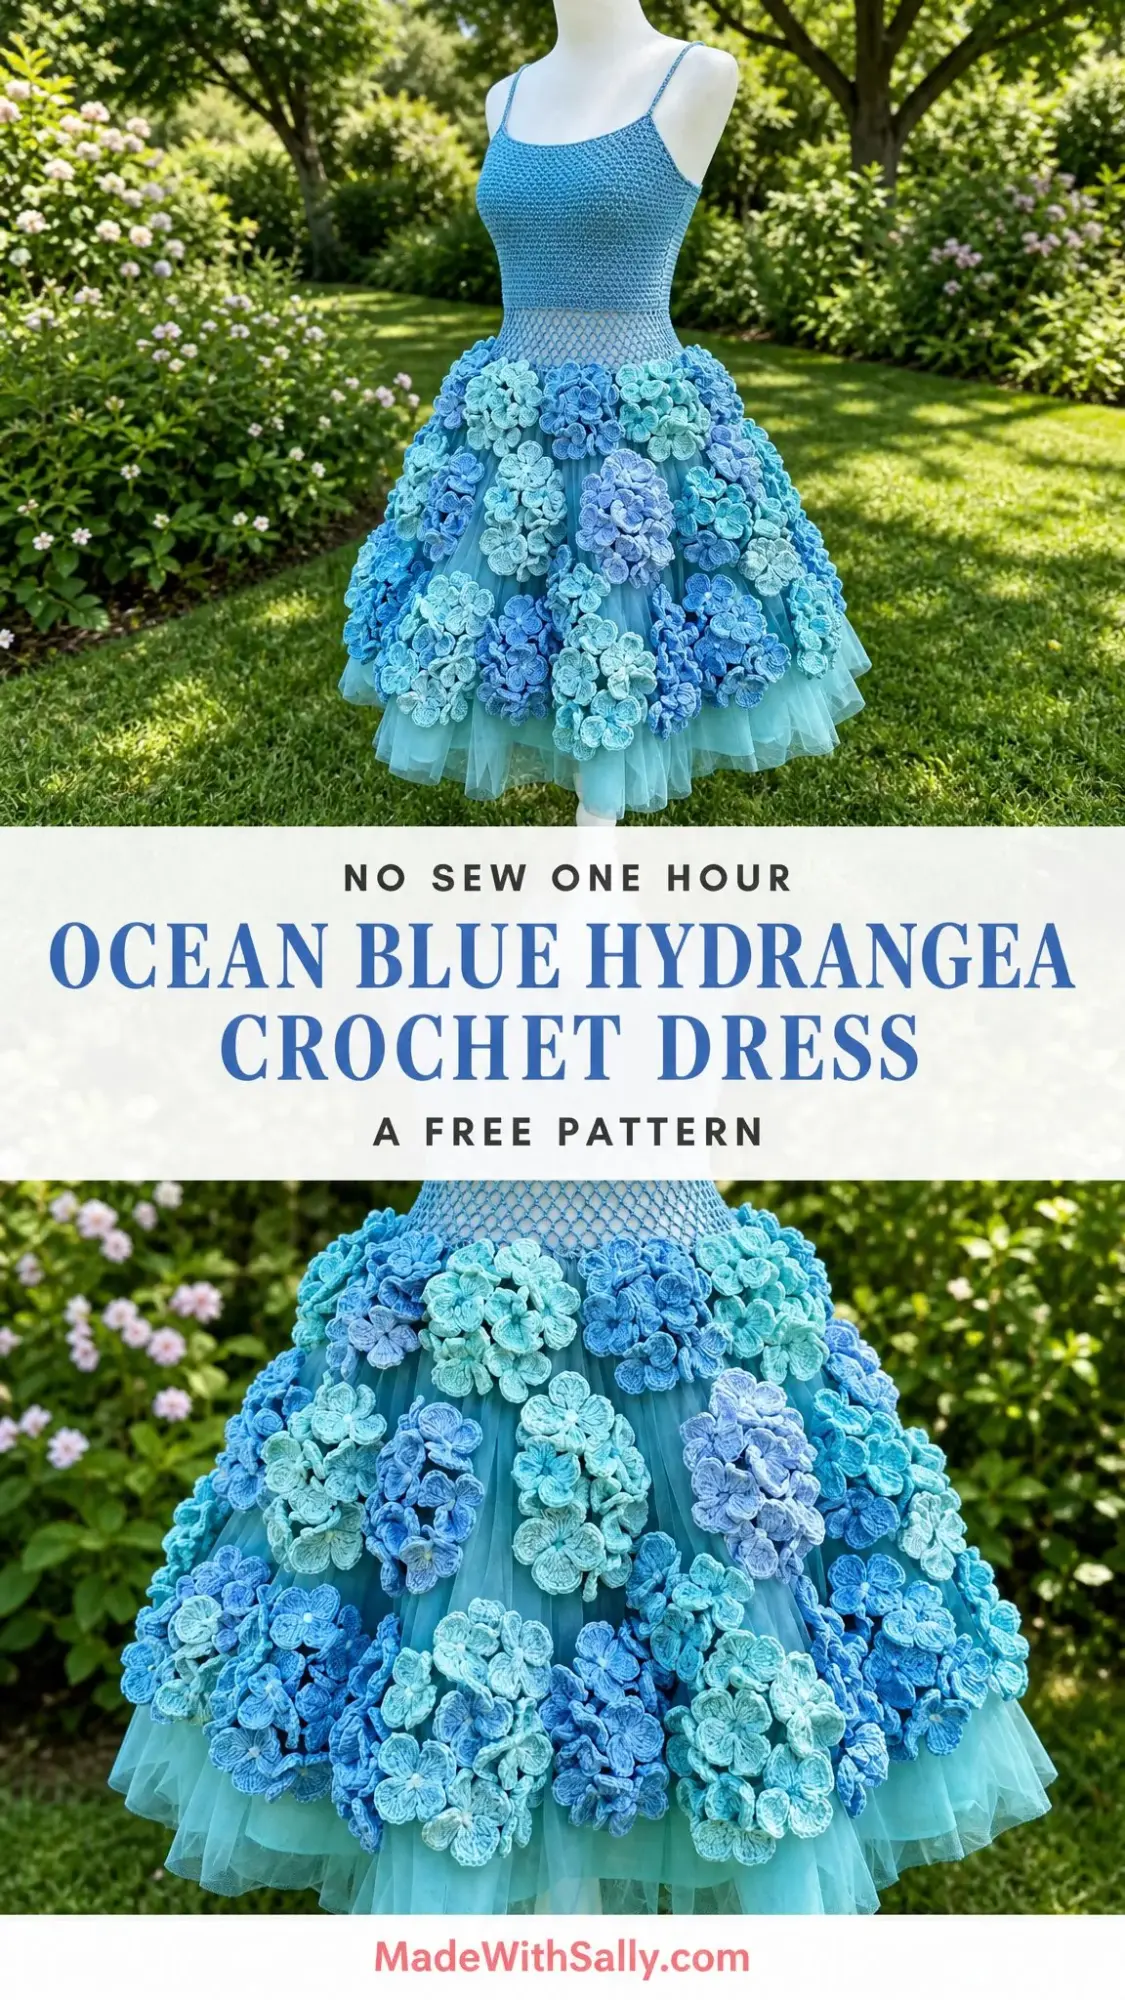
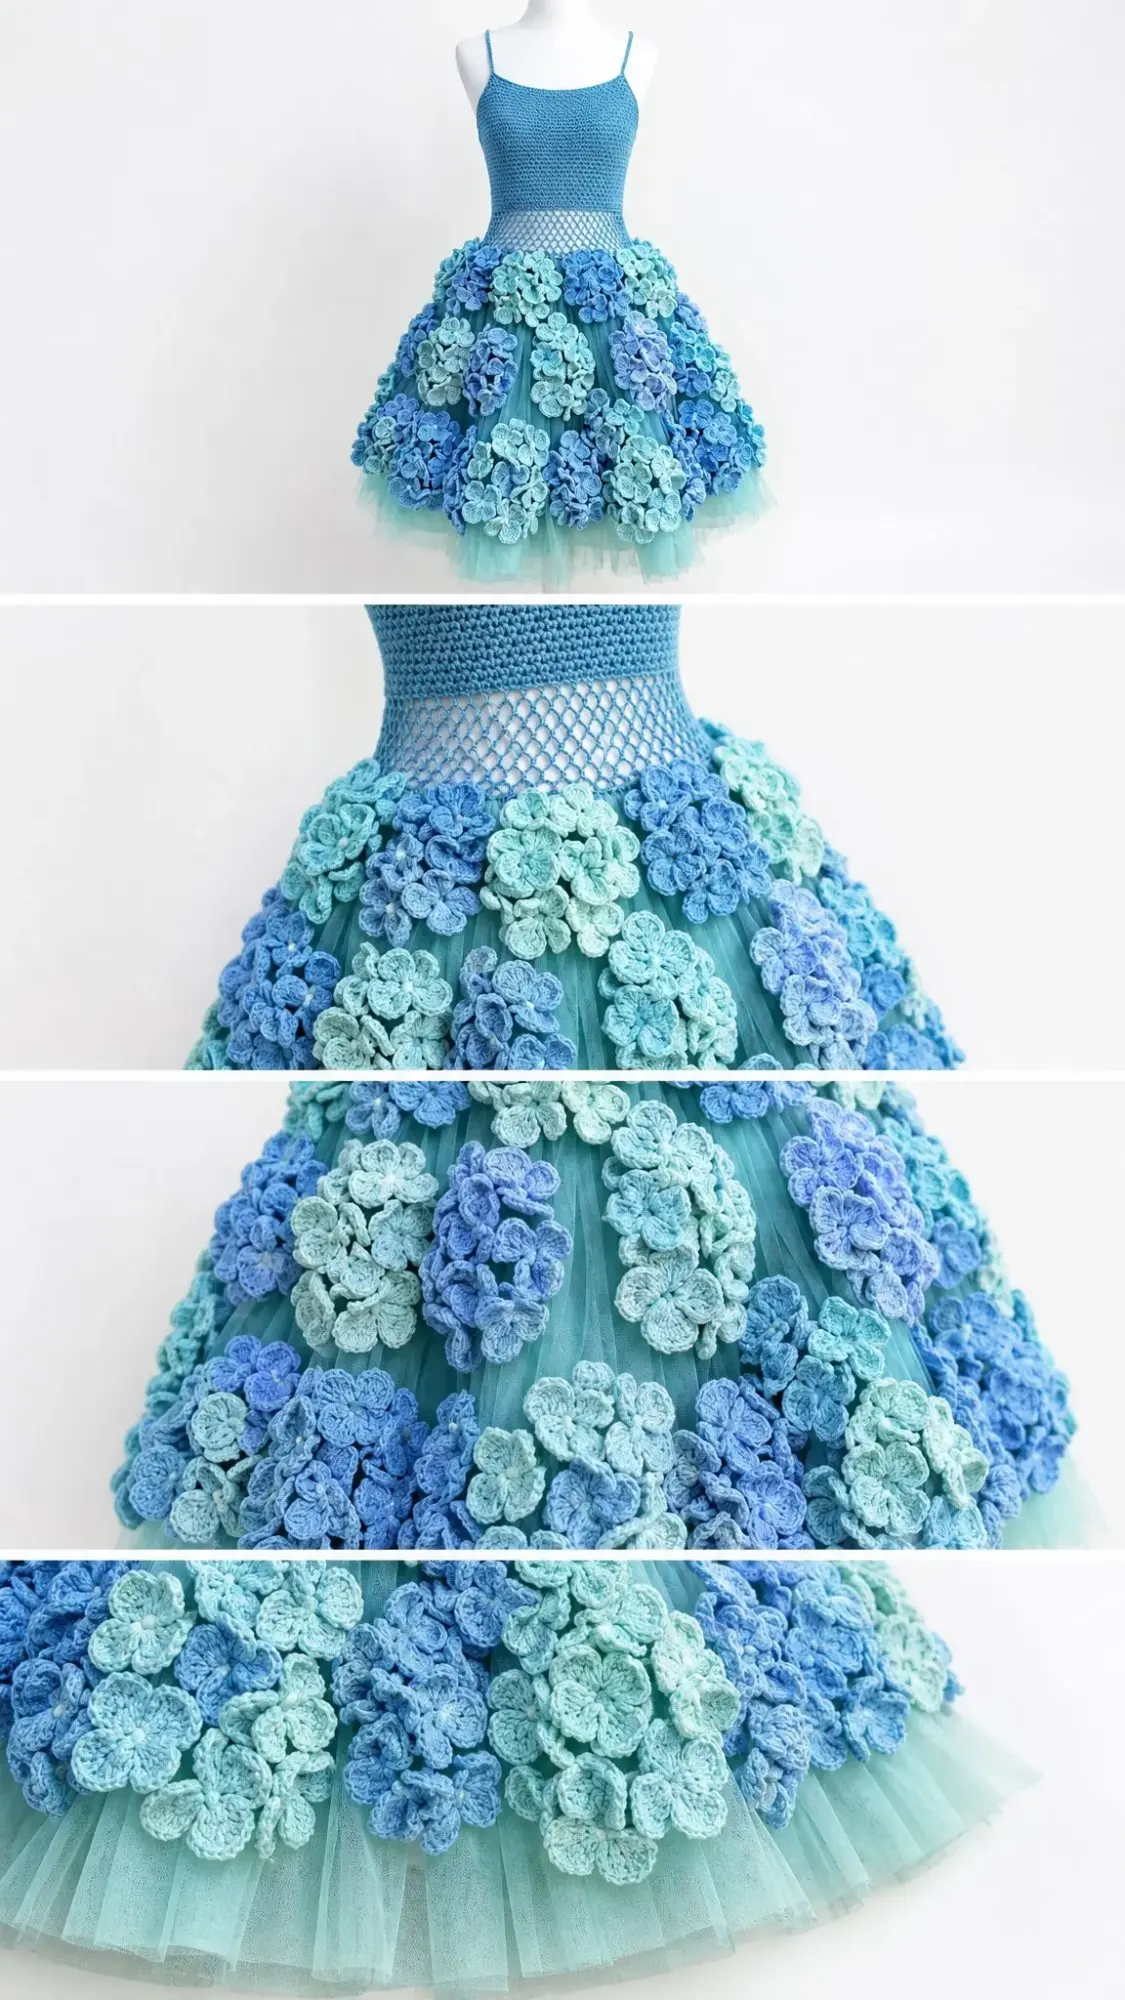
This crochet dress combines a fitted single crochet bodice, a decorative open mesh waist section, a gathered soft tulle underskirt, and 54 handmade three-dimensional hydrangea flowers arranged in cascading layers. The effect is dreamy and dimensional, like wearing a garden. If you’ve been searching for a statement piece that will challenge your skills and reward you with something truly breathtaking, this is the pattern for you.
About This Ocean Blue Hydrangea Crochet Dress Pattern
This dress is designed for an adult small with a fitted bodice. The finished bust measures approximately 26.8 inches (68 cm) around, the waist measures 23.6 inches (60 cm) around, and the total length from strap to hem is about 33.5 inches (85 cm). The design features negative ease at the bust and a close fit at the waist, so choose your size based on your actual body measurements. The tulle skirt is intentionally full and voluminous.
The skill level is adventurous intermediate. You should be comfortable working in joined rounds, counting increases, making small motifs, sewing appliques securely, and adjusting fit from a gauge swatch. If you’ve never made a garment before, this is a big project, but the individual techniques are straightforward. Take your time and trust the checkpoints along the way.
Time estimate: Plan for 28 to 40 hours of work, depending on how quickly you make the flowers and how much attention you give to the finishing details.
Materials You’ll Need
Yarn:
Tulle:
Hook:
Notions:
Yarn Suggestions
I recommend smooth DK cotton or cotton blend yarns with a firm twist. Here are some options that work beautifully:
Avoid fuzzy yarns for the flowers. They will hide the petal definition and lose that dimensional effect you’re working so hard to create.
Gauge
22 single crochet stitches and 24 rounds = 4 inches (10 cm) in joined single crochet after light blocking.
8 mesh rounds = approximately 2.4 inches (6 cm) tall.
Match both stitch and row gauge before starting. This is a fitted garment, so gauge matters. If your gauge is off, your bodice will be too loose or too tight. Make a swatch, block it lightly, and measure carefully.
Abbreviations and Stitch Definitions (US Terms)
Before we begin, let me define every abbreviation you’ll encounter. If you’re coming from a UK crochet background, note that US single crochet equals UK double crochet, and US double crochet equals UK treble.
Special Stitches
Single Crochet 2 Together (sc2tog):
This is a decrease that turns two stitches into one. Insert your hook in the next stitch, yarn over and pull up a loop. Insert your hook in the following stitch, yarn over and pull up a loop. You now have 3 loops on your hook. Yarn over and pull through all 3 loops. One stitch decreased.
Double Crochet Cluster Petal (dc-cl):
This creates the rounded petal shape for your hydrangea flowers. Yarn over, insert hook in the indicated stitch or ring, yarn over and pull up a loop, yarn over and pull through 2 loops. Leave 2 loops on your hook. Repeat this movement two more times in the same place. You now have 4 loops on your hook. Yarn over and pull through all loops to close the petal center.
Pattern Notes Before You Begin
Read through these notes before you start crocheting. They’ll save you confusion later.
Part 1: The Mesh Waist
Begin at the waist with Main Blue or Aqua yarn.
Foundation: Chain 132, taking care not to twist your chain. Join with a slip stitch to the first chain to form a ring.
Round 1: Ch 1, sc in each ch around. Join with sl st to first sc. (132 sc)
Round 2: Ch 1, sc in next st, ch 5, sk 3 sts; rep from around. Join to first sc. (33 ch-5 loops, 33 sc anchors)
Round 3: Sl st into first ch-5 sp, ch 1, sc in ch-5 sp, ch 5; rep from around. Join. (33 loops)
Rounds 4-7: Rep Round 3 four more times. (33 loops each round)
Round 8: Ch 1, work 4 sc in each ch-5 sp around. Join. (132 sc)
Checkpoint: Your mesh panel should be 8 rounds tall with 33 even diamond shapes around the circumference. If your mesh twists or pulls in, block it gently before continuing to the upper bodice.
Part 2: The Upper Bodice
Continue working in Main Blue. Remember, chain 1 at the beginning of each round does not count as a stitch. Join each round.
Round 9: Sc in each st around. (132 sc)
Round 10: Sc in next 21 sts, 2 sc in next st; rep from 6 times. (138 sc)
Rounds 11-14: Sc in each st around. (138 sc)
Round 15: Sc in next 22 sts, 2 sc in next st; rep from 6 times. (144 sc)
Rounds 16-20: Sc in each st around. (144 sc)
Round 21: Sc in next 23 sts, 2 sc in next st; rep from 6 times. (150 sc)
Rounds 22-47: Sc in each st around. (150 sc)
Rounds 48-52: For a snug upper chest, sc in each st around. (150 sc)
Round 53: Sc in next 23 sts, sc2tog; rep from 6 times. (144 sc)
Rounds 54-60: Sc in each st around. (144 sc)
Upper Edge: Ch 1, reverse sc or regular sc in each st around. Join and fasten off. (144 sts)
Fit Checkpoint: After Round 8, your mesh waist should measure about 23.6 inches (60 cm) around and 2.4 inches (6 cm) tall. After Round 60, your bodice should measure about 26.8 inches (68 cm) around at the upper edge and 11 inches (28 cm) tall from waist to top edge.
Part 3: Strap Placement and Construction
Marking Strap Placement
Lay your bodice flat with the side markers aligned. The front and back each have 72 stitches. On the front, count 14 stitches inward from each side marker and place a marker. On the back, count 18 stitches inward from each side marker and place a marker. Try the bodice on and adjust by 1 to 2 stitches if needed before sewing.
Making the Straps (Make 2)
Row 1: Ch 62 for a 15.5 inch (39 cm) strap. Sc in 2nd ch from hook and each ch across. (61 sc)
Row 2: Ch 1, turn, sc in each st across. Fasten off, leaving long tails. (61 sc)
Attaching: Sew each strap securely to the marked front and back points. Reinforce with a small square of stitching at each end.
Strap Checkpoint: The strap length should hold the upper edge in place without pulling the arm opening upward. Shorten or lengthen before weaving in ends.
Optional Inner Elastic
For extra security, especially if you plan to wear this dress for dancing or an event, sew 1/4 inch (6 mm) soft elastic inside the top edge. Use the wearer’s high bust measurement minus 1 inch (2.5 cm), then overlap and sew the elastic ends.
Part 4: The Tulle Underskirt
Cut two tulle rectangles, each 60 inches x 23 inches (152 cm x 58 cm). Stack them with the bottom edges aligned.
The hem is left raw for a soft floating edge. You’ll trim it evenly after assembly.
Run two rows of long gathering stitches along the top edge, 1/4 inch and 1/2 inch (6 mm and 12 mm) from the edge. Gather until the top edge measures 23.6 inches (60 cm), matching the crochet waist.
With the right side of the bodice facing out, place the gathered tulle inside the waist so the tulle top sits just under the mesh. Pin evenly at the side markers, center front, and center back.
Hand sew through the tulle and the lower edge of the mesh/waist round. Keep your stitches small and even.
Skirt Checkpoint: Your top gathered edge should equal 23.6 inches (60 cm). The bottom circumference from the two full panels is about 120 inches (304 cm) before layering, giving you a very full, cloud-like hem.
Part 5: Hydrangea Flower Motifs
Make 54 flowers total in the following color breakdown:
Each flower finishes approximately 2 to 2.25 inches (5 to 5.5 cm) across.
Individual Flower Instructions
Center: Make a magic ring. Ch 1, work 10 sc into the ring. Pull tight and join to first sc. (10 sc)
Petals: Sl st in next st, ch 2, dc-cl in same st, ch 2, sl st in same st, sl st in next st; rep from 5 times. (5 petals)
Layered Option: For a fuller bloom, turn your work slightly and sew a second finished flower behind the first, offsetting the petals. Use this layered option for 18 of your 54 flowers.
Finishing: Leave a 10 inch (25 cm) tail for sewing. Steam lightly from the back only. Do not flatten petals.
Part 6: Flower Placement and Assembly
Arrange all your flowers before sewing anything down. Use a mix of single and layered blooms so the skirt has depth without becoming too heavy.
Flower Placement Map
| Row | Height from Waist | Count | Spacing |
|---|---|---|---|
| Top floral row | 2-5 inches (5-13 cm) | 18 flowers | Approx 1 every 3.75 inches (9.5 cm) |
| Middle floral row | 8-12 inches (20-30 cm) | 18 flowers | Offset between top flowers |
| Lower floral row | 14-18 inches (36-46 cm) | 18 flowers | Cluster in uneven groups of 2-3 |
Sewing the Flowers
Pin the dress on a form or hanger so the tulle hangs naturally.
Begin at center front with 3 large layered blooms, then work outward toward the sides.
Sew each flower through the center and under two petal edges only. Leave some petal edges lifted for dimension.
Overlap flowers slightly at the waistline and scatter them more openly toward the lower skirt.
Check weight after every 12 flowers. If the tulle begins to sag, add two hidden anchor stitches from the flower center into the mesh waist above.
Photo-Style Checkpoint: The densest flowers should sit around the upper skirt, with clusters cascading lower. The tulle hem should remain visible below the flowers.
Size Customization Tips
For bust/upper bodice adjustments: Add or subtract multiples of 6 stitches after Round 21. At gauge, 6 stitches equals about 1.1 inches (2.7 cm) of circumference.
For waist adjustments: The mesh repeat is 4 stitches. Add or subtract repeats in groups of 4 stitches and adjust the number of ch-5 loops accordingly.
For length adjustments: Add or remove single crochet rounds above the mesh. At row gauge, 6 rounds equals about 1 inch (2.5 cm).
For skirt fullness: Use wider tulle panels for more volume. Keep the gathered top equal to the waist circumference.
For flower density: Make extra flowers for a denser couture look or fewer flowers for a lighter dress.
Blocking and Finishing Your Ocean Blue Hydrangea Crochet Dress
Steam the bodice lightly over a towel without stretching the upper edge.
Do not press flowers flat. Steam from the back and shape petals with your fingers while they’re still warm.
Hang the dress for 12 hours, then trim any uneven tulle at the hem.
Secure any heavy flower clusters with additional hidden stitches.
Care Instructions
This dress is delicate and should be cared for gently:
Troubleshooting Common Issues
Mesh waist ruffles: Your chain spaces are too loose. Use a smaller hook for the mesh section or block flatter before attaching tulle.
Bodice is too loose: Match gauge, then reduce the upper bodice by 6 or 12 stitches. Add optional elastic inside the top edge.
Bodice is too tight: Add 6 or 12 stitches after Round 21 and keep the top edge count consistent.
Flowers droop: Use cotton yarn with a firm twist and sew through the flower center plus two hidden petal points.
Tulle pulls down: Distribute flower weight evenly and anchor upper flower clusters into the mesh waist.
Maker Checkpoints Summary
Use these checkpoints throughout your project to make sure you’re on track:
Final Thoughts on the Ocean Blue Hydrangea Crochet Dress Pattern
This crochet dress is a labor of love, and I hope you enjoy making it as much as I enjoyed designing it. The combination of the smooth fitted bodice, the airy mesh waist, the dreamy tulle underskirt, and those beautiful dimensional hydrangea flowers creates something truly special. It’s the kind of project that takes time, but the result is a wearable work of art.
Thank you so much for choosing this pattern. I genuinely appreciate every maker who takes the time to bring these designs to life. If you make this dress, I would absolutely love to see it! Share your finished project with me on Instagram or Facebook, and don’t forget to tag your photos so I can celebrate your beautiful work.
If this dress is calling to you, go ahead and save this pattern to your Pinterest boards so you can find it when you’re ready to start. And please leave a comment below if you make it. I love hearing about your projects and seeing how you make each pattern your own!
Want a Quick & Easy Printable Version?
Get a clean, beautifully formatted PDF of this pattern — easy to follow step by step, ready to print or save on any device. No scrolling, no distractions, just the pattern.
Get the Printable PDF →