Looking for a quick handmade gift that works up in under an hour? This adorable triple heart keychain is exactly what you need. The pattern uses only single crochet stitches worked in the round, making it perfect for confident beginners ready to try their first amigurumi project. Each stuffed heart takes about 15 minutes once you get the hang of it, and the finished charm makes a thoughtful gift for friends, teachers, or yourself. It’s also a fantastic way to use up those small amounts of cotton yarn sitting in your stash.
About This Crochet Heart Keychain Pattern
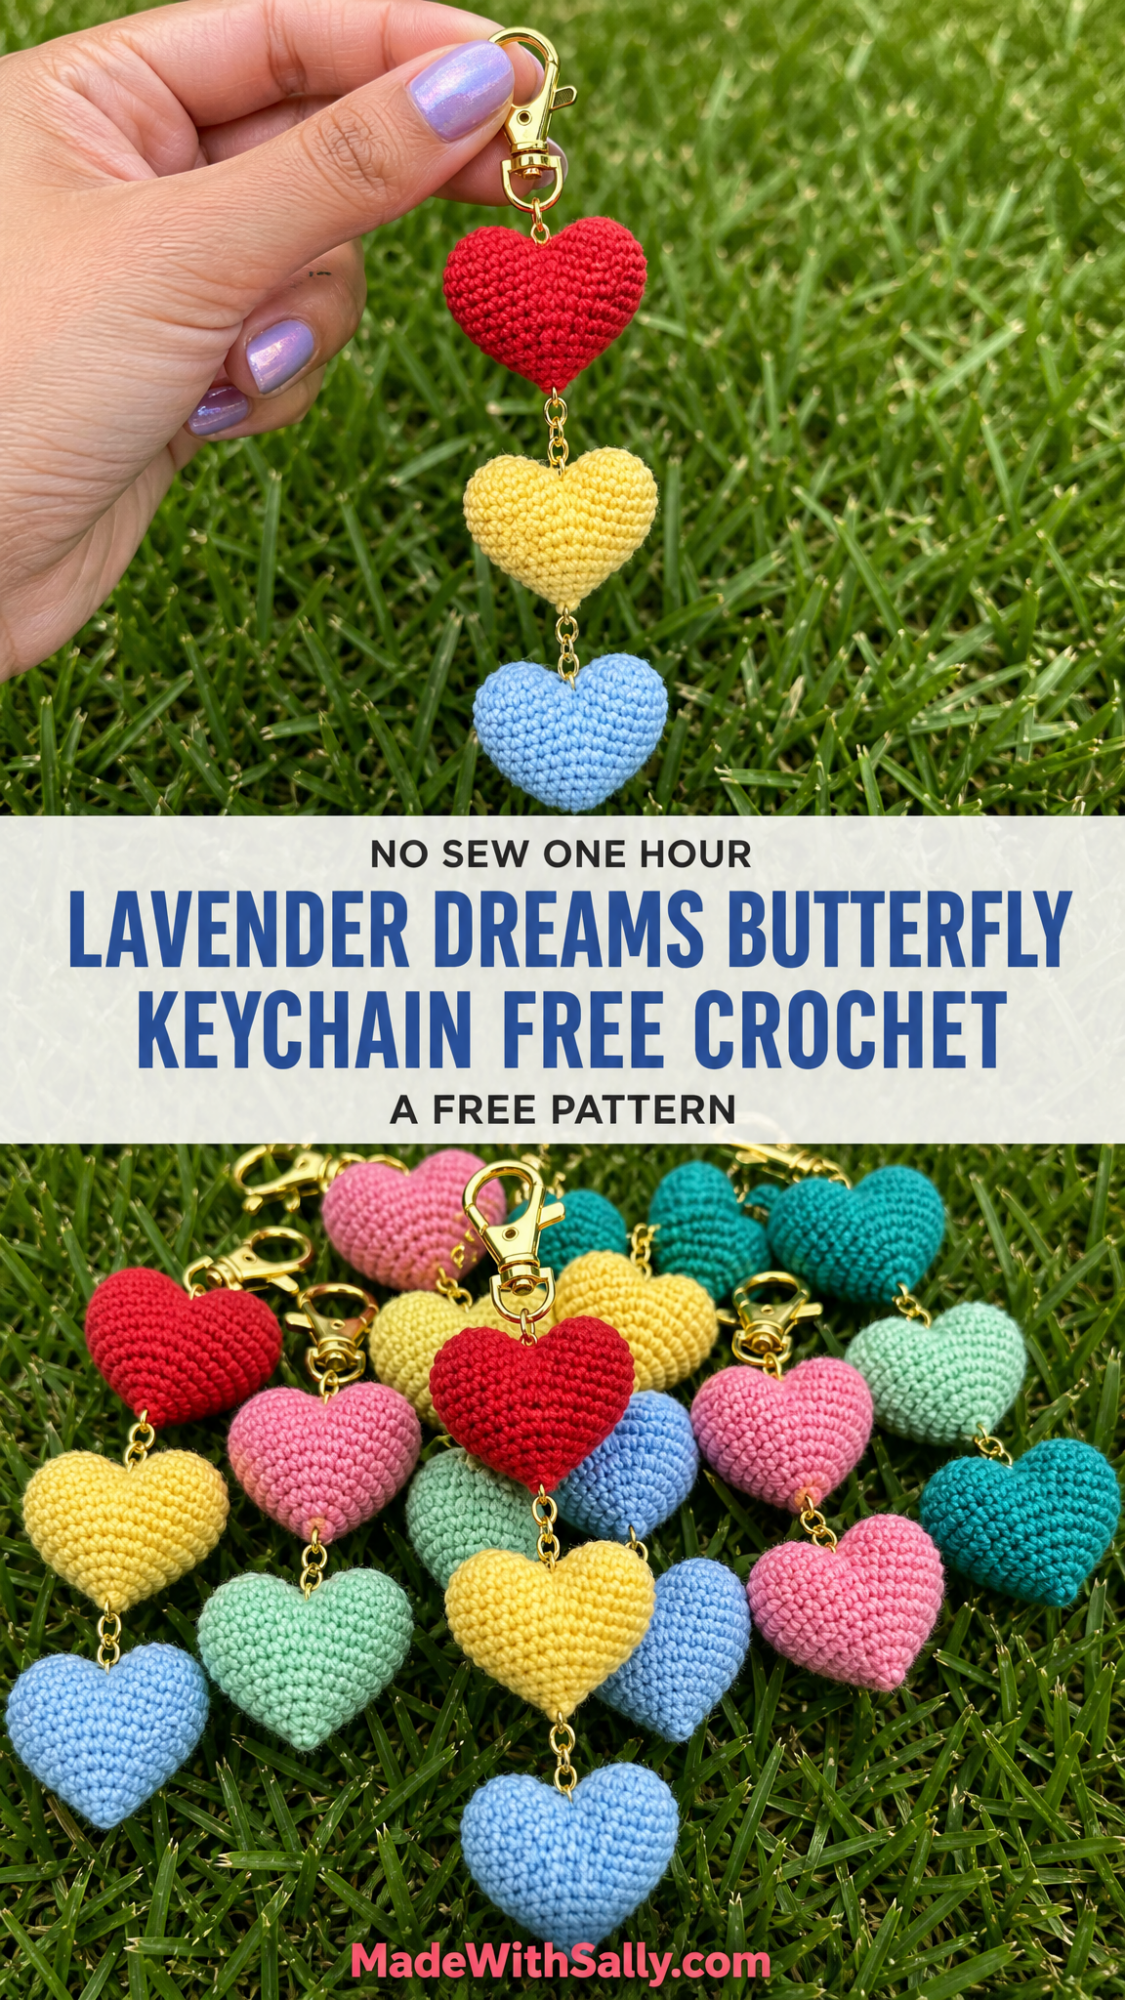
I designed this cascading heart keychain charm after spotting similar designs at craft fairs. Three puffy amigurumi hearts in graduating colors connect with small jump rings and dangle from a gold lobster clasp. The construction is straightforward. You’ll crochet each heart separately using the magic ring method, stuff them lightly with fiberfill, then assemble everything with basic jewelry findings.
The hearts in my version feature a cheerful red, yellow, and light blue color combination, but you can absolutely customize this to match any aesthetic. Think pastels for spring, school colors for a graduation gift, or classic red for Valentine’s Day.
Skill level: Confident beginner to intermediate
Finished dimensions: Each heart measures approximately 1.5 inches (4 cm) wide. Total keychain length is about 5 inches (13 cm) from clasp to bottom heart.
Time to complete: 45 minutes to 1 hour for all three hearts plus assembly
Materials Needed
Yarn:
Recommended yarn brands: Scheepjes Catona, Drops Safran, or any smooth mercerized cotton in sport or DK weight
Hook:
Notions:
Stitches and Abbreviations Used
Let me walk you through every stitch abbreviation you’ll encounter. Even if you’ve crocheted before, a quick refresher never hurts.
Magic Ring (MR): An adjustable starting loop that closes completely, leaving no hole in the center. You’ll wrap yarn around your fingers, insert your hook, pull up a loop, chain one, then work your stitches into the ring. Pull the tail to close.
If magic rings intimidate you, don’t worry. You can chain 2 and work your stitches into the first chain instead. The center won’t close as tightly, but it works.
Chain (ch): The foundation stitch. Yarn over, pull through the loop on your hook.
Single Crochet (sc): Insert hook into stitch, yarn over and pull up a loop (2 loops on hook), yarn over and pull through both loops.
Increase (inc): Work 2 single crochet stitches into the same stitch. This adds one stitch to your count.
Decrease (dec): Also called invisible decrease or sc2tog. Insert hook through front loops only of the next 2 stitches, yarn over and pull through both (3 loops on hook), yarn over and pull through all 3 loops. This removes one stitch from your count.
Slip Stitch (sl st): Insert hook, yarn over, pull through stitch and loop on hook in one motion. Used for joining and shaping.
Pattern Notes Before You Begin
This pattern is worked in continuous rounds, meaning you won’t join at the end of each round. Use a stitch marker to track the first stitch of each round. I like using a small piece of contrasting yarn threaded through the first stitch.
Gauge isn’t critical for this project, but your fabric should be tight enough that stuffing won’t show through. If you see gaps between stitches, try going down a hook size.
Each heart is made from two identical halves that are joined together, then stuffed. This creates that signature puffy 3D heart shape with the characteristic dip at the top.
Work with the right side facing out at all times. In single crochet amigurumi, the right side has neat V-shaped stitches.
Step by Step Crochet Heart Pattern
First Heart Half
Round 1: Make a magic ring. Work 6 sc into the ring. Pull tail to close. (6 sts)
Place your stitch marker in the first stitch.
Round 2: Inc in each st around. (12 sts)
You’re working 2 sc into every single stitch from the previous round.
Round 3: *Sc 1, inc* repeat around. (18 sts)
The asterisk means you’ll repeat that sequence. So: sc in first stitch, inc in second stitch, sc in third stitch, inc in fourth stitch, and so on until you’ve gone all the way around.
Round 4: *Sc 2, inc* repeat around. (24 sts)
Round 5: Sc in each st around. (24 sts)
Round 6: Sc in each st around. (24 sts)
Fasten off, leaving a 6 inch tail on the first half. You’ll use this for sewing.
Second Heart Half
Repeat Rounds 1 through 6 exactly as written above. Do NOT fasten off. You’ll continue working to join the two halves together.
Joining the Two Halves
Here’s where the magic happens. You’ll connect both halves to create one heart.
Hold both halves with the open edges facing up, side by side. The working yarn should be attached to the second half.
Round 7 (Joining Round):
This creates a figure-8 shape that will become your heart.
Round 8: Working around the entire joined piece:
Don’t panic if your stitch count feels off by one or two. The heart shape is forgiving.
Round 9: *Sc 9, dec* repeat 4 times. (40 sts)
Round 10: *Sc 8, dec* repeat 4 times. (36 sts)
Round 11: *Sc 4, dec* repeat 6 times. (30 sts)
The heart shape is really emerging now. You should see the two bumps at the top starting to form.
Round 12: *Sc 3, dec* repeat 6 times. (24 sts)
Pause here to stuff your heart. Use small pieces of fiberfill and push them gently into the two top lobes first, then fill the bottom point. Don’t overstuff. You want it puffy but not stretched.
Round 13: *Sc 2, dec* repeat 6 times. (18 sts)
Round 14: *Sc 1, dec* repeat 6 times. (12 sts)
Add a tiny bit more stuffing to the bottom point if needed.
Round 15: Dec 6 times. (6 sts)
Finishing: Cut yarn leaving a 4 inch tail. Thread tail through yarn needle. Weave through the front loops of all 6 remaining stitches. Pull tight to close. Weave in end securely inside the heart.
Making the Remaining Hearts
Repeat the entire heart pattern two more times in your other colors. You’ll have three completed stuffed hearts.
Before closing each heart completely, decide where you want to attach the jump ring. Thread a small loop of yarn through the top center dip of each heart, leaving just enough space to attach your jump ring later. Alternatively, you can sew the jump ring directly to the top of each heart during finishing.
Assembly Instructions
Now for the fun part. You’ll connect all three hearts to create the cascading keychain.
Step 1: Lay your three hearts in order from top to bottom. The top heart will connect directly to the lobster clasp.
Step 2: Using your jewelry pliers (or your fingers if you have steady hands), gently open one jump ring by twisting it sideways. Never pull jump rings apart, as this weakens them.
Step 3: Thread the open jump ring through the top center of your first heart and through the loop at the bottom of your lobster clasp. Close the jump ring securely.
Step 4: Open another jump ring. Thread it through the bottom point of the first heart and through the top center of the second heart. Close securely.
Step 5: Repeat to connect the second and third hearts.
Step 6: Check all connections are secure by gently tugging each heart.
Your cascading heart keychain is complete.
Customization Ideas for Your Heart Keychain
The beauty of this crochet tutorial is how easily you can make it your own.
Color combinations to try:
Size variations: Use a larger hook and worsted weight yarn for bigger hearts, perfect for bag charms. Or try thread and a tiny steel hook for delicate miniatures.
Alternative uses: Skip the keychain hardware and sew a loop of ribbon to make ornaments. String several hearts on a cord for a garland. Attach a single heart to a headband or hair clip.
Add embellishments: Before closing your hearts, embroider a tiny initial using a contrasting color. Or sew a small button or bead to the center.
Troubleshooting Common Issues
My heart looks lumpy. This usually means uneven stuffing. Use smaller pieces of fiberfill and distribute them carefully into all areas before closing.
The two halves don’t line up when joining. This is normal and happens to everyone. Just do your best to catch stitches evenly. The stuffing will smooth out most imperfections.
I can see stuffing through my stitches. Your tension is too loose. Try a smaller hook or pulling your yarn slightly tighter as you work.
My heart is flat, not puffy. Add more stuffing before closing. The heart should feel firm but still squeezable.
The top dip isn’t deep enough. When stuffing, use less fiberfill in the center between the two top lobes. You can also use your yarn tail to take a small stitch between the bumps and pull gently to deepen the dip.
Why This Makes a Perfect Gift
Handmade keychains carry so much more meaning than store bought ones. This triple heart design tells someone you spent time creating something beautiful just for them. The project is small enough to complete in one sitting, making it ideal for last minute gift giving situations.
Consider making a batch for teacher appreciation week, bridal shower favors, or stocking stuffers. Because each heart uses such a small amount of yarn, this is an economical way to give handmade presents to multiple people.
I really hope you enjoy making this sweet little heart keychain as much as I enjoyed designing it. Thank you so much for choosing this pattern for your next project.
If you make this cascading heart charm, I would absolutely love to see it. Tag me on Instagram or share a photo in my Facebook group. Seeing your color combinations and creative variations honestly makes my whole day.
Save this pattern to your Pinterest crochet board so you can find it easily when you’re ready to make another one or gift the tutorial to a crafty friend. And please drop a comment below if you have any questions or just want to say hello. I read every single one and love hearing from you.
