
THIS BAG. I cannot even tell you how excited I am to share this one with you.
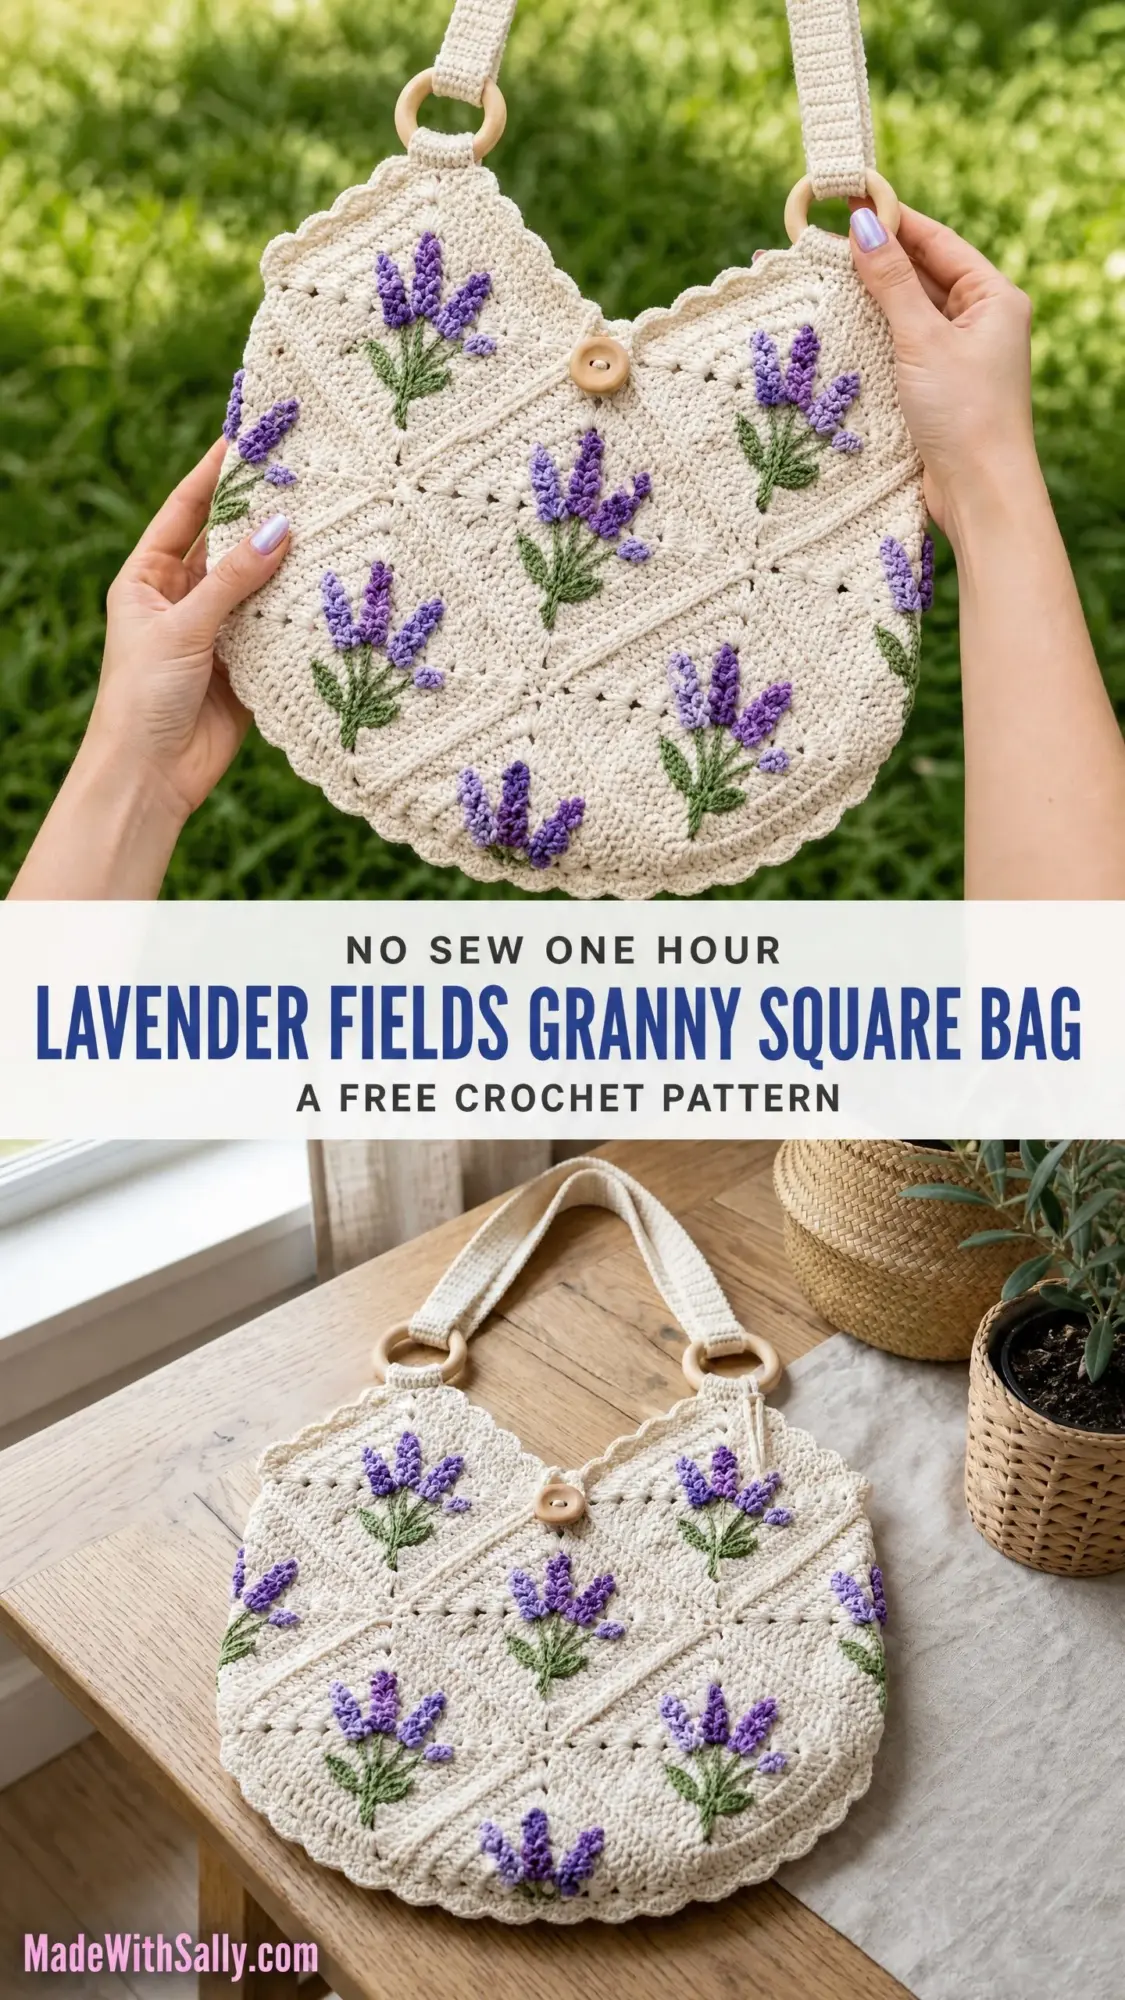
If you have been looking for a project that looks absolutely stunning but still feels achievable, this is it. The Lavender Fields Granny Square Bag combines classic granny square construction with the sweetest dimensional lavender embellishments, and the result is pure cottage-core perfection. You are going to impress everyone who sees this, including yourself.
The best part? You already know how to make granny squares. The rest is just putting them together in a clever way and adding some simple embroidery at the end. Set aside a weekend or two, grab your favorite cotton yarn, and let’s make something beautiful together.
Why This Crochet Pattern Works So Well
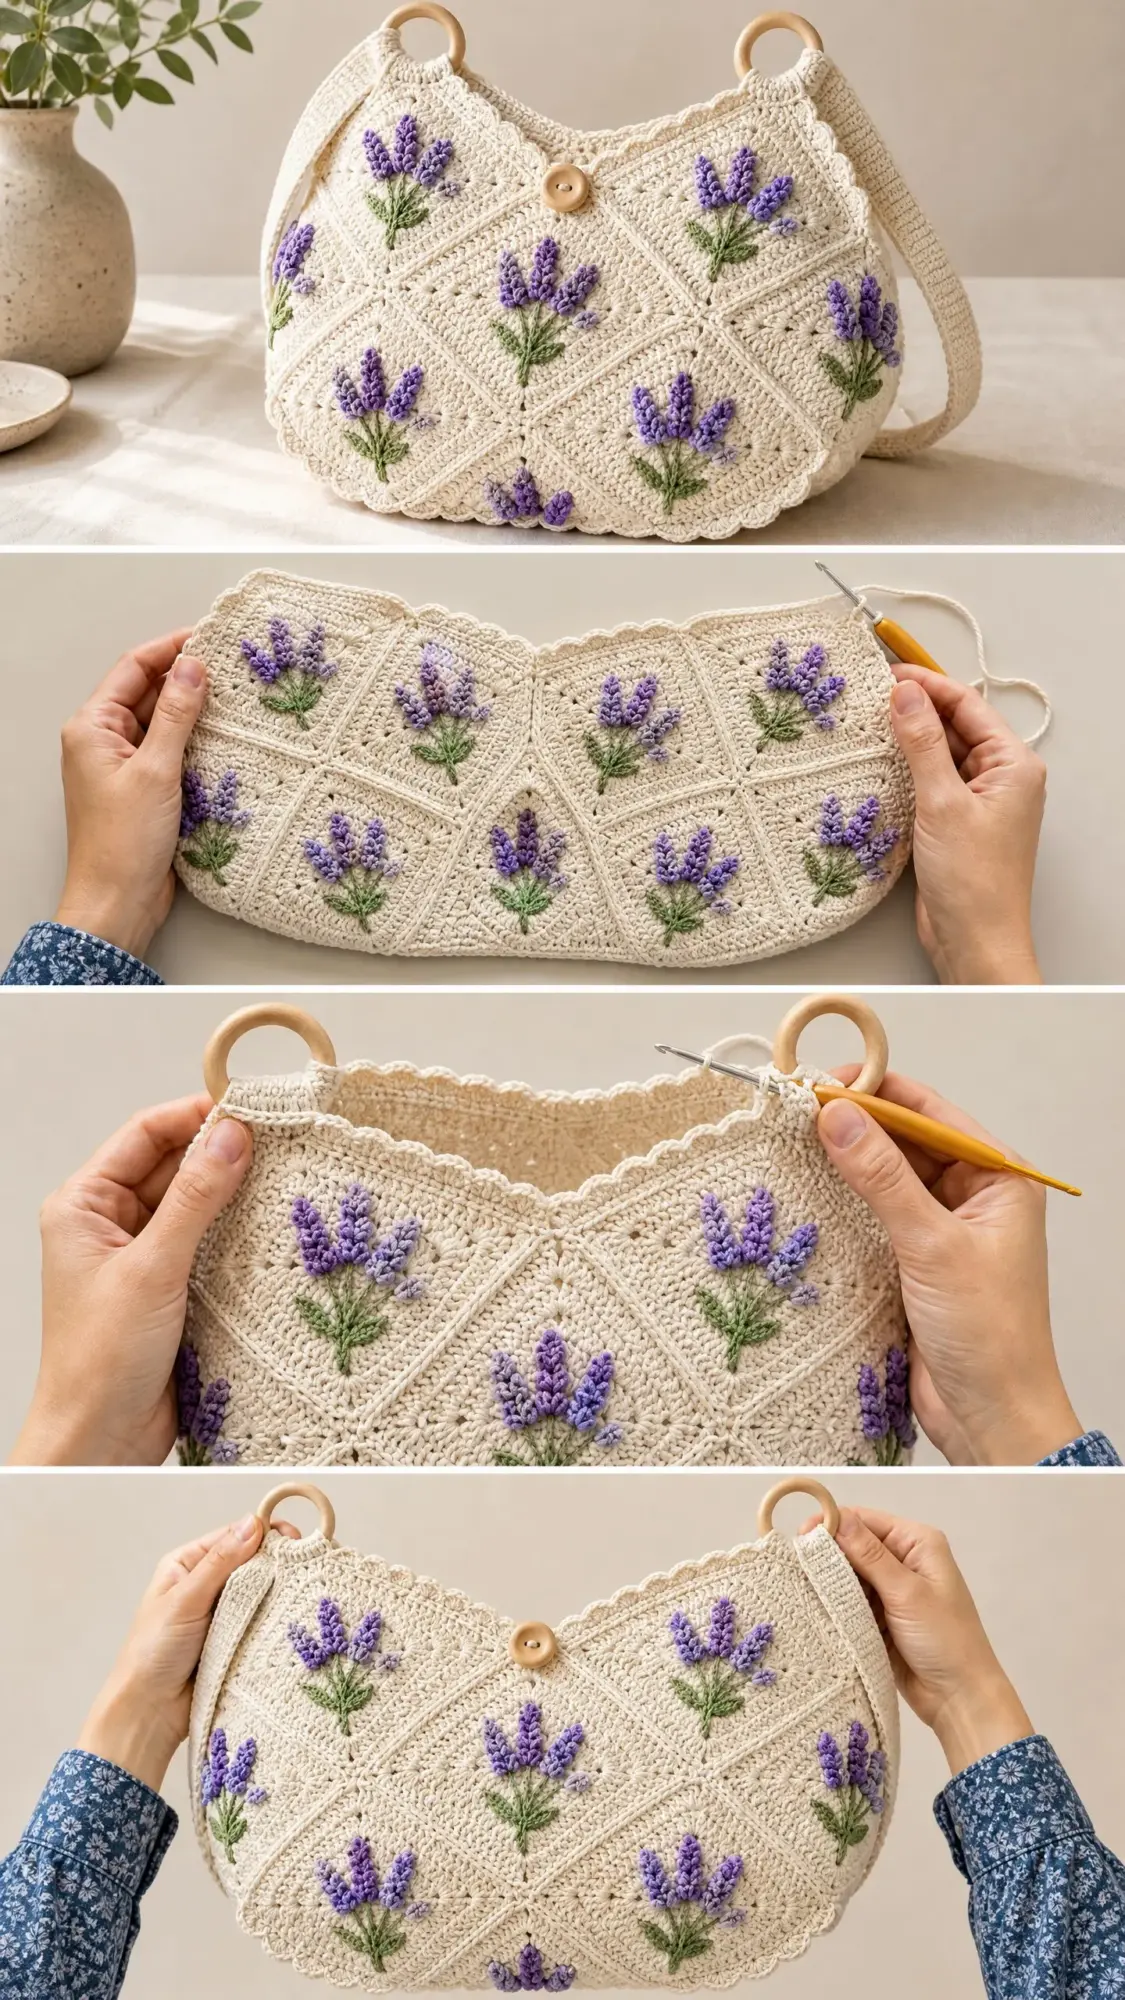
This bag hits that sweet spot where the finished piece looks incredibly impressive but the individual techniques are all things you can handle. The construction breaks down into manageable chunks. You make 18 granny squares. You join them into two panels. You shape the panels slightly. You add lavender sprigs with surface crochet and embroidery. You join the panels together. You add handles and a button.
When you look at it that way, it feels completely doable, right?
The rounded silhouette comes from a simple trick. Instead of adding corner increases on three of the four corners during the shaping rounds, you just skip them. That causes the fabric to pull inward naturally at the bottom, creating that lovely curved profile without any complicated shaping math.
The lavender embellishments are added after the panels are blocked, which makes placement so much easier. You are essentially decorating a flat surface rather than trying to work three-dimensional elements into your crochet as you go.
Finished Size and Gauge Information
Your completed bag will measure approximately 13 inches wide by 11 inches tall, not including the handles. The depth at the widest point is approximately 2.5 inches. For metric measurements, that translates to approximately 33 cm wide by 28 cm tall, with a depth of approximately 6.5 cm.
The handle drop from the top of the bag to the wooden ring measures approximately 8 inches or 20 cm.
Gauge is critical for this project. One completed granny square should measure 4 inches by 4 inches, or 10 cm by 10 cm, after blocking. In single crochet worked in rows, your gauge should be 16 stitches and 18 rows equals 4 inches or 10 cm.
Cotton yarn has very little stretch and does not forgive gauge discrepancies. If your square is larger than 4 inches, go down one hook size. If your square is smaller, go up one hook size. Always make a gauge swatch before beginning.
Materials You Will Need
Yarn:
Suggested yarns:
Lion Brand 24/7 Cotton in Cream, Lavender, and Sage works beautifully for this project. It is a smooth, tightly twisted mercerized cotton that holds stitch definition well and is widely available. Paintbox Yarns Simply DK Cotton in Paper White, Pansy Purple, and Racing Green is another lovely option, though you should go up one hook size to a 4.5 mm if using this slightly lighter weight yarn. WeCrochet Dishie in Cream, Iris, and Basil gives the lavender embellishments excellent texture with its matte single-ply construction.
Use any smooth worsted or DK cotton yarn that achieves the stated gauge. Avoid fluffy, halo, or highly textured yarns because they will obscure the granny square structure and make embellishment placement difficult.
Hook: US size G-6 or 4.0 mm crochet hook
Notions:
Skill Level and Time Estimate
This is an intermediate level crochet pattern. You should be comfortable with granny squares, joining-as-you-go techniques, working in the round, seaming panels, surface crochet, and adding dimensional embellishments. Basic shaping via slip stitches and stitch placement is also required.
No advanced stitch work is needed, but attention to detail in the joining and embellishment steps is essential for a polished result.
Plan for approximately 18 to 24 hours of working time for an experienced intermediate crocheter, including embellishment time. Allow extra time if you are new to joining-as-you-go or surface crochet embellishment.
Abbreviations and Stitch Definitions
ch: chain. Wrap yarn over hook and pull through the loop on your hook to create one chain stitch.
sl st: slip stitch. Insert hook into stitch, yarn over, pull through both the stitch and the loop on hook in one motion.
sc: single crochet. Insert hook into stitch, yarn over, pull up a loop (2 loops on hook), yarn over, pull through both loops.
hdc: half double crochet. Yarn over, insert hook into stitch, yarn over, pull up a loop (3 loops on hook), yarn over, pull through all 3 loops.
dc: double crochet. Yarn over, insert hook into stitch, yarn over, pull up a loop (3 loops on hook), yarn over, pull through 2 loops, yarn over, pull through remaining 2 loops.
tr: treble crochet
sp: space
ch-sp: chain space
sk: skip
st(s): stitch(es)
rep: repeat
pm: place marker
rm: remove marker
BLO: back loop only
FLO: front loop only
RS: right side
WS: wrong side
JAYG: join as you go
tog: together
yo: yarn over
rnd(s): round(s)
Special Stitches Explained
Granny Cluster (gr-cl)
Yarn over, insert hook into indicated chain space, yarn over and pull up a loop, yarn over and pull through two loops. You now have one double crochet started but not completed.
Yarn over, insert hook into the same chain space, yarn over and pull up a loop, yarn over and pull through two loops. Yarn over, insert hook into the same chain space again, yarn over and pull up a loop, yarn over and pull through two loops. Yarn over and pull through all four loops on hook.
This creates a three-double-crochet cluster worked into one space.
Scallop Stitch
Work (sc, hdc, dc, hdc, sc) all into the same stitch or space. This creates one scallop shell. Each scallop is separated by a slip stitch into the next stitch.
Surface Slip Stitch (for stems)
With the right side facing and working yarn held behind fabric, insert hook from front to back through a stitch. Draw up a loop of the working yarn through the fabric, then through the loop on hook. Move to the next stitch position and repeat. This creates a visible chain of stitches on the surface without penetrating the yarn structure of the base fabric.
Lavender Sprig Cluster (for embellishment)
Using Yarn B threaded on a tapestry needle, come up from the wrong side of the fabric at the base of where a lavender blossom will sit. Work 5 to 7 small straight stitches of varying heights, between 0.25 and 0.5 inch or 6 to 12 mm long, fanning them slightly to create the appearance of a lavender flower head. Return needle to wrong side and fasten off. Three such clusters are worked per square to create a full lavender sprig.
Pattern Notes Before You Begin
The bag is constructed from two identical panels, each made of nine granny squares arranged in a 3×3 grid and joined as you go. The panels are then joined at the sides and bottom.
Each panel receives a shaping round worked in single crochet that curves the top edge inward and rounds the bottom corners, creating the rounded silhouette visible in the finished bag.
Lavender embellishments are added after both panels are blocked and before the panels are joined. This makes embellishment placement easier.
The strap is worked in single crochet in rows, folded around the wooden ring, and sewn to the bag top.
Throughout this pattern, each granny square corner is a (gr-cl, ch 2, gr-cl) worked into a ch-2 corner space. Each side consists of one gr-cl worked into a ch-1 space between corner clusters.
When joining squares using JAYG, replace the ch 2 at the joining corner or ch 1 at the joining side with: ch 1, sl st into the corresponding ch-sp of the adjacent completed square, ch 1. This creates a flat, nearly invisible join.
Chain 3 at the beginning of a round counts as the first dc of a cluster only when specified. Otherwise, ch 3 is a turning chain only and does not count as a stitch.
Block each panel before joining. Cotton blocks well with wet blocking. Pin to measurements and allow to dry fully.
Step by Step Crochet Pattern Instructions
Section 1: Granny Square (Make 18 Total, 9 Per Panel)
You will make 18 identical granny squares. Begin each square with Yarn A.
Round 1:
Make a magic ring. Ch 3 (counts as first dc). Work 2 dc into ring, ch 2, (3 dc into ring, ch 2) 3 times. Sl st into top of beginning ch-3 to join. Pull ring closed. (4 clusters of 3 dc, 4 ch-2 corner spaces)
Round 2:
Sl st into each of next 2 dc, sl st into ch-2 corner sp. Ch 3 (counts as first dc of first cluster). Work 2 dc into same corner sp, ch 2, 3 dc into same corner sp (first corner made). Ch 1, (3 dc, ch 2, 3 dc) into next ch-2 corner sp, ch 1. Rep from ( to ) 2 more times. Sl st into top of beginning ch-3.
Stitch check after Round 2: 8 groups of 3 dc, 4 ch-2 corner spaces, 4 ch-1 side spaces.
Round 3:
Sl st into each of next 2 dc, sl st into ch-2 corner sp. Ch 3, 2 dc into same corner sp, ch 2, 3 dc into same corner sp (corner made). Ch 1, 3 dc into next ch-1 sp, ch 1, (3 dc, ch 2, 3 dc) into next ch-2 corner sp, ch 1, 3 dc into next ch-1 sp, ch 1. Rep from corner instruction 2 more times to complete round. Sl st into top of beginning ch-3.
Stitch check after Round 3: 12 groups of 3 dc, 4 ch-2 corner spaces, 8 ch-1 side spaces.
Fasten off and weave in ends.
Each completed square should measure 4 inches or 10 cm square.
Section 2: Joining Squares Into Panels (Make 2 Panels)
Arrange 9 squares in a 3-column by 3-row grid on a flat surface, right sides facing up. You will join them using JAYG on the final round of each square as you add it to the panel. The first square (top left position) is already complete. Each subsequent square is worked through Round 2 independently, then its Round 3 is worked as a JAYG round.
For JAYG Round 3 of any square being added:
Work the side(s) of the square that face an already-completed square using the JAYG method. When you reach a ch-1 sp on the joining side, replace ch 1 with: ch 1, sl st into corresponding ch-1 sp on completed square, ch 1. When you reach a ch-2 corner sp on the joining corner, replace ch 2 with: ch 1, sl st into corresponding ch-2 corner sp of completed square, ch 1.
Work squares in the following order for each panel:
Position 1 (top left): complete independently through Round 3.
Position 2 (top center): complete Round 3 as JAYG, joining to right side of Position 1.
Position 3 (top right): complete Round 3 as JAYG, joining to right side of Position 2.
Position 4 (middle left): complete Round 3 as JAYG, joining to bottom of Position 1.
Position 5 (middle center): complete Round 3 as JAYG, joining to bottom of Position 2 and right side of Position 4.
Position 6 (middle right): complete Round 3 as JAYG, joining to bottom of Position 3 and right side of Position 5.
Position 7 (bottom left): complete Round 3 as JAYG, joining to bottom of Position 4.
Position 8 (bottom center): complete Round 3 as JAYG, joining to bottom of Position 5 and right side of Position 7.
Position 9 (bottom right): complete Round 3 as JAYG, joining to bottom of Position 6 and right side of Position 8.
Completed panel should measure approximately 12 inches wide by 12 inches tall or 30.5 cm by 30.5 cm.
CHECKPOINT: After completing each panel, lay it flat and verify it measures approximately 12 inches wide by 12 inches tall. All joins should lie flat. If the panel is pulling or puckering, check your tension on the JAYG sl sts and loosen them if necessary.
Section 3: Shaping Round for Each Panel
This round is worked around the entire outer edge of each completed panel in Yarn A. It creates the rounded bottom silhouette and prepares the top edge for the opening.
Join Yarn A with a sl st to the ch-2 corner sp at the top right corner of the panel.
Round 1 (Edging Round, worked in sc):
Ch 1 (does not count as st). Work sc evenly around the entire panel as follows:
Along each straight outer side of each square: work 3 sc into each ch-1 side sp and 1 sc into each joining sl st between squares.
At each outer corner ch-2 sp of each square: work (sc, ch 1, sc) into the ch-2 sp.
At each inner corner where squares meet at a shared corner point (the center of each intersection): work 1 sc into the joint.
At the four outermost corners of the entire panel: work (sc, ch 2, sc) to create a proper corner turn.
Aim for approximately 37 sc along each long side of the panel and 37 sc along each short side, with corner ch-2 sps at each panel corner. Adjust by adding or removing 1 sc per square side section if needed to reach 37 sts per side. (Total approximately 152 sc plus 4 ch-2 corner sps)
Sl st to first sc to join. Do not turn.
Round 2 (Bottom Rounding Round, worked in sc):
The top edge of the panel (the opening of the bag) will be worked straight. The bottom corners will be rounded by omitting the corner ch-2 increases.
Ch 1. Sc in each sc across the top edge (37 sts), sc in ch-2 corner sp (no ch-2 increase, just sc), sc in each sc down the right side (37 sts), sc in ch-2 corner sp (no ch-2 increase, just sc), sc in each sc across the bottom (37 sts), sc in ch-2 corner sp (no ch-2 increase, just sc), sc in each sc up the left side (37 sts), sl st to first sc. (152 sc)
The omission of corner increases at the three non-opening corners causes the fabric to draw inward slightly at those corners, creating the rounded bottom profile. The top two corners retain a slight natural squareness which aligns with the opening.
Round 3 (Reinforcement Round):
Ch 1. Sc in each sc around. Sl st to first sc to join. (152 sc)
Fasten off Yarn A. Weave in ends.
CHECKPOINT: Each shaped panel should now have a gently rounded bottom edge and a straight top edge. The panel should measure approximately 13 inches wide at its widest point and approximately 11.5 inches from the straight top edge to the lowest point of the rounded bottom.
Section 4: Lavender Embellishment
Work this section on both panels before joining them together.
Block each panel before embellishing. Wet block by submerging in cool water, gently squeezing out excess water, laying flat on a blocking mat, pinning to measurements (13 in wide, 11.5 in tall), and allowing to dry completely.
Stem placement (Surface Slip Stitch in Yarn C):
Each granny square receives one lavender sprig in its center. The stem begins approximately 0.75 inch or 2 cm up from the center of the square and runs upward approximately 1.25 inches or 3 cm.
For each of the 9 squares per panel:
Join Yarn C with a sl st through the fabric at the base of the stem position. Work approximately 6 surface slip stitches upward toward the center top of the square, angling them slightly as you move upward to create a natural stem curve. At the top of the stem, work 2 to 3 sl sts branching left and 2 to 3 sl sts branching right to create small side branches. Fasten off on WS.
Leaf placement (Surface Slip Stitch in Yarn C):
Using Yarn C and a tapestry needle, work 2 to 3 small straight stitches at the base of the stem on each side, approximately 0.375 inch or 1 cm long, angled outward at 45 degrees. These represent the lower leaves of the sprig.
Lavender blossom placement (Lavender Sprig Clusters in Yarn B):
Using Yarn B threaded on a tapestry needle, work the Lavender Sprig Cluster stitch at the top of each stem. Work 3 clusters side by side at the top of the stem, each cluster consisting of 5 to 7 straight stitches of graduating lengths. Shortest stitches at the outer edges, longest in the center. Fill approximately 0.75 inch or 2 cm of width and 0.5 inch or 1.5 cm of height.
For each of the 9 squares per panel, ensure the lavender sprig sits upright and centered. After completing all 9 sprigs on a panel, weave in all embellishment ends on the WS and press lightly with a damp cloth.
Section 5: Scallop Border on Top Edge
Work this section on each panel separately before joining the panels.
Join Yarn A with a sl st to the first sc at the top left corner of the top edge (the opening edge).
Scallop Round:
Ch 1. Work the Scallop Stitch as follows:
Sc in first sc. (Sk 1 sc, sl st in next sc, sk 1 sc, work (sc, hdc, dc, hdc, sc) all into next sc) across top edge, working the final scallop to end at the last sc of the top edge. Sc in final sc. Sl st to first sc to join.
The top edge has 37 sc. The scallop repeat uses 4 sts (sk 1, sl st 1, sk 1, scallop into 1). 37 sts accommodate 9 full scallops using 36 sts, plus 1 sc at each end. Adjust start and end by 1 sc if needed to center the scallops. (9 scallops)
Fasten off Yarn A. Weave in end.
Section 6: Joining the Two Panels
Hold both panels with RS facing outward (WS together). The panels are joined along their side edges and bottom curved edge using a sc join worked through both layers simultaneously.
With Yarn A, join yarn with a sl st through both layers at the top right corner of the right side edge (just below the scallop border).
Join Round:
Ch 1. Working through both layers simultaneously, sc evenly down the right side, across the bottom curved edge, and up the left side. Work approximately 3 sc per 4-row equivalent of edge, and 1 sc into each sc of the outer edge. At the bottom curve, follow the natural curve of the fabric without adding extra sts at corners.
Stop at the top left corner of the left side edge (just below the scallop border on the left side). Do not join the top edge. The top remains open as the bag opening.
Fasten off Yarn A. Weave in end.
Total join seam: approximately 75 to 80 sc along each side and bottom combined. The exact count is not critical as long as the join lies flat and both panels are aligned evenly.
CHECKPOINT: After joining, the bag should stand up on its own with a rounded bottom. The sides should be approximately 2 to 2.5 inches or 5 to 6.5 cm deep when viewed from the side.
Section 7: Handle Straps (Make 2)
Each handle is a flat single crochet strap that threads through a wooden ring and folds back on itself, with the fold sewn to the top edge of the bag on each side.
With Yarn A, ch 7.
Row 1: Sc in second ch from hook and in each ch across. Turn. (6 sc)
Row 2: Ch 1, sc in each sc across. Turn. (6 sc)
Rep Row 2 until strap measures 9 inches or 23 cm from foundation chain. Fasten off, leaving a 12-inch or 30 cm tail for sewing.
Fold strap in half, threading the fold through one wooden ring so the ring sits at the midpoint of the folded strap. The two raw ends of the strap now hang down together. Align the two raw ends and place them against the inside top edge of the bag, centered on one side panel (approximately 3.5 inches or 9 cm in from each top corner). Sew the double thickness of strap ends firmly to the bag using the tapestry needle and the long yarn tail. Use whipstitch or mattress stitch through both layers of strap and through the top edge of the bag. Sew at least 1.5 inches or 4 cm of the strap end to the bag.
Repeat for second handle on the other side of the bag.
Section 8: Button Closure
Button loop:
With Yarn A, join yarn with a sl st to the center top edge of the front panel, at the midpoint of the scallop border. Ch 12. Sl st back into the same stitch on the bag to form a loop. Work sc back along the 12 ch sts (12 sc). Sl st to base of loop. Fasten off and weave in ends. Check that the wooden button passes through the loop comfortably. Adjust chain count by 1 or 2 if needed.
Button attachment:
On the back panel, at the corresponding center top position (aligned with the loop on the front panel when the bag is closed), sew the wooden button securely using Yarn A doubled on the tapestry needle. Pass through the button holes at least 8 times and tie off securely on the WS.
Section 9: Finishing
Weave in all remaining ends on the WS of the bag using a tapestry needle. Work the yarn tail back through at least 1 inch or 2.5 cm of stitches in two different directions to secure.
Turn the bag inside out and press lightly with a damp cloth or steam iron on the lowest setting to set the shape. Do not apply direct iron heat to the yarn. Allow to dry.
Optional lining:
Cut lining fabric to two pieces, each 14 inches wide by 12.5 inches tall or 35.5 cm by 32 cm. With RS together, sew side and bottom seams using a 0.5 inch or 1.25 cm seam allowance, rounding the bottom corners slightly to match the bag shape. Fold the top edge of the lining down by 0.75 inch or 2 cm and press. Insert lining into bag with WS of lining facing WS of bag. Slip stitch the folded top edge of the lining to the inside of the bag just below the scallop border.
Blocking Your Finished Bag
Wet blocking is strongly recommended for cotton yarn. Submerge the finished bag in cool water for 10 to 15 minutes. Gently squeeze out water without wringing. Roll in a clean towel and press to remove excess moisture.
Shape the bag over a blocking form or stuffed plastic bag to hold the rounded silhouette. Pin the top edge straight and the bottom curve smooth. Allow to dry completely in a well-ventilated area, which may take 24 hours for cotton. Do not place in direct sunlight, as prolonged sunlight exposure can yellow natural cotton.
Care Instructions
Machine wash on gentle cycle in cold water. Place bag inside a mesh laundry bag to protect the embellishments and wooden rings. Remove wooden rings before washing if possible. Lay flat to dry. Do not tumble dry, as heat can shrink cotton and warp the wooden rings. Do not dry clean. Store stuffed with tissue paper to maintain the rounded shape.
Size Customization Tips
To make the bag larger: Work additional rounds on each granny square before joining, or increase the number of squares per panel to a 4×3 or 4×4 arrangement. Each additional round adds approximately 1.25 inches or 3 cm to the square size. Each additional column of squares adds approximately 4 inches or 10 cm to the width. Adjust strap placement accordingly.
To make the bag smaller: Reduce to a 2×3 grid of squares per panel for a clutch-sized bag. Omit the wooden ring handles and work a simple chain loop handle instead.
To add depth: After joining the panels, work a gusset strip separately (approximately 3 inches or 7.5 cm wide in sc) and seam it between the two panels along the sides and bottom, rather than joining directly edge to edge.
To change the yarn weight: This bag can be worked in DK weight cotton using a 3.5 mm hook. The finished bag will be approximately 10 percent smaller. Adjust yarn quantities down by approximately 15 percent.
Tips for Success with This Crochet Tutorial
Take your time with the join-as-you-go technique. It feels fiddly at first, but once you get the rhythm, it creates such a clean, professional look that is worth the learning curve.
When adding the lavender embellishments, work on a flat surface with good lighting. It helps to use pins to mark where each sprig will go before you start stitching.
Do not skip the blocking step. Cotton really opens up and relaxes when wet blocked, and your granny squares will look so much more even and professional afterward.
If this is your first time doing surface crochet for the stems, practice on a swatch first. It takes a few tries to get the tension right so the stitches sit on top of the fabric without puckering it.
You Made It!
Thank you so much for choosing this pattern for your next project. I really hope you love making this Lavender Fields Granny Square Bag as much as I loved designing it. There is something so satisfying about watching those little lavender sprigs come to life on each square.
If you make this bag, I would absolutely love to see it. Tag me on Instagram or share your finished project in my Facebook group. Seeing your creations is honestly the best part of sharing these patterns.
Go ahead and save this crochet pattern to your Pinterest boards so you can find it when you are ready to start. And please drop a comment below if you make one. I love hearing how your projects turn out and seeing the color combinations you choose!
