I don’t know about you, but I’ve always been a sucker for a sweater vest. There’s something about that layered look that feels effortlessly put together without actually requiring much effort at all. This Lilac Clouds Bow Crochet Vest gives you all the cozy vibes of a handmade garment with the cutest feminine details. Those little bows and fluffy cloud appliqués? They took this from "nice vest" to "I need to make this immediately" territory.
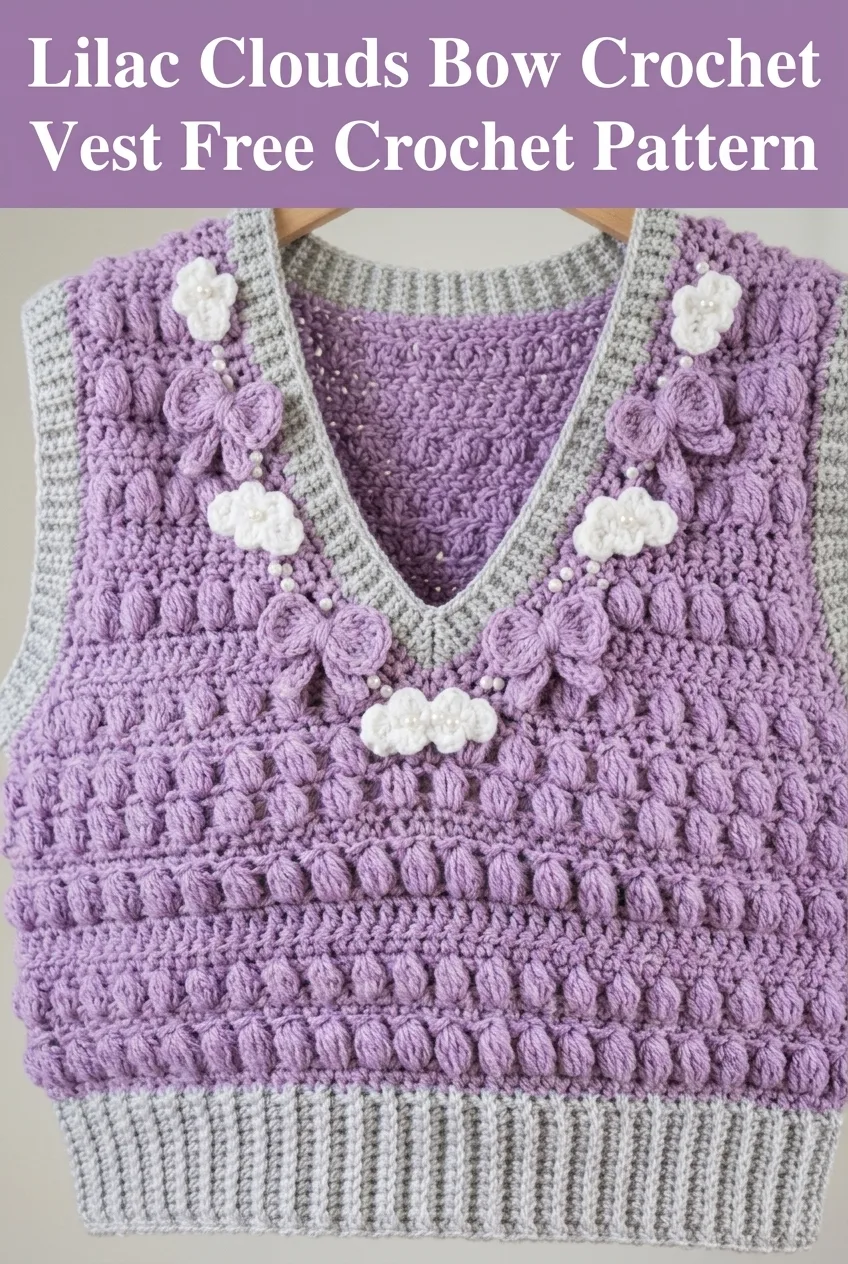
When I designed this piece, I wanted to create something that felt vintage inspired but still fresh and wearable. The soft lavender paired with that silvery grey trim reminds me of a spring morning sky. And those textured puff stitch rows add dimension without overwhelming the delicate bow and cloud embellishments scattered across the neckline.
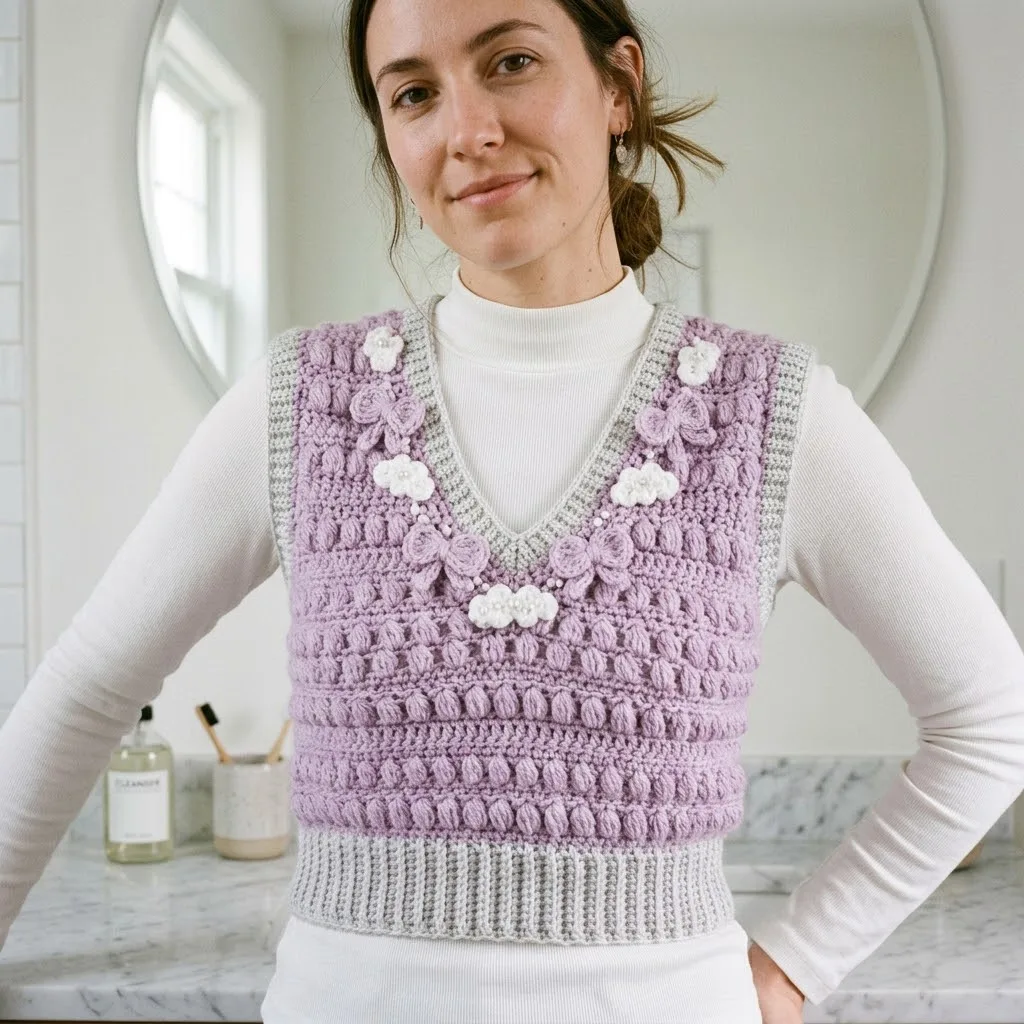
Whether you’re layering it over a crisp white turtleneck or wearing it solo on a mild day, this vest is about to become your new favorite transitional piece.
Why You’ll Love This Crochet Vest Pattern
This crochet tutorial walks you through creating a structured, fitted vest with beautiful texture and whimsical details. The combination of puff stitches and single crochet creates those gorgeous horizontal bands that give the body visual interest. The V-neckline is flattering on most body types, and the ribbed hem provides a snug, comfortable fit.
Skill Level: Intermediate
This pattern uses basic stitches in combination, so if you’re comfortable with single crochet and have made a few projects, you can absolutely tackle this. The puff stitches might be new to some of you, but I’ll walk you through them step by step. The appliqués are worked separately and sewn on, which means you can customize placement however you like.
Materials You’ll Need
Gathering your supplies before you start makes the whole process smoother. Here’s everything you need to crochet this vest pattern:
Yarn:
I recommend a soft acrylic or cotton blend for this project. You want something with good stitch definition so those puff stitches really pop. A yarn with a slight sheen will make the finished vest look polished.
Tools:
Gauge
Gauge matters here because you’re making a wearable garment. Take the time to check yours before diving in.
Gauge: 16 stitches and 14 rows = 4 inches in single crochet using 5.0mm hook
If your swatch is too big, go down a hook size. Too small? Go up a hook size. Trust me, the five minutes spent swatching will save you from a vest that doesn’t fit.
Finished Measurements
This pattern is written for size Small with notes for adjusting. The finished bust measurement is approximately 34 inches with a length of 18 inches from shoulder to hem.
To adjust sizing, add or subtract stitches in multiples of 4 to maintain the puff stitch pattern.
Abbreviations and Stitch Definitions
Let me break down every stitch you’ll encounter in this pattern. Even if you know these, a quick refresher never hurts.
ch = chain: Yarn over, pull through loop on hook. This creates your foundation.
sl st = slip stitch: Insert hook, yarn over, pull through both loops at once. Used for joining and invisible movement.
sc = single crochet: Insert hook, yarn over, pull up a loop (2 loops on hook), yarn over, pull through both loops. Your basic building block stitch.
hdc = half double crochet: Yarn over, insert hook, yarn over, pull up a loop (3 loops on hook), yarn over, pull through all 3 loops.
dc = double crochet: Yarn over, insert hook, yarn over, pull up a loop, yarn over, pull through 2 loops, yarn over, pull through remaining 2 loops.
puff st = puff stitch: This creates those beautiful textured bumps. Here’s how: (Yarn over, insert hook into stitch, yarn over, pull up a loop) 4 times in the same stitch. You’ll have 9 loops on your hook. Yarn over and pull through all 9 loops at once. Chain 1 to close the puff.
sk = skip: Pass over the indicated stitch without working into it.
BLO = back loop only: Work into only the back loop of the stitch, leaving the front loop unworked. This creates ribbing.
Step by Step Crochet Pattern Instructions
Back Panel
The back is worked flat from bottom to top. We start with the ribbed hem.
Ribbed Hem:
With CC (grey) and 5.0mm hook, ch 11.
Row 1: Sc in 2nd ch from hook and in each ch across. (10 sts)
Row 2: Ch 1, turn. Sc in BLO of each st across. (10 sts)
Rows 3 through 68: Repeat Row 2.
You should have a stretchy ribbed rectangle. This creates the hem that hugs your waist.
Tip: Don’t worry if your row count varies slightly. Just make sure your ribbed piece stretches to about 17 inches long.
Main Body:
Turn your ribbing sideways. You’ll now work into the row ends.
Row 1: With MC (lilac), ch 1, work 68 sc evenly across the long edge of the ribbing. (68 sts)
Row 2: Ch 1, turn. Sc in each st across. (68 sts)
Row 3: Ch 1, turn. Sc in first 3 sts, *puff st in next st, sc in next 3 sts* repeat across to last st, sc in last st. (68 sts including puffs)
Row 4: Ch 1, turn. Sc in each st across, working 1 sc into the top of each puff stitch. (68 sts)
Rows 5 through 8: Repeat Rows 3 and 4 twice more.
Rows 9 and 10: Ch 1, turn. Sc in each st across. (68 sts)
Rows 11 through 40: Repeat Rows 3 through 10 three more times, then repeat Rows 3 through 8 once more.
Armhole Shaping:
Row 41: Ch 1, turn. Sl st in first 6 sts, ch 1, sc in next 56 sts, leave remaining 6 sts unworked. (56 sts)
Row 42: Ch 1, turn. Sc2tog over first 2 sts, sc across to last 2 sts, sc2tog. (54 sts)
Row 43: Repeat Row 42. (52 sts)
Rows 44 through 55: Continue in established puff stitch pattern, maintaining 52 sts.
Shoulder Shaping:
Row 56: Ch 1, turn. Sc in first 16 sts. Leave center 20 sts unworked for neck, rejoin yarn to work remaining 16 sts separately.
Fasten off.
Front Panel
Work the front identically to the back through Row 40.
Armhole and V-Neck Shaping:
Row 41: Sl st in first 6 sts, ch 1, sc in next 25 sts. (25 sts for first side)
Row 42: Ch 1, turn. Sc2tog at armhole edge, sc across to neck edge, sc2tog. (23 sts)
Continue decreasing 1 stitch at neck edge every other row while maintaining armhole edge until 16 sts remain.
Work even until front matches back length to shoulder.
Repeat for second side, reversing shaping.
Shoulder and Side Seams
Using your tapestry needle and matching yarn, seam shoulders together using mattress stitch or whip stitch. Then seam side panels from hem to armhole.
Armhole Edging
With CC and 5.0mm hook, join yarn at underarm seam.
Round 1: Ch 1, sc evenly around entire armhole opening, working approximately 60 sc. Join with sl st to first sc.
Rounds 2 through 4: Ch 1, sc in each st around. Join with sl st.
Fasten off. Repeat for second armhole.
Neckline Edging
With CC and 5.0mm hook, join yarn at center back neck.
Round 1: Ch 1, sc evenly around entire neckline, working 3 sc into the point of the V to create a sharp angle. Join with sl st.
Rounds 2 through 5: Ch 1, sc in each st around, working sc3tog at the V point to maintain the shape. Join with sl st.
Fasten off and weave in ends.
How to Crochet the Bow Appliqués
These sweet bows are the star of the show. You’ll make 6 total in MC (lilac).
Bow Loop (make 2 per bow):
With MC and 4.0mm hook, ch 15.
Row 1: Dc in 4th ch from hook and in each ch across. (12 dc)
Row 2: Ch 3, turn. Dc in each st across. (12 dc)
Fasten off, leaving a long tail. Roll into a loop and stitch the ends together.
Bow Center:
Ch 6. Sc in 2nd ch from hook and in each ch across. (5 sc)
Work 3 more rows of sc. Fasten off.
Assembly:
Pinch two loops together at the center. Wrap the small rectangle around the middle and stitch in place. This creates that gathered bow look.
How to Crochet the Cloud Appliqués
These little clouds add the dreamiest touch. Make 4 in AC (white).
With AC and 4.0mm hook, ch 4. Sl st to form a ring.
Round 1: Ch 1, work 8 sc into ring. Join with sl st. (8 sts)
First Bump: Ch 1, 2 sc in next st, hdc in next st, 2 dc in next st, hdc in next st, sl st in next st.
Second Bump: Ch 1, skip 1 st, 2 dc in next st, 3 dc in next st, 2 dc in next st, sl st in next st.
Third Bump: Ch 1, 2 hdc in next st, sc in next st, sl st to beginning.
Fasten off, leaving a tail for sewing.
Finishing and Assembly
Now comes the fun part. Arranging and attaching your appliqués.
Placement Guide:
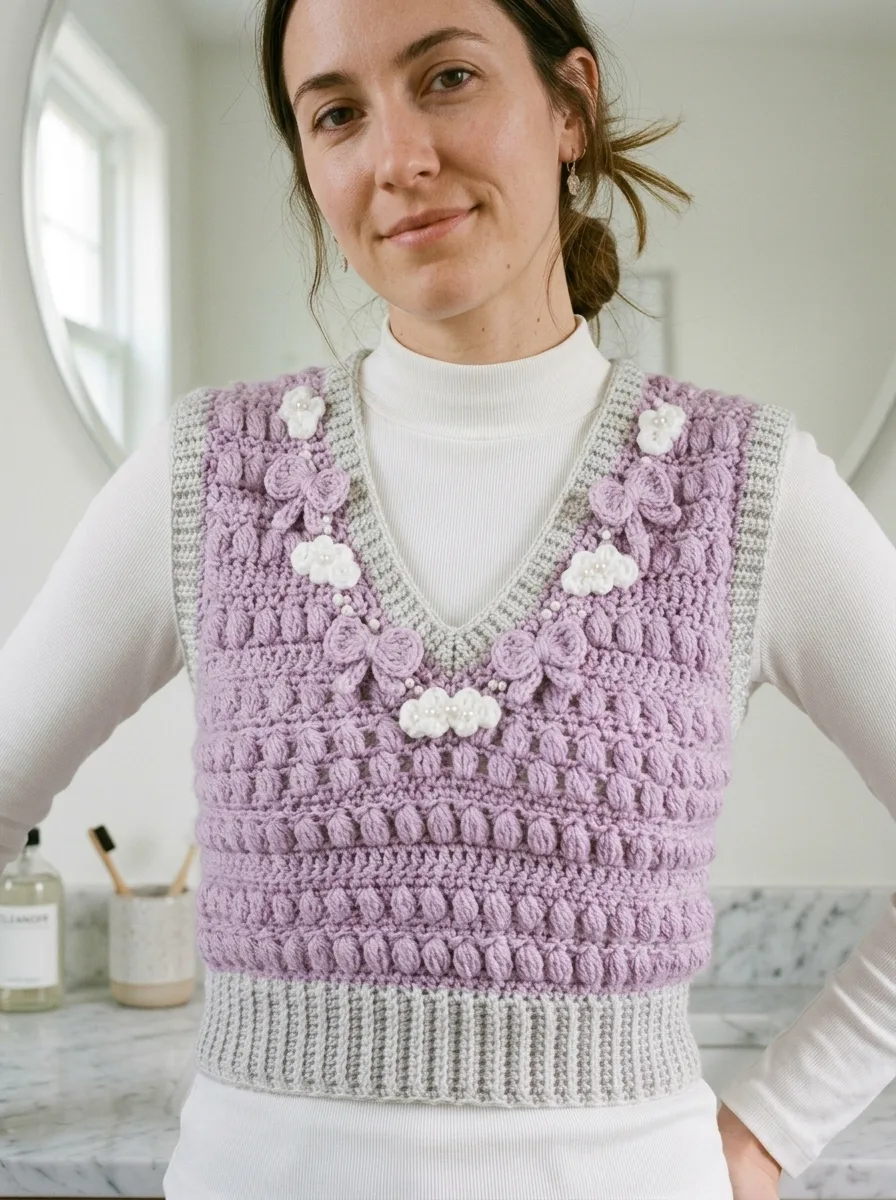
Looking at the front of your vest, arrange 3 bows on each side of the V-neck, cascading downward. Place them roughly 2 inches apart. The clouds nestle between and around the bows, creating that whimsical scattered effect.
Pin everything in place before sewing. Try on the vest if possible to make sure you love the positioning.
Using your tapestry needle and matching yarn, whip stitch each appliqué securely to the vest front. If you’re adding pearl beads to the cloud centers, now is the time. Thread your sewing needle with matching thread and secure each bead with several passes.
Blocking Your Finished Vest
Blocking makes a huge difference in how professional your finished piece looks. Wet block by soaking your vest in lukewarm water for 15 minutes. Gently squeeze out excess water without wringing. Lay flat on a blocking mat or clean towels, shaping to measurements. Allow to dry completely before wearing.
Styling Tips for Your New Crochet Vest
This vest is incredibly versatile. Layer it over a fitted turtleneck like shown for a polished look. Try it with a button-down shirt for preppy vibes. Wear it solo over a simple camisole for warmer days.
The soft lilac pairs beautifully with cream, white, navy, and even soft pink. Those grey accents mean it also works with cool-toned basics in your closet.
Care Instructions
Hand wash your vest in cool water with mild detergent. Lay flat to dry, reshaping as needed. Store folded rather than hung to prevent stretching at the shoulders.
I really hope you love making this Lilac Clouds Bow Crochet Vest as much as I loved designing it. There’s something so satisfying about creating a wearable piece with unique details you won’t find in any store. Those little bows and clouds make this feel like a true heirloom piece.
If you found this crochet pattern helpful, I’d love for you to save it to your Pinterest boards so you can find it easily when you’re ready to cast on. And please, if you make this vest, drop a comment below or tag me on social media. Seeing your creations honestly makes my entire week. Happy crocheting, friends!
