
Let’s address something right away: a floor-length crochet lace dress looks impossibly complex, but it’s actually built from one of the simplest stitch patterns in crochet. If you can work a double crochet and a chain, you already have the skills for this entire dress.
Get the Ad-Free PDF Pattern
Scroll down for the full pattern, or get the ad-free printable PDF from the shop.
Get the Printable PDF →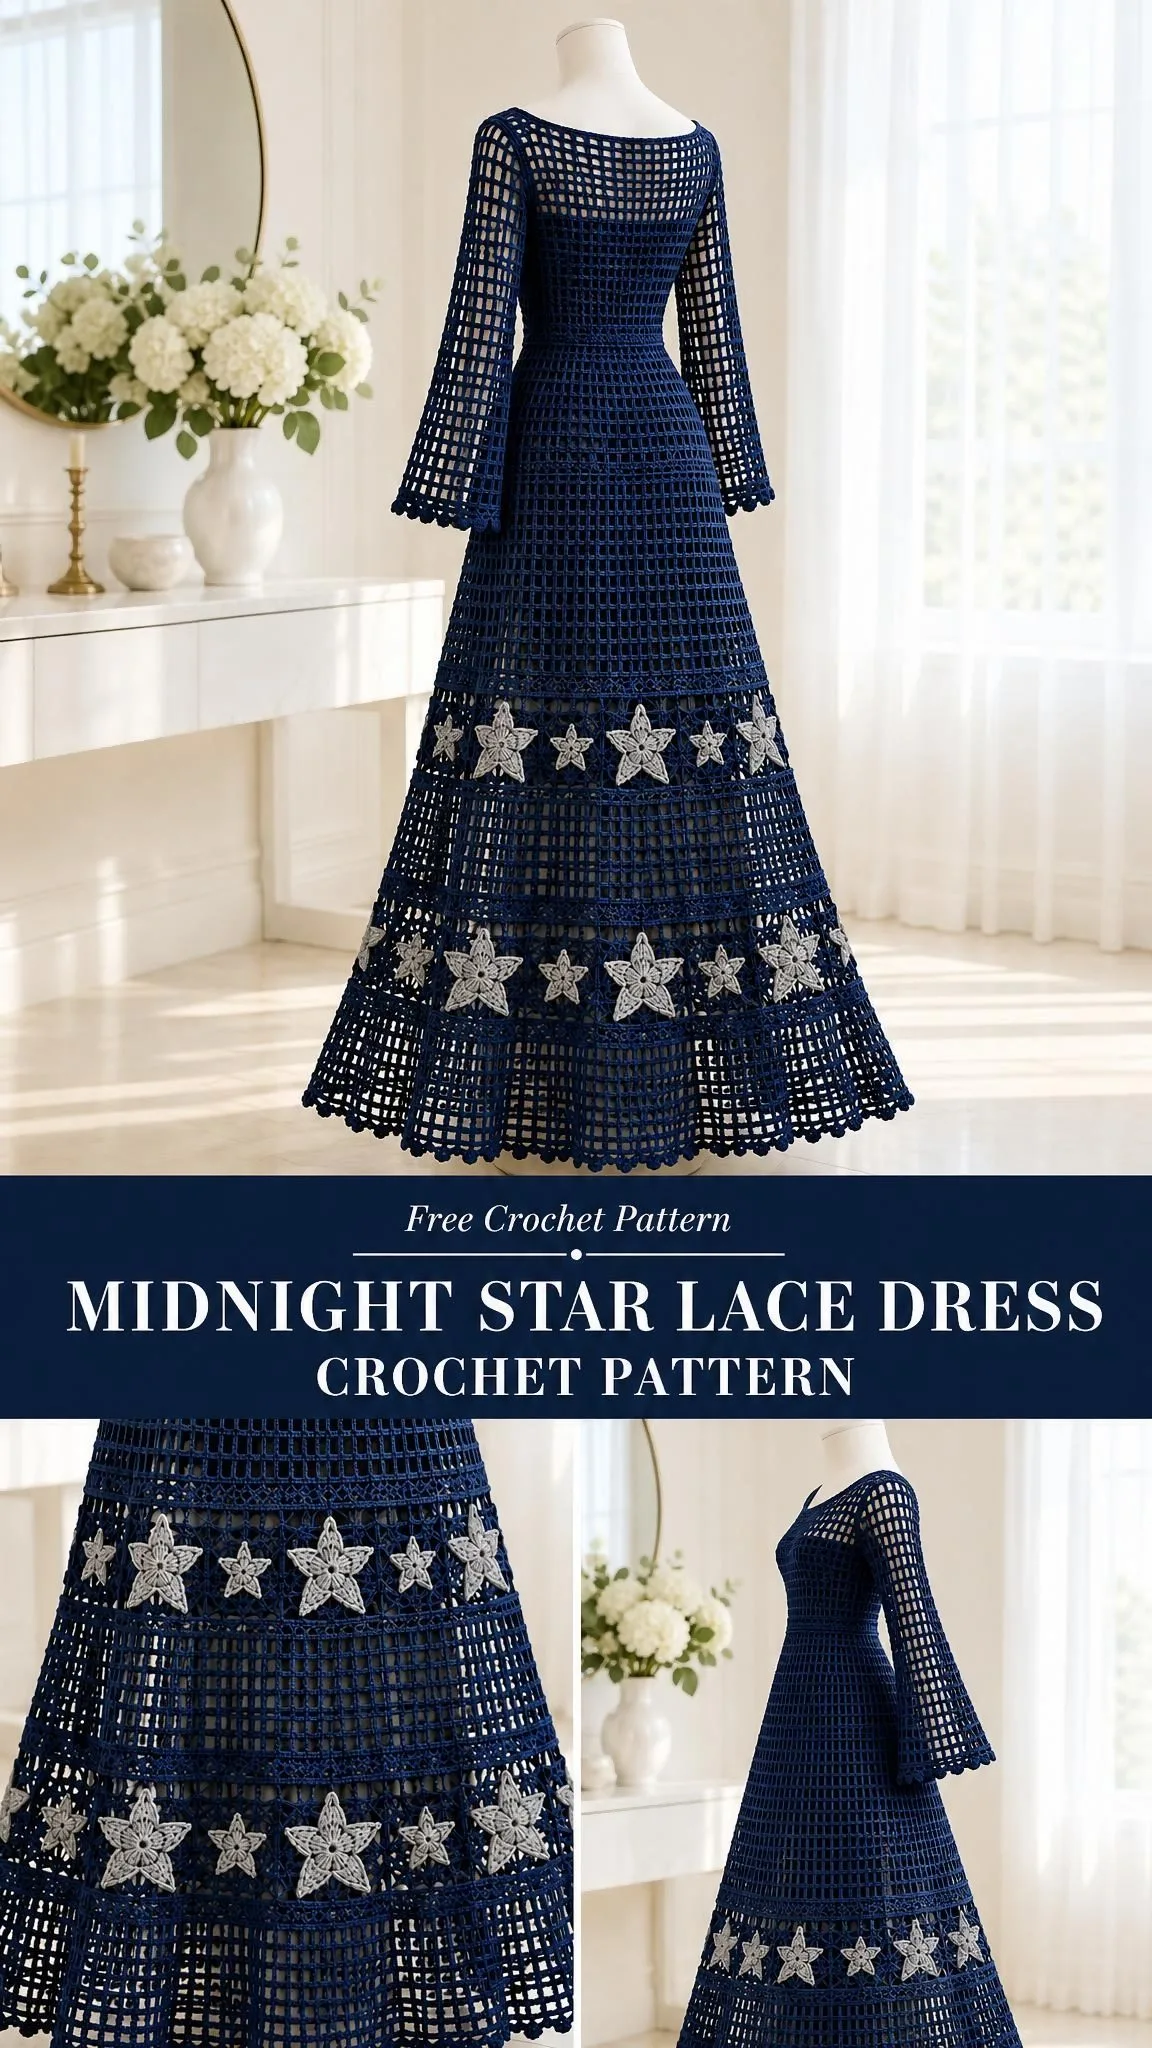
The secret is the small mesh stitch. It’s just alternating double crochets and chain-one spaces, repeated row after row. That’s it. The dramatic silhouette comes from smart construction and gradual increases, not complicated stitchwork. Even the beautiful star appliqués are quick two-round motifs that any confident beginner can master.
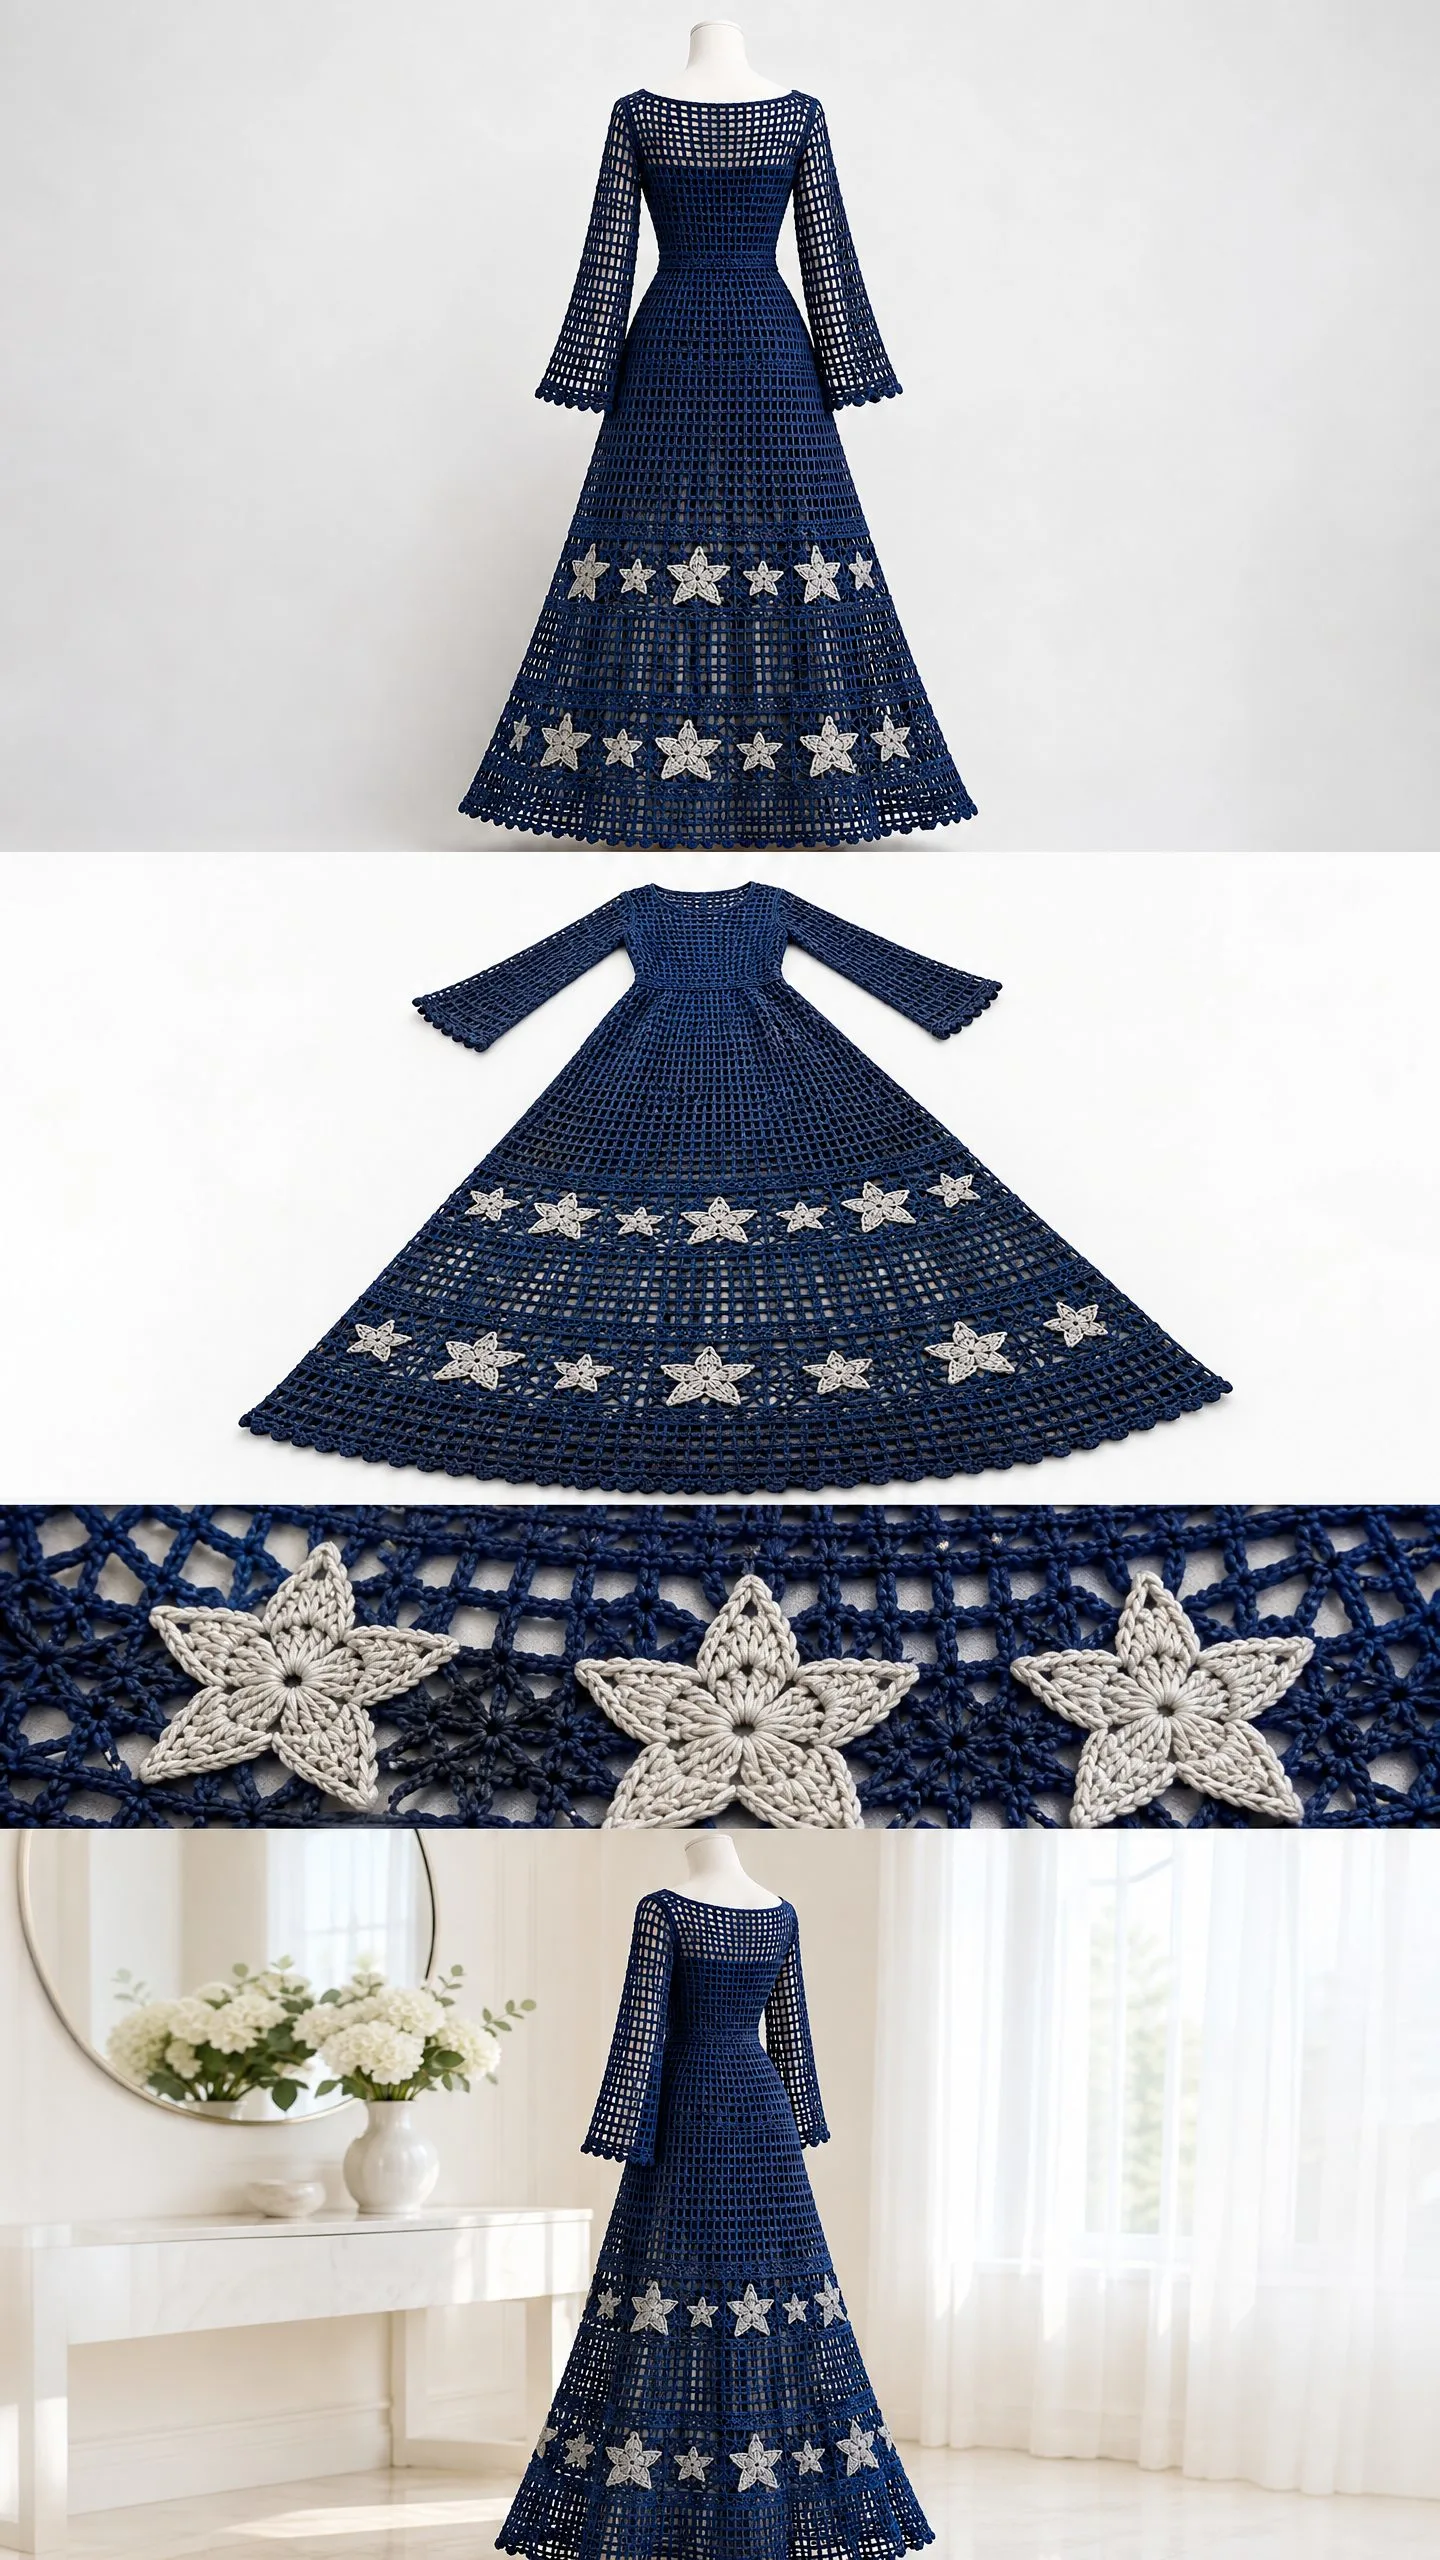
This Midnight Star Lace Dress crochet pattern breaks the project into manageable pieces: two flat bodice panels, a joined circular skirt, optional straight sleeves, and those striking silver-grey stars. Work one section at a time, and before you know it, you’ll have an elegant statement piece perfect for special occasions, photo shoots, or summer evenings.
Why This Design Works
The Midnight Star Lace Dress achieves its elegant drape through careful engineering rather than complex stitches. The bodice is worked flat in two panels, which means no wrestling with circular shaping while you’re getting the fit right. You seam the shoulders and sides, leaving armholes, then pick up stitches around the waist to begin the skirt in joined rounds.
The skirt flares naturally through three tiers of increases. Starting at 96 cells around the waist, it expands to 144 cells, then 192, and finally 240 at the hem. This graduated shaping creates that beautiful A-line sweep without any complicated math on your part.
Those star appliqués are the design’s signature element. Each one takes just two rounds: a magic ring with five single crochets, then five pointed arms worked in a simple progression of slip stitch, single crochet, half double crochet, and double crochet. They’re addictive to make and stunning against the navy mesh.
Skill Level
This pattern is rated intermediate. You should be comfortable with:
- Working flat rows and joined rounds
- Seaming crochet fabric
- Basic increases
- Reading stitch counts and following repeated instructions
- Making an adjustable ring
If you’re an advanced beginner ready to stretch your skills, this is an excellent project. The mesh stitch is forgiving, and the construction teaches valuable garment-making techniques.
Materials and Tools
Yarn:
- Main colour (navy): 800 g / 3200 m of smooth fingering-weight cotton, approximately 200 m per 50 g
- Contrast colour (silver-grey): 100 g / 400 m total for star appliqués
Hooks:
- 3 mm hook for main fabric (or size needed to obtain gauge)
- 2.5 mm hook for edgings
Notions:
- Tapestry needle
- Stitch markers
- Measuring tape
- Scissors
- Blocking mats and rustproof pins
- Matching opaque slip (required for wearing; not included in this pattern)
- Optional: 4 sew-on imitation pearls and strong thread for pearl version
Gauge
Getting gauge right is essential for a wearable garment. Before starting, make a swatch at least 15 x 15 cm.
Target gauge (blocked):
22 stitch positions (11 mesh cells) × 12 mesh rows = 10 cm
A flat bodice panel with 48 cells should measure about 44 cm wide. A finished star appliqué should block to 7-8 cm across.
Wash and dry your swatch exactly as you plan to treat the finished dress, then measure the central 10 cm without stretching. Adjust your hook size up or down until you match gauge. Record both width and height measurements.
Important: All dimensions in this pattern are blocked targets. Cotton lace tends to lengthen while worn, so check fit over your slip after blocking.
Finished Measurements
- Bust: approximately 88 cm (fits 80-84 cm bust)
- Waist: gathers to 80-84 cm with drawstring cord
- Length: approximately 120 cm
- Hem circumference: approximately 218 cm
- Sleeve length: approximately 46 cm
This pattern is written for one sample size only. Adjusting the stitch counts requires recalculating motif placement and shaping.
Abbreviations and Special Stitches
This pattern uses US crochet terminology.
- ch – chain
- st(s) – stitch(es)
- sp – space
- sl st – slip stitch
- sc – single crochet (insert hook, yarn over, pull through, yarn over, pull through both loops)
- hdc – half double crochet
- dc – double crochet (yarn over, insert hook, yarn over, pull through, yarn over, pull through two loops, yarn over, pull through remaining two loops)
- tr – treble crochet
- BLO – back loop only
- RS/WS – right side/wrong side
- rep – repeat
- inc – increase
- sc2tog – single crochet two stitches together (a decrease)
Small Mesh (Flat)
Ch 3 (counts as first dc), [ch 1, skip next ch-1 sp, dc in next dc] to end.
Work the dc into the post stitch, not into the gap. A mesh cell is one ch-1 space bounded by dc posts. Flat fabric with C cells has C+1 dc posts and C chains. Total stitch positions = 2C+1.
Shell Trim
On a prepared sc edge with a multiple of 6 stitches: [skip 2 sc, 5 dc in next sc, skip 2 sc, sl st in next sc].
Picot Trim
[Sc in next 3 sts, ch 3, sl st into third ch from hook].
Pattern Notes
- Turning ch 3 counts as a dc
- Ch 1 does not count as a sc
- Join rounds with sl st unless stated otherwise
- Flat rows turn after each row; joined dress rounds do not turn
- Brackets [ ] enclose a repeat
- Do not count joining sl sts
- Sew with RS together unless directed otherwise
- Work main fabric in navy; use silver-grey for star appliqués
Instructions
Back Bodice
Row 1: Ch 100; dc in sixth ch from hook, [ch 1, skip 1 ch, dc in next ch] 47 times; turn. The skipped chains form first dc and first ch-1 space. — 49 dc + 48 ch-1 spaces; 48 cells.
Rows 2-48: Work small mesh across; turn. — 48 cells; 49 dc + 48 ch-1 spaces.
Front Bodice
Row 1: Ch 100; dc in sixth ch from hook, [ch 1, skip 1 ch, dc in next ch] 47 times; turn. The skipped chains form first dc and first ch-1 space. — 49 dc + 48 ch-1 spaces; 48 cells.
Rows 2-46: Work small mesh across; turn. — 48 cells; 49 dc + 48 ch-1 spaces.
Front Shoulder Tabs
Leave the centre 24 cells unworked. Work the first 12 cells for one shoulder, then rejoin at the opposite outer edge and work the other 12 cells for the second shoulder. Each shoulder receives the following rows:
Rows 47-48: Work small mesh over shoulder cells only; turn. — 12 cells; 13 dc + 12 ch-1 spaces.
Checkpoint: Each bodice panel measures about 44 cm wide × 40 cm long. Final shoulder width is about 11 cm. Back neck opening is about 22 cm. Complete bodice seams before starting the skirt.
Skirt (Joined Rounds from Waist)
After seaming the bodice, distribute 192 sc evenly around the lower waist edge: 96 per panel, skipping each duplicated seam-edge post. Join; this is foundation Round 0. — 192 sc.
Round 1: Ch 3, [ch 1, skip 1 sc, dc in next sc] 95 times; ch 1, skip final sc; join. — 96 cells; 96 dc + 96 ch-1 spaces.
Round 2: Work into the 96 old ch-1 spaces. Alternately work [dc, ch 1, dc, ch 1] in one space and [dc, ch 1] in the next, 48 pairs in all. Replace the first dc with ch 3; join. — 144 dc + 144 ch-1 spaces; 144 cells.
Rounds 3-32: Work [dc in next dc, ch 1] around; replace first dc with ch 3, join. — 144 dc + 144 ch-1 spaces; 144 cells.
Round 33: Into old ch-1 spaces work [(dc, ch 1, dc, ch 1) in next space, (dc, ch 1) in each of next 2 spaces] 48 times; replace first dc with ch 3, join. — 192 dc + 192 ch-1 spaces; 192 cells.
Rounds 34-64: Work [dc in next dc, ch 1] around; replace first dc with ch 3, join. — 192 dc + 192 ch-1 spaces; 192 cells.
Round 65: Into old ch-1 spaces work [(dc, ch 1, dc, ch 1) in next space, (dc, ch 1) in each of next 3 spaces] 48 times; replace first dc with ch 3, join. — 240 dc + 240 ch-1 spaces; 240 cells.
Rounds 66-96: Work [dc in next dc, ch 1] around; replace first dc with ch 3, join. — 240 dc + 240 ch-1 spaces; 240 cells.
Sleeves (Make 2, Top Down)
Row 1: Ch 82; dc in sixth ch from hook, [ch 1, skip 1 ch, dc in next ch] 38 times; turn. — 40 dc + 39 ch-1 spaces; 39 cells.
Rows 2-55: Work small mesh across; turn. — 39 cells; 40 dc + 39 ch-1 spaces.
Checkpoint: Sleeve top width is about 36 cm; length is about 46 cm. The top edge fits the 36 cm armhole perimeter.
Star Appliqués (Make 18)
Use silver-grey yarn for all stars.
Round 1: Into an adjustable ring, ch 1, 5 sc; join to first sc. — 5 sc.
Round 2: [Ch 5, sl st in second ch, sc in next ch, hdc in next ch, dc in last ch; sl st in next ring sc] 5 times. Fasten off. — 5 points; 4 return sts per point.
Block each star to 7-8 cm across.
Assembly
Seam Pass 1: Sew the outer 12 cells of each front shoulder to the corresponding back shoulder. — 2 seams, 12 cells each.
Seam Pass 2: Mark 18 cm down from each shoulder on front and back. Sew side seams from waist to markers; leave upper edges open. — 2 armholes, each about 36 cm around.
Seam Pass 3: If making sleeves, seam each sleeve lengthwise, then match sleeve-top seam to underarm and sew sleeve top evenly around armhole. — 2 sleeves attached (or skip for sleeveless version).
Checkpoint: Try the bodice over your intended slip before adding the skirt. The neckline should lie flat. Shoulders and armholes should not pull. Waist measures about 88 cm before gathering.
Edgings and Details
Hem
Round 1: Sc in each dc and each ch-1 space around skirt. — 480 sc.
Round 2: Work shell trim 80 times, or picot trim 160 times where picot is specified; join. — 480 base sc consumed.
Neckline
Round 1: Sc evenly around neckline, 1 sc per top stitch position and 2 sc per dc row end; use 3 sc at each outward corner and sc2tog across each inward corner. Record count N. — N sc.
Round 2: Sl st in every neckline sc without tightening; join. — N sl sts.
Sleeve Edges
Round 1: Work 1 sc in each dc and each ch-1 space; record C. For sleeveless versions, work 2 sc per dc row end around each armhole. — C sc per opening.
Round 2: Work shell trim over complete 6-st repeats, then sc in remaining 0-5 sts; join. — C base sts consumed.
Waist Cord
Row 1: Ch 241; sl st in second ch and each remaining ch; fasten off. — 240 sl sts.
Thread waist cord through alternate waist mesh cells and tie to fit 80-84 cm. For a centre-neck bow, make two 60-chain cords with 59 return sl sts and attach at the front neck point. For pearl versions, sew beads onto cord tips using doubled thread.
Attaching Star Appliqués
Arrange 18 star appliqués symmetrically: 9 at each of the two lower skirt bands. Sew every centre and each outer point to the mesh.
Checkpoint: Motifs should not bridge or close the wearing openings. Decoration should be balanced. The skirt should hang evenly without tight horizontal bands.
Finishing
Pass 1: Weave each yarn end through at least 5 cm of stitches and reverse direction. — 0 loose tails.
Pass 2: Wash gently and block flat to listed dimensions. Support all wet fabric; do not hang to dry. — 1 finished dress.
Final Checkpoint: Finished bust about 88 cm; total length about 120 cm before optional trim; sleeve length about 46 cm; hem about 218 cm. Let dry fully, then recheck length over intended slip.
Care Instructions
Follow your yarn label. Unless it specifies otherwise:
- Hand-wash cool with mild detergent
- Support the wet fabric completely
- Dry flat away from direct heat
- Do not wring, tumble dry, or iron acrylic components
Safety Notes: This is an adult item only. Beads, cords, and appliqués can be snagging hazards. Attach securely and inspect before each wear. Keep away from babies and young children. Avoid loose cords around machinery. Open mesh does not provide sun protection or opaque coverage. This dress requires a separate opaque slip when worn.
Tips for Success
Take your time with gauge. A garment this size magnifies even small gauge differences. An extra half-centimetre per 10 cm becomes several centimetres across the full bust.
Block your bodice pieces before seaming. This makes matching edges much easier and gives you a chance to check measurements.
Use stitch markers generously. Mark the beginning of rounds, increase positions, and motif placement points.
Make all 18 stars before attaching any. This lets you arrange them for the most pleasing distribution and ensures consistent sizing.
Try it on with your slip at every stage. The bodice alone, the bodice with a few skirt rounds, and the finished piece should all drape correctly over your chosen undergarment.
Who Will Love This Dress
This elegant lace dress crochet pattern suits anyone who loves dramatic, romantic fashion. It makes a stunning choice for:
- Beach weddings and outdoor ceremonies
- Summer evening events
- Maternity photo shoots
- Costume parties and theatrical productions
- Festival wear over a contrasting slip
The navy and silver colourway gives it a celestial, midnight-sky feeling, but you could easily adapt it to white and gold, black and red, or a soft pastel with matching stars.
Final Thoughts
The Midnight Star Lace Dress proves that stunning results come from simple foundations. Mesh stitch, basic shaping, and quick appliqués combine into something genuinely show-stopping. Give yourself permission to work slowly, enjoy the rhythm of the mesh, and trust the construction.
Thank you for choosing this pattern. If you make this dress, I would love to see it! Share your photos on Instagram or Facebook and tag your work so fellow crocheters can admire your creation.
Save this pattern to your Pinterest boards so you can find it when you’re ready to start. And if you make this beautiful dress, please leave a comment below. Hearing about your projects is the best part of sharing patterns.
Want a Quick & Easy Printable Version?
Get a clean, beautifully formatted PDF of this pattern — easy to follow step by step, ready to print or save on any device. No scrolling, no distractions, just the pattern.
Get the Printable PDF →