
I have been dreaming about this butterfly purse design for months. My goal was to create something that looks absolutely stunning but breaks down into manageable pieces that any intermediate crocheter can tackle. I wanted layered wings with a realistic gradient, a functional zipper pocket, and that beautiful scalloped edge that makes the whole piece pop. I am SO pleased with how it turned out!
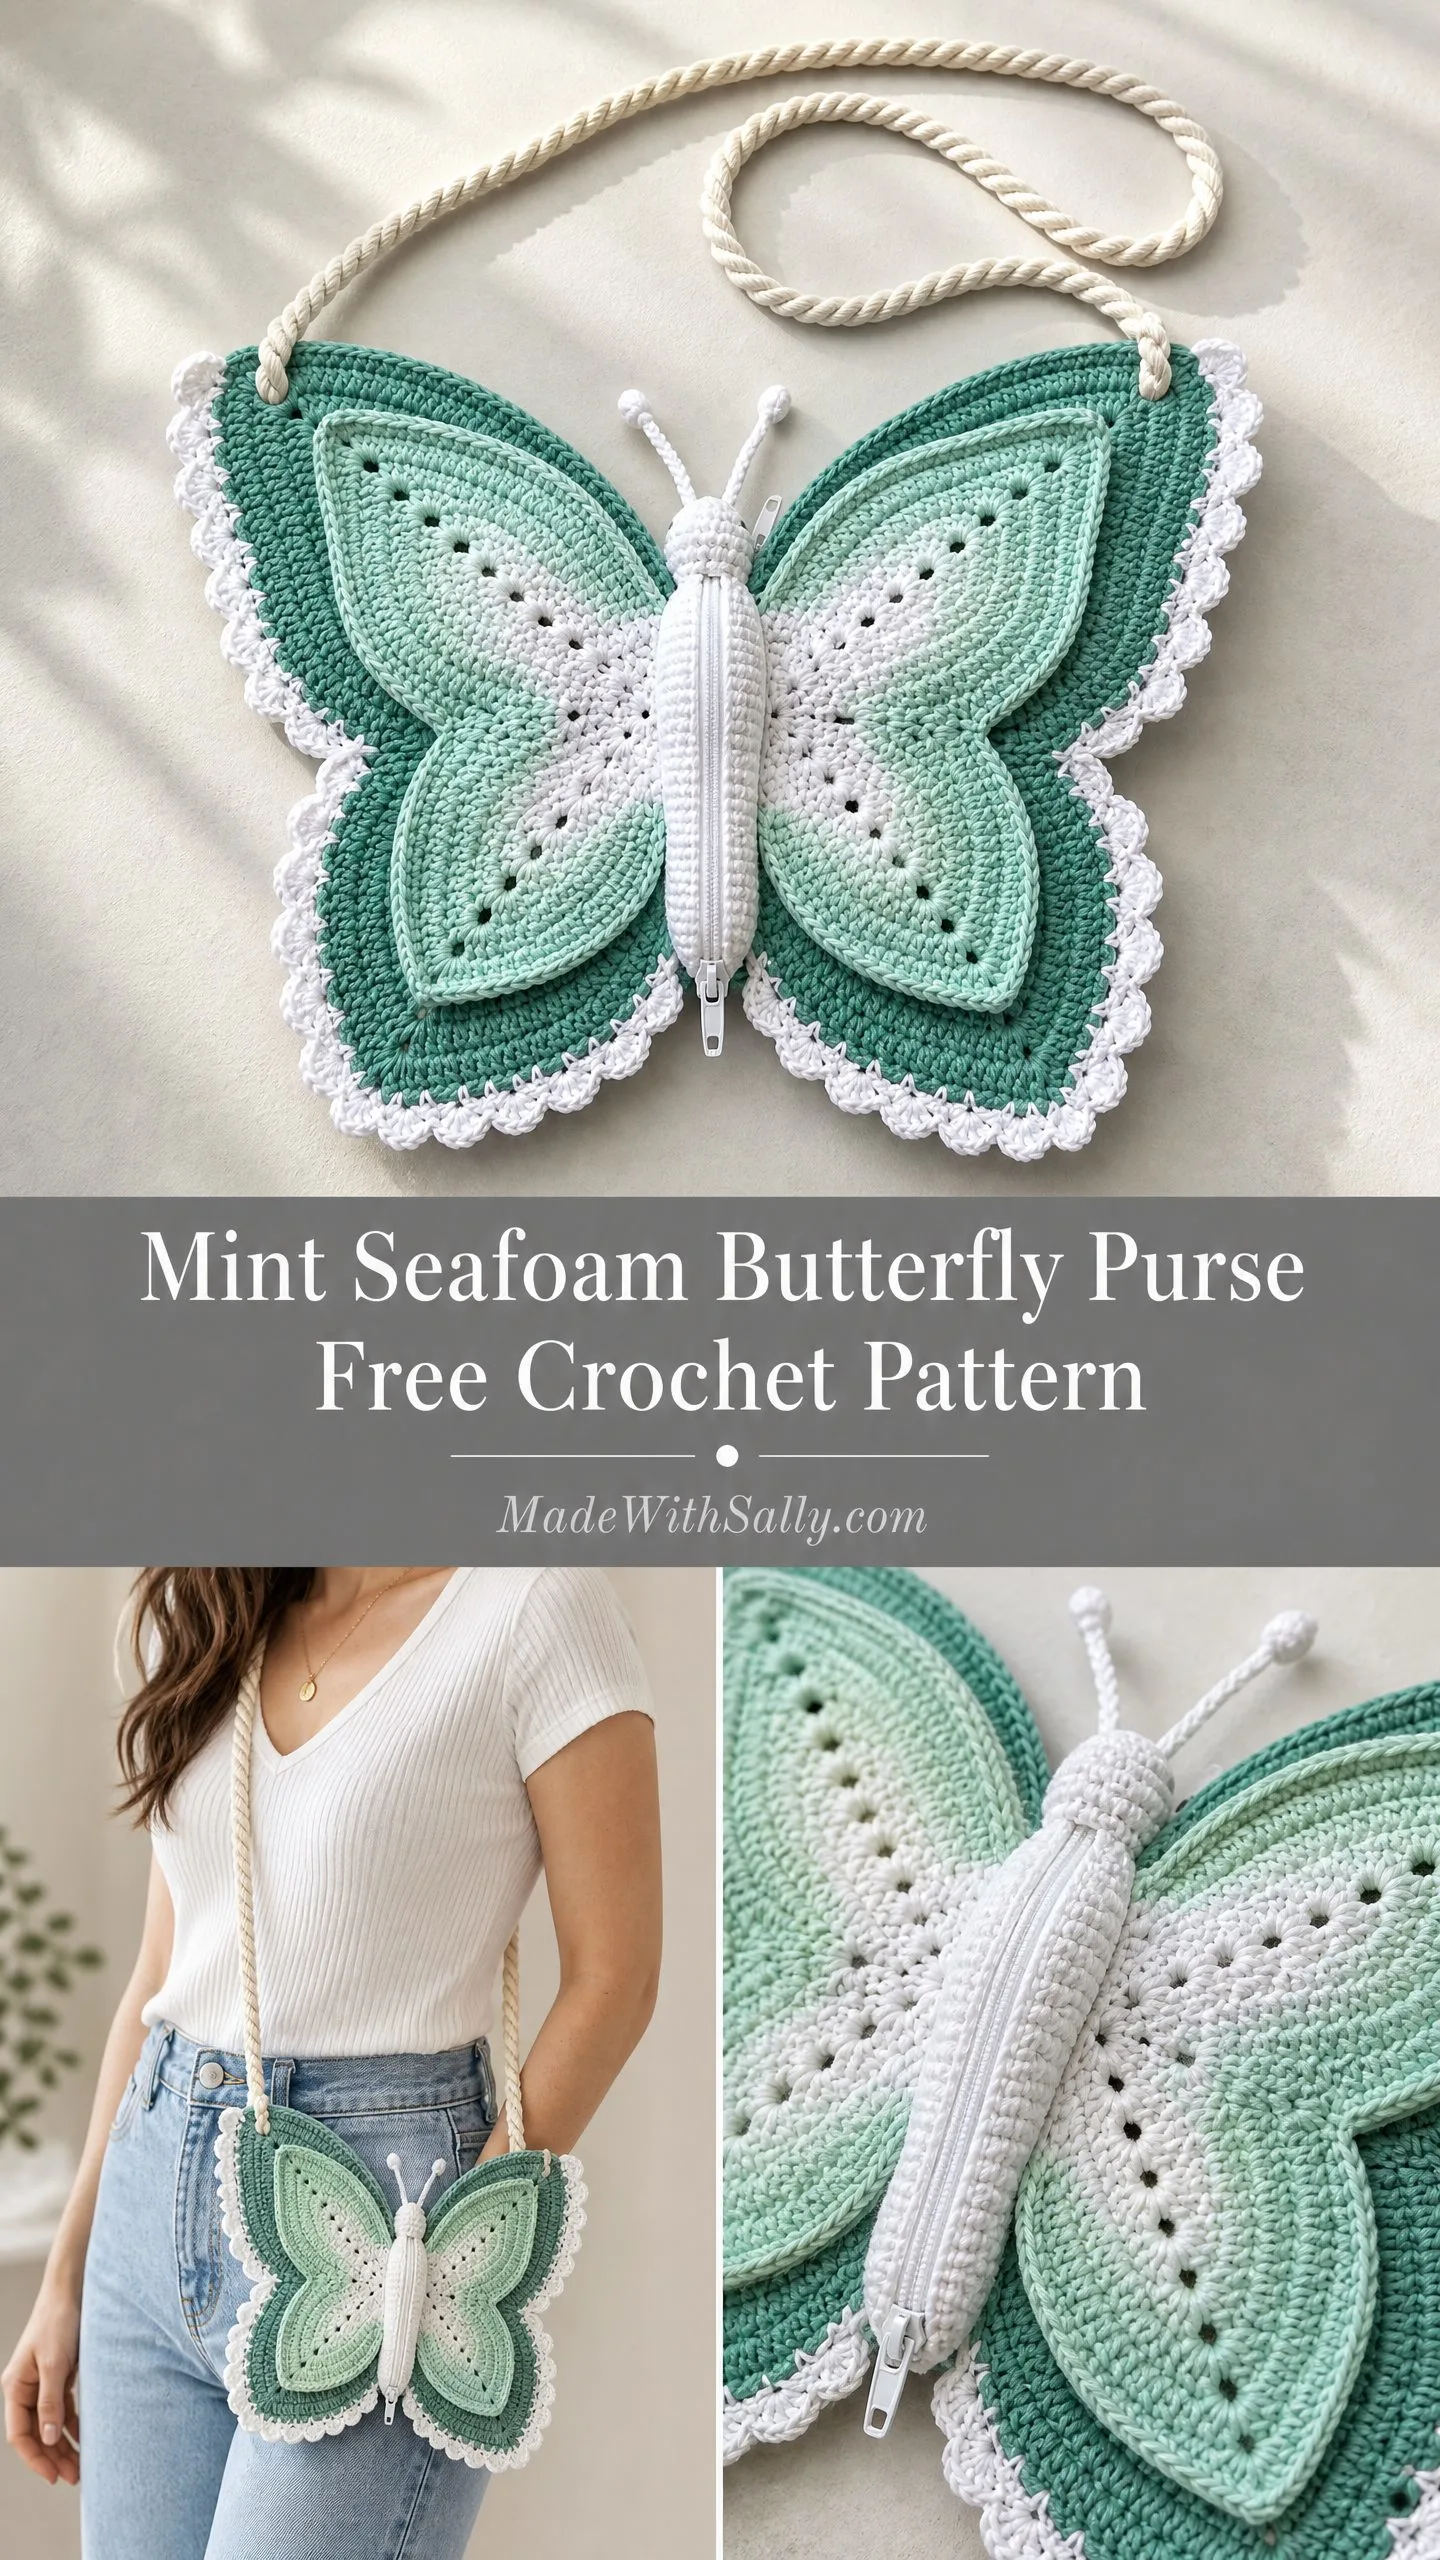
The color palette moves from deep sage on the outer wings through seafoam and mint to crisp white at the center. It mimics the wing markings of a white-veined green butterfly, and the effect is genuinely breathtaking. Every time I look at this finished bag, I smile.
This crochet pattern walks you through every single step. You will make the wing panels, create a stuffed body with a zipper closure, add adorable antennae, and finish everything with elegant scallop edging. Let me show you exactly how it all comes together.
About This Butterfly Purse Crochet Pattern
This butterfly shaped bag measures approximately 12 inches wide by 9 inches tall when finished. That is wingtip to wingtip and from the top of the upper wings to the bottom of the lower wing points. The strap is separate, so that measurement does not include it.
The body pouch in the center is about 5 inches tall by 1.5 inches wide. It holds small essentials like your phone, cards, lip balm, and keys. The zipper keeps everything secure.
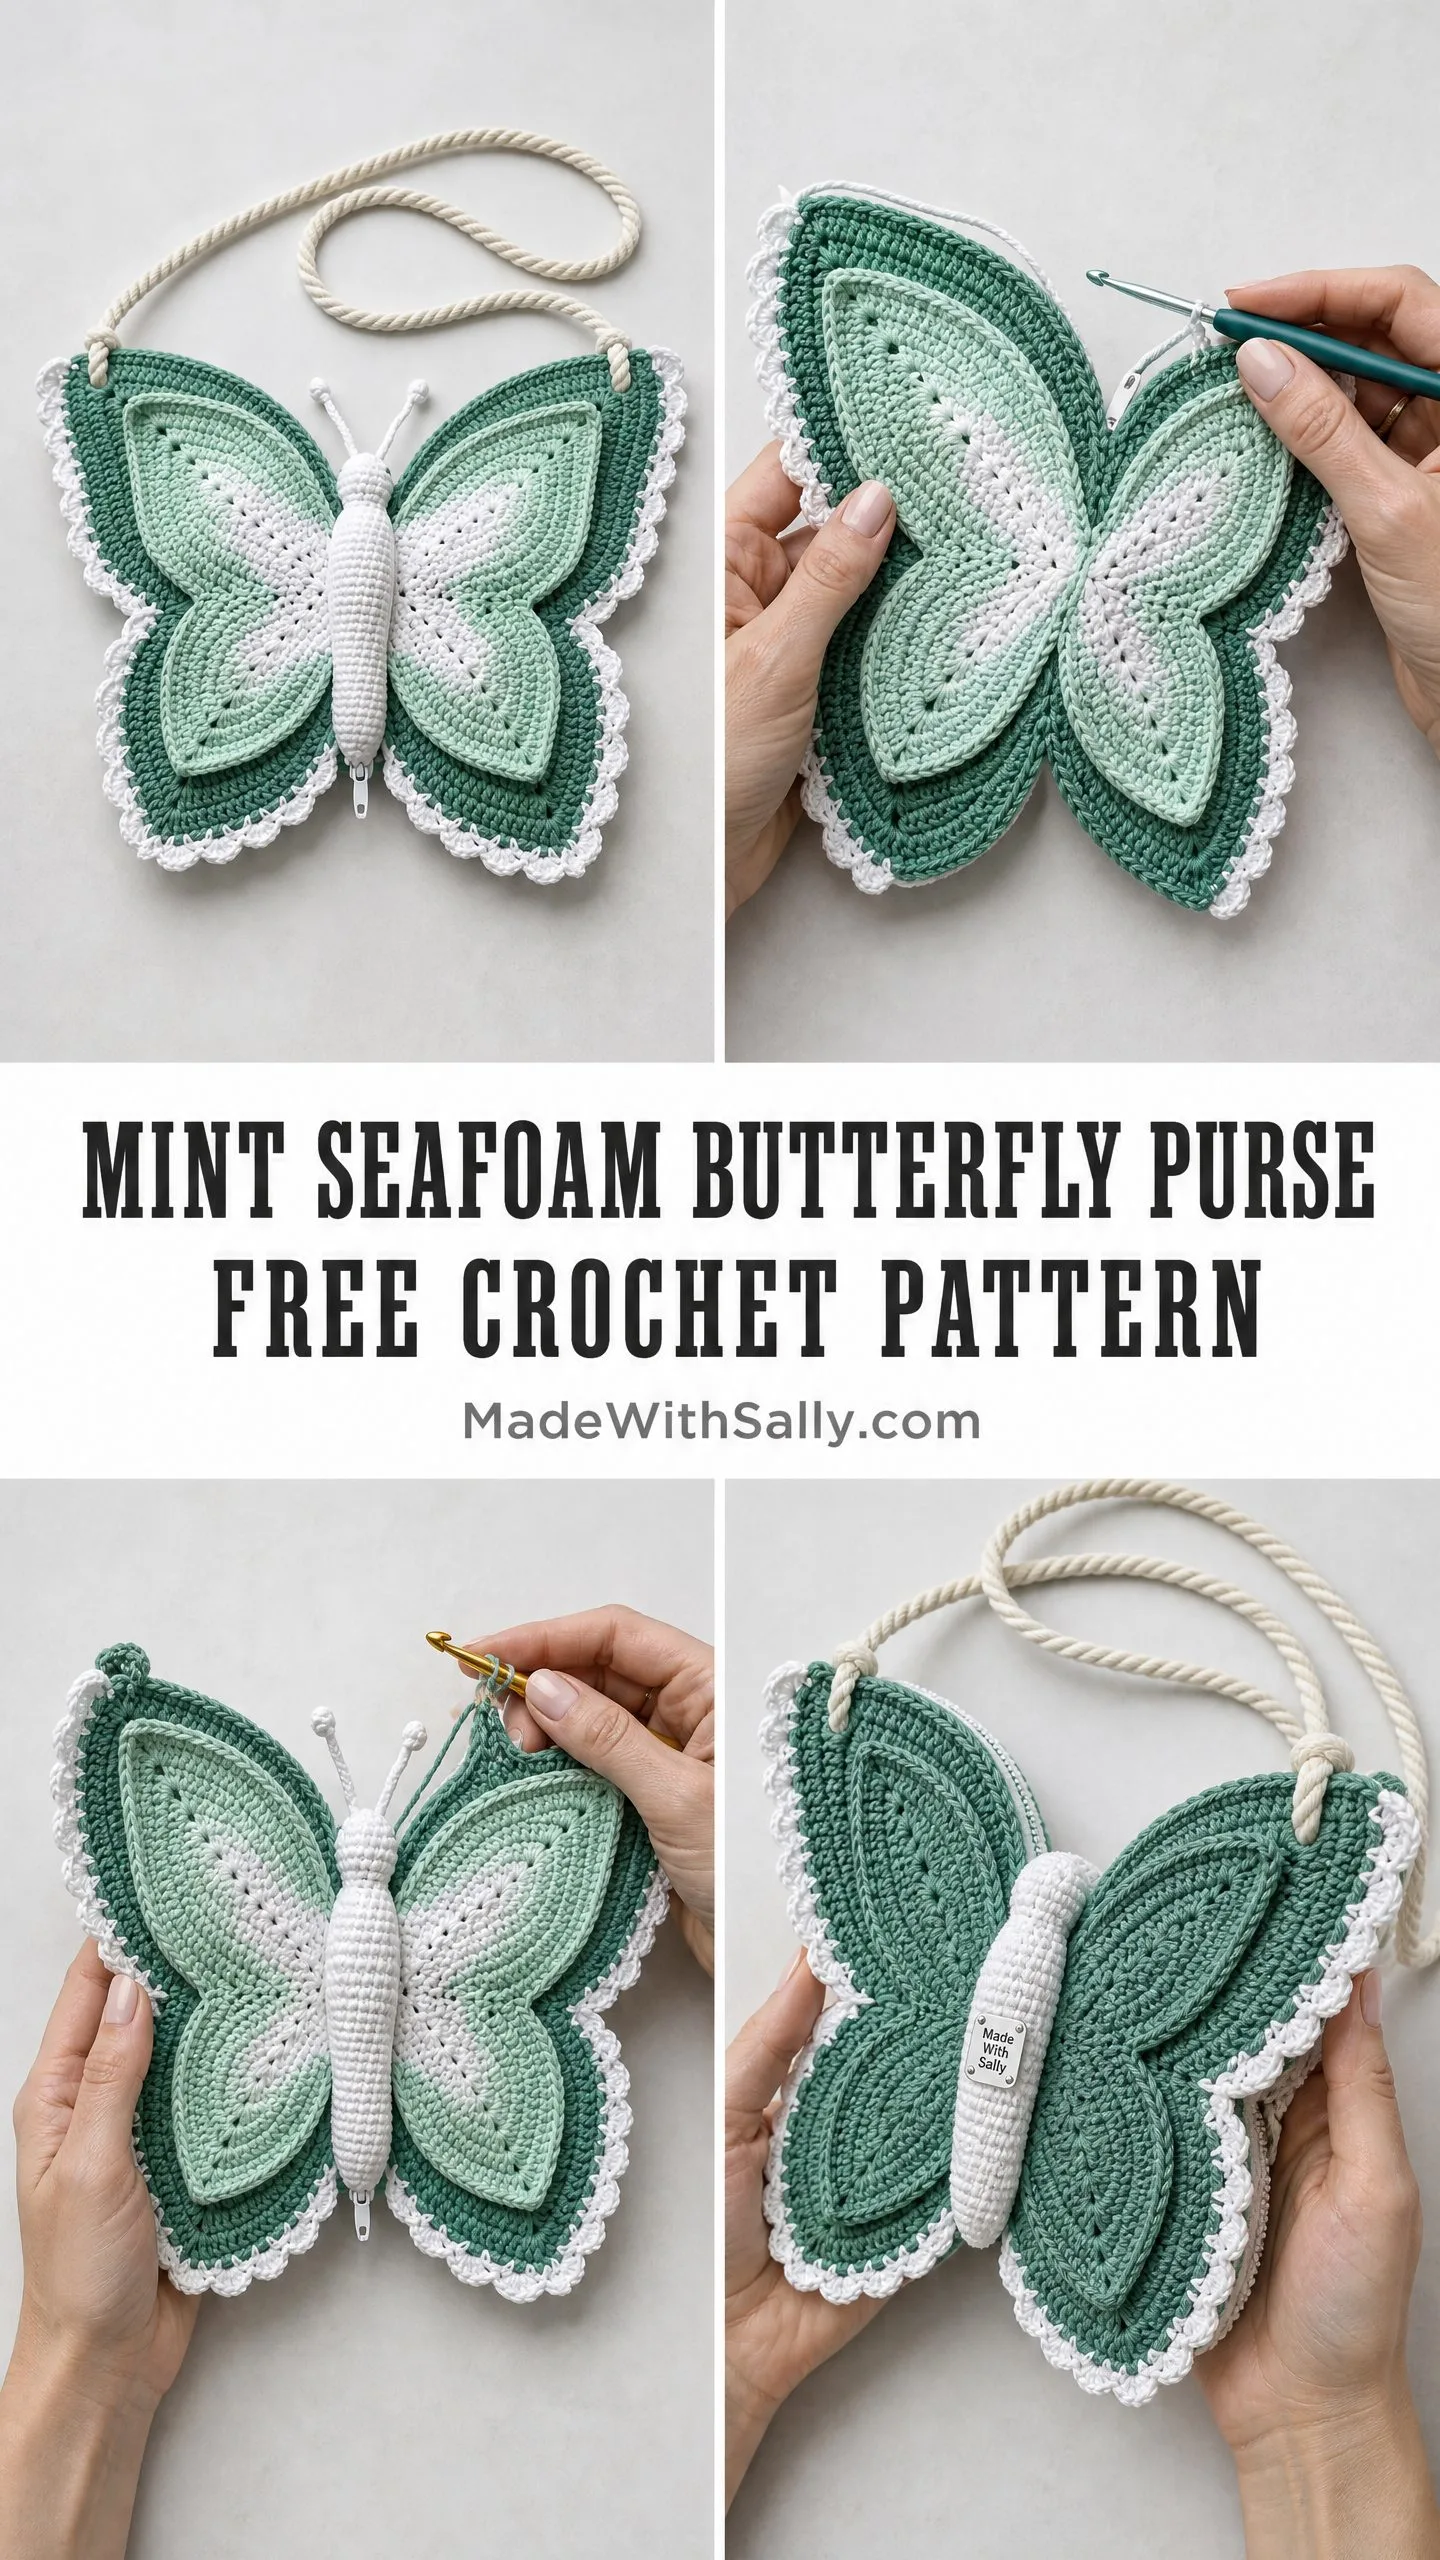
Construction method: You will work flat in joined rounds and straight rows. The four distinct wing pieces (two upper, two lower) get edged in white scallop lace, then sandwiched and seamed together. The body acts as the zipper pocket at the center. A twisted rope strap threads through reinforced anchor loops at the top corners.
The finished piece lies flat and is roughly the thickness of two layers of worsted fabric plus the stuffed body.
Skill Level
This is an intermediate level project. You should be comfortable with working in continuous rounds, changing colors mid-row, reading stitch counts carefully across asymmetrical shaping rows, attaching a zipper into a crocheted body tube, and working a scallop edging.
No advanced techniques like tunisian or overlay crochet are required. However, precision in the wing shaping rows is important for symmetry.
Time estimate: Approximately 12 to 18 hours total across multiple sessions. Wing pieces take the bulk of time. The body and edging together add roughly 3 to 4 hours.
Materials Needed
Yarn:
Hook: US size G-6 (4.0 mm)
Notions:
Yarn Suggestions
Option 1: Lion Brand 24/7 Cotton in Sage, Mint, and White. This 100% mercerized cotton in worsted weight gives crisp stitch definition essential for the layered wing detail. It holds its shape well without blocking. Approximately 186 yards per 3.5 oz skein.
Option 2: Paintbox Yarns Simply DK used doubled throughout. Available in a wide range of greens and white. Doubling gives a near-worsted thickness and excellent drape. Approximately 137 yards per 1.76 oz skein. Purchase two skeins per color if doubling.
Option 3: We Are Knitters The Petite Wool in Sage, Mint Green, and Ecru. A soft Peruvian wool DK held doubled. Slightly warmer hand than cotton. Note that wool should be hand-washed and may require gentle reshaping after each wash.
Substitution Note: Use any smooth worsted weight cotton or cotton-blend yarn that achieves the gauge below. Avoid fuzzy or textured yarns as they obscure the layered wing shape. If substituting a DK weight, hold two strands together.
Gauge
18 single crochet stitches and 20 rows equal 4 inches by 4 inches (10 cm by 10 cm) using US size G-6 (4.0 mm) hook and worsted weight yarn, measured in single crochet worked flat.
Gauge swatch: Chain 22. Work single crochet (sc) across for 24 rows. Fasten off, weave ends. Block lightly and measure center 18 stitches over 20 rows. Adjust hook size as needed: a larger hook if your swatch is smaller than 4 inches, a smaller hook if your swatch is larger.
Gauge matters here. The wings must be proportional to each other and to the body. A half-stitch difference per inch will shift the total width by nearly an inch on each side.
Abbreviations (US Terms)
Special Stitches
Shell Stitch (shell): Work 5 dc in the same stitch or space. This creates a fan shape used in the scallop edging.
Scallop Edging: Step 1: Insert hook into stitch, pull up loop. Step 2: Chain 1, sc in same stitch. Step 3: Skip 2 stitches. Step 4: Work 5 dc (shell) in next stitch. Step 5: Skip 2 stitches. Step 6: Sc in next stitch. Step 7: Repeat steps 3 through 6 around the edge. The stitch count along each edged edge must be a multiple of 6 stitches for the scallop to come out even.
Invisible Decrease (dec): Insert hook into front loop only of next stitch, then insert hook into front loop only of the stitch after that (two front loops on hook). Yarn over, pull through both loops (2 loops on hook). Yarn over, pull through both loops. This creates a nearly invisible decrease without a visible hole.
Magic Ring: Make a loop with the yarn, leaving a 6-inch tail. Insert hook through the center of the loop, yarn over, pull up a loop, chain 1 to anchor. Work the required number of stitches into the ring, then pull the tail to close the center hole.
Pattern Notes
1. The butterfly is made in this order: two Large Upper Wing panels (front and back), two Small Upper Wing panels (inner layer), two Large Lower Wing panels (front and back), two Small Lower Wing panels (inner layer), the Body Pouch, the Antennae, the Scallop Edging, then assembly and strap.
2. All wing panels are worked flat in rows, turning at the end of each row. A turning chain of 1 is used throughout for sc rows and counts as a chain only, not as a stitch.
3. Right side (RS) is the side facing you on odd-numbered rows (Row 1 is RS). Place a stitch marker on the RS when you begin.
4. Work each wing as a mirror of its pair. Instructions are written for the right wing. For the left wing, work increases on the opposite side of the row.
5. The body is worked in continuous rounds (amigurumi style) and stuffed lightly.
6. Color changes: Change color on the last yarn-over of the last stitch before the new color begins.
7. The strap is not crocheted. It is a length of natural cotton twisted rope threaded through crocheted anchor loops.
8. Block all pieces before assembly. Pin to measurements, mist lightly with water, and allow to dry flat.
9. Stitch counts in parentheses at the end of each row represent the total number of working stitches, not counting the turning chain.
Large Upper Wing Panel (Make 4 total: 2 right, 2 left)
The large upper wing is a rounded trapezoid shape. Each upper wing is approximately 6 inches wide at its widest point and 5 inches tall.
Begin with Color A (Deep Sage).
Foundation: Ch 17.
Row 1 (RS): Sc in 2nd ch from hook, sc in each ch across. Turn. (16 sc)
Row 2: Ch 1, inc in first st, sc in each st to last st, inc in last st. Turn. (18 sc)
Row 3: Ch 1, inc in first st, sc in each st to last st, inc in last st. Turn. (20 sc)
Row 4: Ch 1, inc in first st, sc in each st to last st, inc in last st. Turn. (22 sc)
Row 5: Ch 1, inc in first st, sc in each st to last st, sc in last st (no increase on outer edge). Turn. (23 sc)
From Row 5 onward, the inner edge continues to increase while the outer wingtip edge levels off and later curves. For the LEFT wing, reverse all edge designations.
Row 6: Ch 1, sc in each st to last st, inc in last st. Turn. (24 sc)
Row 7: Ch 1, inc in first st, sc in each st across. Turn. (25 sc)
Row 8: Ch 1, sc in each st across. Turn. (25 sc)
Row 9: Ch 1, inc in first st, sc in each st across. Turn. (26 sc)
Row 10: Ch 1, sc in each st across. Turn. (26 sc)
Row 11: Ch 1, sc in each st across. Turn. (26 sc)
Row 12: Ch 1, sc in first st, dec over next 2 sts, sc in each st to last st, inc in last st. Turn. (26 sc)
Row 13: Ch 1, inc in first st, sc in each st to last 3 sts, dec, sc in last st. Turn. (26 sc)
Row 14: Ch 1, sc in first st, dec, sc in each st to last st, inc in last st. Turn. (26 sc)
Row 15: Ch 1, sc in each st to last 3 sts, dec, sc in last st. Turn. (25 sc)
Row 16: Ch 1, sc in first st, dec, sc in each st to last 3 sts, dec, sc in last st. Turn. (23 sc)
Row 17: Ch 1, sc in first st, dec, sc in each st to last 3 sts, dec, sc in last st. Turn. (21 sc)
Row 18: Ch 1, sc in first st, dec, sc in each st to last 3 sts, dec, sc in last st. Turn. (19 sc)
Row 19: Ch 1, sc in first st, dec, sc in each st to last 3 sts, dec, sc in last st. Turn. (17 sc)
Row 20: Ch 1, sc in each st across. Turn. (17 sc)
Row 21: Ch 1, sc in first st, dec, sc in each st to last 3 sts, dec, sc in last st. Turn. (15 sc)
Row 22: Ch 1, sc in first st, dec, sc in each st to last 3 sts, dec, sc in last st. Turn. (13 sc)
Row 23: Ch 1, sc in first st, dec, sc in each st to last 3 sts, dec, sc in last st. Turn. (11 sc)
Row 24: Ch 1, sc in each st across. Fasten off Color A. Join Color B. Turn. (11 sc)
Row 25 (Color B): Ch 1, sc in each st across. Turn. (11 sc)
Row 26: Ch 1, sc in first st, dec, sc in each st to last 3 sts, dec, sc in last st. Turn. (9 sc)
Row 27: Ch 1, sc in each st across. Turn. (9 sc)
Row 28: Ch 1, sc in first st, dec, sc in each st to last 3 sts, dec, sc in last st. Turn. (7 sc)
Row 29: Ch 1, sc in first st, dec, sc in each st to last 2 sts, dec. Turn. (5 sc)
Row 30: Ch 1, dec, sc in next st, dec. Turn. (3 sc)
Row 31: Ch 1, draw up loop in each of 3 sts, yo, pull through all 4 loops on hook. Fasten off. (1 st, tip of wing)
Checkpoint: The panel should measure approximately 6 inches at the widest point and approximately 5 inches tall.
Small Upper Wing Panel (Make 4 total: 2 right, 2 left)
The small upper wing is an inner overlay layer in Colors C and D, approximately 4 inches wide and 4 inches tall.
Begin with Color C (Mint).
Foundation: Ch 13.
Row 1 (RS): Sc in 2nd ch from hook, sc in each ch across. Turn. (12 sc)
Row 2: Ch 1, inc in first st, sc in each st to last st, inc in last st. Turn. (14 sc)
Row 3: Ch 1, inc in first st, sc in each st to last st, inc in last st. Turn. (16 sc)
Row 4: Ch 1, inc in first st, sc in each st across. Turn. (17 sc)
Row 5: Ch 1, sc in each st across. Turn. (17 sc)
Row 6: Ch 1, sc in each st across. Turn. (17 sc)
Row 7: Ch 1, sc in first st, dec, sc in each st to last 3 sts, dec, sc in last st. Turn. (15 sc)
Row 8: Ch 1, sc in first st, dec, sc in each st to last 3 sts, dec, sc in last st. Turn. (13 sc)
Row 9: Ch 1, sc in each st across. Fasten off Color C. Join Color D (White). Turn. (13 sc)
Row 10 (Color D): Ch 1, sc in first st, dec, sc in each st to last 3 sts, dec, sc in last st. Turn. (11 sc)
Row 11: Ch 1, sc in first st, dec, sc in each st to last 3 sts, dec, sc in last st. Turn. (9 sc)
Row 12: Ch 1, sc in first st, dec, sc in each st to last 3 sts, dec, sc in last st. Turn. (7 sc)
Row 13: Ch 1, sc in first st, dec, sc in each st to last 2 sts, dec. Turn. (5 sc)
Row 14: Ch 1, dec, sc in next st, dec. Turn. (3 sc)
Row 15: Ch 1, draw up loop in each of 3 sts, yo, pull through all 4 loops on hook. Fasten off. (1 st, tip)
Large Lower Wing Panel (Make 4 total: 2 right, 2 left)
The lower wing is wider and rounder, shaped like a fat teardrop with a pointed lower tip. It is approximately 5.5 inches wide and 4.5 inches tall.
Begin with Color A (Deep Sage).
Foundation: Ch 19.
Row 1 (RS): Sc in 2nd ch from hook, sc in each ch across. Turn. (18 sc)
Row 2: Ch 1, inc in first st, sc in each st to last st, inc in last st. Turn. (20 sc)
Row 3: Ch 1, inc in first st, sc in each st to last st, inc in last st. Turn. (22 sc)
Row 4: Ch 1, inc in first st, sc in each st to last st, inc in last st. Turn. (24 sc)
Row 5: Ch 1, inc in first st, sc in each st to last st, inc in last st. Turn. (26 sc)
Row 6: Ch 1, sc in each st across. Turn. (26 sc)
Row 7: Ch 1, sc in each st across. Turn. (26 sc)
Row 8: Ch 1, sc in each st across. Turn. (26 sc)
Row 9: Ch 1, sc in first st, dec, sc in each st to last 3 sts, dec, sc in last st. Turn. (24 sc)
Row 10: Ch 1, sc in first st, dec, sc in each st to last 3 sts, dec, sc in last st. Turn. (22 sc)
Row 11: Ch 1, sc in first st, dec, sc in each st to last 3 sts, dec, sc in last st. Turn. (20 sc)
Row 12: Ch 1, sc in first st, dec, sc in each st to last 3 sts, dec, sc in last st. Fasten off Color A. Join Color B. Turn. (18 sc)
Row 13 (Color B): Ch 1, sc in first st, dec, sc in each st to last 3 sts, dec, sc in last st. Turn. (16 sc)
Row 14: Ch 1, sc in first st, dec, sc in each st to last 3 sts, dec, sc in last st. Turn. (14 sc)
Row 15: Ch 1, sc in first st, dec, sc in each st to last 3 sts, dec, sc in last st. Turn. (12 sc)
Row 16: Ch 1, sc in first st, dec, sc in each st to last 3 sts, dec, sc in last st. Turn. (10 sc)
Row 17: Ch 1, sc in first st, dec, sc in each st to last 3 sts, dec, sc in last st. Turn. (8 sc)
Row 18: Ch 1, sc in first st, dec, sc in each st to last 3 sts, dec, sc in last st. Turn. (6 sc)
Row 19: Ch 1, dec, sc in next 2 sts, dec. Turn. (4 sc)
Row 20: Ch 1, dec, dec. Turn. (2 sc)
Row 21: Ch 1, dec. Fasten off. (1 sc, lower tip)
Checkpoint: The panel should measure approximately 5.5 inches wide and approximately 4.5 inches tall.
Small Lower Wing Panel (Make 4 total: 2 right, 2 left)
The small lower wing inner overlay is approximately 3.5 inches wide and 3.5 inches tall.
Begin with Color C (Mint).
Foundation: Ch 15.
Row 1 (RS): Sc in 2nd ch from hook, sc in each ch across. Turn. (14 sc)
Row 2: Ch 1, inc in first st, sc in each st to last st, inc in last st. Turn. (16 sc)
Row 3: Ch 1, inc in first st, sc in each st to last st, inc in last st. Turn. (18 sc)
Row 4: Ch 1, sc in each st across. Turn. (18 sc)
Row 5: Ch 1, sc in each st across. Turn. (18 sc)
Row 6: Ch 1, sc in first st, dec, sc in each st to last 3 sts, dec, sc in last st. Turn. (16 sc)
Row 7: Ch 1, sc in first st, dec, sc in each st to last 3 sts, dec, sc in last st. Fasten off Color C. Join Color D. Turn. (14 sc)
Row 8 (Color D): Ch 1, sc in first st, dec, sc in each st to last 3 sts, dec, sc in last st. Turn. (12 sc)
Row 9: Ch 1, sc in first st, dec, sc in each st to last 3 sts, dec, sc in last st. Turn. (10 sc)
Row 10: Ch 1, sc in first st, dec, sc in each st to last 3 sts, dec, sc in last st. Turn. (8 sc)
Row 11: Ch 1, sc in first st, dec, sc in each st to last 3 sts, dec, sc in last st. Turn. (6 sc)
Row 12: Ch 1, dec, sc in next 2 sts, dec. Turn. (4 sc)
Row 13: Ch 1, dec, dec. Turn. (2 sc)
Row 14: Ch 1, dec. Fasten off. (1 sc, tip)
Body Pouch (Make 1)
The body is a closed oval tube worked in continuous rounds and stuffed lightly. Worked entirely in Color D (White).
Magic ring.
Round 1: Ch 1, work 6 sc into magic ring. Pull tail to close. Do not join; work in continuous spiral. (6 sc)
Round 2: Inc in each st around. (12 sc)
Round 3: (Sc in next st, inc in next st) 6 times. (18 sc)
Round 4: (Sc in next 2 sts, inc in next st) 6 times. (24 sc)
Round 5: (Sc in next 3 sts, inc in next st) 6 times. (30 sc)
Round 6: Sc in each st around. (30 sc)
Round 7: Sc in each st around. (30 sc)
Round 8: (Sc in next 3 sts, dec) 6 times. (24 sc)
Round 9: Sc in each st around. (24 sc)
Round 10: Sc in each st around. (24 sc)
Round 11: (Sc in next 2 sts, dec) 6 times. (18 sc)
Round 12: Sc in each st around. (18 sc)
Round 13: Sc in each st around. (18 sc)
Round 14: (Sc in next st, dec) 6 times. (12 sc)
Round 15: Sc in each st around. (12 sc)
Round 16: Sc in each st around. (12 sc)
Before continuing, stuff the body pouch lightly with polyester fiberfill. Do not overstuff. It should be slightly puffed but still lie relatively flat.
Round 17: Dec 6 times. (6 sc)
Fasten off leaving a long tail. Thread tail on yarn needle and weave through remaining 6 sts, pulling tight to close. Knot and weave in end.
Zipper attachment: Cut the zipper to 5 inches if necessary. Position it along the vertical front center of the body pouch, from approximately Round 3 to Round 14. Using white sewing thread and a hand-sewing needle, whip stitch the zipper tape to the body using small, tight stitches. Test that the zipper opens and closes smoothly before knotting.
Checkpoint: The body should be approximately 5 inches tall and 1.5 inches wide at its widest point.
Antennae (Make 2)
Worked entirely in Color D (White).
Foundation: Ch 22.
Row 1: Sl st in 2nd ch from hook, sl st in next 3 ch (4 sl sts for base of antenna shaft). Now work back along the foundation chain: sc in next 5 ch, sl st in each remaining ch to end. Fasten off leaving 8-inch tail for sewing.
For the tip knob: Using Color D, make a magic ring, work 6 sc into ring, pull to close. Sl st to join. Fasten off, leaving a tail. Using yarn needle, sew the knob to the tip of the antenna shaft. Pull firmly so the knob sits at a right angle to the shaft.
Make 2. Set aside.
Scallop Edging
Apply the scallop edging in Color D (White) to the outer perimeter of each FRONT Large Upper Wing Panel and each FRONT Large Lower Wing Panel before final assembly. Do not edge the inner edges that attach to the body or the straight top edge where strap loops will be.
Before edging, work a surface single crochet border in Color D around the outer edge. Work 1 sc per row end on straight edges and 1 sc per stitch along top and bottom. This establishes a consistent base count.
Surface border count for Large Upper Wing Front Panel (approximate):
Round to the nearest multiple of 6 by adjusting sc placement at corners. Target: 108 sc total (108 divided by 6 = 18 scallop repeats).
Scallop Round: Ch 1, (sc in next st, sk 2 sts, 5 dc in next st, sk 2 sts) 18 times. Sl st to first sc to join. Fasten off.
For Large Lower Wing Front Panel (approximate outer perimeter):
Round to nearest multiple of 6: 60 sc total (60 divided by 6 = 10 scallop repeats).
Surface border Round: Work 60 sc evenly around outer edge. Join.
Scallop Round: Ch 1, (sc in next st, sk 2 sts, 5 dc in next st, sk 2 sts) 10 times. Sl st to join. Fasten off.
Assembly Instructions
Step 1: Layer the upper wing panels.
Take one Large Upper Wing Front Panel (with scallop edging) and one Large Upper Wing Back Panel (no edging). Hold wrong sides together. Align all edges. Using Color A and yarn needle, whip stitch around three outer edges, leaving the straight inner vertical edge open. This forms the right upper wing sandwich. Repeat for left upper wing.
Before closing, insert the Small Upper Wing Panel between the two Large Upper Wing panels. The Color D tip should align with the Color D section of the large panel. Tack the small panel to the back of the front large panel at 4 to 5 points using whip stitches in matching yarn colors.
Step 2: Layer the lower wing panels.
Repeat Step 1 for the lower wing pairs.
Step 3: Attach upper and lower wings together.
Position the right upper wing and right lower wing so their inner straight edges align vertically. The lower wing should overlap the bottom of the upper wing by about 0.5 inch at the inner join point. Using Color A and yarn needle, whip stitch the inner edges along approximately 1.5 inches at the junction. Repeat for left side.
Step 4: Attach the body.
Center the body pouch vertically over the inner join of the wings. The body should overlap the wings by approximately 1 inch on both top and bottom. Using Color D and yarn needle, whip stitch the body to the wing panels at the left and right sides only. Leave the front face with the zipper facing outward.
Step 5: Attach antennae.
Using the long tails, sew the straight base end of each antenna to the top of the body. The antennae should angle outward and slightly upward. Secure with several stitches.
Step 6: Create strap anchor loops.
At the top outer corner of each upper wing, create a small reinforced loop. Using Color D, join yarn at the corner and chain 8. Slip stitch back into the same corner to form a loop. Fasten off and weave in ends. Repeat on the opposite side.
Step 7: Thread the strap.
Take your 50-inch length of natural cotton twisted rope. Thread one end through the right anchor loop, then thread the other end through the left anchor loop. Tie secure knots at each end of the rope, about 1 inch from the loop. Trim any frayed ends.
Care Instructions
Hand wash in cool water with mild detergent. Lay flat to dry. Reshape the wings while damp if needed. Do not machine wash or dry, as this may damage the zipper and distort the shape.
Final Thoughts on This Butterfly Purse Crochet Pattern
This project is absolutely worth every hour you put into it. The layered wings create such beautiful dimension, and the color gradient is stunning in person. Take your time with the shaping rows. They are the key to getting those graceful wing curves just right.
I would love to see your finished butterfly purses! Tag me on social media when you complete yours.
If you enjoyed this crochet tutorial, save it to your Pinterest boards so you can find it whenever you are ready to start. And please drop a comment below if you make one. I genuinely love seeing your creations and hearing how the pattern worked up for you!
