
Last summer, I found myself standing in a beach boutique, completely mesmerized by a crocheted dress on display. The price tag made me laugh out loud. Over two hundred dollars for something I knew I could make myself. I snapped a photo right there in the store, determined to figure it out.
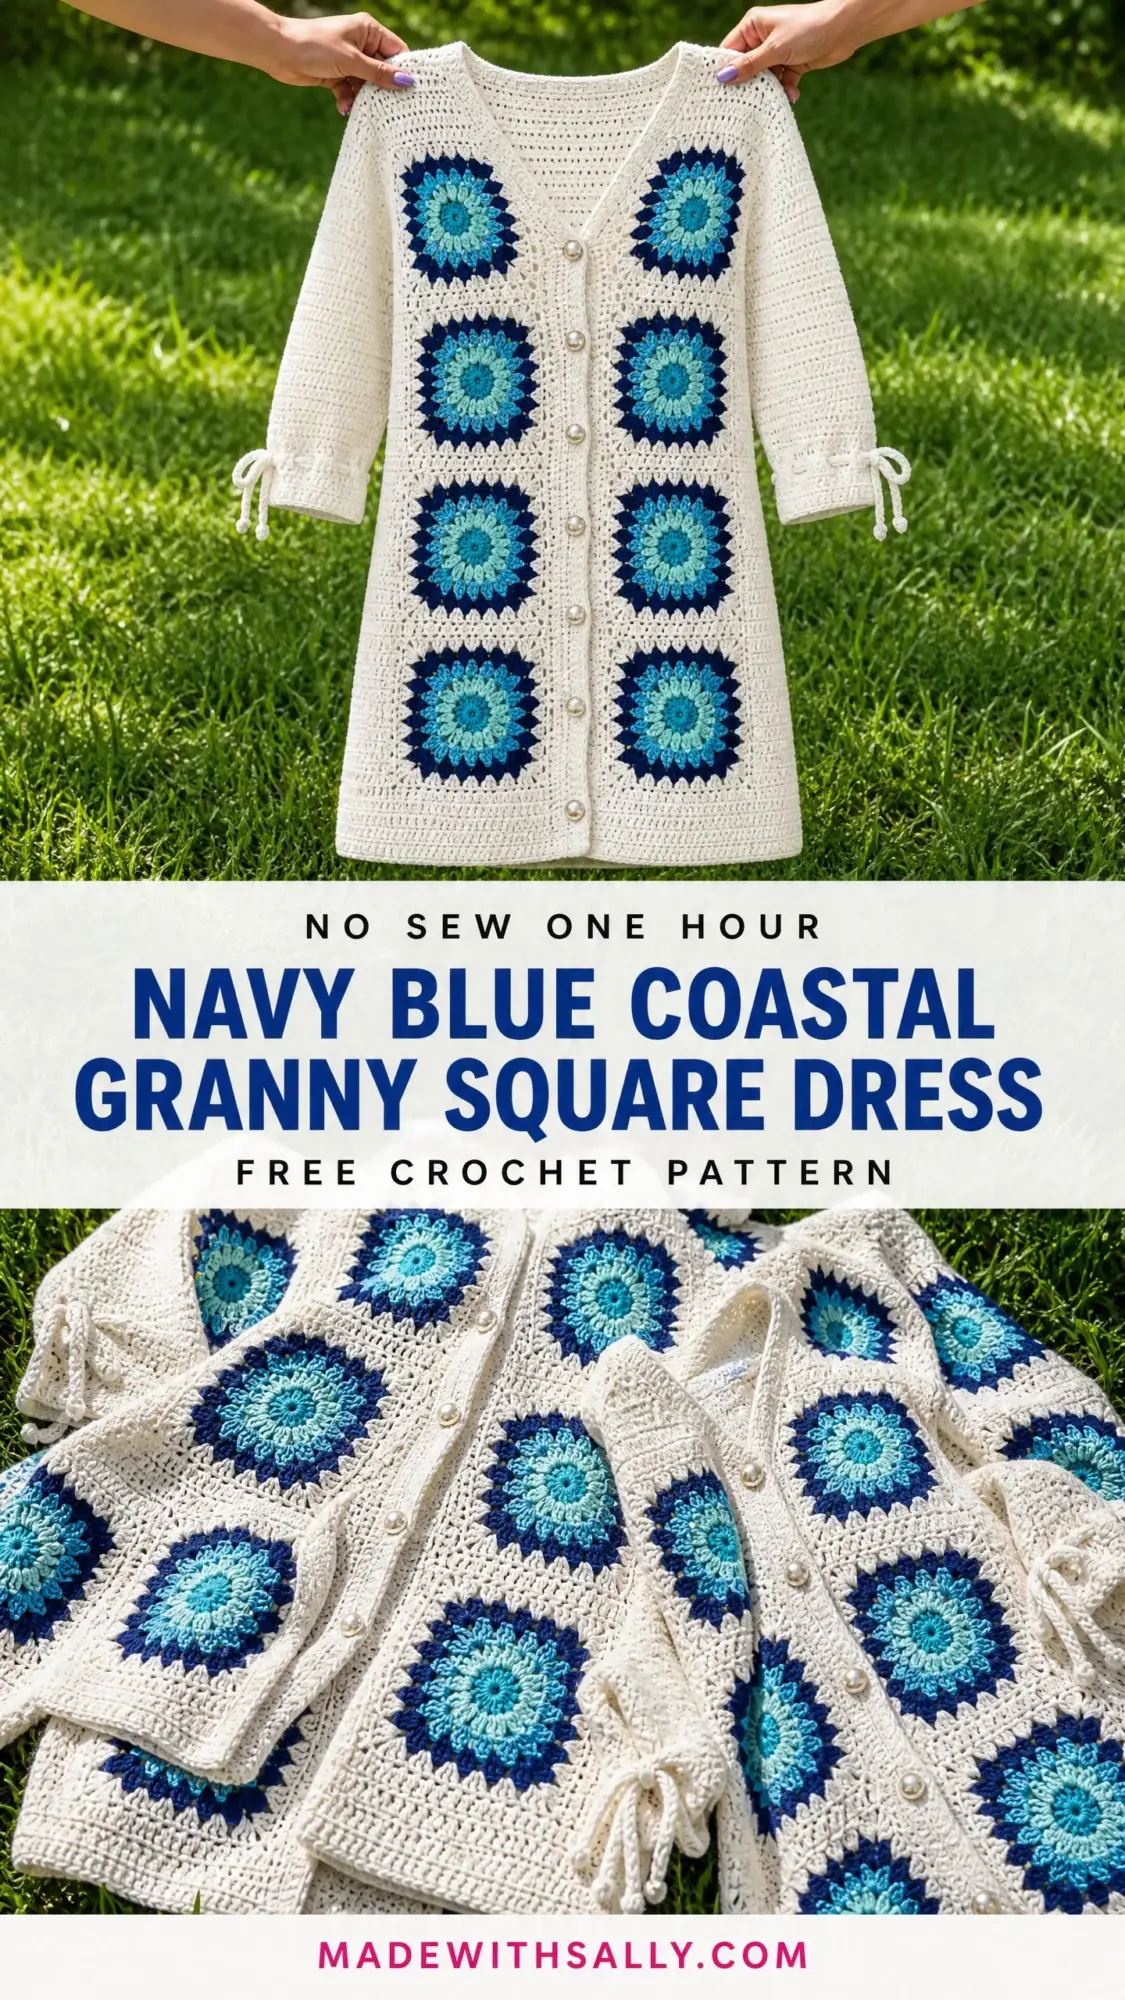
That photo lived on my phone for months while I sketched, swatched, and redesigned. The result is this coastal-inspired granny square dress that combines everything I love about vintage crochet with a modern, wearable silhouette. Those bold navy and aqua squares against the creamy background remind me of Mediterranean tiles or a perfect summer sky meeting the ocean.
If you have ever wanted to make a statement piece that looks like it belongs in a high-end resort boutique, this is your project. It takes some time and patience, but every single technique is approachable. Let me walk you through exactly how to create it.
Why This Granny Square Dress Pattern Works
This dress uses a clever construction method that makes the whole project manageable. You start by making individual granny squares, which are satisfying and portable. Then you join them into panels and build the body around them. Breaking a big project into smaller pieces keeps things fun and prevents overwhelm.
The A-line silhouette skims your hips and falls to mid-thigh. It flatters most body types and moves beautifully. The three-quarter sleeves with drawstring ties at the cuffs add a romantic detail that elevates the whole piece.
I wrote this pattern for size Small/Medium (US sizes 4 to 10), but I have included tips for customizing the fit later in this tutorial.
Skill Level and Time Investment
This crochet pattern sits at the Advanced Beginner to Intermediate level. The individual granny squares use only basic stitches. Chain, slip stitch, double crochet, single crochet. If you can make a granny square, you already know the hardest part.
The challenge comes from joining motifs neatly, working increases for shaping, and setting in sleeves. If you have completed at least one crochet garment before, you will find this totally doable.
Expect to spend approximately 40 to 60 hours on this project depending on your working speed. The granny squares take roughly 12 to 16 hours. Body construction adds another 18 to 24 hours. Finishing, seaming, and embellishments add 6 to 10 hours. This is a labor of love, not a weekend project.
Finished Measurements
Bust: 36 inches / 91.5 cm
Waist: 32 inches / 81 cm
Hip: 40 inches / 101.5 cm
Total length from shoulder to hem: 32 inches / 81 cm
Sleeve length from underarm to cuff: 12 inches / 30.5 cm
Materials You Will Need
Yarn
You will need worsted weight yarn (CYCA 4) in five colors:
Yarn Suggestions
Lion Brand Pound of Love works beautifully for this project. Try Fisherman or Vanilla for Color A and select from their solid worsted line for the blues. This yarn is machine washable and has excellent stitch definition.
Paintbox Yarns Simply DK held double creates a lighter fabric with more drape, perfect for a summer dress. Held double, it matches worsted gauge closely.
Cascade 220 Superwash is a premium choice that blocks like a dream. The squares come out crisp and flat.
Avoid fuzzy or novelty yarns. They obscure the beautiful granny square pattern.
Hook
Notions
Gauge (Please Do Not Skip This)
With US size J / 6.0 mm hook:
14 sc x 16 rows = 4 inches / 10 cm in single crochet, blocked.
One completed granny square (after Round 5) = 5.5 inches / 14 cm x 5.5 inches / 14 cm, blocked.
I cannot stress this enough. Gauge matters for garments. A difference of even half a stitch per inch will throw off your entire dress. Swatch before starting, adjust your hook size if needed, and block your swatch before measuring.
Abbreviations
Special Stitches for This Crochet Tutorial
Granny Cluster
This is the building block of your squares.
1. Yarn over, insert hook into designated space
2. Yarn over, pull up a loop (3 loops on hook)
3. Yarn over, pull through 2 loops (2 loops on hook)
4. Repeat steps 1 through 3 two more times in the same space (4 loops on hook)
5. Yarn over, pull through all 4 loops on hook
This is essentially a dc3tog worked into one space. In the pattern, I call this simply "cluster."
Standing Single Crochet
This technique lets you join new colors without a messy slip stitch start.
1. Make a slip knot with new yarn and place on hook
2. Insert hook into designated stitch or space
3. Yarn over, pull up a loop
4. Yarn over, pull through both loops on hook
Flat Join
This creates an almost invisible seam when joining squares.
1. Hold two squares with wrong sides facing each other (right sides out)
2. Insert hook through the back loop only of the stitch on the front square, then through the front loop only of the corresponding stitch on the back square
3. Work a sl st through both loops together
4. Continue across the edge, one sl st per stitch pair
Drawstring Eyelet Row
Used at the sleeve cuff to create holes for threading your ribbon tie.
Row 1 (WS): ch 3, turn, skip first sc, dc in next sc, (ch 1, sk 1 sc, dc in next sc) across to end. Turn.
Row 2 (RS): ch 1, turn, sc in each dc and each ch-1 sp across. Turn.
Important Pattern Notes Before You Begin
1. The dress front is not worked in the round. The two front panels are worked flat. The back is worked flat. All three panels are joined at the side seams.
2. Make all 10 granny squares first, then join them, then construct the body around them.
3. Color sequence for each square: Rounds 1 and 2 in Color E (teal). Round 3 in Color C (medium aqua). Round 4 in Color D (light aqua). Round 5 in Color B (navy blue). Round 6 in Color A (off-white).
4. For single crochet sections, ch 1 at the beginning of each row does NOT count as a stitch.
5. For double crochet sections, ch 3 counts as the first dc.
Part One: Granny Squares (Make 10 Total)
Each square is worked in the round, joined with a slip stitch at the end of each round.
Starting Ring
With Color E and J hook, ch 4, sl st in first ch to form a ring.
Round 1 (Color E)
Ch 3 (counts as first dc), work 2 more dc in ring (first cluster complete), ch 2, (work 3 dc cluster in ring, ch 2) 3 times, sl st in top of beginning ch-3 to join. Fasten off Color E. (4 clusters, 4 ch-2 corner spaces)
Round 2 (Color E)
Join Color E with standing sc in any ch-2 corner sp. Ch 3, work 3-dc cluster in same corner sp, ch 2, work 3-dc cluster in same corner sp (first corner complete), (ch 1, work 3-dc cluster in next ch-2 corner sp, ch 2, work 3-dc cluster in same sp) 3 times, ch 1, sl st to first cluster of round to join. Fasten off Color E. (8 clusters, 4 ch-2 corner spaces, 4 ch-1 side spaces)
Round 3 (Color C)
Join Color C with standing sc in any ch-2 corner sp. Ch 3, 3-dc cluster in same sp, ch 2, 3-dc cluster in same sp (corner made), (ch 1, 3-dc cluster in next ch-1 side sp, ch 1, 3-dc cluster in next ch-2 corner sp, ch 2, 3-dc cluster in same corner sp) 3 times, ch 1, 3-dc cluster in last ch-1 side sp, ch 1, sl st to first cluster. Fasten off Color C. (12 clusters, 4 ch-2 corner spaces, 8 ch-1 side spaces)
Round 4 (Color D)
Join Color D with standing sc in any ch-2 corner sp. Ch 3, 3-dc cluster in same sp, ch 2, 3-dc cluster in same sp (corner made), (ch 1, 3-dc cluster in next ch-1 sp, ch 1, 3-dc cluster in next ch-1 sp, ch 1, 3-dc cluster in next ch-2 corner sp, ch 2, 3-dc cluster in same corner sp) 3 times, ch 1, 3-dc cluster in next ch-1 sp, ch 1, 3-dc cluster in next ch-1 sp, ch 1, sl st to first cluster. Fasten off Color D. (16 clusters, 4 ch-2 corner spaces, 12 ch-1 side spaces)
Round 5 (Color B)
Join Color B with standing sc in any ch-2 corner sp. Ch 3, 3-dc cluster in same sp, ch 2, 3-dc cluster in same sp (corner made), (ch 1, 3-dc cluster in next ch-1 sp, ch 1, 3-dc cluster in next ch-1 sp, ch 1, 3-dc cluster in next ch-1 sp, ch 1, 3-dc cluster in next ch-2 corner sp, ch 2, 3-dc cluster in same corner sp) 3 times, ch 1, 3-dc cluster in next ch-1 sp, ch 1, 3-dc cluster in next ch-1 sp, ch 1, 3-dc cluster in next ch-1 sp, ch 1, sl st to first cluster. Fasten off Color B. (20 clusters, 4 ch-2 corner spaces, 16 ch-1 side spaces)
Round 6 (Color A)
Join Color A with standing sc in any ch-2 corner sp. Work (2 sc, ch 1, 2 sc) in corner sp, then work 2 sc in each ch-1 side sp and 1 sc in the top of each cluster across each side, ending each side with (2 sc, ch 1, 2 sc) in the next ch-2 corner sp. Continue around all 4 sides. Sl st to first sc to join. Fasten off Color A.
Stitch count check: Each side has 13 sc between corner points. Total: (68 sc, 4 ch-1 corner points)
Block all 10 squares to 5.5 inches / 14 cm x 5.5 inches / 14 cm before proceeding.
Part Two: Joining Squares into Front Panels
Create two identical panels, each with 5 squares stacked vertically.
Use the Flat Join method. Join along the top/bottom edges only.
For each panel, place Square 1 (top) and Square 2 with wrong sides together. Work Flat Join sl sts across the shared edge. This join line should be 13 sl sts between the two corner points. Fasten off.
Join Square 2 to Square 3, then Square 3 to Square 4, then Square 4 to Square 5.
Each completed panel should measure approximately 5.5 inches wide x 27.5 inches tall / 14 cm x 70 cm.
Part Three: Front Panel Side Edging
With Color A and J hook, join yarn at the top corner of one long edge of Left Front Panel. Ch 1, sc evenly down the entire length of the panel. You should pick up 68 sc along each long edge. Fasten off.
Repeat on the other long edge. Repeat both long edges on Right Front Panel.
Each long edge now has 68 sc for joining to the body.
Part Four: Back Panel
The back is worked flat in single crochet.
Foundation
With Color A and J hook, ch 39. (38 working sts)
Row 1 (RS): Sc in 2nd ch from hook and in each ch across. Ch 1, turn. (38 sc)
Row 2 (WS): Sc in each sc across. Ch 1, turn. (38 sc)
Repeat Row 2 for a total of 24 rows.
A-Line Shaping
Row 25 (RS, increase row): Sc in first sc, 2 sc in 2nd sc, sc in each sc to last 2 sts, 2 sc in next sc, sc in last sc. Ch 1, turn. (40 sc)
Work 7 rows even. (40 sc)
Row 33 (RS, increase row): Work increase row as established. Ch 1, turn. (42 sc)
Work 7 rows even. (42 sc)
Row 41 (RS, increase row): Work increase row as established. Ch 1, turn. (44 sc)
Work 7 rows even. (44 sc)
Row 49 (RS, increase row): Work increase row as established. Ch 1, turn. (46 sc)
Work 7 rows even. (46 sc)
Row 57 (RS, increase row): Work increase row as established. Ch 1, turn. (48 sc)
Work 7 rows even. (48 sc)
Row 65 (RS, increase row): Work increase row as established. Ch 1, turn. (50 sc)
Work 7 rows even. (50 sc)
Row 73 (RS, increase row): Work increase row as established. Ch 1, turn. (52 sc)
Work even through Row 80. (52 sc)
Fasten off. Total back panel rows: 80.
Part Five: Button Band and Front Center Edging
Left Front Button Band
With RS facing and Color A, join yarn at top right corner of Right Front Panel. Ch 1, sc 68 sc evenly down the center-front edge. Ch 1, turn.
Buttonhole Row (WS): Sc in first 2 sc, (ch 2, sk 2 sc, sc in next 10 sc) 5 times, ch 2, sk 2 sc, sc in next 10 sc, ch 2, sk 2 sc, sc in last 2 sc. Ch 1, turn.
This places 7 buttonholes evenly spaced. (68 sts)
Button Band Finish Row (RS): Sc in each sc and 2 sc in each ch-2 sp across. Ch 1, turn. (68 sc)
Work 1 additional row of sc even. Fasten off. (68 sc)
Right Front Facing Band
With RS facing and Color A, join yarn at top left corner of Left Front Panel. Ch 1, sc 68 sc evenly down the center-front edge. Ch 1, turn.
Work 3 more rows of sc even. Fasten off. (68 sc per row)
Part Six: Shoulder and Neckline
Back Shoulder Shaping
With back panel RS facing, count 10 sc in from each side at the top edge. Place markers at sts 11 and 28 (leaving an 18-sc center neck span).
Right Back Shoulder: Join Color A at top right corner of back panel. Ch 1, sc across first 10 sc. Ch 1, turn. (10 sc)
Work 3 more rows even. Fasten off. (10 sc)
Left Back Shoulder: Join Color A at stitch 29 of back panel top edge. Ch 1, sc in each sc to end. Ch 1, turn. (10 sc)
Work 3 more rows even. Fasten off. (10 sc)
Front Shoulder Tabs
Right Front Panel, right shoulder section: With RS facing, join Color A at top right corner. Ch 1, sc across top edge of panel: 15 sc across the full top. Ch 1, turn. Work 3 rows even. Fasten off. (15 sc)
Seam shoulders using yarn needle and Color A with mattress stitch, aligning the outer 10 sc of each front shoulder tab to the corresponding back shoulder tab.
Part Seven: Side Seams
Lay the back panel and both front panels flat, RS facing up. Seam each side using Flat Join or mattress stitch from underarm (Row 24) to hem.
Part Eight: Sleeves (Make 2)
Foundation
With Color A and J hook, ch 39. (38 working sts)
Row 1 (RS): Sc in 2nd ch from hook and in each ch across. Ch 1, turn. (38 sc)
Work even for 4 rows total.
Sleeve Taper
Row 5 (decrease row): Sc2tog over first 2 sts, sc to last 2 sts, sc2tog. Ch 1, turn. (36 sc)
Work 3 rows even. (36 sc)
Row 9: Decrease row. (34 sc)
Work 3 rows even. (34 sc)
Row 13: Decrease row. (32 sc)
Work 3 rows even. (32 sc)
Row 17: Decrease row. (30 sc)
Work even through Row 24. (30 sc)
Row 25: Decrease row. (28 sc)
Work even through Row 32. (28 sc)
Sleeve Cuff Eyelet Section
Row 33 (WS): Ch 3, turn, skip first sc, dc in next sc, (ch 1, sk 1 sc, dc in next sc) 13 times, dc in last sc. Ch 1, turn.
Row 34 (RS): Ch 1, turn. Sc in each dc and each ch-1 sp across. (28 sc)
Work 2 more rows of sc even. Fasten off. (28 sc)
Seam the sleeve underarm, then set into armhole with RS together.
Part Nine: Neckline Edging
With RS facing and Color A, join yarn at top right corner of Right Front Panel. Work sc evenly around the entire neckline: approximately 54 sc total. Work 1 additional round of sc even. Sl st to join. Fasten off.
Part Ten: Hem Edging
With RS facing and Color A, join yarn at the bottom center back. Work sc evenly around the entire hem. Approximately 80 sc total. Sl st to join. Fasten off.
Finishing
1. Weave in all ends with your yarn needle
2. Block the entire finished garment
3. Thread ribbon or cord through the eyelet row on each sleeve cuff
4. Sew buttons to the Left Front Facing Band, aligning with buttonholes
Size Customization Tips
To add width, work additional rows on the back panel and add extra sc rows along the side edges of the front panels before joining.
To add length, work additional rows on the back panel before beginning the A-line shaping, and adjust the front panels by adding sc rows at the hem.
For larger sizes, consider adding a sixth granny square to each front panel column.
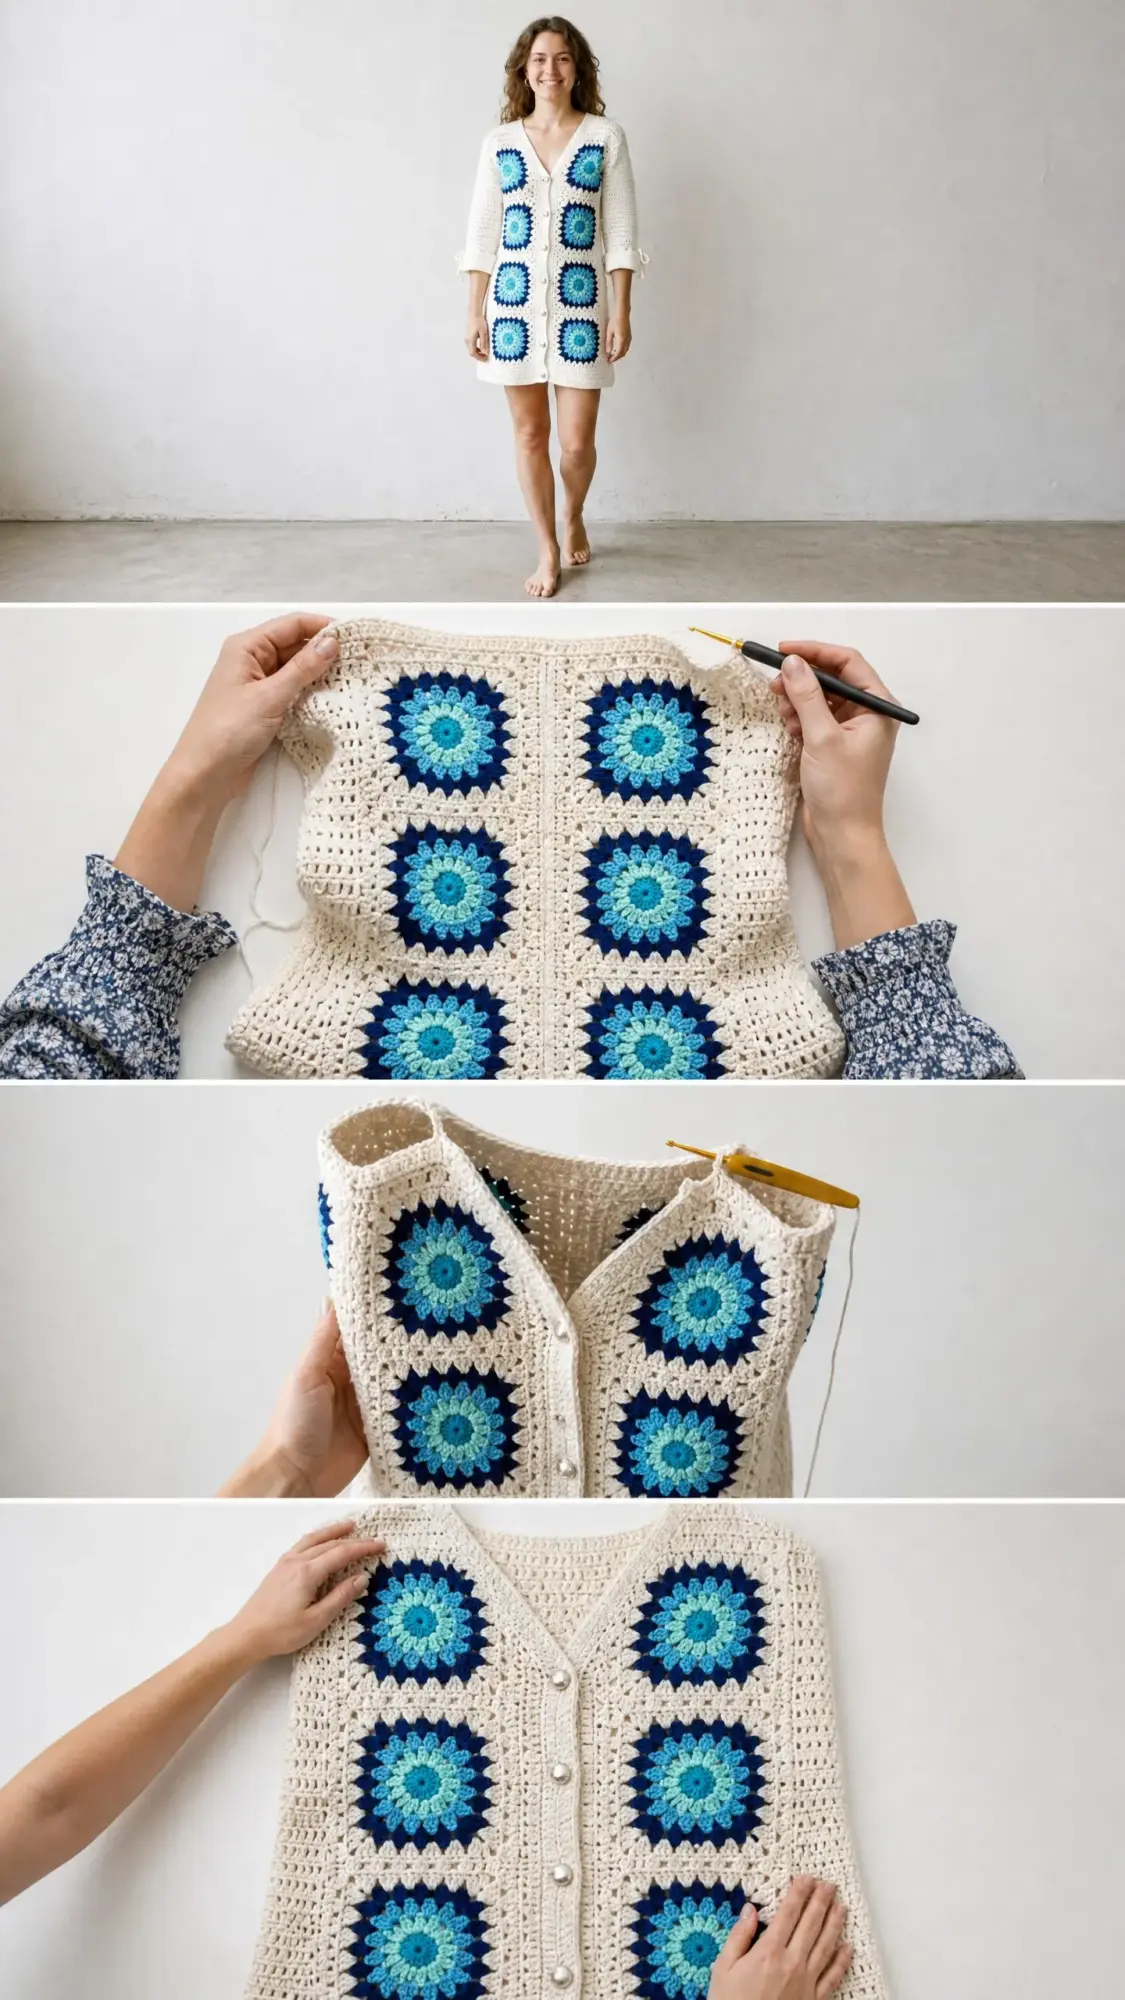
You Did It
This coastal granny square dress is a true showpiece. The kind of project that makes people stop you on the street to ask if you made it yourself. Yes, it takes time. Yes, it requires patience. But the result is a one-of-a-kind garment that looks like it cost a small fortune.
I would absolutely love to see your finished dress. Tag me on Instagram or share in my Facebook group. Seeing your creations genuinely makes my day.
If this pattern is calling to you, go ahead and save it to your Pinterest boards so you can find it when you are ready to start. And please drop a comment below if you make one. I want to hear which color combination you chose and how the construction process went for you. Happy hooking, friend.
