
You know that gorgeous skein of navy cotton you’ve been saving for something truly special? This is it. Pull it out of your stash because this structured peplum dress deserves every yard of that beautiful yarn.
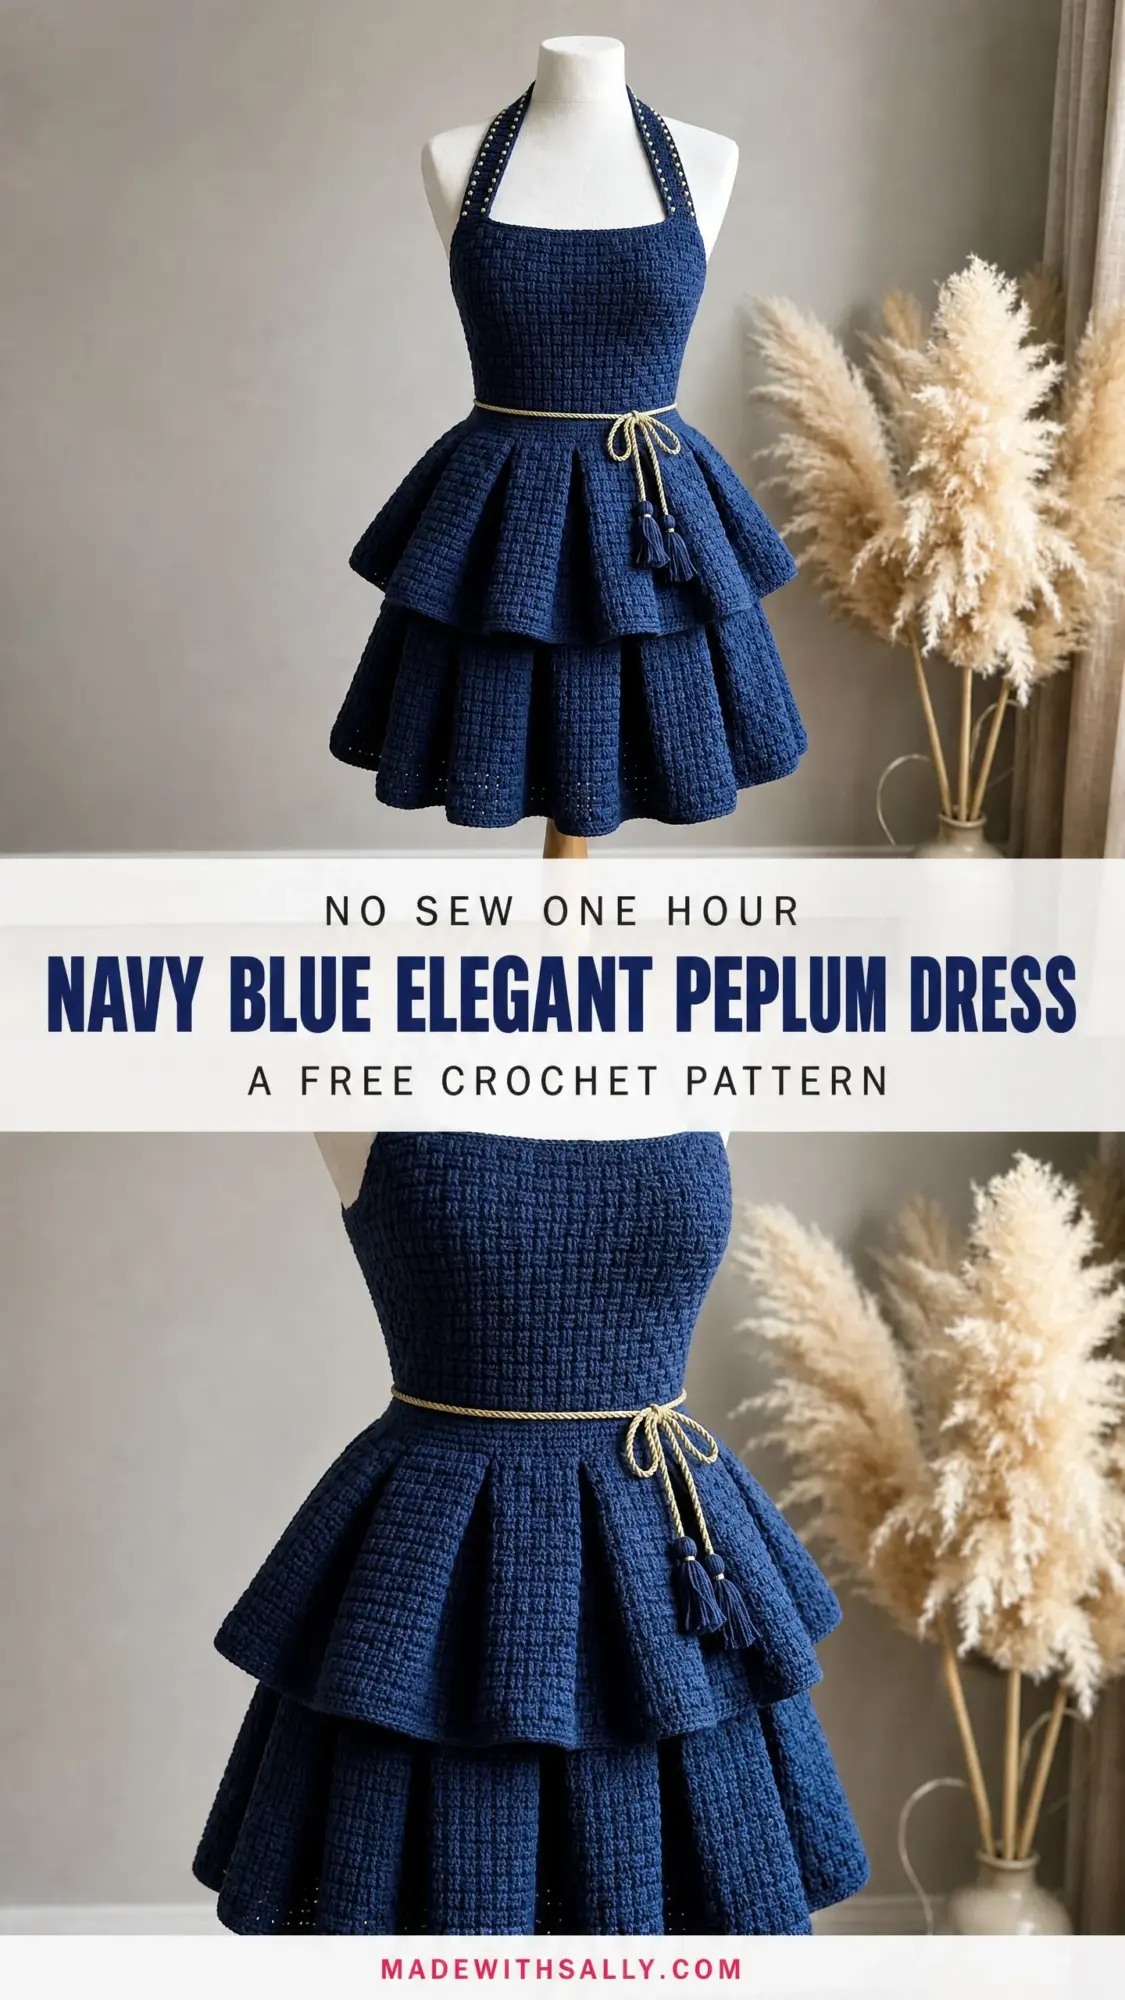
The construction here is genuinely interesting. You’ll work a dense basket-weave texture stitch that creates this stunning woven grid appearance across the entire bodice and skirt. The two-tier peplum adds dramatic volume while the halter straps get embellished with gold studs for an elegant finishing touch. I won’t sugarcoat it though. This is an advanced intermediate project requiring confident tension control and experience with post stitches.
But if you’ve been crocheting for a while and want a showstopper garment that will turn heads, keep reading. Every single detail is mapped out below.
About This Navy Blue Peplum Dress Crochet Pattern
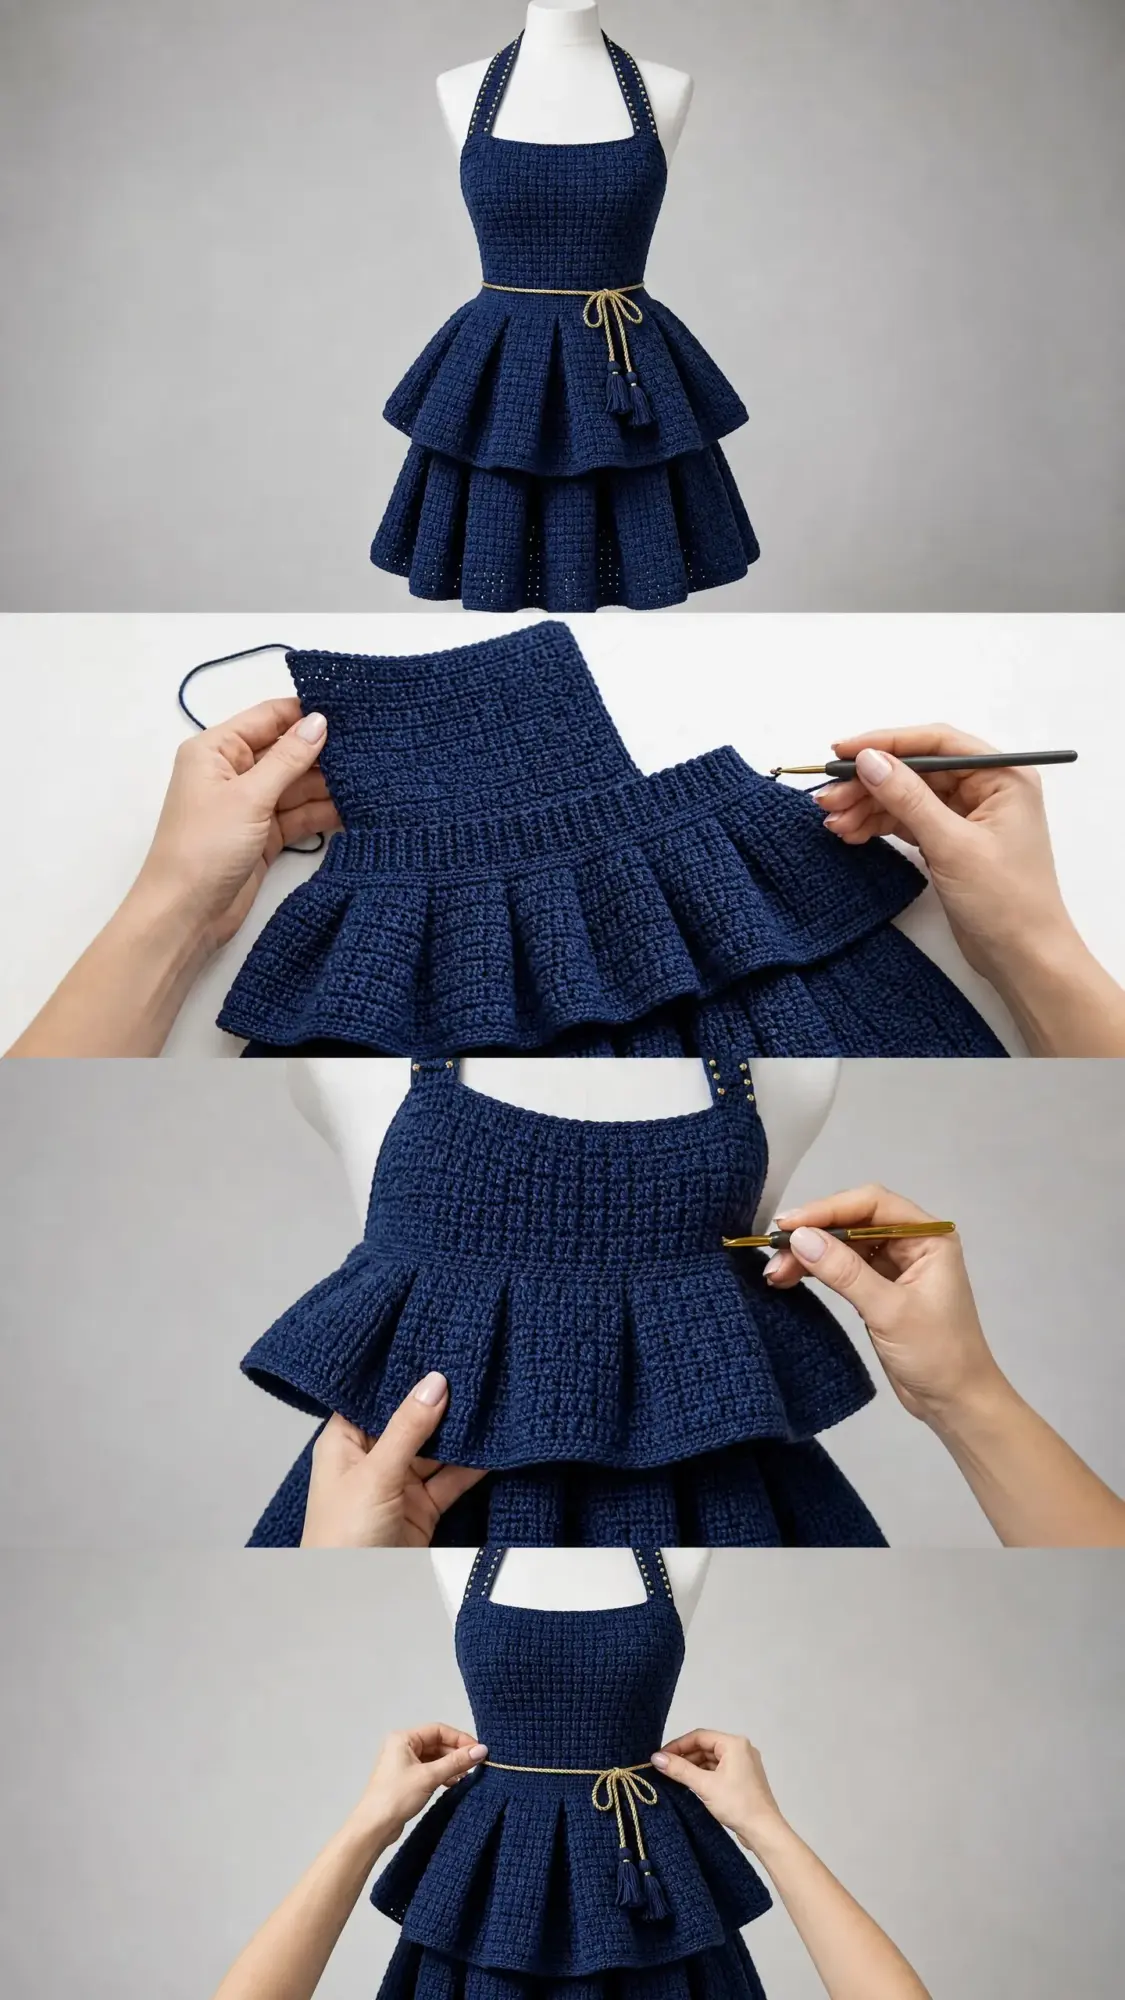
This structured mini dress features a square-neck halter bodice, a fitted waist, and a dramatic two-tier peplum skirt. The bodice uses a dense basket-weave style texture that creates that grid-like woven appearance you can see in the finished piece. The halter straps cross at the back of the neck and get embellished with gold or pearl stud accents. A twisted gold rope belt ties at center front with navy tassels for that polished detail.
The skirt consists of two voluminous gathered tiers worked in the same textured stitch. The lower tier hangs slightly longer and wider than the upper one, creating that beautiful layered silhouette. The back is intentionally open from shoulder to waist, with only the halter straps crossing at the upper back and the waistband closing the lower section.
This pattern is written for a women’s size Medium (US 8/UK 12) with customization tips provided for other sizes.
Skill Level
Advanced Intermediate. The basket-weave texture stitch requires confident tension control and the ability to work front and back post stitches consistently over many rows. The shaped bodice requires waist shaping, and the two-tier gathered skirt requires understanding of increase ratios to achieve the full gathered silhouette. The halter construction requires careful strap placement and finishing.
Time Estimate
Approximately 40 to 55 hours for an experienced crocheter. Allow additional time for blocking, assembly, and embellishment. This is absolutely a labor of love, but the result is worth every hour.
Finished Measurements
Materials Needed for This Crochet Dress Pattern
Yarn
Main Color (MC): Navy Blue, approximately 1,200 yards / 1,097 meters of DK weight (light worsted) smooth yarn, 100% cotton or cotton-acrylic blend
Accent Color (AC): Gold/Champagne, approximately 30 yards / 27 meters of fingering or light DK cord/yarn for belt and strap embellishment
Yarn Suggestions
Option 1: Lion Brand 24/7 Cotton in Navy, 186 yards per 3.5 oz / 100 g skein, DK weight. Excellent stitch definition for textured stitches, machine washable, widely available. You will need approximately 7 skeins.
Option 2: Paintbox Yarns Cotton DK in Sailor Blue, 137 yards per 1.75 oz / 50 g skein, DK weight. High sheen, very smooth, shows basket-weave texture beautifully. You will need approximately 9 skeins.
Option 3: WeCrochet Comfy DK in Admiral, 178 yards per 3.5 oz / 100 g skein, cotton-acrylic blend, DK weight. Slightly more drape and stretch than 100% cotton, easier on hands during a long project. You will need approximately 7 skeins.
Substitution Note: Use any smooth DK weight yarn with good stitch definition. Avoid fuzzy, chenille, or highly textured yarns as they will obscure the basket-weave pattern. Check that your substitute achieves the listed gauge before beginning.
Hooks
Notions
Gauge
With US G-6 / 4.00 mm hook in Basket-Weave Texture Stitch:
Gauge is critical for a fitted garment. Work a swatch of at least 5 by 5 inches / 12.7 by 12.7 cm, block it, and measure before beginning. Adjust hook size as needed. I know swatching feels tedious, but trust me on this one. A dress that doesn’t fit is heartbreaking after 50 hours of work.
Abbreviations (US Terms)
Before we dive into the pattern, let me walk you through every abbreviation you’ll encounter:
Special Stitches
Basket-Weave Texture Stitch (BWTS)
This stitch creates a woven grid texture by alternating columns of front post and back post double crochets in a 2×2 grid pattern. Here’s how it works:
Row 1 (RS): Ch 3 (counts as first dc here and throughout), dc in each st across. Turn.
Row 2 (WS): Ch 2 (does not count as st), (fpdc around each of next 2 dc, bpdc around each of next 2 dc) rep across, end with dc in top of tch. Turn.
Row 3 (RS): Ch 2 (does not count as st), (bpdc around each of next 2 fpdc, fpdc around each of next 2 bpdc) rep across, end with dc in top of tch. Turn.
Row 4 (WS): Repeat Row 2.
Row 5 (RS): Repeat Row 3.
This 4-row repeat after the foundation constitutes the full BWTS. The pattern creates raised columns that shift every 2 rows, giving that beautiful grid or woven appearance.
Sc2tog (Decrease)
Insert hook in next st, yarn over, pull up loop. Insert hook in following st, yarn over, pull up loop. Yarn over, draw through all 3 loops on hook.
Twisted Cord Belt
Cut 6 strands of AC yarn each 60 inches / 152 cm long. Fold in half and anchor the fold. Twist all strands together clockwise until they begin to kink. Fold the twisted length in half and allow it to twist back on itself counterclockwise. Knot both ends and trim. This produces a finished cord approximately 28 to 30 inches / 71 to 76 cm long. Add tassels to each knotted end.
Pattern Notes
Read these before starting. They’ll save you headaches later.
The dress is constructed in this order: Front Bodice Panel, Back Bodice Panel (two side panels), Halter Straps, Upper Waistband, Upper Peplum Tier, Lower Skirt Tier. The two skirt tiers are worked in the round after assembly at the waist.
All bodice pieces are worked flat and seamed at the sides. The back is intentionally open, with only the waistband closing the back seam. The halter straps are worked separately and attached at the top corners of the front bodice, crossing behind the neck.
The 2-stitch basket-weave repeat requires that working stitch counts always be divisible by 2. All stitch counts in this pattern satisfy this requirement.
When working the skirt tiers in the round, place a stitch marker at the beginning of each round and move it up as you work.
For best results, lightly steam block the bodice pieces before seaming. Full wet blocking of the completed dress is recommended before embellishment attachment.
The gold rope belt is not crocheted into the garment. It passes through a simple single crochet channel at the waistband and ties at center front.
Step-by-Step Crochet Pattern Instructions
Front Bodice Panel
The front bodice is worked flat from the bottom (waist) edge upward to the neckline.
Foundation Chain: Ch 93. (This yields 90 working stitches after the turning chain.)
Row 1 (RS): Dc in 4th ch from hook (first 3 chs count as dc), dc in each ch across. Turn. (90 dc)
Row 2: Ch 2 (does not count as st throughout bodice), (fpdc around next 2 sts, bpdc around next 2 sts) 22 times, fpdc around next 2 sts. Turn. (90 sts)
Row 3: Ch 2, (bpdc around next 2 sts, fpdc around next 2 sts) 22 times, bpdc around next 2 sts. Turn. (90 sts)
Rows 4 through 10: Continue alternating Rows 2 and 3 to maintain BWTS pattern. (90 sts)
Row 11 (Waist Decrease Row): Ch 2, work BWTS maintaining pattern as established AND AT THE SAME TIME dec 1 st at each end as follows: sc2tog over first 2 sts, work BWTS across to last 2 sts, sc2tog. Turn. (88 sts)
Row 12: Ch 2, work BWTS across. Turn. (88 sts)
Row 13: Repeat Row 11 style dec. (86 sts)
Row 14: Work BWTS across. Turn. (86 sts)
Row 15: Work dec at each end. (84 sts)
Row 16: Work BWTS across. Turn. (84 sts)
Row 17: Work dec at each end. (82 sts)
Row 18: Work BWTS across. Turn. (82 sts)
Row 19: Work dec at each end. (80 sts)
Row 20: Work BWTS across. Turn. (80 sts)
Checkpoint: After Row 20, the front bodice should measure approximately 3.6 inches / 9 cm tall and 16 inches / 40.5 cm wide at the narrowest waist point.
Now work even (no shaping) for the bust section.
Rows 21 through 26: Ch 2, work BWTS across. Turn after each row. (80 sts)
Row 27 (Bust Shaping Increase Row): Ch 2, work BWTS maintaining pattern AND inc 1 at each end: 2 dc in first st, BWTS across to last st, 2 dc in last st. Turn. (82 sts)
Row 28: Work BWTS across. Turn. (82 sts)
Row 29: Inc at each end. (84 sts)
Row 30: Work BWTS across. Turn. (84 sts)
Row 31: Inc at each end. (86 sts)
Row 32: Work BWTS across. Turn. (86 sts)
Row 33: Inc at each end. (88 sts)
Row 34: Work BWTS across. Turn. (88 sts)
Checkpoint: After Row 34, the front bodice should measure approximately 6.2 inches / 15.7 cm tall and 17.6 inches / 44.7 cm wide at the bust.
Fasten off. Do not cut yarn too short as you will return to pick up the strap.
Halter Straps
Right Halter Strap
Attach MC at top right corner of front bodice (as you look at it).
Row 1: Ch 2, work 8 hdc across the top 8 stitches of the right side of the neckline. Turn. (8 hdc)
Row 2: Ch 2, work 8 hdc. Turn. (8 hdc)
Continue working even in hdc for 52 rows total (approximately 9.5 inches / 24 cm). This length allows the strap to go from the front corner, up over the shoulder, cross at the back of the neck, and fasten at the top of the back bodice panel on the opposite side.
Fasten off, leaving a 12-inch / 30.5 cm tail for seaming.
Left Halter Strap
Attach MC at top left corner of front bodice (from wearer’s perspective the left side).
Repeat Right Halter Strap instructions. (8 hdc, 52 rows)
Fasten off, leaving a 12-inch / 30.5 cm tail.
Back Bodice Panels (Make 2, Mirrored)
The back is open at center back. Each back panel covers one side from side seam to center back.
Foundation Chain: Ch 33. (Yields 30 working stitches.)
Row 1 (RS): Dc in 4th ch from hook, dc in each ch across. Turn. (30 dc)
Rows 2 through 10: Work BWTS maintaining the 2×2 pattern. Turn after each row. (30 sts)
Row 11 (Side Waist Decrease): Work BWTS across, dec 1 at outer side edge only (not the center back edge). Turn. (29 sts)
Row 12: Work BWTS across. Turn. (29 sts)
Row 13: Dec at outer edge. Turn. (28 sts)
Row 14: Work BWTS across. Turn. (28 sts)
Row 15: Dec at outer edge. Turn. (27 sts)
Row 16: Work BWTS across. Turn. (27 sts)
Row 17: Dec at outer edge. Turn. (26 sts)
Row 18: Work BWTS across. Turn. (26 sts)
Row 19: Dec at outer edge. Turn. (25 sts)
Row 20: Work BWTS across. Turn. (25 sts)
Rows 21 through 34: Work even in BWTS. Turn after each row. (25 sts)
Fasten off, leaving tail for seaming.
Make second back panel mirrored: work the decrease at the opposite end (the side seam edge when you flip the panel).
Bodice Assembly
Lay the front bodice RS up. Place each back panel RS down against the front, aligning side edges. Using MC and a tapestry needle, whipstitch or mattress stitch the side seams from foundation edge (waist) to the top (bust) on each side.
The straps cross at center back of neck. The right strap (from wearer’s right) crosses over to attach at the top inner corner of the left back panel. The left strap crosses to attach at the top inner corner of the right back panel. Pin in place and sew securely.
Waistband
The waistband is worked in the round, joining front and back at the waist, and creates a channel for the belt cord.
With RS facing, attach MC at right side seam at the foundation edge of the bodice assembly.
Round 1: Work 1 sc in each foundation chain stitch around the entire waist circumference: 90 sc across front, 30 sc across right back panel, 30 sc across left back panel. Join with sl st. (150 sc)
Rounds 2 and 3: Ch 1, sc in each st around. Join with sl st. (150 sc)
Round 4 (Belt Channel Round): Ch 1, (sc in next 3 sts, ch 1, sk 1 st) 37 times, sc in last 2 sts. Join with sl st. (112 sc + 38 ch-1 sps)
Rounds 5 and 6: Ch 1, sc in each st and in each ch-1 sp around. Join with sl st. (150 sc)
Fasten off.
Thread the twisted cord belt through the ch-1 spaces of Round 4. Pull both ends to center front and tie in a bow. Attach tassels to both ends of the cord before threading if not already attached.
Upper Peplum Tier
The upper peplum tier is worked in the round, beginning from the waistband lower edge.
Attach MC at center front of the lower edge of the waistband.
Setup Round (Increase Round): Ch 3 (counts as dc), work 2 dc in each st around the full lower edge of the waistband. Join with sl st to top of ch-3. (300 dc)
Round 1: Ch 2, (fpdc around next 2 sts, bpdc around next 2 sts) 75 times. Join. (300 sts)
Round 2: Ch 2, (bpdc around next 2 fpdc, fpdc around next 2 bpdc) 75 times. Join. (300 sts)
Rounds 3 through 13: Continue alternating Rounds 1 and 2. (300 sts)
Round 14 (Final Edging): Ch 1, sc in each st around. Join with sl st. (300 sc)
Fasten off.
Checkpoint: The upper peplum tier should measure approximately 5 inches / 12.7 cm from the base of the waistband to the hem.
Lower Skirt Tier
The lower skirt tier begins from the same waistband lower edge as the upper peplum tier but uses the back loops only.
Attach MC at center back of the lower edge of the waistband.
Setup Round (Increase Round): Ch 3 (counts as dc), work 2 dc in each available st around lower waistband edge in BLO. Join with sl st to top of ch-3. (300 dc)
Rounds 1 through 10: Work in BWTS pattern, alternating (fpdc around next 2 sts, bpdc around next 2 sts) and (bpdc around next 2 fpdc, fpdc around next 2 bpdc). (300 sts each round)
Round 11 (Second Expansion): Ch 3, (dc in next st, 2 dc in next st) around, adjusting final stitches to reach 450 sts. Join. (450 dc)
Round 12: Ch 2, (fpdc around next st, bpdc around next st) 225 times. Join. (450 sts)
Round 13: Ch 2, (bpdc around next fpdc, fpdc around next bpdc) 225 times. Join. (450 sts)
Rounds 14 through 26: Alternate Rounds 12 and 13. (450 sts each round)
Round 27 (Final Edging): Ch 1, sc in each st around. Join. (450 sc)
Fasten off.
Checkpoint: The lower skirt tier should measure approximately 11 inches / 28 cm from the waistband to the hem.
Size Customization Tips
For a smaller size (XS to S, bust 32 inches / 81 cm): Reduce the front bodice foundation chain by 12 stitches (Ch 81, yielding 78 working sts). Reduce each back panel by 4 stitches. Begin with 138 total waistband stitches.
For a larger size (L to XL, bust 40 inches / 101 cm): Increase the front bodice foundation chain by 12 stitches (Ch 105, yielding 102 working sts). Increase each back panel by 4 stitches. Begin with 162 total waistband stitches.
For length adjustments: Each additional 5 rounds on the lower tier adds approximately 1 inch / 2.5 cm in length.
Finishing and Blocking
Step 1: Weave in all ends securely using a tapestry needle, working ends in two directions to prevent unraveling.
Step 2: Wet block the completed dress by submerging in cool water, gently squeezing out excess (do not wring), rolling in a clean towel, then laying flat on blocking mats. Pin the skirt tiers to open dimensions, encouraging the ruffles to spread evenly.
Step 3: Allow to dry completely (12 to 24 hours) before removing pins.
Step 4: Lightly mist the skirt tiers with fabric stiffener spray if a more structured ruffle shape is desired.
Step 5: Sew or hot glue the studded trim or individual bead embellishments to the halter straps at approximately every 0.5 inches / 1.3 cm.
Step 6: Thread the twisted cord belt through the belt channel, centering the knot at center front.
Step 7: Give the finished piece a light steam press through a pressing cloth on the bodice panels.
Care Instructions
Hand wash in cool water with a gentle detergent formulated for delicates. Do not machine wash or wring. Lay flat to dry. Do not hang, as the weight of the skirt tiers may distort the bodice. Steam only through a pressing cloth. Store folded rather than on a hanger.
You Did It!
Thank you so much for choosing this pattern for your next big project. I know 50 hours is a serious commitment, and I truly appreciate you trusting me with your time and your beautiful yarn. This dress is going to be absolutely stunning on you.
If you make this navy blue peplum dress, I would absolutely love to see it! Tag me on Instagram or share a photo in my Facebook group. Seeing your finished projects genuinely makes my entire week.
Go ahead and save this crochet pattern to your Pinterest boards so you can find it when you’re ready to start. And if you have any questions along the way, drop a comment below. I’m always happy to help troubleshoot. Happy crocheting!
