
THIS is the dress that will have everyone asking "did you MAKE that?!" Let me tell you, this Peach Blossom Baby Dress is one of those projects that looks absolutely heirloom quality but comes together beautifully once you understand the construction. We’re talking granny square skirt panels, delicate scalloped edges, and the sweetest little crocheted roses you’ve ever seen.
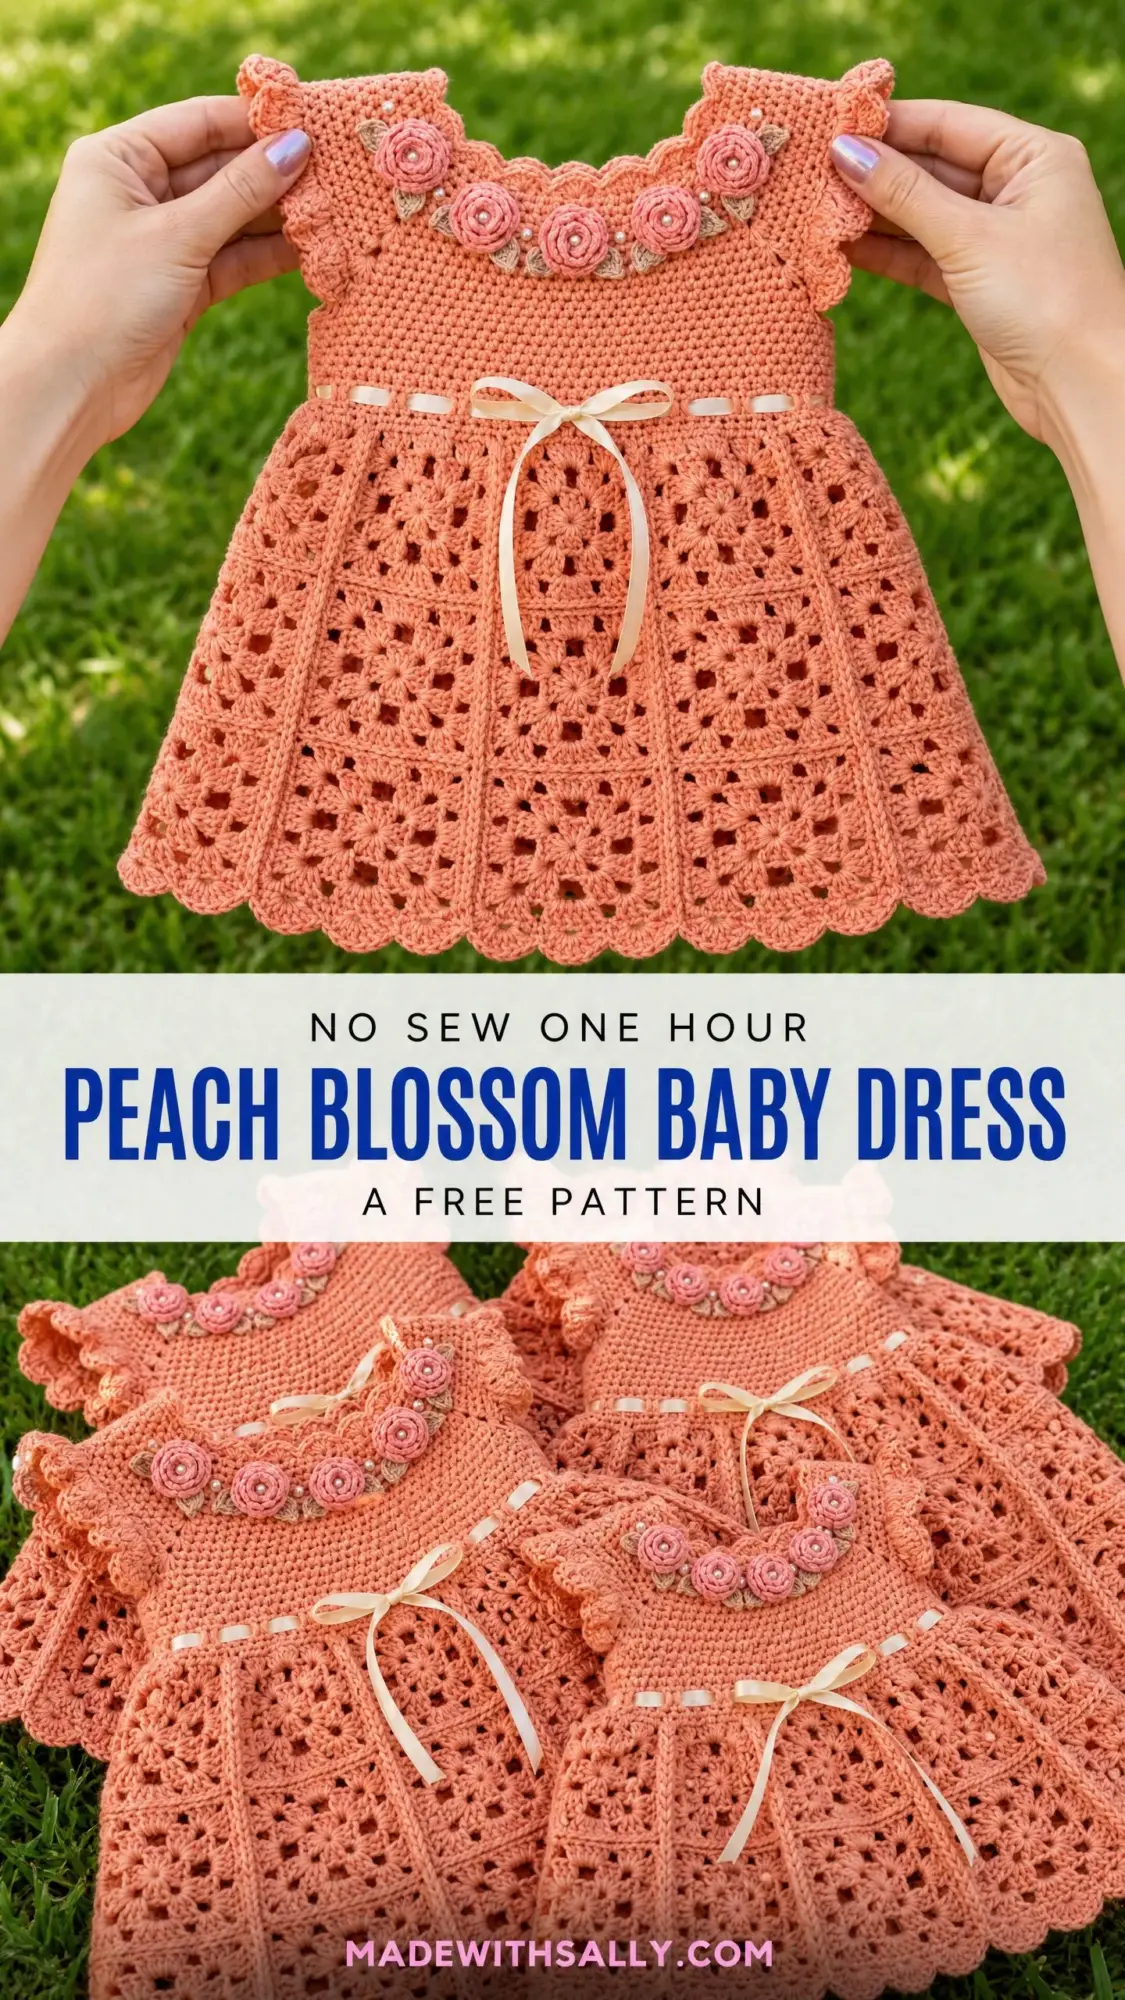
I know what you’re thinking. A dress with this much detail must be impossibly complicated, right? Here’s the thing. If you break it down piece by piece, this gorgeous baby dress is completely achievable. The bodice is straightforward single crochet (sc) worked in the round. The skirt is classic granny squares joined together. The roses? A simple rolled strip technique you’ll master in minutes.
Budget around 18 to 26 hours for this project, and you’ll have a stunning gift or keepsake that looks like it took twice as long. Perfect for baby showers, christenings, first birthdays, or just because every little one deserves something handmade with love. Let’s dive into this crochet tutorial and make something truly special together.
About This Baby Dress Crochet Pattern
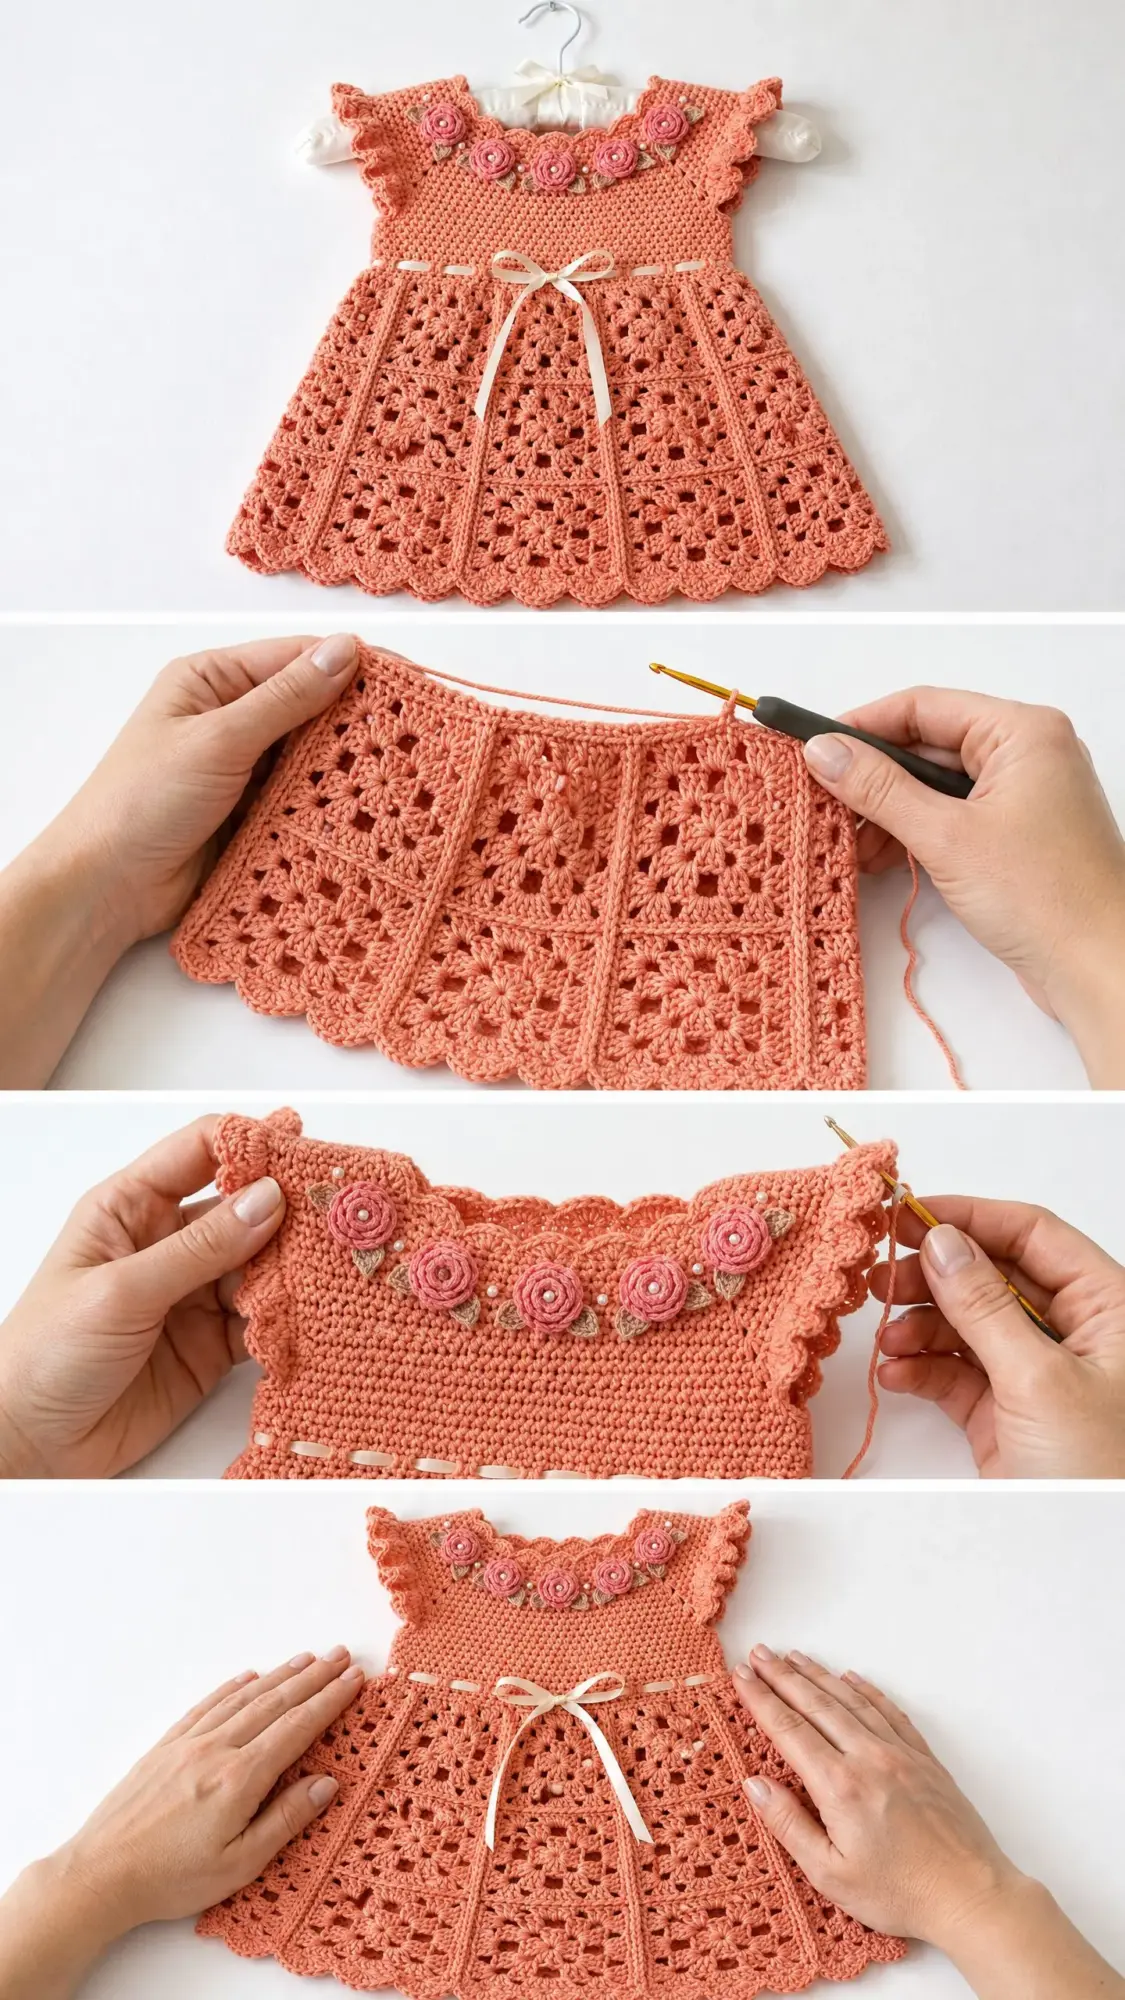
The Peach Blossom Baby Dress is a top-down construction that starts at the neckline and works toward the hem. You’ll begin with a decorative scalloped collar, build out a raglan-style yoke, then transition into a gorgeous granny square skirt. The whole piece comes together with thoughtful details: cap sleeves with a matching ruffle edge, a ribbon eyelet waistline for threading satin ribbon, and three dimensional roses with beaded centers to adorn the neckline.
This pattern is written for size 6 to 12 months and creates a dress with these finished measurements:
I’ve included size customization tips at the end if you need to go smaller for a newborn or larger for a toddler.
Skill Level
I’m going to be honest with you. This is an intermediate to advanced project. You should be comfortable with working in the round and flat within the same project, reading multi-step stitch repeats, joining granny squares, and creating three dimensional embellishments.
That said, if you’ve completed at least two wearable garments and one lace project before, you absolutely have the skills to tackle this. Take it section by section, and you’ll do great.
Materials You’ll Need
Gather everything before you start. There’s nothing worse than running out of yarn halfway through a bodice.
Yarn:
Yarn Suggestions:
Paintbox Yarns Cotton DK works beautifully for this project. You’ll need 3 balls in Peach. Lion Brand 24/7 Cotton is another excellent choice if you want something widely available and mercerized. For a softer hand on sensitive baby skin, Cascade Yarns Cherub DK (a nylon/acrylic blend) is a lovely alternative.
Hooks:
Notions:
Gauge
With US size G-6 / 4.0 mm hook and Yarn A:
18 sc = 4 inches (10 cm) in single crochet rows
9 rows sc = 4 inches (10 cm)
Granny motif gauge: One complete 3-round granny square measures approximately 2.25 inches (5.7 cm) across
Please swatch. I know, I know. Nobody loves swatching. But gauge matters enormously for wearables. Even one stitch per inch off can change your chest circumference by 1 to 2 inches. That’s the difference between a perfect fit and a dress that doesn’t work.
Abbreviations and Stitch Definitions
Let me walk you through every stitch you’ll encounter. If you’re newer to garment construction, read through these carefully.
Special Stitches
These special techniques give this dress its signature look. Practice them on scrap yarn first if they’re new to you.
Scallop Shell
This creates those beautiful wavy edges on the collar and hem.
1. Skip 2 stitches
2. Work 5 dc into the next stitch
3. Skip 2 stitches
4. Sl st into the next stitch
One scallop shell uses 6 stitches and produces 5 dc plus 1 sl st anchor.
Picot
This makes tiny decorative knobs along the ruffle edge.
1. Ch 3
2. Sl st into the first ch made (the one closest to your hook, 3 chains back)
Granny Cluster
The foundation of your beautiful skirt panels.
1. Yo, insert hook into designated space, yo, pull up a loop, yo, pull through 2 loops
2. Repeat two more times in the same space (3 half-completed dc on hook)
3. Yo, pull through all 4 loops on hook
At corners, you’ll work (3 dc, ch 2, 3 dc). At side spaces, you’ll work (3 dc, ch 1, 3 dc).
Granny Square Panel
Work these in 3 rounds:
Round 1: Magic ring, ch 3 (counts as first dc), work 2 dc into ring, ch 2, (3 dc into ring, ch 2) 3 times, sl st to top of beg ch-3 to join. (12 dc, 4 ch-2 corner sps)
Round 2: Sl st to corner ch-2 sp, ch 3, (2 dc, ch 2, 3 dc) into same sp, ch 1, (3 dc, ch 2, 3 dc) into next corner sp, ch 1; rep from 2 more times, sl st to top of beg ch-3. (24 dc, 4 ch-2 corner sps, 4 ch-1 side sps)
Round 3: Sl st to corner ch-2 sp, ch 3, (2 dc, ch 2, 3 dc) into same sp, ch 1, 3 dc into side ch-1 sp, ch 1, (3 dc, ch 2, 3 dc) into next corner sp, ch 1, 3 dc into side ch-1 sp, ch 1; rep from 2 more times, sl st to top of beg ch-3. (36 dc, 4 ch-2 corner sps, 8 ch-1 sps)
Finished square measures approximately 2.25 inches (5.7 cm).
Pattern Notes Before You Begin
Read through these. They’ll save you confusion later.
1. The dress works top down. You’ll start with the collar scallop edging, pick up stitches for the yoke in joined rounds, divide for front and back, then rejoin at underarms.
2. The back has a small keyhole opening at center back closed with a button loop and button.
3. The skirt is made from 24 granny squares arranged in 8 vertical columns of 3 squares each, joined into a tube, then attached to the waist.
4. Turning chains: In sc rows, ch 1 turns and does NOT count as a stitch. In dc rows and rounds, ch 3 turns and DOES count as the first dc.
5. Place stitch markers at the beginning of each round and at all 4 raglan increase points. Move them up as you work.
6. All rounds are joined with a sl st unless instructed otherwise.
Step by Step Instructions
Collar Edging
The collar is worked first as a decorative strip, then you’ll pick up stitches from its straight edge to begin the yoke.
With smaller hook (F-5 / 3.75 mm) and Yarn A, ch 109.
Foundation Row: Sc into 2nd ch from hook, sc into each ch across. (108 sc)
Scallop Row (RS): Ch 1, turn. Sl st into first sc. Skip 2 sc, work 5 dc into next sc, skip 2 sc, sl st into next sc; rep from across. (18 scallop shells total)
Ruffle Picot Row: Without turning, working into the back of each sl st and into the top of each dc along the scallop row, picot into top of each dc of each scallop shell; rep from . Fasten off Yarn A.
Collar Straight Edge: With RS facing and larger hook (G-6 / 4.0 mm), join Yarn A to the far right end of the foundation row of the collar (the straight edge opposite the scallops). Working into each unused chain of the original ch-109 foundation: sc into each ch across. (108 sc)
The 108-sc straight edge becomes Round 1 of the yoke. Do not fasten off. Do not turn. Proceed directly to yoke.
Checkpoint: The collar strip should measure approximately 14 inches (35.5 cm) wide and 1.5 inches (3.8 cm) tall before the scallop picot row.
Yoke
The 108 sc on the collar straight edge is your neckline. From here, work in rounds using raglan-style increases at 4 points.
Distribute the 108 neckline sts as follows:
Join round: Sl st to first sc of collar straight edge to form a ring.
Yoke Round 1 (inc round): Ch 1, sc in same st as join (first sc of right front). Work sc in each st to 1 st before raglan marker, inc (2 sc) in st before marker, inc in st after marker; rep this increase-pair at each of the 4 raglan points. Sc in each remaining st to end of round, sl st to join. (108 + 8 = 116 sc)
Yoke Round 2 (plain round): Ch 1, sc in each st around, sl st to join. (116 sc)
Yoke Round 3 (inc round): Work raglan increases as in Round 1. (116 + 8 = 124 sc)
Yoke Round 4 (plain round): Sc around. (124 sc)
Yoke Round 5 (inc round): Work raglan increases. (124 + 8 = 132 sc)
Yoke Round 6 (plain round): Sc around. (132 sc)
Yoke Round 7 (inc round): Work raglan increases. (132 + 8 = 140 sc)
Yoke Round 8 (plain round): Sc around. (140 sc)
Yoke Round 9 (inc round): Work raglan increases. (140 + 8 = 148 sc)
Yoke Round 10 (plain round): Sc around. (148 sc)
Yoke Round 11 (inc round): Work raglan increases. (148 + 8 = 156 sc)
Yoke Round 12 (plain round): Sc around. (156 sc)
Stitch distribution after 6 increase rounds:
Checkpoint: After 12 yoke rounds, your piece should measure approximately 2.5 inches (6.4 cm) from collar edge to base of yoke. Total stitches: 156.
Dividing for Sleeves and Body
On this round, sleeve stitches go on hold and underarm chains bridge the gap.
Divide Round: Ch 1, sc across right front (24 sts). At raglan marker, skip all 30 right sleeve sts, ch 6 (underarm bridge). Sc across back (48 sts). At raglan marker, skip all 30 left sleeve sts, ch 6 (underarm bridge). Sc across left front (24 sts). Sl st to join.
Stitch count after joining: 24 + 6 + 48 + 6 + 24 = 108 sts in round
Next Round: Ch 1, sc in each sc and each ch around. (108 sc)
Bodice Body
Work 6 more plain rounds of sc, joining each round.
Rounds 1-6 of bodice body: Sc around. (108 sc each round)
Checkpoint: After completing all bodice rounds, the bodice from shoulder to waist should measure approximately 6 inches (15 cm). Total working stitches: 108 sc in round.
Back Keyhole Closure
The keyhole provides an opening for dressing baby. On the last bodice round, at center back, ch 4, skip 1 st, continue round. This forms the button loop. Sew the button approximately 1 inch (2.5 cm) below after blocking.
Cap Sleeves
With larger hook, RS facing, join Yarn A at underarm center of held right sleeve stitches.
Round 1: Sc across the 30 held sleeve sts. Sc into each of the 6 underarm bridge ch. (36 sc) Sl st to join.
Round 2 (ruffle setup): Ch 3 (counts as dc), work 2 dc in same st (first shell). Skip 2 sc, sl st into next sc, skip 2 sc, work 5 dc into next sc; rep from around, ending sl st to join at top of beg ch-3. (6 scallops)
Fasten off. Repeat for left sleeve.
Checkpoint: Sleeve opening circumference should measure approximately 6 inches (15 cm).
Waist Ribbon Eyelet Round
With larger hook, join Yarn A to any st at base of bodice body (the 108-sc round at waist).
Eyelet Round: Ch 4 (counts as dc + ch 1), skip 1 sc, dc in next sc, ch 1, skip 1 sc; rep from around, sl st to top of 3rd ch of beg ch-4 to join. (54 dc, 54 ch-1 sps)
Plain Round: Ch 1, sc in each dc and each ch-1 sp around, sl st to join. (108 sc)
Skirt
Make 24 granny squares using Yarn A following the Granny Square Panel instructions above.
Arrange squares into 8 vertical columns of 3 squares each.
Join squares within each column: Hold two squares with WS together, RS out. Sl st through outer loops of corresponding sts across one edge to join. Join second and third square of each column the same way. You now have 8 column strips.
Join columns into a tube: Join the 8 column strips side by side, forming a tube of 8 columns x 3 rows of squares. Tube circumference = approximately 18 inches.
Attaching skirt to bodice: With RS facing, align top edge of granny tube with waist of bodice. With larger hook and Yarn A, work a joining row: holding bodice and skirt together, sc through both layers across, spacing evenly to join.
Bottom edge preparation: Join to bottom edge of granny tube and work a border round of sc through all bottom edge sts. Adjust to 96 sc around bottom edge.
Checkpoint: Before hem border, the skirt from waist to bottom edge should measure approximately 7 inches (17.8 cm).
Hem Scallop Border
Round 1: Ch 1, sc in each st around, sl st to join. (96 sc)
Round 2 (scallop shells): Ch 1, sl st in first sc. Skip 2 sc, work 5 dc in next sc, skip 2 sc, sl st in next sc; rep from around, sl st to join. (16 scallop shells)
Round 3 (picot edging): Join yarn at top of any dc. Picot in top of each dc of each scallop (5 picots per scallop), sl st into the sl st anchor between scallops; rep from around. Sl st to join. Fasten off.
Checkpoint: The hem scallop border mirrors the collar scallop. Dress should now measure approximately 14 inches (35.5 cm) shoulder to hem.
Roses and Leaves
Crocheted Rose (make 3 in Yarn B):
With smaller hook and Yarn B:
Foundation: Ch 31.
Row 1: Dc into 4th ch from hook, dc into each ch across. (28 dc plus turning ch; 29 sts total)
Row 2: Ch 1, turn. Sc into next dc, ch 1, skip 1 dc; rep from across to end, sc into top of turning ch. (15 sc, 14 ch-1 sps)
Row 3: Ch 1, do not turn. Working along the long edge of the Row 1 foundation, work 3 dc into each dc-post along the side edge, creating a ruffle.
Finishing rose: Starting at one end, roll the strip tightly with the ruffled edge facing outward. Sl st through the base loops every few stitches to secure. Fasten off, leaving a 10-inch tail for sewing. Sew 2 to 3 beads into the center of each rose.
Leaf (make 6 in Yarn C):
With smaller hook and Yarn C:
Ch 10.
Row 1: Sl st into 2nd ch from hook, sc into next ch, hdc into next ch, dc into next 3 ch, hdc into next ch, sc into next ch, sl st into last ch. Do not turn. Working back along the opposite side of the foundation chain: sc into next ch, hdc into next ch, dc into next 3 ch, hdc into next ch, sc into next ch, sl st into last ch. (18 sts total around leaf)
Fasten off leaving 8-inch tail for sewing.
Assembly: Arrange 3 roses across front neckline, spacing evenly. Position one rose at center front and one on each side, approximately 1.5 inches (3.8 cm) apart. Place 2 leaves behind each rose, angling outward. Sew in place with yarn tails.
Ribbon
Cut cream satin ribbon to approximately 22 inches (56 cm). Thread through every other ch-1 sp of the eyelet round, working around the entire waist. Begin and end at center front. Tie in a bow. Trim ribbon ends at an angle to prevent fraying.
Size Customization Tips
To size up to 12-24 months: Add 2 more increase rounds to yoke (Rounds 13 and 14), bringing total sts to 172. Add 2 more granny-square columns to skirt (10 columns total, 30 squares). Finished chest circumference will be approximately 20 inches (51 cm).
To size down to 0-3 months: Remove 2 increase rounds from yoke (stop at Round 8), bringing total sts at divide to 140. Adjust bodice body to 5 inches (12.7 cm) length. Use 6 granny columns (18 squares). Finished chest circumference approximately 16 inches (40.6 cm).
To lengthen the skirt: Add a 4th square to each column (make 32 squares). Skirt length increases by approximately 2.25 inches (5.7 cm).
Finishing and Blocking
Weave in all ends securely, working tails back on themselves at least 1 inch in two directions.
Wet blocking is strongly recommended. Soak the finished dress in cool water with gentle wool wash for 20 minutes. Gently squeeze out water without wringing. Roll in a clean towel to remove excess moisture. Lay flat on a blocking board. Use rust-proof pins to open out the lace granny squares to their full dimensions, pinning each corner. Pin the hem and collar scallops open. Allow to dry completely flat, at least 24 hours.
Attach roses and leaves after blocking if not already sewn on. Sew on button at center back.
Care Instructions
Hand wash in cool water with gentle baby-safe detergent. Do not wring. Roll in a towel to remove water. Dry flat. Do not tumble dry. Store flat or folded loosely to preserve the three-dimensional collar and roses.
I hope you absolutely love making this Peach Blossom Baby Dress as much as I loved designing it. Thank you so much for choosing this pattern for your next project. I would be thrilled to see your finished dresses, so please tag me on Instagram or share in my Facebook group when you complete yours!
If this pattern made your heart sing, go ahead and save it to your Pinterest boards so you can find it easily when you’re ready to start. And please drop a comment below if you make one. I read every single comment and genuinely love seeing what you create!
