
I’ve been on the hunt for the perfect baby dress pattern for months now, and this one stopped me in my tracks. The delicate fan lace, the sweet rosebud details at the waist, that gorgeous flared skirt. This is my absolute favourite style of heirloom baby garment, and I’m thrilled to share every stitch with you today.
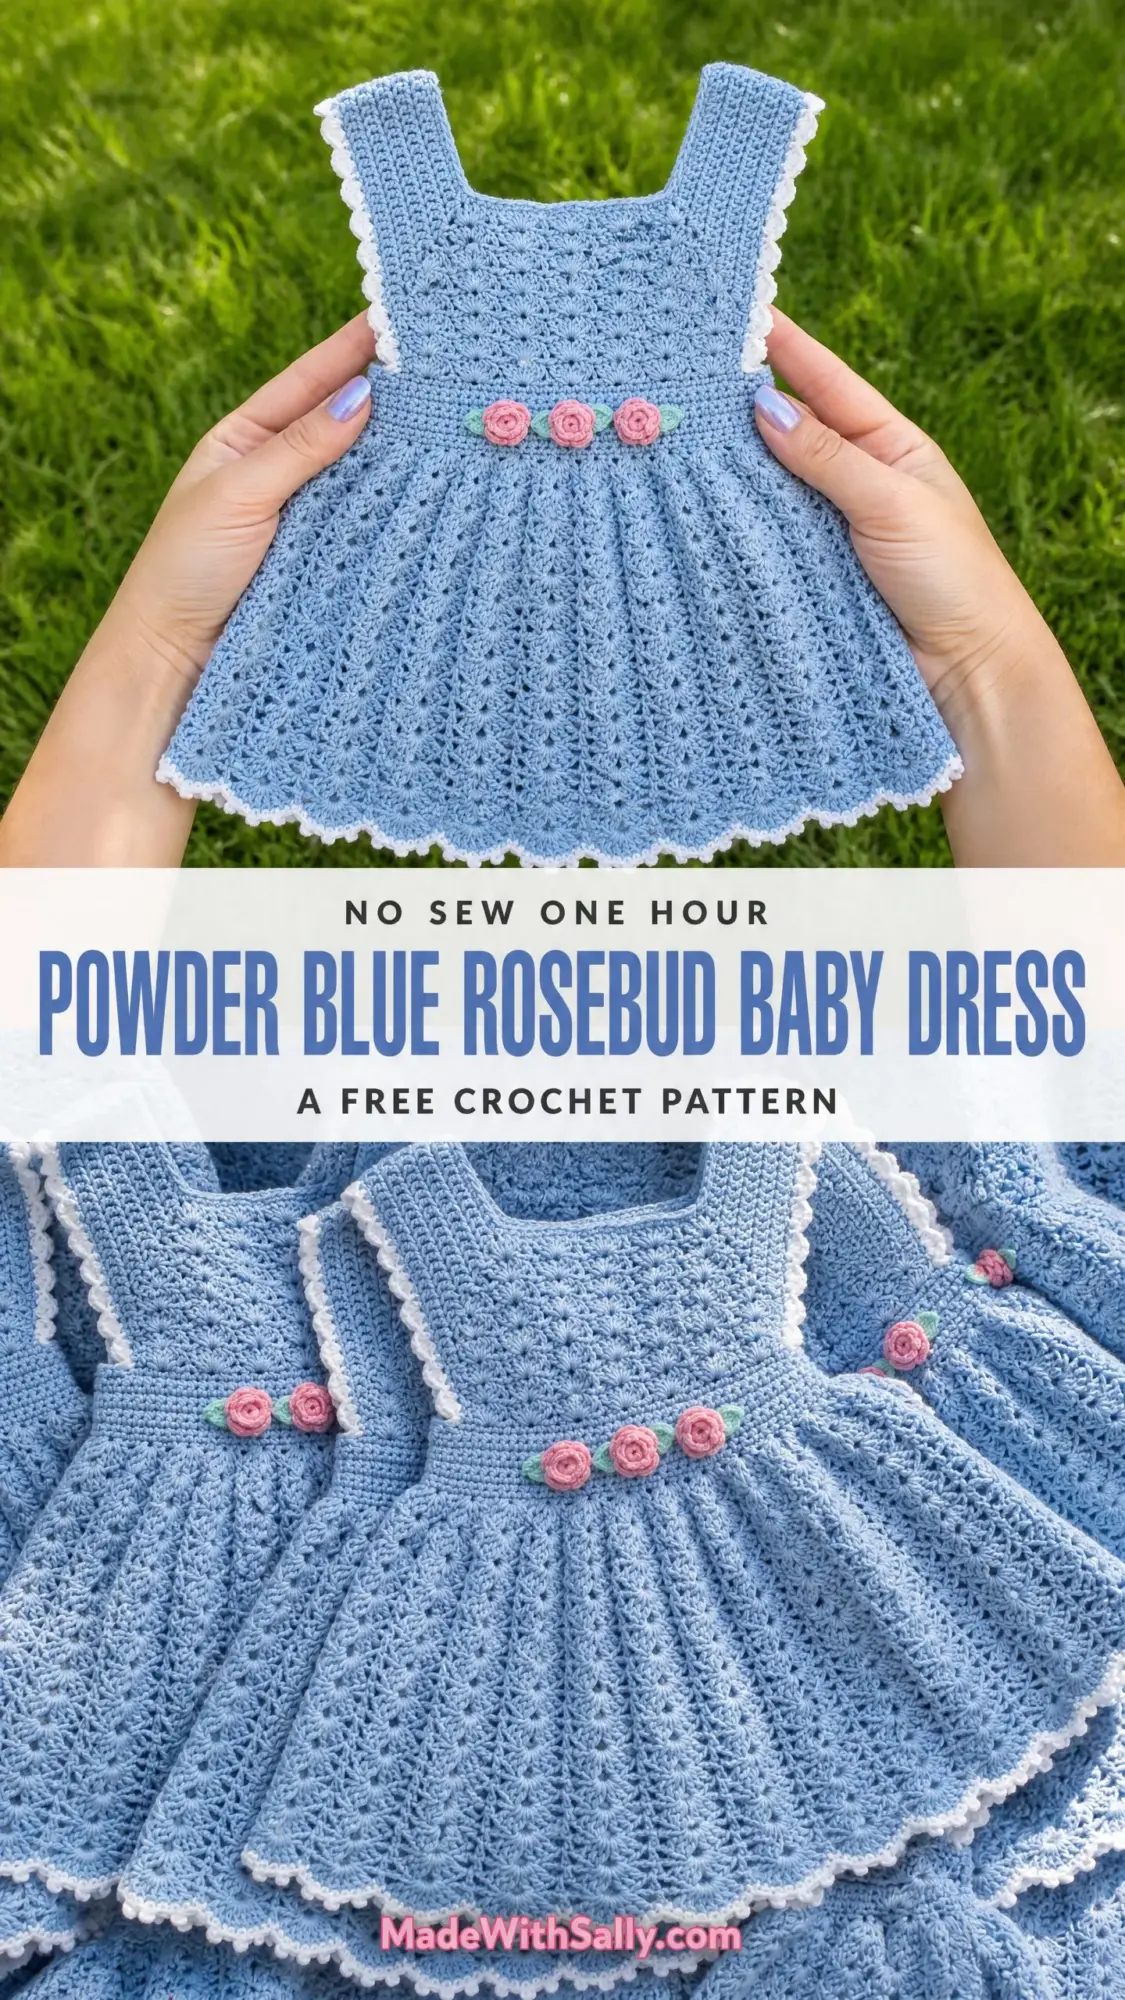
If you’ve ever wanted to make something truly special for a little one, this powder blue rosebud baby dress is the project. It looks intricate and impressive, but the construction is surprisingly straightforward once you understand how the pieces come together.
The bodice works up in flat rows from the top down, then you join everything and work the beautiful lace skirt in rounds. Add some white shell edging and three tiny crocheted rosebuds, and you’ve got a keepsake dress that will be treasured for generations.
Why You’ll Love This Baby Dress Crochet Pattern
This dress has everything I look for in a special occasion baby garment. The square neckline sits beautifully on tiny shoulders. The wide straps stay put without digging in. And that skirt? It flares out like a little bell, thanks to cleverly expanding fan stitches that grow wider as you work down.
The fan and shell lace pattern creates an almost vintage aesthetic. Think Sunday best, christening gowns, and family photo sessions. But don’t let the fancy look fool you. If you can work a double crochet (dc), which is simply yarn over, insert hook, pull up a loop, then yarn over and draw through two loops twice, you have the main skill you need.
The three tiny rosebuds at the waist are worked as simple spirals. You chain, double crochet across, then roll the strip up like a little cinnamon bun. It’s honestly the most satisfying part of the whole project.
Skill Level
This pattern is rated Advanced Beginner to Intermediate. The bodice uses basic stitches in a simple fan arrangement. The skirt requires careful attention to stitch placement as the fans expand. The rosebud embellishments are the fiddliest element, but they’re small and quick.
If you’re comfortable with double crochets, shells, and working in joined rounds, you’ll handle this beautifully.
Time Estimate
Plan for approximately 8 to 12 hours for an experienced crocheter working the smallest size. Larger sizes add 2 to 3 hours. If you’re newer to lace repeats, give yourself extra time and don’t rush. This is meant to be enjoyed, not stressed over.
Finished Sizes
Size 0 to 3 months: Chest 14 in / 35.5 cm, Length shoulder to hem 12 in / 30.5 cm
Size 3 to 6 months: Chest 16 in / 40.5 cm, Length shoulder to hem 13.5 in / 34.5 cm
Size 6 to 12 months: Chest 18 in / 45.5 cm, Length shoulder to hem 15 in / 38 cm
Size 12 to 18 months: Chest 20 in / 51 cm, Length shoulder to hem 16.5 in / 42 cm
Instructions are written for size 0 to 3 months. Changes for larger sizes appear in parentheses in this order throughout: (3 to 6 months, 6 to 12 months, 12 to 18 months).
Materials
Yarn: DK weight (CYCA 3), smooth mercerized cotton or cotton blend
Hook: US size E-4 / 3.5 mm (or size needed to obtain gauge)
Notions: Yarn needle, scissors, 4 stitch markers, rust-proof pins for blocking
Yarn Suggestions
Option 1: Paintbox Yarns Simply DK (100% cotton, 137 yards / 125 m per 50 g ball). Excellent stitch definition with a slight sheen that flatters lace patterns.
Option 2: Lion Brand 24/7 Cotton DK (100% mercerized cotton, 186 yards / 170 m per 100 g ball). Machine washable and widely available. The tight spin gives crisp fan stitches.
Option 3: Drops Safran (70% cotton, 30% polyamide, 175 yards / 160 m per 50 g ball). The polyamide adds just enough elasticity for comfortable shaping.
Substitution note: Choose any smooth DK-weight cotton or cotton blend. Avoid fuzzy or textured yarns. They’ll obscure your beautiful lace. Always swatch to confirm gauge before beginning.
Gauge
18 stitches and 10 rows = 4 in / 10 cm in double crochet with MC using E-4 / 3.5 mm hook, after blocking.
One 6-double-crochet fan repeat in the skirt pattern = approximately 1.25 in / 3.2 cm wide.
Gauge is critical for a fitted garment. Adjust hook size up or down as needed. A swatch saves heartache later.
Abbreviations
Special Stitches
Fan Stitch (Skirt Version)
Work 6 dc all into the same stitch or space. Yarn over, insert hook, pull up a loop, yarn over and draw through 2 loops, yarn over and draw through 2 loops. Repeat 5 more times in the same spot. You’ll have 6 double crochets grouped together, forming a fan shape. This is the main decorative element of the skirt.
Shell Edging
In the first edging stitch, work (sc, ch 1, dc). Skip 2 stitches. In the next stitch, work (sc, ch 1, dc). Continue along the edge, adjusting spacing at corners so the edging lies flat.
Small Shell (Bodice)
Work 5 dc all into the same stitch.
V-Stitch
Work (dc, ch 2, dc) all into the same stitch or chain space.
Rosebud
With RC, ch 16. Work 3 dc in the 4th chain from hook, then 3 dc in each remaining chain across. (39 dc total). Fasten off leaving a 6 in / 15 cm tail. Roll the strip into a tight coil from one end to the other, sewing the base together with the tail as you roll. Secure and weave in ends. Make 3 rosebuds.
Leaf
With LC, ch 7. Sl st in 2nd ch from hook, sc in next ch, hdc in next ch, dc in next ch, hdc in next ch, sc in last ch, ch 1, turn. Working back along the opposite side of the foundation chain: sc in next st, hdc in next st, dc in next st, hdc in next st, sc in next st, sl st in last st. Fasten off leaving a tail for sewing. Make 2 leaves.
Pattern Notes
The dress is constructed in five stages: Front Bodice Panel, Back Bodice Panel, joining and working the skirt in rounds, adding edging, and adding embellishments.
The bodice is worked flat in rows from the top down (shoulder to waist). Front and back panels are made separately, then joined at shoulders and sides.
The skirt is worked in joined rounds from the waist downward. Fan lace expands as rounds increase.
Shell edging is added last in CC around armholes, neckline, and hem.
Turning chains: At the start of every row, chain 3 and turn. This ch 3 counts as the first dc of that row throughout the bodice. At the end of each row, work the last stitch into the top of the turning chain from the previous row.
No zipper or button closure is used. The square neck and wide straps allow the dress to slip over baby’s head easily.
Step by Step Instructions
Front Bodice Panel
Foundation: With MC, ch 34 (38, 42, 46).
Row 1 (RS): Dc in 4th ch from hook and in each ch across. Turn. (32, 36, 40, 44 dc)
Row 2: Ch 3, dc in each st across to end, dc in top of t-ch. Turn. (32, 36, 40, 44 dc)
Row 3: Ch 3, dc in next 1 st, (ch 2, sk 2, 5 dc in next st, ch 2, sk 2, sc in next st) 4 times, ch 2, sk 2, dc in last st, dc in t-ch. Turn. (32 sts)
Row 4: Ch 1, sc in first st, (ch 2, 5 dc in next sc, ch 2, sc in center dc of next fan) 4 times, ch 2, 5 dc in next sc, ch 2, sc in top of t-ch. Turn. (32 sts)
Rows 5 and 6: Repeat Rows 3 and 4 once more, maintaining fan placement. (32 sts each row)
Row 7: Ch 3, dc in each st and ch-sp across, working 1 dc in each ch of every ch-2 space and 1 dc in each dc. Turn. (32 dc)
CHECKPOINT: After Row 7, the front bodice panel should measure approximately 3 in / 7.5 cm from foundation chain to working edge. (3.5, 4, 4.5 in / 9, 10, 11.5 cm for larger sizes.)
Row 8: Ch 3, dc in each of next 9 sts. Turn, leaving remaining sts unworked. This begins the right shoulder strap. (10 dc)
Rows 9 to 14: Ch 3, dc in each st across, dc in t-ch. Turn. (10 dc each row)
After Row 14, fasten off.
Left Shoulder Strap:
Rejoin MC at the 23rd st of Row 7 (leaving 12 sts unworked in the center for the neck opening).
Row 8L: Ch 3, dc in each of next 9 sts, dc in t-ch. Turn. (10 dc)
Rows 9L to 14L: Ch 3, dc in each st across, dc in t-ch. Turn. (10 dc each row)
Fasten off.
For larger sizes: The center neck opening remains 12 sts in all sizes. Each strap width = (total sts minus 12) divided by 2. For 36 sts: straps are 12 dc wide. For 40 sts: straps are 14 dc wide. For 44 sts: straps are 16 dc wide.
Back Bodice Panel
Work exactly as Front Bodice Panel through Row 14. The back is identical to the front, which makes dressing baby easy.
Joining Shoulders and Sides
Lay front panel on top of back panel with right sides together.
Shoulder seam: With MC and yarn needle, whipstitch across the top 10 (12, 14, 16) sts of each right strap pair. Repeat for left straps. Turn right side out.
Side seams: With right sides together, whipstitch or slip stitch the side edges of front and back bodice panels together from underarm to waist, leaving the lower edge open for the skirt.
CHECKPOINT: After joining, the bodice should measure approximately 6 in / 15 cm total height (shoulder point to lower edge). Chest circumference at widest point should measure approximately 14 in / 35.5 cm (16, 18, 20 in / 40.5, 45.5, 51 cm).
Skirt
The skirt is worked in joined rounds from the waist down in MC. Each round is joined with a sl st and begun with ch 3 (counts as dc).
Setup Round: With RS facing, join MC at one side seam. Ch 3, dc evenly around the waist edge to produce a total stitch count divisible by 7. Work approximately 1 dc per dc row-end and 1 dc per stitch across the lower edge of each panel.
For 0-3 month size, work to produce 56 dc total. Join with sl st to top of ch-3. (56 dc)
For 3-6 month size: 63 dc. For 6-12 month size: 70 dc. For 12-18 month size: 77 dc.
Round 1: Ch 3 (counts as dc), dc in each st around. Join with sl st to top of ch-3. (56, 63, 70, 77 dc)
Round 2: Ch 1, sc in same st as join, (ch 2, sk 2, 6 dc in next st, ch 2, sk 2, sc in next st) around, ending last repeat at beginning sc. Join with sl st to first sc. (8, 9, 10, 11 fans)
Round 3: Sl st across to center dc of first fan (3rd dc), ch 3, 2 dc in same st, (ch 3, sc in next sc, ch 3, 3 dc in center dc of next fan) around, ending ch 3, sc in last sc, ch 3. Join with sl st to top of ch-3. (8, 9, 10, 11 groups of 3 dc)
Round 4: Ch 1, sc in same st as join, (ch 2, sk ch-sp, 6 dc in next sc, ch 2, sk ch-sp, sc in center dc of next 3-dc group) around. Join with sl st to first sc. (8, 9, 10, 11 fans)
Round 5: Sl st to center dc of first fan, ch 3, 2 dc in same st, (ch 3, sc in next sc, ch 3, 3 dc in center dc of next fan) around, ch 3, sc in last sc, ch 3. Join with sl st to top of ch-3.
Round 6: Ch 1, sc in first st, (ch 2, 6 dc in next sc, ch 2, sc in center of next 3-dc group) around. Join with sl st to first sc. (8, 9, 10, 11 fans)
Rounds 7 and 8: Repeat Rounds 5 and 6 once. (8, 9, 10, 11 fans)
Expansion Round A
Round 9: Sl st to center dc of first fan, ch 3, 2 dc in same st, (ch 3, sc in next sc, ch 3, 3 dc in center dc of next fan) around, ch 3, sc in last sc, ch 3. Join.
Round 10: Ch 1, sc in first st, (ch 3, sk ch-sp, 6 dc in next sc, ch 3, sk ch-sp, sc in center of next 3-dc group) around. Join with sl st. Note: ch 3 instead of ch 2 begins widening the spacing, flaring the skirt.
Round 11: Sl st to center dc of first fan, ch 4, 2 dc in same st, (ch 3, sc in next sc, ch 3, dc in center dc of fan, ch 1, dc in same st) around, ch 3, sc in last sc, ch 3. Join to 3rd ch of ch-4.
Round 12: Ch 1, sc in ch-1 sp of first V-st, (ch 3, 6 dc in next sc, ch 3, sc in ch-1 sp of next V-st) around. Join. (8, 9, 10, 11 fans, now wider)
Round 13: Sl st to center of first fan, ch 3, 2 dc in same st, (ch 3, sc in next sc, ch 3, 3 dc in center of next fan) around, ch 3, sc in last sc, ch 3. Join.
Round 14: Ch 1, sc in first st, (ch 3, 6 dc in next sc, ch 3, sc in center of next 3-dc group) around. Join.
Rounds 15 and 16: Repeat Rounds 13 and 14. (8, 9, 10, 11 fans)
Expansion Round B
Round 17: Sl st to center dc, ch 5, 2 dc in same st, (ch 4, sc in next sc, ch 4, dc in center dc, ch 2, dc in same st) around, ch 4, sc in last sc, ch 4. Join to 3rd ch of ch-5.
Round 18: Ch 1, sc in ch-2 sp, (ch 3, 6 dc in next sc, ch 3, sc in ch-2 sp of next V-st) around. Join.
Round 19: Sl st to center of fan, ch 3, 2 dc in same st, (ch 4, sc in next sc, ch 4, 3 dc in center of next fan) around, ch 4, sc in last sc, ch 4. Join.
Round 20: Ch 1, sc in first st, (ch 3, 6 dc in next sc, ch 3, sc in center of 3-dc group) around. Join.
Rounds 21 and 22: Repeat Rounds 19 and 20. (8, 9, 10, 11 fans at widest skirt flare)
For size 12-18 months, work 2 additional rounds repeating the Round 19-20 pattern before proceeding to hem edging.
CHECKPOINT: After Round 22 (24 for largest size), the skirt should measure approximately 8 in / 20.5 cm from waist seam. Total dress length from shoulder should be approximately 12 in / 30.5 cm (13.5, 15, 16.5 in / 34.5, 38, 42 cm). Hem width should measure approximately 22 to 24 in / 56 to 61 cm around.
Hem Edging
Fasten off MC. Join CC at any sc between fans.
Edging Round 1: Ch 1, sc in same st, work sc evenly across all fan tops and chain spaces around so that the total stitch count is divisible by 3. Join with sl st to first sc.
For 0-3 month size: 96 sc. For 3-6 month size: 108 sc. For 6-12 month size: 120 sc. For 12-18 month size: 132 sc.
Edging Round 2 (shell edging): Ch 1, sc in first sc, (sk 2 sts, 5 dc in next st, sk 2 sts, sc in next st) around. Join with sl st to first sc. Fasten off CC.
Armhole Edging
With RS facing, join CC at underarm seam of right armhole.
Edging Round 1: Ch 1, sc evenly around armhole opening, working 1 sc per row-end along strap sides and 1 sc per stitch across strap tops. Target approximately 30 (33, 36, 39) sc divisible by 6. Join with sl st.
Edging Round 2: Ch 1, sc in first sc, (sk 2, 5 dc in next st, sk 2, sc in next st) around. Join with sl st. Fasten off CC.
Repeat for left armhole.
Neckline Edging
With RS facing, join CC at back right shoulder corner.
Edging Round 1: Ch 1, sc evenly around entire neckline opening (front and back neck edges and across tops of straps), targeting approximately 60 (66, 72, 78) sc divisible by 6. Join with sl st.
Edging Round 2: Ch 1, sc in first sc, (sk 2, 5 dc in next st, sk 2, sc in next st) around. Join with sl st. Fasten off CC.
Waist Accent Line (Optional)
With CC and yarn needle, work a row of surface slip stitches along the seam between the bodice and skirt Setup Round. This step is optional since the rosebuds provide waist definition.
Rosebuds and Leaves
Make 3 rosebuds as described in Special Stitches with RC.
Make 2 leaves as described in Special Stitches with LC.
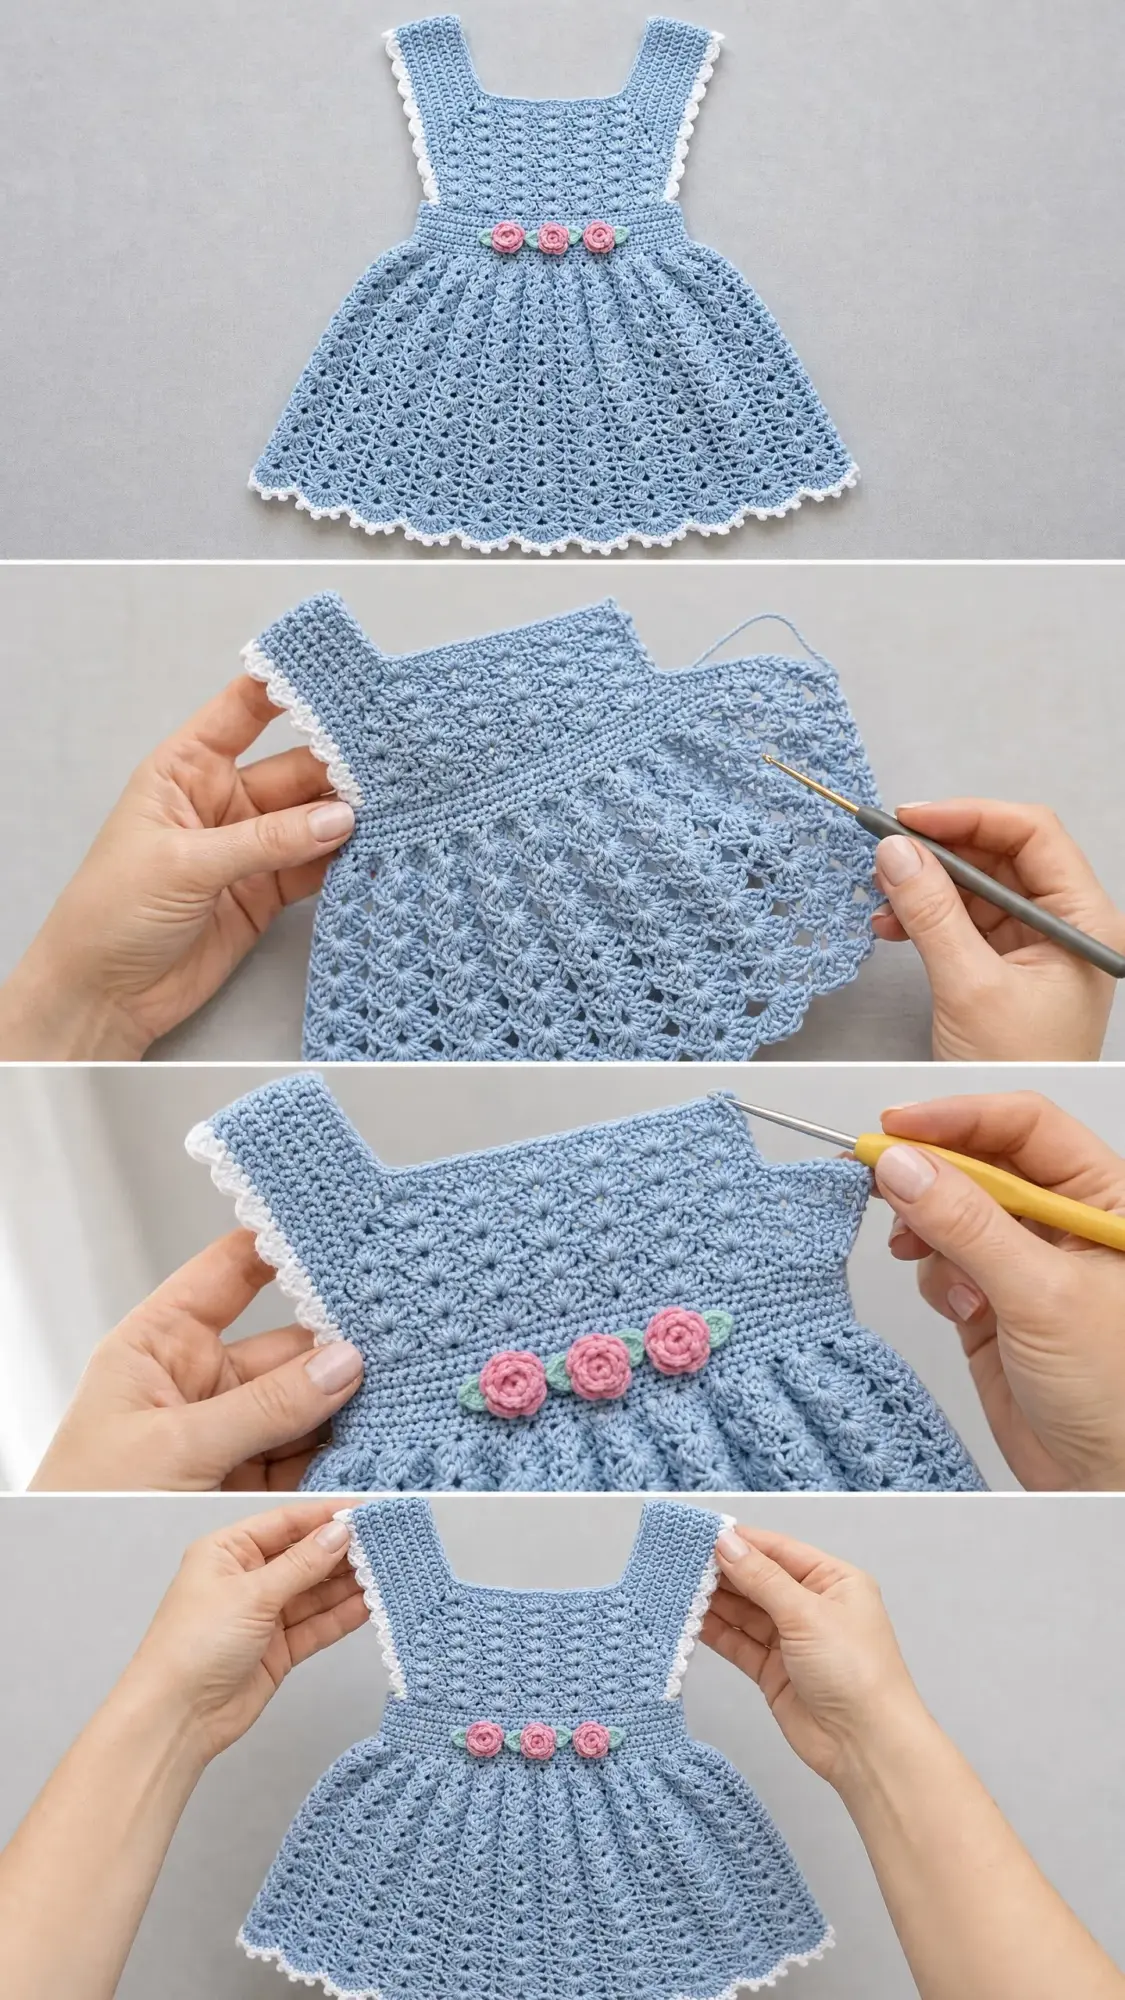
Placement: Arrange rosebuds side by side at center front waist, just above the first skirt round. Place one leaf between the leftmost and center rosebud, and one leaf between the center and rightmost rosebud, angling them outward slightly. Sew all pieces to the dress using yarn tails and yarn needle.
Finishing and Blocking
Weave in all yarn ends securely on the wrong side, working in different directions to prevent unraveling.
Wet blocking is strongly recommended for cotton and cotton-blend yarn. Submerge the finished dress in cool water and gently squeeze out excess water without wringing. Lay flat on a blocking mat and pin to finished measurements. Pay particular attention to opening the fan lace in the skirt so each fan spreads to its full width. Allow to dry completely before unpinning, which may take 12 to 24 hours depending on humidity.
After blocking, the lace pattern will be significantly more defined and the fabric will drape beautifully. Trust me, this step makes all the difference.
Size Customization Tips
To make the dress longer: Work additional rounds of the fan pattern before beginning hem edging. Two additional rounds add approximately 1 inch / 2.5 cm to skirt length.
To widen the bodice: Add 7 stitches (one full fan repeat) to the foundation chain and adjust strap and neck calculations accordingly. Each 7-stitch repeat adds approximately 1.5 in / 3.8 cm to chest circumference.
To lengthen the straps: Add additional plain dc rows to the strap sections of both front and back panels before working fan rows.
Care Instructions
Hand wash in cool water with gentle soap. Do not wring. Roll in a clean towel to remove excess water and lay flat to dry in shade. If using machine-washable cotton like Lion Brand 24/7 Cotton, a gentle machine cycle in a mesh laundry bag on cold is acceptable. Do not tumble dry. Heat will shrink cotton and distort the lace. Iron on low heat with a pressing cloth if needed to refresh the blocked shape.
Final Thoughts on This Baby Dress Crochet Pattern
This powder blue rosebud baby dress is the kind of project that feels like a gift to yourself as much as to the lucky little one who’ll wear it. Every fan stitch, every tiny rosebud, every careful round of expanding lace adds up to something genuinely beautiful.
Take your time with it. Pour yourself a cup of tea between sections. Enjoy watching the skirt bloom outward as you work those expansion rounds. This is heirloom crafting at its finest.
Thank you so much for choosing this crochet tutorial for your next project. I truly hope you love making this dress as much as I loved designing it. If you finish one, I would absolutely love to see your work. Tag me on Instagram or share a photo on Facebook.
If this pattern caught your eye, go ahead and save it to your Pinterest boards so you can find it when you’re ready to start. And please, drop a comment below if you make one. I love hearing which colors you choose and seeing those finished dresses. Happy crocheting!
